- Company Articles
- Products and Technology
- Installation And Maintenance
- 4040E EU Standard Aluminum Profile Installation Tips: Efficient Assembly for Lean Systems

4040E EU Standard Aluminum Profile Installation Tips: Efficient Assembly for Lean Systems
Related Product
4040E EU Standard Aluminum Profile
4040E is a 4.00x4.00 CM fractional 40 series square extrusion T-slot profile with two side open T-slots, two side with closed face, each side with 4.00cm face. The profile has align-a-grooves to assist in aligning connecting profiles.
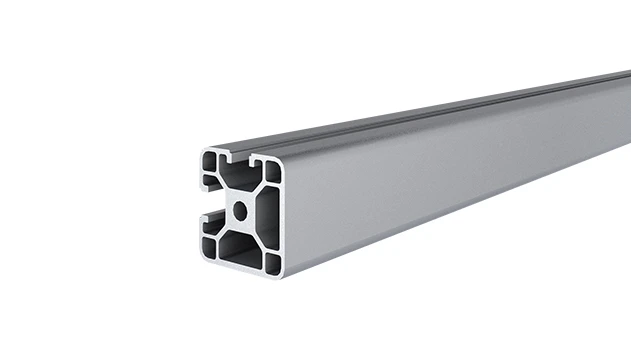
Ever walked into a well-oiled production facility and wondered how everything flows so seamlessly? The secret often lies in the unsung heroes of lean systems: modular, adaptable structures that keep workflows smooth and waste to a minimum. And at the heart of many of these structures? The 4040E EU Standard Aluminum Profile. This unassuming extruded aluminum beam is a workhorse, quietly holding together workbenches, material racks, and conveyor frames—all while embodying the core principles of lean manufacturing: flexibility, efficiency, and continuous improvement. But installing it? That's where the real magic (and a few pro tips) come in. Let's dive into how to assemble 4040E profiles like a pro, ensuring your lean system isn't just functional, but built to last.
Why 4040E Profiles Matter for Lean Systems
Before we grab our tools, let's talk about why the 4040E profile is a staple in lean environments. First, it's modular. Unlike welded steel frames, 4040E profiles connect with simple aluminum profile accessories—think 90° aluminum profile connectors, gussets, and end caps—so you can reconfigure structures on the fly. Need to expand a workbench? Add a section. Repurpose a material rack? Disassemble and rebuild. No cutting torches, no welding fumes, just quick adjustments. That's lean gold: reducing setup time and adapting to changing production needs without waste.
Second, it's strong but lightweight. The 4040E's hollow, rectangular design (40mm x 40mm, hence the name) balances rigidity with portability. Anodized aluminum resists corrosion, so it holds up in factory environments, and its smooth finish means parts glide easily—perfect for flow racks or roller tracks. And let's not forget cost-effectiveness. While aluminum isn't the cheapest material upfront, its reusability and low maintenance make it a smart long-term investment for lean systems focused on reducing total cost of ownership.
Prep Work: The Lean Way to Start
Lean systems thrive on preparation—no one wants to stop mid-assembly to hunt for a missing connector. Let's walk through the prep steps that'll save you time (and frustration) later.
1. Inspect Your Materials
Unbox your 4040E profiles with care. Check for dents, scratches, or bent sections—even a small kink can throw off alignment. Lay each profile flat on the floor; if it rocks, it's warped and should be replaced. Next, sort your aluminum profile accessories. Spread them out on a table: separate your 90° aluminum profile connectors from your 45° ones, your gusset alp 4040 brackets from your end caps. Trust me, mixing up a 2020 corner code with a 4040 gusset mid-project is a surefire way to waste time. Label bins if you have to—your future self will thank you.
2. Measure Twice, Cut Once (But Maybe Skip Cutting Altogether)
If you're building a custom structure, map out your dimensions first. Use a metal measuring tape (the flexible plastic ones stretch—annoying!) and mark cuts with a pencil. But here's a lean hack: many suppliers offer pre-cut 4040E profiles. Ordering them to length saves you the hassle of cutting, deburring, and cleaning up metal shavings. Unless you have a high-quality miter saw with a fine-tooth blade (60+ teeth) and a steady hand, skip the DIY cutting. Time saved here = more time for assembly, which is where the real value is.
3. Gather Your Tools (No Fancy Gear Required)
You don't need a workshop full of tools, but these essentials will make the job smoother:
- Allen Keys: Most aluminum joints use hex screws, so a set with long and short arms is a must. The long arms give leverage for tight spots; the short ones fit in cramped corners.
- Rubber Mallet: For gently tapping joints into alignment. Metal hammers dent profiles—no thanks.
- Level: A 2-foot spirit level ensures your structure isn't wobbly. Skip the app on your phone—nothing beats a physical level for accuracy.
- Tape Measure & Pencil: Obvious, but worth repeating: measure, mark, confirm.
- Adjustable Wrench: For tightening nuts on accessories like caster wheels or leveling feet.

Step-by-Step Installation: Building with 4040E Profiles
Now, let's get hands-on. We'll use a common lean structure—a workbench—as our example, but the principles apply to anything from material racks to machine guards. Follow these steps, and you'll have a sturdy, functional frame in no time.
Step 1: Build the Frame (Start with the Basics)
Begin with the vertical legs. For a standard workbench, cut (or order) four 4040E profiles, each 36–40 inches tall (adjust for your height). Screw adjustable leveling feet into the bottom of each leg—these are lifesavers for uneven factory floors. Twist them in until they're flush with the end, then you can tweak later to level the bench.
Next, connect the legs with horizontal rails. Cut two profiles for the front and two for the back (length depends on your bench width—typically 48–72 inches). Use 90° aluminum profile connectors to join the rails to the legs. Here's the trick: slide the connector into the end of the rail first, then align it with the leg. Push gently—if it's tight, wiggle it slightly; don't force it. Once aligned, insert the hex screw and tighten with an Allen key. Pro tip: Tighten until snug, but stop when you feel resistance. Over-tightening strips threads or cracks the connector—both lean no-nos (waste from replacement parts).
Step 2: Reinforce with Gussets (Because Stability Matters)
For a workbench that holds tools, parts, or even heavy machinery, add gusset alp 4040 brackets. These triangular metal plates fit into the corners of your frame, reinforcing the joints like a seatbelt for your structure. Slide the gusset into the T-slots of the rail and leg, align the holes, and secure with a hex screw. Install one on each inside corner—four total for a basic frame. Suddenly, that wobbly prototype becomes a rock-solid workbench.
Step 3: Add the Top (Smooth, Strong, and Simple)
Now for the work surface. Aluminum honeycomb panels are ideal—lightweight, scratch-resistant, and easy to clean. Cut the panel to match your frame dimensions (or order pre-cut from your supplier). To attach it, use T-slot nuts: slide them into the top rails, align the panel, and secure with bolts. No drilling, no glue—just quick, tool-free installation. That's lean flexibility at its best: if you need to replace the top later, just unscrew and swap.
Step 4: Add Mobility (Casters for the Win)
Want your workbench to roll? Add caster wheels to two legs (lockable ones, obviously). Choose casters rated for at least 50% more weight than you plan to put on the bench—overkill is better than a collapsed structure. Screw the caster mounting plates into the bottom of the legs using the pre-drilled holes (most 4040E legs have tapped holes for this). Test the locks: you don't want your bench rolling away mid-task!
Step 5: Level It Out (No More Wobbles)
Even the best floors are uneven. Grab your level and place it on the workbench top. If it tilts, adjust the leveling feet: twist them clockwise to raise, counterclockwise to lower. Check front-to-back and side-to-side until the bubble is centered. A level workbench prevents parts from rolling off and reduces strain on your back—lean systems aren't just about efficiency; they're about people, too.
Essential Aluminum Profile Accessories: A Quick Reference
| Accessory Name | Purpose | Pro Tip |
|---|---|---|
| 90° Aluminum Profile Connector | Joins profiles at right angles (e.g., legs to rails) | Use with gussets for heavy loads; don't overtighten. |
| Gusset Alp 4040 | Reinforces corners; adds stability to frames | Install on both sides of joints for maximum strength. |
| Adjustable Leveling Feet | Levels structures on uneven floors | Leave ½ inch of thread exposed for adjustability. |
| 4040 Aluminum Profile End Cap | Covers sharp ends; prevents dust buildup | Snap on after assembly to avoid scratching during installation. |
| Lockable Caster Wheel | Adds mobility to structures | Pair with fixed casters on two legs for stability when locked. |
Troubleshooting Common Hiccups
Even pros run into issues. Here's how to fix the most common ones:
Problem: Wobbly Frame
First, check alignment. Lay the frame on the floor—if it rocks, a profile might be bent. replace warped profiles; they'll never straighten. Next, tighten loose joints, but go easy—stripped threads mean replacing the connector. If that doesn't work, add more gussets. Sometimes, a little extra reinforcement is all it takes.
Problem: Accessories Don't Fit
Mismatched accessories are the culprit here. A 2020 corner code won't fit a 4040 profile—check the label! EU standard profiles (like 4040E) use metric sizes, so double-check that your accessories are labeled "4040" or "EU standard." If in doubt, ask your supplier—they'll know which parts pair with which profiles.
Problem: Scratched Profiles
Oops—dropped a profile? Minor scratches can be buffed with a soft cloth and aluminum polish. Deep dents? If they compromise the structure, replace the profile. Prevention is better than cure: use foam padding when transporting profiles, and avoid dragging them across rough surfaces.
Lean Efficiency Tips: Work Smarter, Not Harder
Installing 4040E profiles is already lean, but these tips will make it even more efficient:
- Pre-Sort Accessories: Use bins labeled by type (connectors, gussets, casters). No more hunting for parts mid-assembly.
- Use Templates: For repetitive structures (e.g., multiple workbenches), make a cardboard template of your frame dimensions. Trace instead of measuring each time—consistency + speed = lean win.
- Team Up: Two people assemble faster than one. One holds profiles, the other tightens connectors. Less fumbling, more progress.
- Order Pre-Cut Profiles: As mentioned earlier, skip cutting. Suppliers often offer free cutting on bulk orders—take advantage.
- Label Finished Structures: Use stickers to mark weight limits or intended use (e.g., "Max Load: 200kg" or "Assembly Station #3"). Clarity reduces misuse and waste.
Final Thoughts: Building Lean for the Long Haul
Installing 4040E EU Standard Aluminum Profiles isn't just about putting metal together—it's about building the foundation of a lean system that adapts, grows, and improves over time. By following these tips—prepping thoroughly, using the right tools and accessories, and troubleshooting smartly—you'll create structures that reduce waste, boost efficiency, and stand the test of time. Remember, lean isn't just a buzzword; it's a mindset. And with 4040E profiles, that mindset becomes tangible: a workbench that reconfigures for new products, a flow rack that expands with demand, a system that works with your team, not against them.
So grab your Allen key, sort your connectors, and start building. Your lean system (and your bottom line) will thank you.