- Company Articles
- Products and Technology
- Product knowledge
- 4040F EU Standard Aluminum Profile for Material Racks: Load Capacity & Design Tips

4040F EU Standard Aluminum Profile for Material Racks: Load Capacity & Design Tips
Related Product
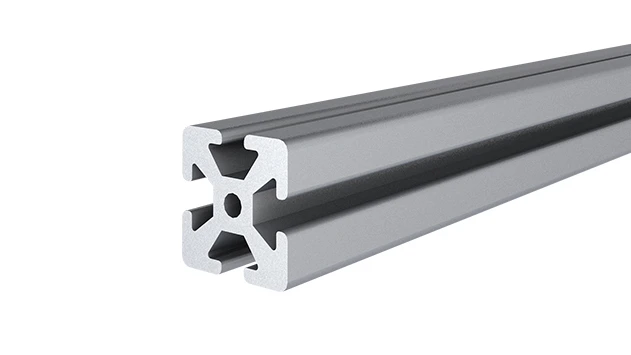
4040F EU Standard Aluminum Profile
4040F is a 4.00x4.00 CM fractional 40 series square extrusion T-slot profile with four side open T-slots, each side with 4.00cm face. The profile has align-a-grooves to assist in aligning connecting profiles.
Let's set the scene: You walk into a busy factory workshop. Shelves are overflowing with parts, tools are scattered, and workers are spending more time hunting for materials than assembling products. Sound familiar? If your material storage feels like a puzzle missing half its pieces, you're not alone. Many manufacturers—big and small—struggle with disorganized, inefficient storage that slows down production and eats into profits. But what if there was a solution that let you build strong, flexible material racks tailored to your space? Enter the 4040F EU Standard Aluminum Profile. This unassuming yet powerful building block is changing how workshops and factories store everything from small components to heavy machinery parts. In this guide, we'll break down why the 4040F profile is a game-changer for material racks, how to calculate its load capacity, and design tips to make your storage system work harder for you. Let's dive in.
What Is the 4040F EU Standard Aluminum Profile, Anyway?
First things first: Let's get clear on what we're talking about. The 4040F is part of the EU standard aluminum extrusion profile family—a group of modular, T-slot aluminum rails designed for building everything from workbenches to machine guards. The "4040" in its name tells you the basics: it's 40mm wide and 40mm tall, forming a square cross-section. The "F" denotes its specific slot design and wall thickness (typically 2mm, though this can vary by supplier), making it sturdier than lighter-duty profiles in the same size category.
But what makes it "EU standard"? Unlike some generic aluminum profiles, EU-standard profiles adhere to strict manufacturing guidelines for dimensions, material quality, and slot tolerances. That means if you buy a 4040F profile from one lean system supplier and accessories from another, they'll still fit together perfectly. No more guessing if a bracket will slide into the T-slot or if a joint will lock securely—consistency is built in.
Material-wise, the 4040F is usually made from aluminum alloy 6063-T5. If you're not a metal expert, that translates to: lightweight (about 2.7kg per meter, depending on length), corrosion-resistant (no rust, even in humid workshops), and surprisingly strong. Think of it as the Goldilocks of industrial materials—not too heavy to lift, not too flimsy to hold weight, and just right for everyday use.
Why the 4040F Profile Is a Storage Superstar for Material Racks
You might be thinking, "Aluminum? Isn't that for window frames and soda cans?" While it's true aluminum is, the 4040F's design makes it uniquely suited for material racks. Here's why:
- Modularity That Grows With You: The T-slot design is a genius invention. Those grooves running along the profile's length let you attach brackets, shelves, and aluminum profile accessories anywhere—no drilling or welding required. Need to add a shelf halfway up? Slide a bracket into the slot, tighten a bolt, and you're done. Seasonal inventory spike? Add an extra level in an hour. This flexibility means your rack isn't a one-and-done project; it's a system that evolves with your needs.
- Strength Without the Bulk: Steel racks are strong, but they're also heavy, hard to move, and prone to rust. The 4040F profile hits that sweet spot: it can support hundreds of kilograms per linear meter (we'll get to exact numbers later) but is light enough for two people to carry and reposition. This is a big win for small workshops where floor space is tight—you can rearrange racks without hiring a crane.
- Corrosion Resistance for the Long Haul: If your workshop deals with oils, coolants, or even just high humidity, steel racks can start rusting within months. Aluminum, especially when anodized (a common finish for 4040F profiles), forms a protective oxide layer that resists corrosion. That means your rack will look (and function) like new for years, even in messy environments.
- Easy to Customize: Unlike prefab plastic or wooden shelves, the 4040F lets you design a rack that fits your materials, not the other way around. Need to store long pipes? Build vertical dividers. Small electronic components? Add drawers or bins. Heavy tools? Reinforce with cross-braces. The only limit is your workshop's layout (and maybe your imagination).

Calculating Load Capacity: How Much Weight Can the 4040F Actually Hold?
This is the question we get asked most: "How much weight can I put on a 4040F rack?" The short answer: It depends. Load capacity isn't just about the profile itself—it's a mix of the profile's specs, how you support it, and how you distribute the weight. Let's break down the key factors so you can calculate it for your setup.
Factor 1: Profile Thickness and Alloy Grade
The 4040F's wall thickness is the foundation of its strength. Most standard 4040F profiles have a 2mm wall, but some suppliers offer heavy-duty versions with 3mm walls (often labeled "4040F-HD"). Unsurprisingly, thicker walls mean higher load capacity. For example, a 2mm 4040F can typically support around 80-100kg per linear meter when supported at both ends, while a 3mm version might handle 120-150kg under the same conditions. The alloy grade (remember 6063-T5?) also plays a role—T5 heat treatment gives the aluminum better tensile strength, so avoid cheaper, unannealed profiles that bend easily.
Factor 2: Joints and Aluminum Profile Accessories
Even the strongest profile is only as good as the joints holding it together. The 4040F uses T-slot accessories like corner brackets, end caps, and flange nuts to connect pieces. For material racks, the most critical joints are the vertical supports (holding up the shelves) and the shelf brackets (connecting shelves to uprights). Using heavy-duty brackets—like L-shaped angle brackets with two T-slot bolts instead of one—spreads the weight across more of the profile, reducing stress on any single point.
Pro tip: Avoid "cheater" joints, like using zip ties or adhesive to hold brackets in place. Invest in high-quality accessories—they're a small cost compared to the damage (or injury) caused by a collapsing shelf.
Factor 3: Span Between Supports
Imagine holding a ruler at both ends and pressing down in the middle—it bends, right? The same happens with aluminum profiles. The longer the distance between vertical supports (the "span"), the less weight the shelf can hold. For example, a 4040F shelf with a 500mm span (distance between uprights) might hold 150kg, but stretch that span to 1000mm, and the capacity drops to 50kg or less. To maximize load capacity, keep spans short—ideally no more than 600mm for heavy items. If you need longer shelves, add a middle support (a vertical upright in the center) to split the span into two smaller sections.
Factor 4: Weight Distribution
How you load the shelf matters as much as how much you load it. Piling all your weight in one corner (say, a 50kg toolbox teetering on the edge) is a recipe for bending the profile or snapping a joint. Instead, spread weight evenly across the shelf's surface. If you're storing irregularly shaped items, use dividers or bins to keep them from shifting. Think of it like packing a suitcase: distribute the heavy stuff (shoes, tools) evenly, and you won't end up with a lopsided mess.
| Span Between Supports (mm) | 2mm Wall 4040F (Max Load per Shelf, kg) | 3mm Wall 4040F (Max Load per Shelf, kg) |
|---|---|---|
| 500mm | 150kg | 220kg |
| 800mm | 90kg | 140kg |
| 1000mm | 50kg | 80kg |
| 1200mm | 30kg | 50kg |
*Note: These are general guidelines based on aluminum alloy 6063-T5 and standard T-slot joints. Always confirm with your supplier for exact load ratings.
Design Tips: Building a 4040F Material Rack That Works for Your Space
Now that you know the "why" and "how much," let's talk about the "how to build it." Designing a 4040F material rack isn't rocket science, but a little planning goes a long way. Here are our top tips to make sure your rack is safe, efficient, and easy to use.
1. Start With a "Storage Audit"
Before you buy a single profile, take a day to map out what you're actually storing. Ask: What's the heaviest item? (A 20kg motor part? A 50kg tool chest?) What's the most common item? (Small screws? Large metal sheets?) How often do you need to access each item? (Daily? Weekly? Once a month?) This audit will tell you everything from shelf height (keep frequently used items at eye level) to shelf depth (deeper shelves for big items, shallower for small parts).
For example, if you're storing small electronic components, you might prioritize shelves with bins and dividers. If you're storing large, heavy machinery parts, you'll need thicker profiles and shorter spans. A quick sketch (even on graph paper) of your space and storage needs will save you from buying extra parts or realizing halfway through that your rack is too tall to fit under the ceiling.
2. Use Aluminum Guide Rail A for Smooth Material Flow
If your material rack is part of a production line—say, feeding parts to an assembly station—adding roller track or guide rails can turn static storage into a dynamic workflow tool. Aluminum Guide Rail A is a slim, T-slot compatible rail that mounts to 4040F shelves, creating a smooth surface for sliding bins or boxes. Pair it with roller track (those small, free-spinning wheels) and suddenly, moving heavy parts from shelf to workstation takes half the effort. No more lifting—just push, and the wheels do the work.
Pro tip: Install the guide rails at a slight downward angle (1-2 degrees) toward your workstation. Gravity will gently pull bins forward, so the next part is always within reach. Just make sure to add a stop at the end to keep bins from sliding off!
3. Think Vertically (But Don't Overdo It)
Walls are wasted space in most workshops—don't let yours go unused! The 4040F's modular design makes it easy to build tall racks that reach toward the ceiling (just check your ceiling height first). But here's the catch: the taller the rack, the more stable it needs to be. For racks over 1.8 meters tall, add diagonal cross-braces between uprights (using angle brackets) to prevent swaying. You can also bolt the rack to the floor (using floor flanges) for extra stability, especially if you're storing heavy items up high.
A great example of vertical efficiency is the Material Rack B (3 row and 3 floor) design, a popular configuration among manufacturers. With three rows (width) and three floors (height), it maximizes vertical space while keeping items organized by category. Each floor can be adjusted in height using 4040F profiles and shelf brackets, so you can fit tall items on the bottom and small parts on the top without wasting space.
4. Don't Skimp on Feet and Casters (If You Need Mobility)
Not all racks need to be permanent. If you occasionally need to move your rack (e.g., to clean behind it or reconfigure your workshop), add locking casters to the base. Look for heavy-duty casters rated for at least 50kg each (four casters = 200kg total capacity). For stationary racks, use adjustable feet (screw-in leveling feet) to keep the rack stable on uneven floors—this prevents wobbling and reduces stress on joints.
5. Label Everything (Yes, Everything)
This might seem obvious, but you'd be surprised how many workshops build a beautiful rack and then forget to label the shelves. A simple label maker or even handwritten tags (laminated to resist grease) will save your team hours of hunting for parts. For bonus points, color-code shelves by item type (e.g., red for electrical parts, blue for mechanical) or create a digital map (a photo on your phone) of where everything lives. Trust us—your future self (and your employees) will thank you.
Common Mistakes to Avoid (So You Don't Waste Time or Money)
Even with the best intentions, it's easy to make missteps when building a 4040F rack. Here are the ones we see most often—and how to steer clear of them.
Mistake 1: Underestimating Weight
We get it—no one wants to spend extra money on thicker profiles or stronger joints. But skimping on load capacity is a false economy. If a shelf bends or collapses, you'll not only have to replace the rack but potentially replace damaged parts (or worse, deal with injuries). When in doubt, round up your weight estimates by 20%. It's better to have a rack that can hold more than you need than one that can't hold what you have.
Mistake 2: Ignoring Ergonomics
A rack that's "efficient" on paper but a pain to use in real life isn't efficient at all. Avoid shelves that are too high (requiring a ladder) or too low (requiring you to bend over). The sweet spot for most adults is shelves between 600mm (knee height) and 1500mm (eye height). Reserve the space above 1500mm for rarely used items (like seasonal inventory) and below 600mm for heavy, bulky items you don't need to access daily.
Mistake 3: Overcomplicating the Design
The 4040F's modularity is a strength, but it can also be a temptation to build something overly complex. Do you really need a rotating shelf with built-in LED lights? Maybe! But start simple. Build the basic rack first, use it for a month, and then add upgrades (like the rotating shelf) based on what's actually missing. You'll save money and avoid ending up with a rack that's more "cool" than functional.
Choosing the Right Supplier: Why It Matters More Than You Think
You've done the audit, designed the rack, and crunched the load capacity numbers. Now it's time to buy the parts. But not all 4040F profiles and accessories are created equal. A reliable lean system supplier can make the difference between a rack that lasts 10 years and one that wobbles after 6 months. Here's what to look for:
- EU Standard Certification: Ask for proof that their 4040F profiles meet EU standards (EN 755-9 is the relevant spec). This ensures consistent dimensions and material quality.
- Range of Accessories: A good supplier should stock everything from brackets and joints to guide rails and casters. Buying all parts from one supplier reduces the risk of compatibility issues.
- Technical Support: Even with this guide, you might have questions. Does the supplier offer design help or load capacity charts? A quick phone call or email to their tech team can save you from costly mistakes.
- Customer Reviews: Check online reviews or ask for references. If other manufacturers rave about their 4040F racks, that's a good sign. If reviews mention bent profiles or loose joints, keep looking.
Final Thoughts: Your Rack, Your Rules
At the end of the day, the 4040F EU Standard Aluminum Profile isn't just a piece of metal—it's a tool to make your workshop work for you. Whether you're building a small parts rack for a garage-based startup or a full production-line storage system for a factory, its modularity, strength, and versatility mean you're in control. By following the load capacity guidelines, using the right accessories (shoutout to Aluminum Guide Rail A and roller track!), and avoiding common mistakes, you'll end up with a storage system that's not just organized, but a boost to your bottom line.
So what are you waiting for? Grab a tape measure, do that storage audit, and start sketching. Your future self—with more space, less stress, and faster production—will be glad you did.