- Company Articles
- Products and Technology
- Installation And Maintenance
- 4040F EU Standard Aluminum Profile Installation Guide: Step-by-Step Assembly for Workbenches

4040F EU Standard Aluminum Profile Installation Guide: Step-by-Step Assembly for Workbenches
Related Product
4040F EU Standard Aluminum Profile
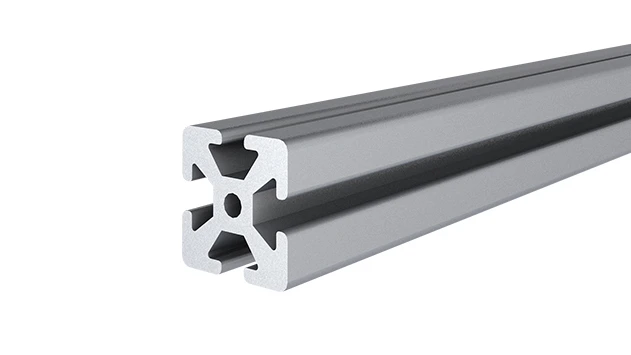
4040F is a 4.00x4.00 CM fractional 40 series square extrusion T-slot profile with four side open T-slots, each side with 4.00cm face. The profile has align-a-grooves to assist in aligning connecting profiles.
Introduction: Why 4040F Aluminum Profile Stands Out for Your Workbench
If you've ever dreamed of a workbench that's sturdy enough to handle heavy tools, flexible enough to adapt as your projects change, and straightforward to put together even if you're new to DIY, you're in the right place. The 4040F EU standard aluminum profile has become a go-to choice for workshops, garages, and small manufacturing spaces—and for good reason. Its T-slot design, lightweight yet durable aluminum build, and compatibility with a wide range of aluminum profile accessories mean you can build a workbench that fits your needs, not just a one-size-fits-all solution.
In this guide, we're breaking down the assembly process step by step. Whether you're setting up a hobbyist workspace or upgrading your professional bench, we'll cover everything from unpacking your parts to adding the finishing touches. No confusing technical jargon, no skipped steps—just clear, friendly advice to help you build a workbench you'll be proud to use. Let's dive in!
Tools You'll Need: Gather These Before You Start
Before you unbox those shiny 4040F profiles, let's make sure you have all the tools handy. You won't need a fully stocked workshop—just a few basics to ensure smooth assembly. Here's what to grab:
| Tool | Why You Need It | Pro Tip |
|---|---|---|
| Hex Key Set (Allen Wrenches) | Most aluminum profile connectors use hex screws—this is your main tightening tool. | Get a set with both long and short arms; the long ones help reach tight spots. |
| Rubber Mallet | Gently taps profiles into connectors without damaging the aluminum finish. | Avoid metal hammers—they can scratch or dent the profiles. |
| Spirit Level | Ensures your workbench is flat and steady (no wobbly projects here!) | A 24-inch level works best for checking the worktop and frame. |
| Measuring Tape | Double-checks lengths and distances to keep everything aligned. | Opt for a retractable tape with clear markings—accuracy matters! |
| Pencil or Marker | Marks where to attach connectors or cut profiles (if needed). | A fine-tip marker won't smudge on aluminum—easy to wipe off later. |

Step 1: Unpack and Organize Your Parts
First things first: let's get your workspace ready. Clear a flat, clean area—preferably a concrete floor or large table—where you can lay out all your parts. Unbox the 4040F EU standard aluminum profiles, aluminum profile connectors, and any accessories (like caster wheels if you want a mobile bench) and spread them out. This might seem tedious, but trust me—knowing exactly what you have will save you from hunting for a missing connector halfway through assembly.
Take a quick inventory to ensure you have all the basics: typically, you'll need 4040F profiles for the frame (usually 4 for the top, 4 for the bottom, and 4 legs, but this depends on your workbench size), aluminum profile connectors (90° connectors are most common for corners), and maybe end caps to cover sharp edges. If your kit includes a worktop (like an aluminum honeycomb panel or plywood), set that aside for later.
Pro Move: Use small bins or zip-top bags to group similar parts—connectors in one, screws in another. This keeps things from rolling away and makes assembly feel less chaotic.
Step 2: Build the Base Frame
The base frame is the skeleton of your workbench—it needs to be strong, so take your time here. Let's start with the bottom frame, which will support the legs and keep everything stable.
2.1 Connect the Bottom Rails
Lay out four 4040F profiles to form a rectangle: two longer pieces (front and back) and two shorter pieces (sides). Take your 90° aluminum profile connectors—these are the cornerstones of the frame. Slide one connector into the end of a long profile, then align the short profile with the connector's other slot. It should fit snugly, but don't force it! If it's tight, wiggle the profiles slightly or use the rubber mallet to tap them into place—gentle taps, not whacks.
Once the corners are loosely connected, check that the rectangle is square. Measure the diagonals—both should be the same length. If not, nudge the corners until they are. Then, grab your hex key and tighten the screws on each connector. Don't overtighten yet—you'll want to adjust later if needed—but make them snug enough to hold the shape.
2.2 Attach the Legs
Now, it's time to add height. Take four vertical 4040F profiles (these are your legs) and attach them to the bottom frame using more 90° connectors. Flip the bottom frame upside down so the connectors are facing up—this makes it easier to attach the legs. Slide a connector onto the end of each leg, then align it with the corner connectors of the bottom frame. Again, tap gently to seat the profiles, then tighten the screws just enough to hold them upright.
Stand the frame up carefully (you might want a helper for this!) and check if the legs are straight. Use your level against each leg—if one leans, loosen the connector, adjust, and retighten. A wobbly leg now means a wobbly workbench later, so this step is worth the extra minute.
Step 3: Add the Top Frame and Worktop
With the legs in place, it's time to top off the frame. The top frame will support your work surface, so we'll mirror the bottom frame's structure for balance.
3.1 Build the Top Rails
Repeat Step 2.1 to create another rectangle with 4040F profiles—this should be the same size as the bottom frame. Once the top frame is square, attach it to the top of the legs using 90° connectors. Again, start loose, check for squareness, then tighten. Now your workbench has a "cage" shape: bottom frame, four legs, top frame—solid as a rock (or at least, solid as aluminum!)
3.2 Mount the Worktop
Now for the part you'll actually work on: the worktop. If you're using a pre-cut aluminum honeycomb panel or plywood, center it on the top frame. Mark where the T-slots of the 4040F profiles line up underneath the worktop—this is where you'll attach it. Use T-slot nuts and bolts (included with most worktop kits) to secure the worktop to the frame. Slide the T-slot nuts into the profile's slots, align them with the marks, then bolt the worktop down. Tighten the bolts evenly to avoid warping the surface.
Grab your level again and set it on the worktop. If it's uneven, adjust the bolts slightly or add shims under the worktop (cardboard works in a pinch!) until it's perfectly flat. A level worktop isn't just for looks—it prevents tools from rolling off and ensures accurate measurements for your projects.
Step 4: Customize with Accessories (Optional but Awesome)
Here's where the 4040F profile really shines: accessories! Aluminum profile accessories let you tailor the workbench to how you work. Let's add a few popular upgrades.
4.1 Add Side Rails for Tool Storage
If you want to hang tools or add shelves, attach horizontal 4040F profiles to the legs using parallel aluminum profile connectors. These connectors let you mount rails parallel to the worktop, perfect for hanging pegboards or tool hooks. Measure where you want the rails (usually 12–18 inches above the worktop), attach the connectors, and slide the rails into place. Tighten the screws, and voila—extra storage space without cluttering the bench.
4.2 Install Caster Wheels for Mobility (If You Want to Roll)
A stationary workbench is great, but a mobile one? Even better. If your workbench needs to move (say, to sweep underneath or reconfigure your space), swap out the fixed feet for caster wheels. Remove the bottom frame's end caps (if any), then attach caster mounting plates to the bottom of the legs using T-slot bolts. Screw the caster wheels into the plates—make sure two have brakes (for safety when you're working!). Test the wheels by rolling the bench back and forth—they should move smoothly, and the brakes should lock firmly.
Heads Up: Casters add height, so double-check that the workbench still feels comfortable to use. If it's too tall, swap the legs for shorter 4040F profiles before attaching the casters.
Step 5: Final Checks and Tightening
You're almost done! Now it's time to make sure everything is tight, level, and ready to work. Grab your hex key and go around the entire workbench, tightening all the connector screws. This time, tighten them firmly—you want the joints to be solid, but don't strip the screws. If a screw feels stuck, back it out slightly and try again.
Give the workbench a gentle shake—no wobbles allowed! If it moves, check the legs for levelness or tighten any loose connectors. Then, set the level on the worktop one last time to confirm it's flat. If all looks good, you're ready to load it up with tools, projects, and whatever else you need.
Troubleshooting: Oops, That Didn't Work—Now What?
Even the best DIYers hit snags. Here's how to fix common issues:
- Loose Joints: If a connector feels wobbly after tightening, check if the profile is fully seated in the connector. Sometimes, profiles need a little extra tap to go all the way in. If that doesn't work, replace the screw—occasionally, a screw might be stripped.
- Uneven Workbench: If the bench rocks, use the level to find the high leg. Loosen its connector, slip a thin shim (like a piece of cardboard) under the leg, then retighten. Repeat until the bench is steady.
- Accessories Won't Fit: Aluminum profile accessories are designed for specific profiles, but sometimes a T-slot nut might be the wrong size. Check that the accessories are labeled for 4040F profiles—most suppliers list compatibility, so double-check if you're unsure.
Maintenance Tips: Keep Your Workbench Happy for Years
Your 4040F workbench is built to last, but a little care goes a long way:
— Clean Regularly: Wipe down the profiles and worktop with a damp cloth to remove dust and grease. Avoid harsh chemicals—mild soap and water work best.
— Tighten Connectors Annually: Even the sturdiest joints can loosen over time. Once a year, go around with your hex key and snug up any screws that feel loose.
— Protect the Worktop: If using power tools, add a rubber mat or plywood overlay to prevent scratches. For heavy machinery, bolt it directly to the frame using T-slot nuts for stability.
Conclusion: You Built That! Now Go Create Something Great
Take a step back and admire your handiwork—you just built a custom workbench using 4040F EU standard aluminum profile! Whether it's for woodworking, electronics, or just tinkering, this bench is designed to grow with you. Need more shelves? Add them. Want to move it outside for a project? Lock the casters. The T-slot design and aluminum profile accessories mean the possibilities are almost endless.
Remember, even if you hit a few bumps along the way, that's part of the DIY journey. The best workbenches aren't just about the parts—they're about the projects you'll build on them. So grab your tools, fire up that project, and enjoy the fruits of your labor. Happy building!