- Company Articles
- Products and Technology
- Product knowledge
- 4040F EU Standard Aluminum Profile Jointing Techniques: Ensuring Structural Integrity

4040F EU Standard Aluminum Profile Jointing Techniques: Ensuring Structural Integrity
Related Product
4040F EU Standard Aluminum Profile
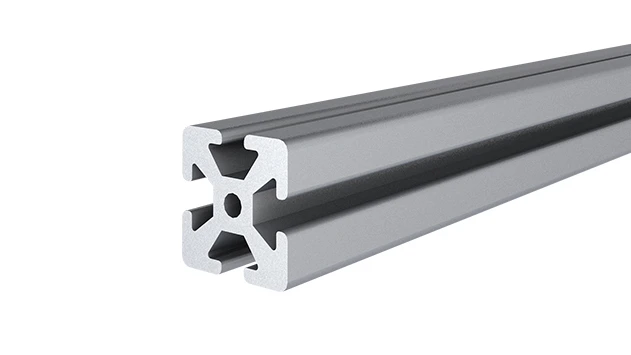
4040F is a 4.00x4.00 CM fractional 40 series square extrusion T-slot profile with four side open T-slots, each side with 4.00cm face. The profile has align-a-grooves to assist in aligning connecting profiles.
Walk into any modern manufacturing facility, and you'll likely spot aluminum profiles hard at work. From assembly line workbenches to material racks, conveyor systems to machine guards, these lightweight yet durable structures form the backbone of efficient production environments. Among the most widely used profiles is the 4040F EU Standard Aluminum Profile—a versatile, 40x40mm extruded frame that balances strength, flexibility, and cost-effectiveness. But here's the thing: even the highest-quality aluminum profile is only as reliable as the joints holding it together. A weak joint can turn a sturdy workbench into a wobbly hazard, a well-designed rack into a collapsing risk, or a smooth conveyor into a jolting bottleneck. In this article, we'll dive deep into the art and science of jointing 4040F EU Standard Aluminum Profiles, exploring techniques, tools, and best practices to ensure your structures stand strong, safe, and efficient for years to come.
Understanding the 4040F EU Standard Aluminum Profile
Before we jump into jointing techniques, let's get to know the star of the show: the 4040F EU Standard Aluminum Profile. As the name suggests, this profile measures 40mm in width and 40mm in height, with a "F" designation that refers to its specific groove design—typically featuring T-slots along all four sides. These T-slots are the profile's secret superpower: they allow for easy attachment of accessories, brackets, and connectors without the need for welding or drilling, making customization a breeze.
Manufactured through an extrusion process, the 4040F profile is crafted from high-grade aluminum alloy (often 6063-T5), known for its excellent strength-to-weight ratio, corrosion resistance, and machinability. This makes it ideal for everything from light-duty workstations to medium-heavy load applications like material handling racks. What sets the EU Standard apart is its strict adherence to dimensional tolerances and quality control, ensuring compatibility across brands and consistency in performance. When you choose a 4040F EU Standard profile, you're not just buying a piece of metal—you're investing in a system designed to integrate seamlessly with a wide range of aluminum profile accessories, from end caps to connectors, making structural assembly both flexible and reliable.
Manufactured through an extrusion process, the 4040F profile is crafted from high-grade aluminum alloy (often 6063-T5), known for its excellent strength-to-weight ratio, corrosion resistance, and machinability. This makes it ideal for everything from light-duty workstations to medium-heavy load applications like material handling racks. What sets the EU Standard apart is its strict adherence to dimensional tolerances and quality control, ensuring compatibility across brands and consistency in performance. When you choose a 4040F EU Standard profile, you're not just buying a piece of metal—you're investing in a system designed to integrate seamlessly with a wide range of aluminum profile accessories, from end caps to connectors, making structural assembly both flexible and reliable.
Why Joint Integrity Matters: Beyond "Just Holding It Together"
Think of a structure built with aluminum profiles as a team: each profile is a team member, and the joints are the communication and collaboration that keep them working in sync. A weak joint is like a miscommunicating team member—soon, the whole group falters. So why does joint integrity matter so much?
First, safety. In a factory setting, unstable structures pose serious risks. A wobbly workbench might cause tools to slip, injuring operators. A poorly jointed material rack could collapse under the weight of components, damaging inventory or worse. Even minor vibrations from machinery can loosen subpar joints over time, turning a small issue into a major hazard.
Second, efficiency. A structure with loose joints doesn't just; it wastes time. Imagine a conveyor system where sections shift out of alignment because the roller track connectors are ill-fitted—products get stuck, production slows, and workers spend precious minutes fixing avoidable issues. Tight, precise joints keep workflows smooth, reducing downtime and keeping productivity high.
Third, longevity. Aluminum profiles themselves are built to last, but joints are often the first point of failure. By prioritizing strong, well-installed joints, you extend the lifespan of your entire structure, delaying the need for costly replacements. This is especially critical in high-traffic areas, like assembly lines or warehouses, where structures endure constant use and stress.
In short, joint integrity isn't just about "holding it together"—it's about building structures that protect your team, your operations, and your bottom line.
First, safety. In a factory setting, unstable structures pose serious risks. A wobbly workbench might cause tools to slip, injuring operators. A poorly jointed material rack could collapse under the weight of components, damaging inventory or worse. Even minor vibrations from machinery can loosen subpar joints over time, turning a small issue into a major hazard.
Second, efficiency. A structure with loose joints doesn't just; it wastes time. Imagine a conveyor system where sections shift out of alignment because the roller track connectors are ill-fitted—products get stuck, production slows, and workers spend precious minutes fixing avoidable issues. Tight, precise joints keep workflows smooth, reducing downtime and keeping productivity high.
Third, longevity. Aluminum profiles themselves are built to last, but joints are often the first point of failure. By prioritizing strong, well-installed joints, you extend the lifespan of your entire structure, delaying the need for costly replacements. This is especially critical in high-traffic areas, like assembly lines or warehouses, where structures endure constant use and stress.
In short, joint integrity isn't just about "holding it together"—it's about building structures that protect your team, your operations, and your bottom line.

Key Jointing Techniques for 4040F Profiles
When it comes to joining 4040F EU Standard Aluminum Profiles, there's no one-size-fits-all approach. The right technique depends on your application: Is the structure static or mobile? Does it need to support heavy loads, or is it lightweight? Will it be disassembled and reconfigured later? Below are the most common jointing methods, each with its own strengths and ideal use cases.
1. Mechanical Connectors: The Workhorses of Jointing
Mechanical connectors are the go-to choice for most 4040F applications. These pre-fabricated components—designed specifically for T-slot profiles—lock profiles together using bolts, nuts, and clamping forces. Let's break down the most popular types:90° Aluminum Profile Connectors : As the name suggests, these connectors join profiles at a right angle, making them essential for building frames, workbench corners, or rack sides. They come in two main styles: internal and external. Internal connectors fit inside the profile's T-slots, creating a clean, flush look, while external connectors wrap around the profile's edges, offering extra strength for heavy loads. Installation is straightforward: slide the connector into the T-slot, align the second profile, and tighten the bolt to secure the clamp. For added stability, pair with a "gusset" or angle bracket—small, triangular plates that reinforce the joint by distributing stress across two sides.
45° and 135° Aluminum Profile Connectors : For structures with angled frames (think sloped roofs on machine enclosures or triangular material racks), these connectors are indispensable. Like their 90° counterparts, they use clamping force to secure profiles, but their angled design ensures a tight fit at non-right angles. Pro tip: When using 45° connectors, always check alignment with a protractor—even a 1° misalignment can throw off the entire structure's balance.
Tee and Cross Connectors : When you need to branch a profile off another (e.g., adding a shelf to a vertical rack post), tee connectors (for T-joints) and cross connectors (for X-joints) are the way to go. These connectors fit into the T-slot of the main profile and have a perpendicular arm that accepts the secondary profile. For heavy shelves, opt for "reinforced" tee connectors, which feature thicker walls and extra bolts to handle downward pressure.
2. Bolt-and-Nut Joints: Simple, Strong, and Reusable
For applications where disassembly is needed (e.g., temporary workstations or modular racks), bolt-and-nut joints are a reliable, cost-effective option. This method uses T-slot bolts (which slide into the profile's grooves) and flange nuts to secure two profiles together. Here's how it works: Drill a hole through the secondary profile (if it's not pre-slotted), slide a T-slot bolt into the main profile's T-slot, align the holes, and tighten the nut. The result is a joint that's strong enough for most medium-load applications and easy to take apart when needed.The key to success with bolt-and-nut joints? Torque. Under-tighten, and the joint will loosen over time; over-tighten, and you risk stripping the threads or warping the profile. A torque wrench set to 8-10 Nm (for M8 bolts) is your best friend here. Also, consider using lock washers or thread-locking fluid (like Loctite) for joints in high-vibration areas—this prevents nuts from backing off during use.
3. Adhesive Bonding: For Permanent, Seamless Joints
When you need a joint that's both strong and aesthetically clean—no visible bolts or connectors—adhesive bonding is worth considering. This technique uses industrial-grade structural adhesives (like epoxy or polyurethane) to bond profiles together. It's ideal for applications where weight is a concern (adhesives add minimal mass) or where a smooth surface is needed (e.g., medical equipment enclosures or cleanroom structures).But adhesive bonding isn't for everyone. It requires careful surface preparation: profiles must be cleaned with alcohol or a degreaser to remove dirt, oil, or oxidation, ensuring the adhesive bonds properly. Cure time is another factor—most adhesives take 24 hours to fully set, so you'll need to clamp the joint firmly during this period. And unlike mechanical connectors, bonded joints are permanent; disassembly means cutting the profiles, which is costly and time-consuming. For these reasons, adhesive bonding is best reserved for static, low-stress structures where appearance matters most.
Comparing Joint Types: Which One Is Right for You?
| Joint Type | Primary Use Case | Strength Rating (1-10) | Installation Difficulty | Reusability | Best For |
|---|---|---|---|---|---|
| 90° Aluminum Profile Connector (Internal) | Right-angle frames, workbench corners | 8 | Easy (tools: hex key) | High (can be disassembled/reused) | Static structures, clean aesthetics |
| 90° Aluminum Profile Connector (External) | Heavy-load frames, rack uprights | 9 | Moderate (tools: hex key, may need alignment) | High | Heavy-duty applications, industrial racks |
| Bolt-and-Nut Joint | Modular structures, temporary setups | 7 | Moderate (tools: wrench, torque wrench recommended) | Very High (easily disassembled) | Workstations, mobile trolleys, reconfigurable racks |
| Adhesive Bonding | Smooth, permanent structures | 6 | High (requires surface prep, clamping, cure time) | Low (permanent) | Cleanrooms, medical equipment, aesthetic displays |
| Tee Connector | Branched structures (shelves, crossbars) | 7.5 | Easy to Moderate | High | Material racks, multi-level workbenches |
Tools and Materials: Setting Yourself Up for Success
Even the best jointing technique falls flat without the right tools and materials. Here's what you'll need to ensure precise, strong joints for your 4040F profiles:
Essential Tools :
- Hex Keys (Allen Wrenches) : Most aluminum profile connectors use hex bolts, so a set of metric hex keys (ranging from 2mm to 10mm) is a must. Look for ball-end hex keys—they allow you to reach bolts at an angle, which is handy in tight corners.
- Torque Wrench : Critical for bolt-and-nut joints and mechanical connectors. A torque wrench ensures you tighten bolts to the manufacturer's specs (typically 8-12 Nm for M8 bolts), preventing over-tightening or under-tightening.
- Deburring Tool : After cutting profiles to length, sharp edges and burrs can make inserting connectors difficult or damage T-slot bolts. A deburring tool smooths these edges, ensuring a clean fit.
- Measuring Tools : A tape measure, square, and level are non-negotiable for alignment. Even a small misalignment can weaken joints, so take the time to measure twice and cut once.
- Clamps : Useful for holding profiles in place during installation, especially for adhesive bonding or when working alone.
Must-Have Materials :
- High-Quality Connectors : Invest in reputable brands—cheap connectors often have poor tolerances, leading to loose fits. Look for connectors made from die-cast aluminum or steel for durability.
- Aluminum Profile Accessories : Don't overlook small parts like end caps (which protect T-slots from debris and prevent sharp edges), gaskets (for vibration dampening), and thread lockers (to keep bolts from loosening).
- Cleaners/Degreasers : For adhesive bonding or when working with oily profiles, a solvent like isopropyl alcohol ensures surfaces are free of contaminants.
- Lubricant : A small amount of dry lubricant (like graphite powder) can make sliding connectors into T-slots easier, especially in cold weather when aluminum contracts slightly.
Essential Tools :
- Hex Keys (Allen Wrenches) : Most aluminum profile connectors use hex bolts, so a set of metric hex keys (ranging from 2mm to 10mm) is a must. Look for ball-end hex keys—they allow you to reach bolts at an angle, which is handy in tight corners.
- Torque Wrench : Critical for bolt-and-nut joints and mechanical connectors. A torque wrench ensures you tighten bolts to the manufacturer's specs (typically 8-12 Nm for M8 bolts), preventing over-tightening or under-tightening.
- Deburring Tool : After cutting profiles to length, sharp edges and burrs can make inserting connectors difficult or damage T-slot bolts. A deburring tool smooths these edges, ensuring a clean fit.
- Measuring Tools : A tape measure, square, and level are non-negotiable for alignment. Even a small misalignment can weaken joints, so take the time to measure twice and cut once.
- Clamps : Useful for holding profiles in place during installation, especially for adhesive bonding or when working alone.
Must-Have Materials :
- High-Quality Connectors : Invest in reputable brands—cheap connectors often have poor tolerances, leading to loose fits. Look for connectors made from die-cast aluminum or steel for durability.
- Aluminum Profile Accessories : Don't overlook small parts like end caps (which protect T-slots from debris and prevent sharp edges), gaskets (for vibration dampening), and thread lockers (to keep bolts from loosening).
- Cleaners/Degreasers : For adhesive bonding or when working with oily profiles, a solvent like isopropyl alcohol ensures surfaces are free of contaminants.
- Lubricant : A small amount of dry lubricant (like graphite powder) can make sliding connectors into T-slots easier, especially in cold weather when aluminum contracts slightly.
Case Study: How Proper Jointing Transformed a Small Manufacturer's Assembly Line
Let's take a look at a real-world example of how prioritizing joint integrity can make a tangible difference. Consider a small electronics manufacturer we'll call "TechPro." TechPro's assembly line relied on a series of workbenches and material racks built with 4040F profiles, but they were struggling with frequent issues: workbenches wobbled during soldering, causing minor defects; material racks sagged under component boxes, leading to jams; and roller track guides on their conveyors kept misaligning, slowing production.
After an audit, the problem became clear: the original installer had used low-quality plastic connectors and skipped torque checks, leading to loose joints across the line. TechPro decided to invest in upgrading their joints, switching to steel-reinforced 90° aluminum profile connectors, adding gussets to high-stress areas, and using a torque wrench to ensure consistent tightening. They also replaced worn roller track placon mounts with new, precision-fit versions.
The results? Within a month, production defects dropped by 15% (thanks to stable workbenches), material handling time decreased by 20% (no more unjamming racks), and conveyor downtime fell by nearly 30%. Workers reported feeling safer and more confident in their tools, and the company avoided the cost of replacing entire structures—all by focusing on the joints.
TechPro's story isn't unique. It's a reminder that strong joints aren't just a "nice-to-have"—they're a catalyst for better performance, safety, and profitability.
After an audit, the problem became clear: the original installer had used low-quality plastic connectors and skipped torque checks, leading to loose joints across the line. TechPro decided to invest in upgrading their joints, switching to steel-reinforced 90° aluminum profile connectors, adding gussets to high-stress areas, and using a torque wrench to ensure consistent tightening. They also replaced worn roller track placon mounts with new, precision-fit versions.
The results? Within a month, production defects dropped by 15% (thanks to stable workbenches), material handling time decreased by 20% (no more unjamming racks), and conveyor downtime fell by nearly 30%. Workers reported feeling safer and more confident in their tools, and the company avoided the cost of replacing entire structures—all by focusing on the joints.
TechPro's story isn't unique. It's a reminder that strong joints aren't just a "nice-to-have"—they're a catalyst for better performance, safety, and profitability.
Troubleshooting Common Joint Issues
Even with careful installation, joints can develop issues over time. Here's how to spot and fix the most common problems:
Loose Joints : The most frequent culprit. Signs include wobbling, creaking, or visible gaps between profiles.
Solution : Tighten the connector bolts with a hex key or torque wrench. If the joint still loosens, check for worn threads on the connector or bolts—replace them if damaged. For high-vibration areas, apply thread locker to the bolts.
Misaligned Profiles : If your structure leans or parts don't line up (e.g., a shelf sits crooked), misalignment is likely to blame.
Solution : Disassemble the joint, use a square or level to realign the profiles, and reinstall the connector. If misalignment persists, check if the profiles were cut straight—warped or bent profiles are hard to joint properly and may need replacement.
Stripped T-Slots : Over-tightening bolts can strip the T-slot threads, making it impossible to secure connectors.
Solution : For minor stripping, try a larger bolt or a connector with a wider clamping surface. For severe damage, the profile may need to be cut back to a fresh section of T-slot.
Corroded Connectors : In humid or wet environments, steel connectors can rust, weakening the joint.
Solution : replace corroded connectors with stainless steel or zinc-plated versions. Apply a corrosion-resistant coating to exposed metal parts.
Loose Joints : The most frequent culprit. Signs include wobbling, creaking, or visible gaps between profiles.
Solution : Tighten the connector bolts with a hex key or torque wrench. If the joint still loosens, check for worn threads on the connector or bolts—replace them if damaged. For high-vibration areas, apply thread locker to the bolts.
Misaligned Profiles : If your structure leans or parts don't line up (e.g., a shelf sits crooked), misalignment is likely to blame.
Solution : Disassemble the joint, use a square or level to realign the profiles, and reinstall the connector. If misalignment persists, check if the profiles were cut straight—warped or bent profiles are hard to joint properly and may need replacement.
Stripped T-Slots : Over-tightening bolts can strip the T-slot threads, making it impossible to secure connectors.
Solution : For minor stripping, try a larger bolt or a connector with a wider clamping surface. For severe damage, the profile may need to be cut back to a fresh section of T-slot.
Corroded Connectors : In humid or wet environments, steel connectors can rust, weakening the joint.
Solution : replace corroded connectors with stainless steel or zinc-plated versions. Apply a corrosion-resistant coating to exposed metal parts.
Best Practices for Long-Lasting Joints
To ensure your 4040F profile joints stand the test of time, follow these best practices:
1. Plan Before You Build : Sketch your structure and identify high-stress areas (e.g., rack corners, workbench legs). Use stronger connectors (like external 90° joints) in these spots, and reinforce with gussets if needed.
2. Prioritize Alignment : A level, square structure is a strong structure. Take the time to align profiles before tightening joints—rushing this step leads to weak spots.
3. Torque Consistently : Use a torque wrench to apply the same tension to all bolts. Inconsistent tightening causes uneven stress, weakening joints over time.
4. Inspect Regularly : Schedule monthly checks for loose bolts, corrosion, or wear. Catching issues early prevents costly failures.
5. Use the Right Connector for the Job : Don't cut corners with underrated connectors. A heavy-load rack needs external 90° joints, not lightweight internal ones. When in doubt, consult the manufacturer's load ratings.
6. Protect Against the Elements : In damp or dusty environments, seal T-slots with end caps, use corrosion-resistant connectors, and clean joints periodically to remove debris.
1. Plan Before You Build : Sketch your structure and identify high-stress areas (e.g., rack corners, workbench legs). Use stronger connectors (like external 90° joints) in these spots, and reinforce with gussets if needed.
2. Prioritize Alignment : A level, square structure is a strong structure. Take the time to align profiles before tightening joints—rushing this step leads to weak spots.
3. Torque Consistently : Use a torque wrench to apply the same tension to all bolts. Inconsistent tightening causes uneven stress, weakening joints over time.
4. Inspect Regularly : Schedule monthly checks for loose bolts, corrosion, or wear. Catching issues early prevents costly failures.
5. Use the Right Connector for the Job : Don't cut corners with underrated connectors. A heavy-load rack needs external 90° joints, not lightweight internal ones. When in doubt, consult the manufacturer's load ratings.
6. Protect Against the Elements : In damp or dusty environments, seal T-slots with end caps, use corrosion-resistant connectors, and clean joints periodically to remove debris.
Conclusion: Building Stronger Structures, One Joint at a Time
The 4040F EU Standard Aluminum Profile is a workhorse of modern manufacturing, but its true potential lies in the joints that bring it to life. By understanding the importance of joint integrity, mastering key techniques, and investing in quality tools and materials, you can build structures that are safe, efficient, and built to last. Whether you're assembling a simple workbench or a complex conveyor system, remember: every joint matters. Take the time to align, tighten, and inspect, and you'll reap the rewards of a stronger, more reliable operation. After all, in the world of manufacturing, the best structures aren't just built—they're jointed with care.