- Company Articles
- Products and Technology
- Installation And Maintenance
- 4040r EU Standard Aluminum Profile Installation Tools: Essential Equipment

4040r EU Standard Aluminum Profile Installation Tools: Essential Equipment
Related Product
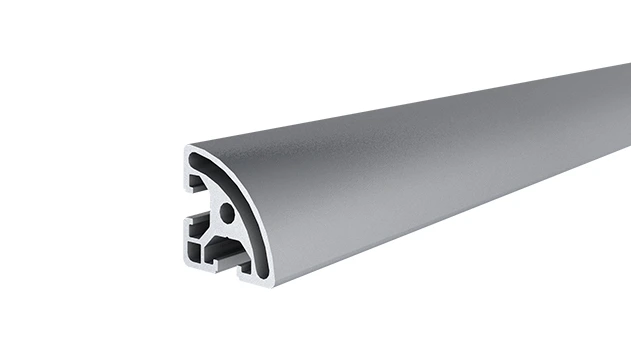
4040R EU Standard Aluminum Profile
4040R is a 4.00x4.00 CM fractional 40 series square extrusion T-slot profile with two side open T-slots, each side with 4.00cm face,the other side is round face. The profile has align-a-grooves to assist in aligning connecting profiles.
Walk into any modern manufacturing facility, warehouse, or workshop, and you'll likely spot a common sight: sleek, silver structures that seem to effortlessly adapt to their environment. These could be workbenches where technicians assemble electronics, material racks holding inventory, or roller track systems moving components along a production line. Chances are, many of these structures are built using 4040r EU standard aluminum profiles—the unsung heroes of modular industrial design. But what turns a pile of aluminum extrusions into a sturdy, functional workspace? The answer lies in the tools and aluminum profile accessories that make installation precise, efficient, and reliable. In this guide, we'll dive deep into the essential equipment you need to work with 4040r profiles, why each tool matters, and how the right accessories can elevate your modular system from "good enough" to "built to last."
Understanding the 4040r EU Standard Aluminum Profile: More Than Just Metal
Before we talk tools, let's take a moment to appreciate the star of the show: the 4040r EU standard aluminum profile. What makes this profile so popular? For starters, its dimensions—40mm by 40mm—strike a perfect balance between strength and versatility. The "r" in 4040r refers to its rounded edges, a design choice that enhances safety by reducing sharp corners (a small detail that makes a big difference in busy workplaces). EU standards ensure consistency in wall thickness, slot dimensions, and material quality, meaning profiles from different suppliers will fit together seamlessly—a critical feature for modular systems.
But the real magic of 4040r profiles lies in their T-slots. These longitudinal grooves running along each side of the profile act as universal connection points, allowing you to attach everything from brackets and panels to roller track and workbench surfaces. Whether you're building a lightweight assembly station or a heavy-duty material rack, the 4040r profile's modularity means you can reconfigure, expand, or repurpose your structure as needs change. However, this flexibility hinges on one thing: precise installation. Even the highest-quality profile will underperform if joints are loose, cuts are uneven, or connections are misaligned. That's where the right tools come in.
Why Installation Tools Deserve Your Attention: Safety, Durability, and Efficiency
Imagine this: You've invested in premium 4040r profiles and aluminum pipe joints, eager to build a workbench for your team. You grab a generic hex key from your toolbox, tighten the bolts as much as you can by hand, and call it a day. A month later, the workbench wobbles when someone leans on it. A year later, a joint slips, and a toolbox crashes to the floor. This scenario isn't just frustrating—it's avoidable. The tools you use to install 4040r profiles directly impact three critical areas: safety, durability, and efficiency.
Safety First: Loose connections or sharp, unprocessed profile edges are accident waiting to happen. A torque wrench ensures bolts are tightened to the manufacturer's specifications, preventing structural failure. A deburring tool smooths rough edges after cutting, eliminating the risk of cuts or snags. These tools don't just build better structures—they protect the people using them.
Durability That Lasts: Aluminum profiles are designed to withstand years of use, but their longevity depends on how well they're installed. Using a profile cutter with a dull blade can leave jagged cuts that weaken the material. Skipping a measuring square might result in misaligned joints, putting extra stress on certain sections and leading to premature wear. The right tools ensure every cut, hole, and connection is precise, so your structure stands strong through daily use.
Efficiency in Every Step: Time is money, especially in industrial settings. A high-quality hex key set with ball-end tips lets you reach bolts at awkward angles without stripping them. A magnetic level speeds up alignment, so you don't spend 20 minutes adjusting a single shelf. When tools work with you, not against you, installation becomes faster, less frustrating, and less prone to mistakes.
Pro Tip: Think of installation tools as an investment, not an expense. A $50 torque wrench might seem pricey upfront, but it will save you from costly repairs or replacements down the line. Plus, quality tools last for years—you'll use that same wrench for every 4040r project you tackle.

Essential Installation Tools for 4040r Aluminum Profiles: Your Go-To Toolkit
Now that we've established why tools matter, let's break down the must-have equipment for working with 4040r EU standard aluminum profiles. We'll cover everything from cutting and measuring to tightening and finishing, so you can approach your next project with confidence.
1. Hex Keys (Allen Wrenches): The Backbone of T-Slot Connections
If there's one tool you'll reach for more than any other when working with 4040r profiles, it's the hex key. Most T-slot fasteners—from bolts to brackets—use hexagonal sockets, and a well-fitted hex key is the only way to tighten them properly. But not all hex keys are created equal. Look for a set that includes metric sizes (since EU standards use metric measurements), with sizes ranging from 2mm to 6mm (the most common for 4040r profiles). Ball-end hex keys are a game-changer: their rounded tips allow you to approach bolts at a 30-degree angle, perfect for tight spaces where a straight key won't fit. For added durability, choose hex keys made from chrome vanadium steel—they resist stripping and bending, even when you apply pressure.
Pro tip: Keep a magnetic hex key holder near your workspace. It's easy to drop small keys in the chaos of installation, and a magnetic tray ensures you won't waste time hunting for them.
2. Torque Wrench: Precision Tightening for Consistent Joints
You might think, "Can't I just tighten the bolts as much as I can by hand?" While that works for a bookshelf at home, industrial structures demand more precision. Over-tightening can warp the aluminum profile or strip the T-slot, weakening the connection. Under-tightening leaves joints loose, risking wobble or collapse. A torque wrench solves this by letting you set a specific torque (measured in Newton-meters, or Nm) and alerting you when you've reached it (usually with a "click" sound). For 4040r profiles, most manufacturers recommend a torque range of 3-5 Nm for M5 bolts and 5-8 Nm for M6 bolts—check your fastener specs to be sure. A digital torque wrench with an LCD display is ideal for beginners, as it shows the exact torque applied, but a mechanical click-type wrench works well too for those who prefer simplicity.
3. Profile Cutters: Clean Cuts Without the Hassle
Unless your project uses pre-cut profiles (which is rare, since every setup is unique), you'll need to cut 4040r aluminum to length. The goal here is a clean, square cut that leaves the T-slots intact and the edges smooth. A hacksaw can work in a pinch, but it's slow and prone to uneven cuts. For better results, invest in a dedicated aluminum profile cutter. These tools come in two main types: manual shears (great for small projects) and electric saws with carbide-tipped blades (ideal for larger jobs or frequent cutting). Look for a cutter with a built-in clamp to hold the profile steady during cutting—this prevents slipping and ensures straight edges. If you're using an electric saw, wear eye protection and a dust mask; aluminum dust is fine and can irritate your lungs.
4. Deburring Tools: Smooth Edges for Safety and Fit
After cutting, even the cleanest cut leaves tiny burrs—sharp, raised metal fragments—on the edges of the profile. These burrs aren't just a safety hazard (they can slice through gloves or skin); they can also prevent aluminum profile accessories like end caps from fitting snugly. A deburring tool is designed to remove these burrs quickly and easily. Look for a tool with both internal and external deburring blades: the external blade smooths the outer edges, while the internal blade cleans up the T-slots. A few swipes with the tool, and your profile edges will be safe to handle and ready for assembly.
5. Measuring and Marking Tools: Accuracy Starts Here
"Measure twice, cut once" isn't just a cliché—it's a golden rule for 4040r profile installation. Even a 1mm error in measurement can throw off an entire structure, leading to misaligned shelves or uneven workbench surfaces. Start with a reliable tape measure (metric, of course) with a locking mechanism to keep the tape from retracting mid-measure. A combination square is essential for marking 90-degree angles—critical when building frames or attaching cross-braces. For longer profiles, a straightedge (at least 1 meter long) helps ensure your cut lines are straight. And don't forget a pencil or permanent marker—preferably one that wipes off aluminum easily (alcohol-based markers work well) in case you need to adjust your marks.
6. Clamping Tools: Holding It All Together (Temporarily)
During dry-fitting (assembling the structure without fully tightening bolts to check alignment), you'll need a way to hold profiles together. G-clamps and F-clamps are perfect for this—they grip the profiles firmly, allowing you to step back and check if everything lines up. Look for clamps with soft jaws to avoid scratching the aluminum finish. For larger projects, consider parallel clamps, which apply even pressure across the profile and prevent bending. Clamps aren't just for dry-fitting, either: they can hold profiles steady while you drill holes or attach accessories, making one-person installation much easier.
| Tool Category | Must-Have Features | Best For | Common Mistakes to Avoid |
|---|---|---|---|
| Hex Keys | Metric sizes (2-6mm), ball-end tips, chrome vanadium steel construction | Tightening T-slot bolts, attaching aluminum pipe joints and brackets | Using a worn or ill-fitting key (stripped bolts); over-tightening by hand |
| Torque Wrench | Adjustable torque range (3-10 Nm), clear torque indicators, compatible with hex bits | Ensuring bolts are tightened to manufacturer specs | Ignoring torque recommendations; using a wrench that's out of calibration |
| Profile Cutters | Carbide-tipped blade (electric saws), built-in clamp, square cutting guide | Cutting profiles to custom lengths | Using a dull blade (jagged cuts); cutting without clamping (uneven edges) |
| Deburring Tools | Dual internal/external blades, ergonomic handle, replaceable blades | Removing burrs after cutting; preparing edges for end caps | Skipping this step (safety hazards, poor accessory fit) |
| Measuring Tools | Metric tape measure (3m+), combination square, straightedge (1m+) | Marking cut lines, ensuring square joints, aligning shelves/racks | Estimating measurements; using a bent or stretched tape measure |
Aluminum Profile Accessories: The Finishing Touches That Make a Difference
Tools lay the foundation for installation, but aluminum profile accessories are what turn a basic frame into a functional system. These small components might seem minor, but they enhance safety, functionality, and even aesthetics. Let's explore a few key accessories that pair perfectly with your 4040r installation toolkit.
4040r Aluminum Profile End Caps: Protecting Profiles and People
After cutting and deburring, the ends of your 4040r profiles are smooth—but they're still open, leaving the internal cavity exposed to dust, debris, and moisture. 4040r aluminum profile end caps snap into place, sealing off the ends and adding a polished look. They also prevent small objects (like screws or washers) from falling into the profile, which could jam T-slots later. Most end caps are made of durable plastic (often black or silver to match the profile) and require no tools to install—just press them firmly onto the end of the profile until they click. It's a simple step, but it extends the life of your structure and keeps workspaces tidy.
T-Slot Rubber Seal Covers: Quiet, Clean, and Protected
Not every T-slot in your 4040r profile will be used for connections—some will be left open. These empty slots can collect dust, dirt, or small parts, and they can also create noise when the structure vibrates (common in busy workshops). T-slot rubber seal covers solve both problems. These flexible strips press into the T-slots, creating a tight seal that keeps out debris and dampens vibrations. They come in various colors (grey, black, or yellow for high-visibility areas) and are easy to trim to length with scissors. Bonus: They also protect the T-slot edges from wear, ensuring future connections will still fit snugly.
Aluminum Pipe Joints: The Glue That Holds Modular Systems Together
If 4040r profiles are the bones of your structure, aluminum pipe joints are the joints that let it move and adapt. These connectors come in countless configurations: 90-degree angles for corners, T-joints for branching structures, and swivel joints for adjustable components like workbench shelves. Most joints are designed to fit into T-slots, secured with bolts tightened using—you guessed it—your trusty hex key. When choosing joints, look for ones with a secure grip (some have rubberized inserts to prevent slipping) and corrosion-resistant finishes (like anodized aluminum) for long-term durability. A well-chosen joint can turn a static frame into a dynamic system that grows with your needs.
Step-by-Step Installation Guide: Building a 4040r Workbench
To put all this into practice, let's walk through installing a basic workbench using 4040r profiles, aluminum pipe joints, and the tools we've discussed. This project is common in workshops and assembly lines, and it will help you apply the skills we've covered.
Step 1: Plan Your Design and Gather Materials
Start by sketching your workbench dimensions. For a standard setup, aim for a height of 800-900mm (ergonomic for most users), width of 1200mm, and depth of 600mm. You'll need: 4040r profiles (4 legs, 2 front/back rails, 2 side rails), aluminum pipe joints (4 corner joints for the frame, 4 T-joints for the tabletop supports), a wooden or metal tabletop, end caps, T-slot rubber covers, and M5 bolts/washers. Gather your tools: hex key set, torque wrench, profile cutter, deburring tool, tape measure, combination square, and clamps.
Step 2: Cut Profiles to Length
Measure and mark each profile according to your design. Use the combination square to ensure marks are square to the profile's edges. Clamp the profile to a workbench, then cut with your profile cutter. After cutting, use the deburring tool to smooth all edges. Repeat for all profiles, then test-fit them loosely to ensure they match your measurements.
Step 3: Assemble the Frame (Dry Fit)
Lay out the leg profiles and attach the corner joints using bolts (but don't tighten fully). Add the front/back and side rails to form a rectangular frame. Use clamps to hold the joints in place, then check if the frame is square (measure diagonally from corner to corner—both measurements should be equal). Adjust as needed, then tighten the bolts with your hex key (but not fully—you'll torque them later).
Step 4: Add Tabletop Supports and Attach the Tabletop
Install T-joints on the side rails to support the tabletop. Measure and cut additional profiles to span between these T-joints (these will be the tabletop supports). Attach the supports, then place the tabletop on top. Mark where the tabletop meets the supports, then drill holes (if needed) and secure it with bolts through the T-slots. Use the torque wrench to tighten all bolts to the recommended torque (typically 4-5 Nm for M5 bolts).
Step 5: Finish with Accessories
Snap end caps onto all exposed profile ends. Press T-slot rubber covers into any unused T-slots. If desired, add extras like a roller track along the back edge for material handling or a power strip attached via T-slot brackets. Give the workbench a final inspection—shake it gently to check for wobble, and tighten any loose bolts.
Real-World Example: A manufacturing plant in Germany recently reconfigured their assembly line using 4040r profiles and the tools outlined here. By investing in a torque wrench and precision cutters, they reduced installation time by 30% and reported zero structural issues six months later. The plant manager noted, "We used to have to rebuild workbenches every year because joints would loosen. Now, with proper tools, they're still solid as a rock."
Troubleshooting Common Installation Challenges
Even with the right tools, installation can hit snags. Here are three common issues and how to fix them:
Problem: Bolt Won't Tighten—It Just Spins
This usually happens when the T-slot nut (the small, threaded insert inside the T-slot) is misaligned or stuck. Solution: Loosen the bolt, use a magnet or small hook to reposition the nut inside the T-slot, then try tightening again. If the nut is damaged, replace it—they're inexpensive and easy to find at hardware stores or aluminum profile suppliers.
Problem: Profile Cuts Are Uneven, Making Joints Misalign
Uneven cuts often stem from not clamping the profile securely or using a dull blade. Solution: Re-cut the profile with a sharp blade, ensuring the profile is clamped tightly to a straight surface. If the cut is only slightly off, use a file to trim the edge until it's square.
Problem: Structure Wobbles Even After Tightening All Bolts
Wobble usually means the frame isn't square or the joints are under-tightened. Solution: Check diagonal measurements to ensure the frame is square. If it's not, loosen the corner bolts, adjust the frame, and re-tighten. If the frame is square, use a torque wrench to ensure all bolts are tightened to spec—loose joints are often the culprit.
Conclusion: Tools and Accessories—The Key to Unlocking 4040r's Full Potential
4040r EU standard aluminum profiles have revolutionized modular industrial design, offering flexibility, strength, and adaptability that traditional materials can't match. But to truly harness their power, you need more than just profiles—you need the right tools and aluminum profile accessories. From hex keys that tighten joints with precision to deburring tools that keep workspaces safe, each tool plays a role in building structures that are durable, efficient, and built to last. And when paired with accessories like end caps, rubber seal covers, and aluminum pipe joints, your 4040r system becomes more than a collection of metal parts—it becomes a workspace that grows with your needs, supports your team, and stands the test of time.
So, the next time you're planning a modular project, remember: the difference between a structure that frustrates and one that performs lies in the tools you choose. Invest in quality, take the time to measure and cut precisely, and don't overlook the small accessories that make a big difference. With the right equipment, you'll turn 4040r profiles into something extraordinary.