- Company Articles
- Products and Technology
- Installation And Maintenance
- 4080A EU Standard Aluminum Profile for Exhibition Stands: Quick Assembly Guide

4080A EU Standard Aluminum Profile for Exhibition Stands: Quick Assembly Guide
Related Product
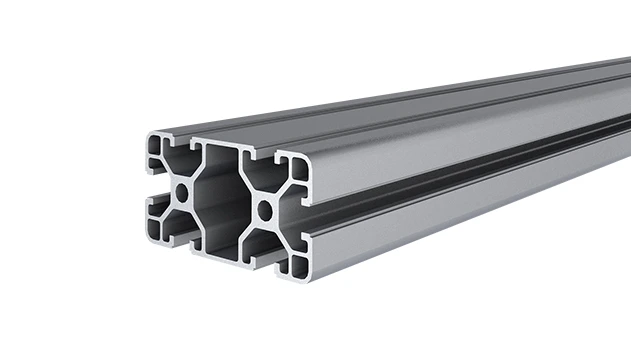
4080A EU Standard Aluminum Profile
4080A is a 4.00x8.00 CM fractional 40 series square extrusion T-slot profile with two side open T-slots, each side with 4.00cm face, two side with 8.00cm face. The profile has align-a-grooves to assist in aligning connecting profiles.
Introduction: The Stress of Exhibition Setup—And a Smarter Solution
If you've ever been part of setting up an exhibition stand, you know the drill: tight deadlines, heavy materials, and the constant worry that something might not fit right. Whether you're a small business owner prepping for your first trade show or a seasoned event planner managing multiple booths, the pressure to create a professional, eye-catching space in just a few hours is real. You need something sturdy enough to hold displays, flexible enough to adapt to different booth sizes, and—most importantly—fast to put together. That's where the 4080A EU Standard Aluminum Profile comes in. This unassuming piece of metal might just be the game-changer you've been looking for, turning chaotic setup days into smooth, stress-free experiences.
In this guide, we're diving deep into why the 4080A profile is the go-to choice for exhibition stands, breaking down its key components, and walking you through a step-by-step assembly process that even beginners can master. By the end, you'll not only understand how to build a stand quickly but also how to customize it to fit your brand—all while keeping durability and reusability in mind. Let's get started.
Why 4080A EU Standard Aluminum Profile? Let's Talk Basics
First things first: What makes the 4080A profile different from other materials? Let's start with the "EU Standard" part. This isn't just a marketing buzzword—EU standards ensure the profile meets strict criteria for quality, safety, and consistency. That means when you buy a 4080A profile, you're getting a product that's been tested for strength, corrosion resistance, and dimensional accuracy. No more guessing if the parts will fit together or if the frame will hold up through a busy trade show.
Then there's the aluminum itself. Unlike wood, which warps in humidity and adds extra weight, or steel, which rusts and requires heavy tools to cut, aluminum is lightweight yet surprisingly strong. A 4080A profile—named for its dimensions (40mm wide, 80mm tall)—strikes the perfect balance between heft and portability. You can carry a bundle of profiles by hand without straining, but once assembled, they'll easily support shelves, signage, and even small product displays.
Modularity is another big win. The 4080A profile features T-slots along its length—those handy grooves that run the full length of the profile. These slots let you attach accessories like brackets, shelves, and guide rails without drilling holes or welding. Need to add a last-minute shelf for brochures? Just slide a bracket into the T-slot and tighten a screw. Want to reposition a sign halfway through the show? No problem—loosen the fastener, adjust, and re-tighten. This flexibility is a lifesaver when you're adapting to unexpected changes on the exhibition floor.

Key Components You'll Need: Beyond the Profile Itself
The 4080A profile is the star of the show, but it can't do it alone. To build a functional exhibition stand, you'll need a handful of aluminum profile accessories that work seamlessly with it. Think of them as the supporting cast—small but essential for bringing the whole setup together. Let's break down the must-haves:
1. 4080A Aluminum Profile (The Backbone)
This is your main structural frame. It comes in standard lengths (usually 2m, 3m, or 6m), but can be cut to size with a miter saw or a hacksaw if you need custom dimensions. The "4080" refers to its cross-section: 40mm in width and 80mm in height, giving it a sturdy, rectangular shape that resists bending. Look for profiles with smooth edges to avoid snags on fabric or fingers during assembly.
2. 90° Aluminum Profile Connectors (The Glue That Holds It All Together)
These small, L-shaped pieces are what let you join two 4080A profiles at right angles—perfect for building the corners of your stand. Most come with pre-threaded holes and hex screws, so you don't need to drill anything. Just slide the connector into the T-slots of two profiles, align them, and tighten the screws with a hex key. Pro tip: Go for connectors made from the same aluminum alloy as the profile to ensure compatibility and prevent galvanic corrosion (that greenish rust that happens when different metals touch).
3. Aluminum Guide Rail A (For Shelves, Signage, and More)
Aluminum Guide Rail A is a narrow, channel-like accessory that mounts directly to the 4080A profile via T-slots. It's designed to support shelves, product displays, or even lightweight signage. What makes it special? Its smooth surface and pre-drilled holes make attaching other components a breeze. For example, if you want to add a wooden shelf, just place it on top of the guide rail and secure it with screws—no need to fumble with complicated brackets.
4. Aluminum Profile End Caps (The Finishing Touch)
You might not think about end caps until you accidentally brush against a raw aluminum edge and get a cut—but trust us, they're non-negotiable. These small, plastic or aluminum caps snap onto the ends of the 4080A profile, covering sharp edges and giving your stand a polished, professional look. They also keep dust and debris from getting inside the profile's hollow core, which can make disassembly and storage easier later.
| Component | Function | Pro Tip |
|---|---|---|
| 4080A Aluminum Profile | Main structural frame; forms the skeleton of your stand | Buy extra length if you're unsure about dimensions—you can always cut it down, but you can't add length back! |
| 90° Aluminum Connector | Joins profiles at 90° angles (e.g., corners of walls or shelves) | Keep a few spares in your toolkit—they're easy to misplace in the chaos of setup. |
| Aluminum Guide Rail A | Supports shelves, signage, or display panels | Use a level to ensure guide rails are straight—crooked shelves look unprofessional. |
| Aluminum Profile End Cap | Covers sharp ends; adds a clean finish | Choose caps in your brand color for a subtle, cohesive look. |
Bonus: Hex Keys and a Rubber Mallet
Not exactly accessories, but you'll need these tools. A set of hex keys (also called Allen wrenches) is essential for tightening connectors, and a rubber mallet helps tap end caps or connectors into place without damaging the aluminum. Avoid using a regular hammer—it can dent the profile.
Step-by-Step Assembly Guide: Building Your Stand in 3 Hours or Less
Now that you have your components, let's put them to work. We'll walk through building a basic 3m x 2m exhibition stand with a single shelf—a common setup for small to medium booths. Follow these steps, and you'll be ready to welcome visitors before you know it.
Step 1: Prep Your Workspace and Layout Your Design
Before you start screwing anything together, take 10 minutes to plan. Lay out your 4080A profiles on the floor according to your design—mark where walls, shelves, or support beams will go. Use masking tape to outline the booth dimensions (e.g., 3m wide by 2m deep) so you can visualize the space. This might seem like a waste of time, but it prevents mistakes like building a wall that's too short or a shelf that blocks your entrance.
Pro tip: If you're working with a team, assign roles. One person can measure and mark profiles, another can sort connectors, and someone else can handle cutting (if needed). Teamwork makes the setup go twice as fast.
Step 2: Cut Profiles to Size (If Necessary)
Most exhibition stands use standard profile lengths, but if you need custom pieces (e.g., a 1.5m shelf support), now's the time to cut them. Use a miter saw with a metal-cutting blade for clean, straight cuts. If you don't have a saw, many suppliers will cut profiles to your specifications for a small fee—take advantage of that!
After cutting, use sandpaper to smooth any rough edges. Sharp burrs can tear fabric backdrops or scratch floors, so this step is worth the extra minute.
Step 3: Build the Main Frame (Walls and Support Beams)
Start with the vertical supports—these are the "legs" of your stand. For a 2m tall booth, cut four 4080A profiles to 2m length. Then, cut two 3m profiles for the top and bottom horizontal beams (the ones that connect the vertical supports). Lay the vertical profiles on their sides, and attach the horizontal beams using 90° connectors:
- Slide a 90° connector into the T-slot of one vertical profile, near the top.
- Align the end of a horizontal profile with the connector, and slide the connector's other end into the horizontal profile's T-slot.
- Tighten the connector's screws with a hex key—snug, but not so tight that you strip the threads.
- Repeat for the bottom beam, then do the same for the other side of the wall.
Once both walls are built (you'll need two for a back wall and a side wall, or four for a full enclosure), stand them upright and connect them with additional horizontal beams. Have a friend hold the walls steady while you attach the beams—this prevents wobbling and ensures the frame is square.
Step 4: Add Aluminum Guide Rail A for Shelves
Now it's time to add functionality. Let's install a shelf 1m off the ground. Measure 1m up from the bottom of your vertical supports and mark the spot. Attach Aluminum Guide Rail A to both vertical supports at this height using T-slot bolts (these slide into the profile's T-slots and screw into the guide rail). Make sure the guide rail is level—use a bubble level to check, and adjust as needed.
Once the guide rails are in place, cut a 4080A profile to the width of your shelf (e.g., 3m) and place it on top of the guide rails. Secure it with additional connectors or T-slot bolts for extra stability—you don't want the shelf to slide off mid-show!
Step 5: Finish with End Caps and Final Checks
Snap aluminum profile end caps onto all exposed profile ends. They should fit snugly, but if they're tight, tap them gently with a rubber mallet. Then, give the entire stand a once-over: shake it gently to check for wobbles (tighten any loose connectors), ensure shelves are level, and make sure all end caps are secure.
Congratulations—you've built an exhibition stand! Depending on your design complexity, this should take 2–3 hours from start to finish. Compare that to the 6+ hours it might take with wood or steel, and you'll see why the 4080A profile is a favorite among event pros.
Pro Tips for Even Faster Setup: Lean System Principles in Action
If you really want to streamline your setup process, borrow a page from lean system principles—focus on efficiency, minimize waste, and optimize every step. Here are some practical ways to apply lean thinking to your exhibition stand assembly:
1. Pre-Assemble Modules at Your Workshop
Why build everything from scratch on-site? Pre-assemble smaller modules (like a wall section or a shelf unit) at your workshop, then transport them to the venue as pre-built pieces. For example, you could pre-assemble a 1m x 2m wall panel with guide rails already attached, then just connect the panels on-site. This cuts down on on-site time by 30–40%.
2. Label Everything (Yes, Everything)
Ever spent 10 minutes searching for the right connector? Avoid that by labeling each component with masking tape: "Back Wall – Left Vertical," "Shelf Support – Right," etc. You can even color-code labels by section (red for back wall, blue for shelves) to make sorting faster. It might seem tedious, but it's a small investment that saves big time during setup.
3. Use a Rolling Tool Cart
Instead of spreading tools and accessories across the floor, keep them organized in a rolling cart. This way, everything you need—hex keys, extra connectors, end caps—is within arm's reach, and you won't waste time walking back and forth to a toolbox.
4. Practice Once Before the Event
If it's your first time using the 4080A profile, do a dry run at your office or warehouse. Time yourself, note where you get stuck, and adjust your process. You'll be amazed at how much faster you'll go on the actual setup day once you've ironed out the kinks.
Customization: Making Your Stand Stand Out (Without the Fuss)
The 4080A profile isn't just about speed—it's also about flexibility. With the right accessories, you can customize your stand to reflect your brand and showcase your products. Here are a few ideas to get you started:
Add Branded Panels
Attach lightweight aluminum honeycomb panels or printed fabric backdrops to the 4080A frame using T-slot bolts and clips. The T-slots make it easy to swap out panels for different events, so you can reuse the same frame but update your branding.
Install Lighting
LED strip lights can be mounted directly to the 4080A profile using adhesive clips or T-slot mounts. Highlight your logo, products, or key messages with strategic lighting—just make sure to use battery-powered or low-voltage lights to avoid complicated wiring.
Go Mobile with Casters
Add locking casters to the bottom of your stand's vertical supports, and you can move it around the venue with ease. This is great if you need to reposition your booth last-minute or if you're sharing space with other exhibitors.
Why Not Wood or Steel? Comparing Materials for Exhibition Stands
You might be wondering: Why bother with aluminum when wood or steel is cheaper? Let's break down the pros and cons:
Wood: Cheap but Cumbersome
Wood is affordable and easy to cut, but it's heavy (a 3m 2x4 weighs around 10kg, vs. 3kg for a 4080A profile of the same length). It also absorbs moisture, which can cause warping, and it's not reusable—you'll likely have to rebuild the stand from scratch for each event. Plus, cutting wood on-site creates sawdust, which is messy and time-consuming to clean up.
Steel: Strong but Rust-Prone
Steel is strong, but it's even heavier than wood and prone to rust if not painted. Welding steel pieces together requires specialized tools and skills, making on-site adjustments nearly impossible. And like wood, it's not easily reusable—once you weld a joint, you can't take it apart without cutting it.
Aluminum (4080A Profile): The Sweet Spot
Aluminum hits the trifecta: lightweight, strong, and reusable. It won't rust, it's easy to cut and assemble, and you can take it apart and rebuild it for every event. Yes, it might cost a bit more upfront than wood, but the time and money saved on setup, transportation, and replacement make it a smarter long-term investment.
Maintenance and Reusability: Getting the Most Out of Your Investment
One of the best things about the 4080A profile is that it's built to last. With a little care, you can reuse it for years—saving money and reducing waste. Here's how to keep it in top shape:
Cleaning
Wipe down profiles and accessories with a damp cloth after each event to remove dust and fingerprints. For stubborn stains, use a mild soap and water solution—avoid harsh chemicals, which can damage the aluminum's finish.
Storage
Store profiles horizontally on a rack to prevent bending, and keep accessories in labeled plastic bins to avoid losing pieces. If you're storing them for more than a few months, wrap profiles in bubble wrap to protect against scratches.
Replacement Parts
Connectors and end caps are cheap and easy to replace if they get lost or damaged. Keep a stock of spares so you're never caught off guard.
Conclusion: Your Exhibition Stand, Reimagined
Exhibition setup doesn't have to be a nightmare. With the 4080A EU Standard Aluminum Profile, aluminum profile accessories like 90° connectors and Aluminum Guide Rail A, and a lean system approach to assembly, you can build a professional, durable stand in a fraction of the time it takes with traditional materials. Whether you're a first-time exhibitor or a seasoned pro, this guide gives you the tools to turn setup day from a stressor into a smooth, even enjoyable process.
So the next time you're gearing up for a trade show, skip the wood and steel. Invest in 4080A aluminum profiles, gather your accessories, and get ready to build a stand that not only looks great but also lets you focus on what really matters—connecting with customers and growing your business. Happy exhibiting!