- Company Articles
- Products and Technology
- Installation And Maintenance
- 4080B EU Standard Aluminum Profile Assembly Tips: Ensuring Stability & Precision

4080B EU Standard Aluminum Profile Assembly Tips: Ensuring Stability & Precision
Related Product
4080B EU Standard Aluminum Profile
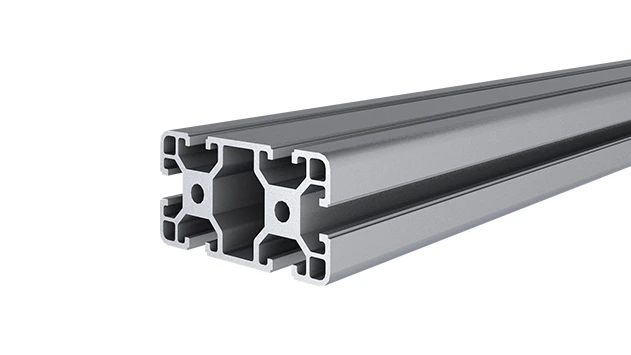
4080B is a 4.00x8.00 CM fractional 40 series square extrusion T-slot profile with two side open T-slots, each side with 4.00cm face, two side with 8.00cm face. The profile has align-a-grooves to assist in aligning connecting profiles.
If you've ever rolled up your sleeves to build something that needs to stand the test of time—whether it's a workshop workbench, a material rack for your warehouse, or a custom production line—you know that the right materials are only half the battle. The other half? Assembly. And when it comes to versatile, durable structures, few materials hold a candle to the 4080B EU standard aluminum profile. But even the sturdiest aluminum extrusion profile can feel wobbly or misaligned if you skip the critical steps that ensure stability and precision. Today, we're breaking down everything you need to know to assemble 4080B profiles like a pro, from prepping your workspace to troubleshooting common hiccups. Let's dive in.
Understanding the 4080B EU Standard Aluminum Profile: Why It Matters
First, let's get familiar with our star material: the 4080B EU standard aluminum profile. If you're new to aluminum profiles, the "4080" refers to its dimensions—40mm in width and 80mm in height—while the "B" denotes a specific groove design (think: T-slots) that makes it compatible with a wide range of aluminum profile accessories. What sets this profile apart? It's a workhorse. Its robust cross-section balances strength and weight, making it ideal for everything from light-duty shelving to heavy-duty industrial workbenches. But here's the kicker: its precision-machined T-slots and standardized dimensions mean that with the right assembly techniques, you can create structures that are not only rock-solid but also easy to modify or expand later. That's why it's a favorite among engineers, DIYers, and manufacturers alike.
But even the best aluminum extrusion profile relies on how you put it together. A poorly assembled 4080B structure might sag under load, vibrate loose over time, or fail to align with other components. So, whether you're building a single workbench or an entire production cell, stability (so it doesn't wobble or collapse) and precision (so parts fit together seamlessly) are non-negotiable. Let's start with the basics: preparation.
Pre-Assembly Prep: The Foundation of Success
You wouldn't bake a cake without preheating the oven, right? The same logic applies here. Rushing into assembly without prep is a recipe for frustration (and a wonky structure). Here's what you need to do first:
1. Inspect Your Materials
Unpack your 4080B EU standard aluminum profile and aluminum profile accessories (think: joints, bolts, end caps) and give them a once-over. Look for dents, scratches, or bent edges on the profiles—even a small nick can throw off alignment. For accessories like internal straight joints or aluminum guide rail A, check that threads are clean and undamaged (no cross-threading allowed!). And don't forget the aluminum profile end cap—these little guys cover sharp edges and add a finished look, but a cracked cap won't do its job. If anything looks off, reach out to your supplier before you start.
2. Measure Twice, Cut Once (If Cutting is Needed)
Most projects will require cutting 4080B profiles to length. If you're doing this yourself, use a miter saw with a fine-tooth blade (aluminum-specific blades work best) to avoid burrs. Measure your cuts at least twice—mark the profile with a pencil, then double-check with a tape measure. Pro tip: Use a square to ensure your marks are straight; a (crooked) cut will make joining profiles a nightmare later. After cutting, deburr the edges with a file or deburring tool—sharp aluminum burrs can slice through gloves and ruin T-slot accessories.
3. Clear Your Workspace
Assembly requires space to lay out parts, maneuver tools, and check alignment. Clear a flat surface (a workbench or even a clean floor works) and cover it with a soft material like a rubber mat or cardboard to prevent scratches on your profiles. Organize your aluminum profile accessories in bins or trays—there's nothing worse than hunting for a tiny joint when you're in the middle of fitting a frame together.

Essential Tools and Aluminum Profile Accessories You'll Need
You wouldn't try to drive a nail with a wrench, so make sure you have the right tools for the job. Here's your must-have list:
- Hex Keys (Allen Wrenches): Most 4080B accessories use hex bolts, so a set of long-arm hex keys (or a hex driver with bits) is a must. Look for ones with ball ends—they let you reach bolts at awkward angles.
- Torque Wrench: Critical for avoiding over-tightening (which can strip threads or warp profiles) or under-tightening (which leads to wobble). Aim for a torque range of 3-10 Nm—most aluminum profile accessories work best between 4-6 Nm.
- Level: A 2-foot or 4-foot spirit level ensures your structure is plumb (vertical) and level (horizontal). Digital levels are great for precision, but a classic bubble level works too.
- Straightedge: For checking that long runs of profiles are perfectly straight (hello, aluminum guide rail A alignment!)
- Rubber Mallet: Gently taps parts into place without damaging the aluminum finish.
- Cleaning Cloth: Microfiber works best to wipe away dust, oil, or debris from T-slots—gunk in the slots can prevent bolts from seating properly.
And of course, your aluminum profile accessories. For most 4080B projects, you'll need:
- Joints: Internal straight joints (for 90° angles), 45° joints, or multi-angle joints, depending on your design.
- Bolts and Nuts: M6 or M8 T-slot bolts (length depends on your accessories) and flange nuts (they distribute pressure better than regular nuts).
- Aluminum Profile End Cap: Covers exposed ends to prevent injury and keep out dust.
- Aluminum Guide Rail A: For aligning moving parts (like conveyor tracks) or adding edge support to shelves.
- Gussets: Triangular brackets that reinforce corners—essential for heavy-load structures.
| Accessory Type | Function | Assembly Pro Tip |
|---|---|---|
| Aluminum Profile End Cap | Covers sharp ends, prevents debris in T-slots, adds finished look. | Tap gently with a rubber mallet to seat; avoid using screws unless specified—over-tightening can crack the cap. |
| Aluminum Guide Rail A | Guides movement (e.g., sliding bins) or aligns parallel profiles. | Mount using T-slot bolts; use a straightedge to ensure it's parallel to the profile edge—gaps >0.1mm mean misalignment. |
| Internal Straight Joint | Connects profiles at 90° angles (inside the T-slot). | Apply a drop of light machine oil to bolts before tightening—reduces friction and makes torque easier to control. |
| Gusset | Reinforces corners to prevent flexing under load. | Install on both sides of the joint for maximum strength; torque bolts in a crisscross pattern (like tightening lug nuts). |
Step-by-Step Assembly: Building with Stability & Precision
Now, let's put it all together. We'll walk through assembling a simple frame (think: a 4-legged workbench frame) to illustrate key steps, but these principles apply to any 4080B project.
Step 1: Dry-Fit First
Dry-fitting is non-negotiable. Lay out your 4080B profiles and accessories on your workspace and assemble them loosely (no tightening bolts yet). This lets you check if parts align, if you have the right joints, and if your measurements are spot-on. For example, if you're building a frame with vertical legs and horizontal rails, dry-fit the corners with internal straight joints to ensure the angles are 90° (use a square to check). If something looks off—say, a rail is too short or a joint sits crooked—now's the time to adjust. Trust me: taking 10 minutes to dry-fit saves hours of disassembling later.
Step 2: Clean T-Slots Thoroughly
Aluminum profiles and accessories often come with a light coating of oil (to prevent corrosion) or dust from manufacturing. Before final assembly, run a clean microfiber cloth through each T-slot to wipe away grime. For stubborn debris, use a small brush (a toothbrush works in a pinch). Why? Even a tiny speck of dirt can prevent a bolt from seating flush, leading to loose joints over time. It's a small step, but it makes a huge difference in stability.
Step 3: Start with the Base Frame
Build from the bottom up. For our workbench example, start with the two horizontal "side rails" (the long pieces that will form the front and back of the base). Attach internal straight joints to each end of these rails—make sure the joints are oriented correctly (the part that inserts into the T-slot should face inward). Then, connect the side rails with two shorter "cross rails" to form a rectangle. At this point, bolts should be finger-tight only—you'll torque them later.
Step 4: Square the Frame
A rectangle that's not square is a wobbly rectangle. To square your frame, measure the diagonals—both should be equal. If one diagonal is longer than the other, gently push the longer corner inward until the measurements match. Once squared, use your level to ensure the frame is flat (no rocking). If it's uneven, shim the low corners with small pieces of cardboard (temporarily!) while you tighten the bolts.
Step 5: Attach Vertical Legs
Now, add the vertical legs to each corner of your base frame. Slide the legs into the internal straight joints (which should still be finger-tight) and check that they're plumb using your level. Adjust as needed, then hold the leg steady while you partially tighten the joint bolts (about 50% of final torque). Repeat for all four legs—this partial tightening lets you make (fine adjustments) later without throwing off the frame.
Step 6: Add Cross-Bracing for Stability
Even with squared corners, a tall frame can sway. That's where cross-bracing comes in. Cut 4080B profiles to length and attach them diagonally between the legs using 45° joints or gussets. For extra strength, add bracing on both the front/back and sides. Tighten these joints to 70% torque—you'll do a final pass once everything is aligned.
Step 7: Torque All Bolts to Specification
Now, the moment of truth: torquing. Using your torque wrench, tighten all bolts in a crisscross pattern (e.g., tighten the top-left joint, then bottom-right, then top-right, then bottom-left) to the recommended torque (usually 4-6 Nm for M8 bolts). Why crisscross? It distributes pressure evenly, preventing warping. Go slow—over-tightening can strip T-slot threads or even bend the aluminum extrusion profile. If you hear a "creaking" sound, stop—you've gone too far.
Step 8: Install Aluminum Profile End Cap and Finishing Touches
Once the frame is solid, pop on the aluminum profile end cap to cover any exposed ends. For a polished look, wipe down the entire structure with a clean cloth to remove fingerprints or oil. If your project includes moving parts (like sliding shelves guided by aluminum guide rail A), test their movement—they should glide smoothly without sticking. If they bind, check for misaligned guide rails or tight bolts and adjust as needed.
Troubleshooting Common Assembly Issues
Even with careful prep, hiccups happen. Here's how to fix the most common problems:
Problem: The Frame Wobbles Side-to-Side
Possible causes: Missing cross-bracing, loose bolts, or an unsquared frame. Check diagonal measurements—if they're unequal, square the frame again. Add cross-bracing if needed, then re-torque all bolts.
Problem: Aluminum Guide Rail A Isn't Sliding Smoothly
Possible causes: Misaligned rail, debris in the T-slot, or over-tightened mounting bolts. Use a straightedge to ensure the rail is parallel to the profile. Clean the T-slot under the rail and loosen the mounting bolts slightly—over-tightening can bow the rail, causing friction.
Problem: Aluminum Profile End Cap Won't Stay On
Possible causes: Bent profile end or cracked cap. If the cap is cracked, replace it. If the profile end is bent, gently tap it straight with a rubber mallet (place a block of wood over the end to avoid dents) before reinserting the cap.
Problem: Bolts Keep Stripping
Possible causes: Using the wrong bolt size, over-tightening, or cross-threading. Always use M6/M8 bolts (check your accessory specs!). Start bolts by hand to avoid cross-threading, and never exceed the recommended torque.
Long-Term Maintenance: Keeping Your Structure Stable
Your 4080B structure is built—now, how do you keep it that way? A little maintenance goes a long way:
- Check Bolts Quarterly: Vibration (from machinery, foot traffic, etc.) can loosen bolts over time. Do a quick torque check every 3-6 months.
- Clean T-Slots: Dust and debris can build up, especially in industrial settings. Vacuum or brush out T-slots monthly, and wipe with a damp cloth.
- replace Worn Accessories: If an aluminum profile end cap cracks or a joint starts to bind, replace it ASAP. A small faulty part can compromise the whole structure.
- Lubricate Moving Parts: For aluminum guide rail A or sliding components, apply a thin coat of silicone-based lubricant every 6 months to reduce friction.
Final Thoughts: Precision Pays Off
Assembling 4080B EU standard aluminum profile isn't rocket science, but it does require patience and attention to detail. From inspecting your aluminum extrusion profile to torquing bolts with care, every step contributes to a structure that's stable, precise, and built to last. And remember: the goal isn't perfection—it's progress. Even if your first frame takes a little longer, the skills you learn will make the next project a breeze.
So, grab your hex keys, line up your aluminum profile accessories, and get building. With these tips, you'll be creating structures that not only meet your needs today but can adapt to whatever tomorrow throws at them. Happy assembling!