- Company Articles
- Products and Technology
- Product knowledge
- 4080B EU Standard Aluminum Profile Connectors: Types & Installation Guide

4080B EU Standard Aluminum Profile Connectors: Types & Installation Guide
Related Product
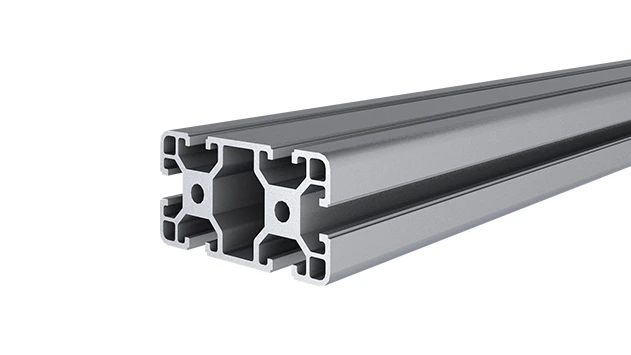
4080B EU Standard Aluminum Profile
4080B is a 4.00x8.00 CM fractional 40 series square extrusion T-slot profile with two side open T-slots, each side with 4.00cm face, two side with 8.00cm face. The profile has align-a-grooves to assist in aligning connecting profiles.
Introduction: The Backbone of Industrial Modularity
In the world of industrial design, manufacturing, and warehouse operations, there's a silent workhorse that holds everything together: aluminum profiles. From sturdy workbenches in assembly lines to dynamic material racks in warehouses, these profiles form the skeleton of countless structures. But what truly brings their versatility to life? Connectors. Small, unassuming, yet critical—connectors are the unsung heroes that turn rigid aluminum bars into flexible, customizable systems.
Today, we're zeroing in on one of the most widely used profiles in industrial settings: the 4080B EU Standard Aluminum Profile. Whether you're building a production workbench, a flow rack, or a turnover trolley, understanding the connectors that pair with this profile is key to creating stable, efficient, and long-lasting structures. In this guide, we'll break down the most essential connector types, their uses, and how to install them like a pro—no engineering degree required.
Understanding the 4080B EU Standard Aluminum Profile
Before diving into connectors, let's get familiar with the star of the show: the 4080B EU Standard Aluminum Profile. If you've ever walked through a factory or warehouse, you've probably seen this profile without realizing it. Its name gives away its dimensions: 40mm in width and 80mm in height, following the EU standard for industrial aluminum profiles. But there's more to it than just numbers.
Typically made from 6063-T5 aluminum alloy, the 4080B profile balances strength and lightweight design—two traits that make it ideal for everything from light-duty workbenches to medium-heavy material racks. Its surface is often anodized, giving it a smooth, corrosion-resistant finish that stands up to daily wear and tear in busy environments. What really sets it apart, though, is its T-slot design: long, recessed channels running along its length that allow connectors, brackets, and accessories to slide in and lock into place. This T-slot system is what makes aluminum profiles modular—you can reconfigure, add, or remove components without welding or drilling new holes.
Why choose 4080B over other profiles? Its width and height make it a versatile middle ground. It's beefier than smaller profiles (like 2020 or 3030) but more maneuverable than larger ones (like 8080), making it perfect for applications where space and strength need to coexist. Think of it as the "all-rounder" of the aluminum profile world—equally at home holding up a workbench in a lab as it is supporting a three-row, three-floor material rack in a warehouse.

Types of 4080B Aluminum Profile Connectors: Your Building Blocks
Connectors are the "glue" of aluminum profile systems, and choosing the right one for the job can make or break your structure. While there are dozens of connector types on the market, we'll focus on the most common and essential ones for 4080B profiles. Each is designed for specific angles, load capacities, and use cases—let's break them down.
1. 90° Aluminum Profile Connector: The Right-Angle Workhorse
If there's one connector you'll use more than any other, it's the 90° aluminum profile connector. As the name suggests, it joins two profiles at a perfect right angle—think the corner of a workbench, the vertical and horizontal beams of a rack, or the legs of a turnover trolley. These connectors are the backbone of most rectangular or square structures.
Most 90° connectors are T-slot compatible, meaning they slide into the recessed channels of the 4080B profile. They're typically secured with hex bolts or set screws, which tighten against the profile's inner walls to create a snug, rattle-free fit. Some designs even feature built-in spring-loaded pins for quick assembly—handy for temporary setups or frequent reconfigurations.
Material-wise, you'll usually find them in aluminum alloy (matching the profile) or stainless steel for extra corrosion resistance. For most industrial applications, aluminum alloy is sufficient, but if your setup is in a humid or chemical-exposed environment (like a cleanroom or food processing facility), stainless steel is worth the upgrade.
2. 45° Aluminum Profile Connector: For Slopes and Diagonals
Not all structures are right angles. Sometimes you need a slope—like the incline of a flow rack to let materials glide downward, or a diagonal brace to reinforce a tall frame. That's where the 45° aluminum profile connector comes in. Designed to join profiles at a 45-degree angle, these connectors add flexibility to your designs, allowing for triangular supports, sloped surfaces, or even diamond-patterned frames.
Installation is similar to the 90° connector but requires more precision. Since the angle is fixed, you'll need to ensure both profiles align perfectly before tightening. Some 45° connectors come with angle markers or guides to help with placement—don't skip using them! A misaligned 45° connection can throw off the entire structure's balance, leading to wobbles or uneven weight distribution.
Common uses include material racks with sloped shelves, workbench edges that need a gentle incline to prevent tools from sliding off, or diagonal reinforcements in tall racks to prevent swaying under heavy loads.
3. 135° Aluminum Profile Connector: Obtuse Angles for Unique Frames
While 90° and 45° connectors handle most straight and acute angles, there are times when you need an obtuse angle—more than 90 degrees but less than 180. Enter the 135° aluminum profile connector. This specialized connector is perfect for corner joints where two profiles meet at a "blunt" angle, such as the inside corner of a frame that needs to wrap around an obstacle, or a workbench with a angled extension to save space.
135° connectors are less common than their 90° counterparts, but they're invaluable for custom designs. Like other angle connectors, they fit into T-slots and are secured with bolts. Because they're used in less standard configurations, it's extra important to check the load capacity—obtuse angles can put different stress on the connector than right angles, so always verify that the connector is rated for your intended weight.
4. Three-Way Aluminum Profile Connector: Branching Out
What if you need to connect three profiles at once? Maybe you're building a T-shaped workbench, a multi-level material rack, or a frame with a crossbeam. The three-way aluminum profile connector is your answer. As the name implies, it allows three profiles to meet at a single point—either in a T-shape, Y-shape, or cross shape, depending on the design.
Three-way connectors come in fixed or swivel versions. Fixed ones lock the profiles at a specific angle (like 90° for T-junctions), while swivel versions let you adjust the angle of each arm before tightening. For 4080B profiles, T-shaped three-way connectors are particularly popular—they're used to add shelves to racks, extend workbench surfaces, or create cross-braces for stability.
Pro Tip:
Always match connector material to your profile. Mixing aluminum connectors with stainless steel profiles (or vice versa) can cause galvanic corrosion over time, especially in damp environments. Stick to the same material family for longevity.
Connector Comparison Table
| Connector Type | Angle | Material | Best For | Installation Difficulty |
|---|---|---|---|---|
| 90° Aluminum Profile Connector | 90° | Aluminum Alloy (6063-T5) or Stainless Steel | Right-angle joints: workbenches, square frames, rack corners | Easy (align profiles, tighten bolts) |
| 45° Aluminum Profile Connector | 45° | Aluminum Alloy or Stainless Steel | Sloped surfaces, diagonal braces, triangular frames | Moderate (requires precise angle alignment) |
| 135° Aluminum Profile Connector | 135° | Aluminum Alloy or Stainless Steel | Obtuse angles, corner wraps, space-saving frames | Moderate (verify load capacity for angle stress) |
| Three-Way Aluminum Profile Connector | Variable (e.g., 90° for T-junctions) | Aluminum Alloy or Stainless Steel | T-junctions, Y-shapes, crossbeams, multi-level racks | Moderate-Hard (align three profiles simultaneously) |
Installation Guide: Step-by-Step for Secure Connections
Now that you know the types of connectors, let's walk through how to install them properly. Even the best connector won't work if it's not mounted correctly—loose connections can lead to wobbly structures, reduced load capacity, or even safety hazards. Follow these steps for a rock-solid setup.
Tools You'll Need
- Hex key set (most connectors use M5 or M6 hex bolts)
- Torque wrench (to avoid over-tightening)
- Rubber mallet (for gently tapping profiles into alignment)
- Measuring tape and square (for angle accuracy)
- Marker or pencil (to mark T-slot positions)
- Deburring tool (to smooth any rough edges on cut profiles)
- Thread locker (optional, for high-vibration environments)
Step 1: Prep Your Profiles
Before installing any connector, start with clean, properly cut profiles. If you've just cut the 4080B profile to length, use a deburring tool to remove sharp edges or burrs from the cut ends—these can scratch the connectors or make alignment harder. Wipe down the T-slots with a dry cloth to remove dust, debris, or oil; even a small speck can prevent the connector from seating properly.
Measure and mark where the connector will go. For 90° connections, use a square to ensure the profiles meet at a perfect right angle. For 45° or 135°, use a protractor or angle guide to mark the joint position. Pro tip: If you're building a repeating structure (like a rack with multiple shelves), create a template from scrap wood or cardboard to mark positions consistently—this saves time and reduces errors.
Step 2: insert the Connector
Slide the connector into the T-slot of one profile. Most connectors have a "foot" that fits into the T-slot, with a bolt hole on top. For two-profile connectors (like 90° or 45°), align the second profile so its T-slot lines up with the connector's other foot. If the connector has multiple bolts (common in three-way designs), make sure all feet are seated in their respective T-slots before tightening.
For tight fits, gently tap the connector with a rubber mallet—never use a metal hammer, as it can dent the profile or damage the connector's threads. If the connector still won't slide in, check if the T-slot is bent or misaligned; a slight bend can be fixed with a plastic pry tool, but severe damage may require replacing the profile.
Step 3: Tighten the Bolts (But Don't Overdo It)
Once the connector is aligned, insert the hex bolt into the connector's bolt hole and start tightening with a hex key. Go slow—alternate between bolts if the connector has multiple (like three-way designs) to ensure even pressure. Stop when you feel resistance, then use a torque wrench to tighten to the manufacturer's recommended torque (usually 2-3 Nm for aluminum connectors). Over-tightening is a common mistake! It can strip the threads, warp the T-slot, or even crack the connector—especially in cold environments where aluminum becomes more brittle.
If you're working in a high-vibration area (like near a conveyor or production line), apply a small drop of thread locker to the bolt threads before tightening. This prevents the bolt from loosening over time without making future disassembly impossible (use removable thread locker, not permanent).
Step 4: Test the Connection
After tightening, give the connection a gentle shake or pull to test stability. There should be no movement or creaking. If the profiles wiggle, check if the connector is seated fully in the T-slot or if the bolts are loose. For angle connectors (45° or 135°), use a protractor to verify the angle is still correct—tightening can sometimes pull profiles out of alignment.
Repeat for all connections, and once the entire structure is built, do a final inspection. Check that all connectors are secure, profiles are level, and the structure can bear its intended load (test with weights similar to what it will hold in use). Better to catch a loose connector now than after you've loaded it with materials!
Troubleshooting Common Connector Issues
Even with careful installation, you might run into hiccups. Here are solutions to the most common connector problems:
Issue: Connector Won't Slide Into T-Slot
Cause: Debris in the T-slot, bent profile, or connector foot is too large.
Solution: Clean the T-slot with compressed air or a pipe cleaner. Check the profile for bends—if bent, gently straighten with a clamp and pliers. If the connector foot is oversized, verify you're using a 4080B-compatible connector; some manufacturers make connectors for smaller profiles (like 3030) that won't fit 4080B.
Issue: Loose Connection After Tightening
Cause: Under-tightening, stripped threads, or mismatched bolt size.
Solution: Check the bolt size—most 4080B connectors use M5 bolts. If threads are stripped, replace the connector (stripped threads can't be repaired). For under-tightening, use a torque wrench to reach the recommended torque; if the bolt still loosens, apply thread locker.
Issue: Profiles Misaligned at Joint
Cause: Marking errors, uneven floor, or connector installed at wrong angle.
Solution: Disassemble and re-mark using a square or protractor. If the floor is uneven, use shims under the structure's legs to level it before reinstalling the connector. For angle connectors, double-check the angle with a protractor during re-installation.
Maintenance: Keeping Your Connectors (and Structure) Strong
Aluminum profiles are low-maintenance, but a little care for your connectors goes a long way in extending their life. Here's what to do:
- Inspect quarterly: Check bolts for tightness, especially in high-use areas. Tighten any that are loose, and replace connectors with stripped threads or cracks.
- Clean annually: Wipe down connectors with a mild detergent and soft cloth to remove grease or grime. Avoid abrasive cleaners, which can scratch the anodized finish.
- Lubricate moving parts: If you're using swivel or adjustable connectors, apply a small amount of silicone lubricant to moving joints to prevent sticking.
- replace when worn: Connectors are affordable—don't wait for one to fail! If a connector shows signs of corrosion (common in humid areas) or deformation, swap it out for a new one.
Conclusion: Connectors Make the System
The 4080B EU Standard Aluminum Profile is a versatile tool, but its true power lies in the connectors that bring it to life. Whether you're building a simple workbench or a complex material handling system, choosing the right connectors—90° for right angles, 45° for slopes, 135° for obtuse joints—and installing them properly ensures your structure is safe, stable, and built to last.
Remember, modularity is the magic of aluminum profiles. With the right connectors, you're not just building a frame—you're creating a system that can grow, change, and adapt to your needs. So grab your hex key, measure twice, and build something that works as hard as you do.