- Company Articles
- Products and Technology
- Installation And Maintenance
- 60 Aluminum Roller Track Grey Installation Guide: Step-by-Step Process

60 Aluminum Roller Track Grey Installation Guide: Step-by-Step Process
Related Product
60 Aluminum Roller Track Grey
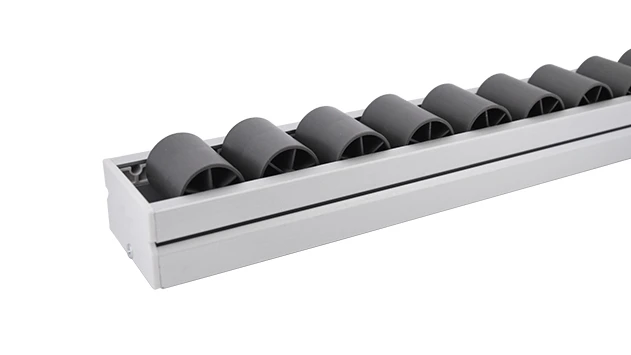
Modular system roller tracks aluminum gravity roller tracks are an excellent solution for transporting materials within industrial environments, warehouses and distribution centres.
60 Aluminum Roller Track Grey Installation Guide: Step-by-Step Process
Ever struggled with getting materials to glide smoothly along your production line or warehouse shelves? If you're into optimizing workflows (which, let's be honest, who isn't these days?), the 60 Aluminum Roller Track Grey is your new best friend. This sturdy, reliable track is a core part of flow racks and lean systems, designed to make material handling a breeze—whether you're in 3C assembly, medical device manufacturing, or any other industry that values efficiency.
In this guide, we'll walk you through every step of installing the 60 Aluminum Roller Track Grey, from unboxing to testing. We'll cover tools you need, common pitfalls to avoid, and how to keep your track running like new for years. Let's dive in!
Pre-Installation Checklist
Before you start installing your track, make sure you have all the necessary components and tools. Use the table below to double-check everything:
| Component/Tool | Notes |
|---|---|
| 60 Aluminum Roller Track Grey Sections | Check the number and length against your order |
| Roller Track Connectors | Ensure they fit your aluminum profile (compatible with our aluminum profile accessories) |
| End Stops | Prevent materials from sliding off the track |
| Mounting Brackets | Part of our aluminum profile accessories line for secure installation |
| Allen Wrench Set (Size 4/5) | For tightening bolts on connectors |
| Phillips Screwdriver | For mounting end stops and brackets |
| Spirit Level | To ensure the track is level |
| Tape Measure | For aligning track sections and spacing connectors |
| Rubber Mallet | For gentle adjustments without damaging components |
Step-by-Step Installation Process
Step 1
Unpack and Verify All Components
First things first—open up your package and lay out all components on a flat, clean surface. You should have your 60 Aluminum Roller Track Grey sections, roller track connectors, end stops, mounting brackets (from our aluminum profile accessories), and the necessary screws/bolts. Double-check each item against the packing list to ensure nothing is missing or damaged. If you find any broken parts or missing items, contact your supplier immediately—proceeding with incomplete parts will lead to a faulty installation.
First things first—open up your package and lay out all components on a flat, clean surface. You should have your 60 Aluminum Roller Track Grey sections, roller track connectors, end stops, mounting brackets (from our aluminum profile accessories), and the necessary screws/bolts. Double-check each item against the packing list to ensure nothing is missing or damaged. If you find any broken parts or missing items, contact your supplier immediately—proceeding with incomplete parts will lead to a faulty installation.
Step 2
Prepare the Mounting Frame
This track is designed to be mounted on flow racks or lean system frames, so you need to have your frame ready before installation. Ensure the frame is stable and level—wobbly frames will result in uneven tracks, which means materials won't slide properly. If you're using an existing flow rack, clean the mounting area thoroughly to remove dust, debris, or any leftover adhesive that might interfere with the connectors. For new frames, make sure all joints are tight and the structure is rigid.
This track is designed to be mounted on flow racks or lean system frames, so you need to have your frame ready before installation. Ensure the frame is stable and level—wobbly frames will result in uneven tracks, which means materials won't slide properly. If you're using an existing flow rack, clean the mounting area thoroughly to remove dust, debris, or any leftover adhesive that might interfere with the connectors. For new frames, make sure all joints are tight and the structure is rigid.
Step 3
Attach Roller Track Connectors
Now, take your roller track connectors—these are the key to securing the track to the frame. Align each connector with the T-slots on your aluminum profile (our connectors are perfectly compatible with all standard aluminum profiles, including those in our aluminum profile accessories line). insert the bolts through the connector holes into the T-slots and tighten them with an Allen wrench. Be careful not to over-tighten—this can warp the connector or damage the profile's T-slot. Space the connectors evenly along the frame (we recommend every 30 to 40 centimeters) to distribute the weight of the track and materials evenly, preventing sagging over time.
Now, take your roller track connectors—these are the key to securing the track to the frame. Align each connector with the T-slots on your aluminum profile (our connectors are perfectly compatible with all standard aluminum profiles, including those in our aluminum profile accessories line). insert the bolts through the connector holes into the T-slots and tighten them with an Allen wrench. Be careful not to over-tighten—this can warp the connector or damage the profile's T-slot. Space the connectors evenly along the frame (we recommend every 30 to 40 centimeters) to distribute the weight of the track and materials evenly, preventing sagging over time.
Step 4
Install the Roller Track Sections
Next, grab your 60 Aluminum Roller Track Grey sections. Carefully lift each section and place it onto the connectors you just attached. Make sure the track is aligned straight with the frame—use a tape measure to check that both ends of the track are flush with the frame's edges. Once aligned, secure the track to the connectors using the provided screws. Tighten the screws firmly but not excessively—you want the track to be stable without bending. If you're installing multiple track sections, ensure they are flush with each other (no gaps between sections) so materials can slide smoothly from one section to the next. A small gap can cause materials to get stuck or jostled.
Next, grab your 60 Aluminum Roller Track Grey sections. Carefully lift each section and place it onto the connectors you just attached. Make sure the track is aligned straight with the frame—use a tape measure to check that both ends of the track are flush with the frame's edges. Once aligned, secure the track to the connectors using the provided screws. Tighten the screws firmly but not excessively—you want the track to be stable without bending. If you're installing multiple track sections, ensure they are flush with each other (no gaps between sections) so materials can slide smoothly from one section to the next. A small gap can cause materials to get stuck or jostled.
Step 5
Add End Stops and Side Guides
End stops are essential to prevent materials from sliding off the end of the track. Take your end stops and attach them to the final connector at each end of the track using the provided screws. For applications where materials might shift sideways (like small parts or irregularly shaped containers), add side guides. Our plastic side guides (part of our aluminum profile accessories) are perfect for this—they snap into the T-slots of the frame and keep materials on the track without slowing them down. Ensure the side guides are parallel to the track and spaced wide enough to accommodate your materials.
End stops are essential to prevent materials from sliding off the end of the track. Take your end stops and attach them to the final connector at each end of the track using the provided screws. For applications where materials might shift sideways (like small parts or irregularly shaped containers), add side guides. Our plastic side guides (part of our aluminum profile accessories) are perfect for this—they snap into the T-slots of the frame and keep materials on the track without slowing them down. Ensure the side guides are parallel to the track and spaced wide enough to accommodate your materials.
Step 6
Level and Adjust the Track
Grab your spirit level and place it across the track. Check if the track is level—if one side is higher than the other, adjust the connectors by loosening the bolts slightly and adding small shims (like thin aluminum strips) under the lower connectors, then retighten. For flow racks, you'll want a slight downward slope (about 1 to 2 degrees) to help gravity move materials along. To achieve this, add shims under the connectors at the higher end of the track. Test the slope by sliding a material container along—if it moves too fast, reduce the slope by removing shims; if it's too slow, add more. This step is crucial for optimal performance, so take your time to get it right.
Grab your spirit level and place it across the track. Check if the track is level—if one side is higher than the other, adjust the connectors by loosening the bolts slightly and adding small shims (like thin aluminum strips) under the lower connectors, then retighten. For flow racks, you'll want a slight downward slope (about 1 to 2 degrees) to help gravity move materials along. To achieve this, add shims under the connectors at the higher end of the track. Test the slope by sliding a material container along—if it moves too fast, reduce the slope by removing shims; if it's too slow, add more. This step is crucial for optimal performance, so take your time to get it right.
Step 7
Test the Track Performance
Now it's time to test your installation! Take a container or box similar to what you'll be using on the track (same weight and size) and slide it along the track. Does it glide smoothly without any stops or jolts? Are there any spots where the container gets stuck? If yes, check for loose connectors, bent rollers, or uneven sections. Adjust as needed until the container moves freely. Repeat this test several times with different containers to ensure the track works well for all your materials. Once you're satisfied, your installation is complete!
Now it's time to test your installation! Take a container or box similar to what you'll be using on the track (same weight and size) and slide it along the track. Does it glide smoothly without any stops or jolts? Are there any spots where the container gets stuck? If yes, check for loose connectors, bent rollers, or uneven sections. Adjust as needed until the container moves freely. Repeat this test several times with different containers to ensure the track works well for all your materials. Once you're satisfied, your installation is complete!
Troubleshooting Common Issues
Even with careful installation, you might encounter some issues. Here are the most common problems and their solutions:
Problem: Rollers are stuck or not spinning smoothly.
Solution: First, clean the rollers with a dry cloth to remove dust or debris. If that doesn't work, apply a small amount of silicone oil to the roller axles—avoid heavy oils like motor oil, as they attract dust and dirt. If rollers are bent, replace them with new ones (our roller track sections are easy to replace).
Problem: Track is not level, causing materials to slide to one side.
Solution: Use your spirit level to find the uneven spot. Loosen the connectors in that area and add or remove shims to adjust the height. Retighten the connectors and check again until the track is level.
Problem: Materials slide too fast or too slow.
Solution: Adjust the slope of the track. For faster sliding, add more shims under the higher end of the track. For slower sliding, remove shims or level the track completely. Remember, the ideal slope depends on the weight of your materials—heavier materials need a gentler slope, while lighter ones can handle a steeper slope.
Problem: Connectors are loose, causing the track to wobble.
Solution: Retighten the connector bolts with an Allen wrench. If the bolts keep coming loose, check if the T-slots are damaged—if so, replace the frame section or use larger bolts (consult your supplier for compatible bolts).
Maintenance Tips for Long-Lasting Performance
To keep your 60 Aluminum Roller Track Grey running smoothly for years, follow these simple maintenance tips:
Clean the track and rollers regularly: Wipe down the track with a dry cloth every week to remove dust and debris. For stubborn dirt, use a damp cloth (avoid harsh chemicals, as they can damage the aluminum finish).
Lubricate rollers occasionally: Every 3 to 6 months, apply a small amount of silicone oil to the roller axles. This keeps the rollers spinning freely and prevents rust.
Inspect connectors and screws monthly: Check all connectors and screws to ensure they are tight.
replace worn parts promptly: If rollers are bent, connectors are damaged, or end stops are broken, replace them immediately. Our aluminum profile accessories and roller track components are readily available.
Application Scenarios for 60 Aluminum Roller Track Grey
This track is versatile and can be used in a wide range of industries. Here are some common applications:
- Warehouse Logistics: Used in flow racks to move boxes from storage to picking stations, reducing manual handling.
- 3C Assembly Lines: Integral part of lean system workstations, moving phone/tablet components between assembly steps.
- Medical Device Manufacturing: Transports sensitive parts without damage, thanks to smooth rolling action.
- Automotive Industry: Moves small car parts along assembly lines, cutting down worker reach time.
- Retail Distribution: Sorts packages to shipping areas, improving efficiency and reducing errors.
Why Choose Our 60 Aluminum Roller Track Grey?
Our 60 Aluminum Roller Track Grey stands out from the competition for several reasons:
- Durability: High-quality aluminum with grey finish resists rust and wear, handling up to 50kg/m without sagging.
- Compatibility: Works seamlessly with flow racks, lean system frames, and aluminum profile accessories.
- Flexibility: Custom-cut lengths available; connectors allow easy slope/position adjustments.
- Cost-Effective: Wholesale options make bulk purchases affordable, with long lifespan reducing replacement costs.
Whether you're setting up a new lean system or upgrading flow racks, our track is the perfect choice for efficient material handling.