- Company Articles
- Products and Technology
- Installation And Maintenance
- 60 Aluminum Roller Track Yellow Assembly: Tools You'll Need

60 Aluminum Roller Track Yellow Assembly: Tools You'll Need
Related Product
60 Aluminum Roller Track Yellow
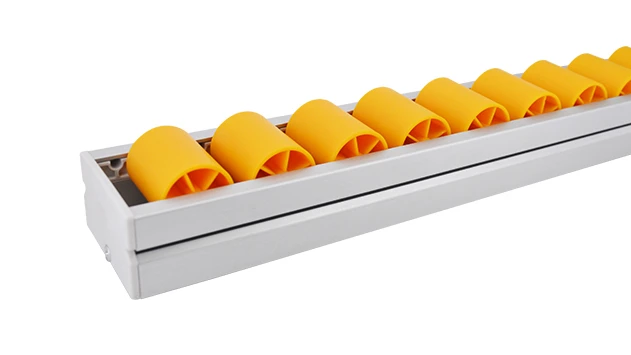
Modular syetem roller tracks aluminum gravity roller tracks are an excellent solution for transporting materials within industrial environments, warehouses and distribution centres.
60 Aluminum Roller Track Yellow Assembly: Tools You'll Need
If you've ever walked through a well-organized manufacturing floor or an efficient warehouse, chances are you've seen the smooth, yellow glint of a 60 Aluminum Roller Track. This component is more than just a piece of metal—it's the backbone of efficient material flow in lean production systems. Whether you're setting up a flow rack for parts storage, a conveyor line for assembly, or integrating it into a workstation, assembling this roller track correctly is crucial for optimal performance. In this guide, we'll walk you through everything you need to know about the tools required for assembling 60 Aluminum Roller Track Yellow, step-by-step assembly, troubleshooting, and how it fits into your overall lean setup.
The 60 Aluminum Roller Track Yellow is designed for durability and flexibility, making it a popular choice in various industries like 3C assembly, medical device manufacturing, and. Its lightweight aluminum construction ensures easy handling, while the yellow coating provides visibility and resistance to wear. This roller track is compatible with a wide range of lean pipe accessories, allowing you to customize your setup to meet specific production needs.
Essential Tools for Assembly
Before you start assembling your 60 Aluminum Roller Track Yellow, it's important to gather all the necessary tools. Having the right tools on hand will not only make the process smoother but also ensure that your roller track is stable, aligned, and built to last. Let's break down each tool and why it's needed:
| Tool Name | Purpose | Tips for Usage |
|---|---|---|
| Allen Wrench Set (Metric) | Used to tighten hex bolts that connect roller track sections and accessories like aluminum guide rails. | Ensure you have the correct size for each bolt to avoid stripping the heads. |
| Rubber Mallet | Gentle tapping to fit components together without damaging the aluminum profile. | Avoid using a metal hammer as it can dent or scratch the surface. |
| Tape Measure | To measure the length of the track and ensure proper spacing between sections. | Use a retractable tape for accuracy, and double-check measurements before cutting (if needed). |
| Spirit Level | Ensure the roller track is perfectly horizontal for smooth material flow. | Check both lengthwise and crosswise to avoid any tilting. |
| Phillips Screwdriver | For attaching end caps or other accessories that use Phillips head screws. | Use a magnetic tip to hold small screws in place during assembly. |
| Torque Wrench (Optional) | To apply precise torque to bolts, preventing over-tightening which can damage components. | Follow the manufacturer's recommended torque settings for each bolt type. |
Each tool plays a vital role in the assembly process. Skipping any of these might lead to misalignment, unstable connections, or even damage to the roller track components. Now that you have all your tools ready, let's move on to the pre-assembly preparation.
Pre-Assembly Preparation: Setting the Stage for Success
Before you start putting the roller track together, taking a few minutes to prepare can save you time and frustration later. Here's what you need to do:
1. Unpack and Inspect All Components
Lay out all the parts of your 60 Aluminum Roller Track Yellow on a clean, flat surface. This includes the roller track sections, aluminum connectors, end caps, any aluminum guide rails, and lean pipe accessories if you're integrating it with other systems. Check each part for damage—like dents, scratches, or bent rollers. If you find any defective parts, contact your supplier immediately to get replacements. It's better to fix this before assembly than to have issues down the line.
2. Clean the Workspace
Ensure your workspace is free of debris, dust, and any other materials that could interfere with the assembly. A cluttered area increases the risk of losing small parts or making mistakes in alignment. If possible, use a workbench with a flat surface—maybe even a lean pipe workbench—to keep everything organized.
3. Review the Assembly Instructions
Even if you've assembled roller tracks before, it's always a good idea to read through the manufacturer's instructions for this specific model. Each 60 Aluminum Roller Track Yellow might have unique features or connection methods that you need to be aware of. Pay attention to any specific torque settings or alignment marks mentioned in the guide.
4. Gather Additional Supplies (If Needed)
Depending on your setup, you might need extra supplies like lubricant for the rollers, cleaning cloths, or protective gloves. Lubricant can help ensure smooth rolling, especially if the rollers are stiff initially. Cleaning cloths are useful for wiping down the aluminum profile to remove any dust or fingerprints before assembly.
With your workspace prepared and all parts inspected, you're ready to start assembling the roller track. Let's dive into the step-by-step process.
Step-by-Step Assembly: Building Your 60 Aluminum Roller Track Yellow
Assembling the 60 Aluminum Roller Track Yellow is a straightforward process when you follow the right steps. Let's walk through each stage, highlighting the tools you'll use and key tips to ensure a perfect fit.
Step 1: Connect the Roller Track Sections
Start by taking two roller track sections and aligning their ends. Most 60 Aluminum Roller Track Yellow models use aluminum connectors to join sections together. insert the connector into the end of one section, then slide the other section onto the connector. Use a rubber mallet to gently tap the sections together until they are flush. Avoid applying too much force—you don't want to damage the aluminum profile. Once the sections are joined, use an Allen wrench to tighten the bolts on the connector, ensuring a secure fit.
Repeat this process until you have the desired length of the roller track. If you need to cut the track to a specific length, use a saw designed for aluminum (like a hacksaw or a miter saw with a non-ferrous blade). After cutting, use a file to smooth the edges to prevent sharp corners that could damage materials or cause injury.
Step 2: Attach End Caps
End caps are important for safety and aesthetics—they prevent debris from getting inside the roller track and give it a finished look. Take the end caps and align them with the ends of the track. Use a Phillips screwdriver to attach the end caps using the provided screws. Make sure the screws are tight enough to hold the end caps in place but not so tight that they strip the threads.
Step 3: Install Aluminum Guide Rails (If Applicable)
If your setup includes aluminum guide rails, now is the time to attach them. Guide rails help keep materials on the track and prevent them from falling off. Align the guide rails along the sides of the roller track, making sure they are parallel to the track. Use the Allen wrench to tighten the bolts that secure the guide rails to the track. Check the alignment with a spirit level to ensure the guide rails are straight and even.
Step 4: Check Alignment and Level
Once the roller track is fully assembled, place it on the surface where it will be used (like a flow rack or conveyor frame). Use a spirit level to check if the track is perfectly horizontal. If it's tilted, adjust the supporting structure—maybe by adding shims under the legs or adjusting the caster wheels if it's on a mobile unit. A level track is essential for smooth material flow; even a slight tilt can cause materials to move too fast or get stuck.
Step 5: Test the Roller Movement
After ensuring the track is level, test the rollers by placing a small object (like a box or a part) on the track and pushing it. It should roll smoothly without any resistance. If the rollers are stiff, apply a small amount of lubricant to each roller. Avoid using too much lubricant, as it can attract dust and debris over time. If any rollers are not spinning freely, check for debris or misalignment and adjust as needed.
Congratulations! You've successfully assembled your 60 Aluminum Roller Track Yellow. But the process doesn't end here—let's talk about how to troubleshoot common issues and integrate it into your lean production system.
Troubleshooting Common Assembly Issues
Even with careful preparation, you might encounter some issues during assembly. Here are some common problems and how to fix them:
Issue 1: Roller Track Sections Won't Connect Properly
If the sections don't slide together easily, check if the connectors are aligned correctly. Sometimes, the connector might be slightly misaligned, preventing the sections from joining. Use a rubber mallet to tap the connector into place gently. If that doesn't work, check if there's debris inside the track ends—clean them with a cloth and try again.
Issue 2: Rollers Are Not Rolling Smoothly
Stiff rollers are often caused by lack of lubrication or debris. First, clean the rollers with a dry cloth to remove any dust or dirt. Then, apply a small amount of lubricant (like silicone spray) to each roller. If the problem persists, check if the rollers are bent or damaged. replace any defective rollers to ensure smooth operation.
Issue 3: Track Is Not Level
If the track is tilted, adjust the supporting structure. For fixed installations, add shims under the low side. For mobile units, adjust the caster wheels—most casters have a leveling foot that can be turned to raise or lower the unit. Keep checking with the spirit level until the track is perfectly horizontal.
Issue 4: End Caps Keep Falling Off
If the end caps are loose, check if the screws are tight enough. Use a Phillips screwdriver to tighten them, but be careful not to over-tighten. If the threads are stripped, you might need to replace the screws or the end caps. Alternatively, use a small amount of adhesive to hold the end caps in place, but make sure it's a non-permanent adhesive in case you need to remove them later.
By addressing these issues promptly, you can ensure your roller track functions optimally for years to come. Now, let's explore how to integrate this roller track into your lean production system.
Integrating 60 Aluminum Roller Track Yellow into Lean Production Systems
The 60 Aluminum Roller Track Yellow is more than just a standalone component—it's a versatile tool that can be integrated into various lean production setups. Let's look at some common applications:
1. Flow Racks for Parts Storage
Flow racks are a staple in lean manufacturing, allowing parts to move from the back to the front as they are used. The 60 Aluminum Roller Track Yellow is perfect for flow racks because it enables smooth, gravity-fed movement of parts. You can build a flow rack using aluminum profiles and attach the roller track to the shelves. This setup reduces the time workers spend retrieving parts and ensures first-in-first-out (FIFO) inventory management.
2. Conveyor Systems in Assembly Lines
Conveyor systems are essential for moving parts between workstations in an assembly line. The 60 Aluminum Roller Track Yellow can be part of a roller conveyor, where motors or gravity move parts along the track. This integration helps create a continuous flow of materials, reducing bottlenecks and improving efficiency. You can also combine it with other conveyor types, like belt conveyors, to create a hybrid system that meets your specific needs.
3. Lean Pipe Workstations
Lean pipe workstations are designed to be flexible and adaptable. Adding a 60 Aluminum Roller Track Yellow to a workstation allows workers to easily move parts from the storage area to the assembly area. For example, a workstation in a 3C assembly line might have a roller track attached to the side, holding components that need to be assembled. This reduces the need for workers to reach across the workstation, improving ergonomics and productivity.
4. Mobile Material Carts
Mobile material carts with roller tracks are great for transporting parts between different areas of the factory. The 60 Aluminum Roller Track Yellow can be installed on the cart's shelves, allowing parts to slide off easily when needed. Adding casters to the cart makes it mobile, so workers can move it to wherever the parts are needed. This setup is especially useful in warehouses and distribution centers where materials need to be moved frequently.
By integrating the 60 Aluminum Roller Track Yellow into these systems, you can enhance the efficiency of your production line, reduce waste, and improve overall productivity. Now, let's talk about how to maintain your roller track to keep it in top condition.
Maintenance Tips for Long-Lasting Performance
Proper maintenance is key to ensuring your 60 Aluminum Roller Track Yellow remains functional and durable. Here are some tips to keep it in good shape:
1. Regular Cleaning
Dust and debris can accumulate on the rollers and in the track, causing friction and reducing performance. Clean the track regularly with a dry cloth or a brush to remove any debris. For stubborn dirt, use a mild detergent and water, then dry thoroughly to prevent corrosion.
2. Lubrication
Lubricate the rollers every 3-6 months, depending on usage. Use a light lubricant like silicone spray or oil. Avoid using heavy oils, as they can attract dust. Apply a small amount to each roller, then roll them to distribute the lubricant evenly.
3. Check for Loose Parts
Periodically inspect the track for loose bolts, connectors, or end caps. Tighten any loose parts using the appropriate tools. Loose parts can cause misalignment and reduce the track's stability.
4. Inspect for Damage
Check the track for dents, scratches, or bent rollers. If you find any damage, repair or replace the affected parts immediately. Damaged rollers can cause materials to get stuck or move unevenly.
5. Store Properly (If Not in Use)
If you need to store the roller track for an extended period, clean it thoroughly and store it in a dry, cool place. Avoid stacking heavy objects on top of it, as this can bend the track or damage the rollers.
By following these maintenance tips, you can extend the lifespan of your 60 Aluminum Roller Track Yellow and ensure it continues to perform well for years to come.
Final Thoughts
Assembling a 60 Aluminum Roller Track Yellow doesn't have to be a daunting task. With the right tools, careful preparation, and step-by-step guidance, you can build a functional and durable roller track that enhances your lean production system. Whether you're using it in a flow rack, conveyor system, or workstation, this roller track is a versatile component that can help improve material flow, reduce waste, and boost productivity.
Remember to follow the maintenance tips to keep your roller track in top condition. By investing time in proper assembly and maintenance, you can get the most out of your 60 Aluminum Roller Track Yellow and enjoy its benefits for years to come.