- Company Articles
- Products and Technology
- Installation And Maintenance
- 60 Steel Roller Track White Installation Tools: Essential Equipment Guide

60 Steel Roller Track White Installation Tools: Essential Equipment Guide
Related Product
60 Steel Roller Track White
The roller track can be installed with multiple accessories to create different slopes and configurations of flow racks.All steel conveyor 60 roller track accessories are engineered to perfectly fit the sliding rail.It is enable the movement of SLC boxes.
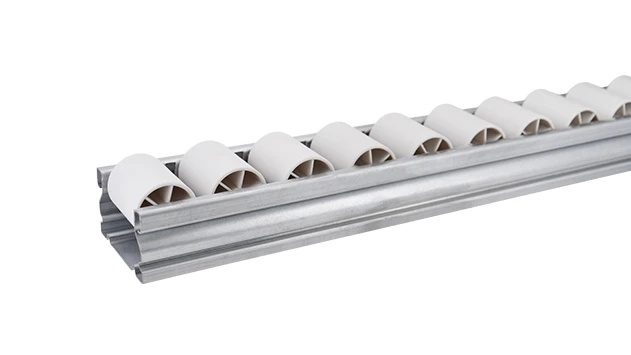
If you've ever worked in a warehouse, production line, or even a small workshop, you know how critical smooth material movement is. The 60 Steel Roller Track White is a workhorse in these settings—its durable steel construction, corrosion-resistant finish, and ability to handle heavy loads make it a go-to choice for moving boxes, components, and products efficiently. But here's the thing: even the best roller track won't perform well if it's installed incorrectly. That's where having the right installation tools comes in. In this guide, we'll walk you through every essential tool you need to get your 60 Steel Roller Track White up and running perfectly, along with step-by-step tips to ensure a seamless installation process.
Essential Installation Tools for 60 Steel Roller Track White
1. Measuring Tape
A reliable measuring tape is the foundation of any successful installation. You'll need it to mark the exact position where your roller track will go, measure the length of track sections needed, and ensure alignment between multiple sections. Opt for a tape that's at least 25 feet long (or 8 meters) with clear, easy-to-read markings. Rigid tapes are better for straight-line measurements, while flexible tapes work well for curved areas. Always double-check your measurements—even a small mistake can lead to misaligned tracks and bumpy material movement.
2. Spirit Level
Leveling your roller track is non-negotiable. A spirit level helps you ensure that the track is perfectly horizontal, which prevents materials from sliding off or getting stuck. Choose a level that's at least 18 inches long (45 cm) for accurate readings across the track's width. When using it, place the level along both the length and width of the track section to check for any tilting. If the bubble isn't centered, adjust the track's position using shims or by tightening/loosening mounting bolts until it's level.
3. Drill & Drill Bits
Most roller track installations require drilling holes to mount the track to the floor, wall, or a support structure. A cordless drill is convenient for mobility, but a corded drill offers more power for harder surfaces like concrete. You'll need drill bits matching the size of your mounting bolts—usually between 3/16 inch and 1/4 inch (5mm to 6mm). For concrete floors, use masonry bits; for wood or metal supports, use twist bits. Always wear safety goggles when drilling to protect your eyes from debris.
4. Wrenches & Socket Set
You'll need wrenches to tighten the bolts that secure the roller track. A combination wrench set (both open-end and box-end) works for most situations, but a socket set is faster and more efficient for large installations. Make sure you have the right sizes for your bolts—common sizes are 8mm, 10mm, and 12mm. Avoid over-tightening the bolts, as this can warp the track or strip the threads. A torque wrench can help you apply the correct amount of force if you're working with heavy-duty tracks.
5. Rubber Mallet
A rubber mallet is essential for gently tapping track sections into place without damaging the steel surface or the rollers. Unlike a metal hammer, it won't leave dents or scratches. Use it to align track sections, fit connectors, or adjust the position of mounting brackets. Always tap lightly—too much force can bend the track or break the rollers.
6. Safety Gear
Don't skip safety! Wear work gloves to protect your hands from sharp edges, metal shavings, and heavy components. Safety goggles shield your eyes from drilling debris and flying particles. Steel-toe boots are a good idea if you're working with heavy track sections or materials. If you're drilling in enclosed spaces, consider a dust mask to avoid inhaling dust.
7. Roller Track Accessories
While not tools per se, roller track accessories are critical for a complete installation. These include connectors to join multiple track sections, end stops to prevent materials from sliding off, and mounting brackets to attach the track to supports. Make sure you have the right accessories for your specific track model—for example, 60 Steel Roller Track White often uses specific connectors that match its width and hole spacing. High-quality roller track accessories ensure a secure, stable installation that lasts.
| Tool Name | Primary Function | Pro Tips |
|---|---|---|
| Measuring Tape | Mark positions, measure track lengths, ensure alignment | Use a tape with both metric and imperial units for versatility; double-check all measurements |
| Spirit Level | Ensure track is horizontal | Check level in multiple spots along the track to avoid unevenness |
| Drill & Bits | Drill mounting holes | Use the correct bit size for your bolts; keep bits sharp for clean holes |
| Wrenches & Socket Set | Tighten mounting bolts | Avoid over-tightening to prevent track warping |
| Rubber Mallet | Gently align track sections | Tap lightly to avoid damaging track or rollers |
| Safety Gear | Protect hands, eyes, and feet | Always wear gloves and goggles during installation |
| Roller Track Accessories | Join sections, secure track, add end stops | Use accessories designed for your specific track model for best results |
Step-by-Step Installation Guide for 60 Steel Roller Track White
1. Prepare the Work Area
Start by clearing the area where you'll install the track. Remove any obstacles, boxes, or debris that could get in the way. If you're installing the track on a concrete floor, make sure it's clean and dry. For wall-mounted tracks, ensure the wall is sturdy enough to support the weight of the track and materials. Gather all your tools and roller track accessories so they're within easy reach—this saves time and prevents mistakes.
2. Measure & Mark the Track Position
Use your measuring tape to mark the starting and ending points of the track. If you're installing multiple sections, mark the positions where each section will join. For floor-mounted tracks, use a chalk line to draw a straight line along the desired path—this helps ensure alignment. For wall-mounted tracks, mark the positions of the mounting brackets at regular intervals (usually every 2 feet or 60 cm) to distribute weight evenly.
3. Align & Level the Track Sections
Place the first track section on the marked line. Use your spirit level to check if it's horizontal. If it's not, adjust the position using shims (small pieces of wood or metal) under the low spots. Repeat this for each section, making sure they're aligned with the chalk line. For joined sections, use roller track connectors to link them together—gently tap the connectors into place with a rubber mallet to ensure a tight fit.
4. Drill Mounting Holes
Once the track is aligned and leveled, mark the positions of the mounting holes using a pencil or marker. For floor-mounted tracks, drill holes through the track's mounting slots into the floor. For wall-mounted tracks, drill holes into the wall at the marked bracket positions. Use the correct drill bit size for your bolts—if you're unsure, test the bit with a bolt to ensure a snug fit. Always drill straight to avoid damaging the track or support structure.
5. Secure the Track
insert the bolts through the track's mounting holes (or brackets) and into the drilled holes. Use a wrench or socket set to tighten the bolts—don't over-tighten, as this can warp the track. For floor-mounted tracks, use concrete anchors if the floor is concrete; for wood floors, use wood screws. For wall-mounted tracks, use wall anchors or lag bolts to ensure stability.
6. Install Accessories
Add roller track accessories like end stops to the ends of the track to prevent materials from sliding off. If you're using the track as part of a mobile unit, attach caster wheels to the base—make sure they're locked in place when installing. For tracks mounted on aluminum profiles, use aluminum profile accessories like brackets or clamps to secure the track to the profiles. These accessories help customize the track to your specific needs.
7. Test the Track
Once installation is complete, test the track by rolling a sample box or container along it. Check for smooth movement—if there are bumps or resistance, adjust the track sections or tighten loose bolts. Listen for any unusual noises (like squeaking or grinding) and address them immediately. If the track is part of a production line, test it with the actual materials you'll be moving to ensure it can handle the weight.

Maintenance Tips for Long-Lasting Roller Track Performance
Proper maintenance keeps your 60 Steel Roller Track White working smoothly for years. Here are some tips:
- Clean Regularly: Wipe the track with a dry cloth every week to remove dust and debris. For stubborn dirt, use a damp cloth and mild detergent—avoid harsh chemicals that can damage the finish.
- Lubricate Rollers: Apply a light oil (like machine oil) to the rollers every month to reduce friction. This keeps materials moving smoothly and prevents wear on the rollers.
- Check Bolts: Tighten loose bolts every month to ensure stability. If bolts are stripped or worn, replace them immediately.
- replace Worn Parts: If rollers are damaged or not moving, replace them with new roller track accessories. Damaged connectors or brackets should also be replaced to maintain safety.
- Inspect for Corrosion: Check the track for signs of rust or corrosion. If you spot any, clean the area with a wire brush and apply a rust-resistant paint to prevent further damage.

Common Installation Issues & Troubleshooting
Uneven Track
If your track is uneven, use a spirit level to find the high and low spots. Adjust the shims under the low spots or re-tighten the bolts in the high areas. For wall-mounted tracks, check if the brackets are installed at the correct height—adjust them if necessary.
Bumpy Material Movement
Check for debris between the rollers—clean them with a brush or cloth. If rollers are misaligned, adjust the track sections or connectors. Apply lubricant to the rollers if they're dry. If the problem persists, replace worn rollers with new roller track accessories.
Loose Track Sections
If sections are coming apart, check the roller track connectors—ensure they're properly inserted and tightened. If connectors are damaged, replace them. For floor-mounted tracks, check if the bolts are loose—tighten them with a wrench.
Noise During Operation
Noise usually comes from misaligned rollers or loose bolts. Tighten all bolts, adjust the track sections for alignment, and lubricate the rollers. If the noise continues, check if the track is warped—replace the affected section if needed.
Track Sliding on Floor
For floor-mounted tracks, ensure the bolts are secured with concrete anchors or wood screws. If the track still slides, add non-slip pads under the mounting brackets or use heavier-duty bolts.
Final Thoughts
Installing the 60 Steel Roller Track White doesn't have to be complicated—with the right tools and a little patience, you can create a smooth, efficient material movement system. Remember to use quality roller track accessories, follow the step-by-step guide, and maintain your track regularly to ensure it lasts. Whether you're setting up a warehouse, production line, or workshop, a well-installed roller track saves time, reduces effort, and improves safety. So grab your tools, get started, and enjoy the benefits of a perfectly installed 60 Steel Roller Track White!