- Company Articles
- Products and Technology
- Installation And Maintenance
- 60 Steel Roller Track Yellow DIY Installation: Tools & Expert Tips

60 Steel Roller Track Yellow DIY Installation: Tools & Expert Tips
Related Product
60 Steel Roller Track Yellow
The roller track can be installed with multiple accessories to create different slopes and configurations of flow racks.All steel conveyor 60 roller track accessories are engineered to perfectly fit the sliding rail.
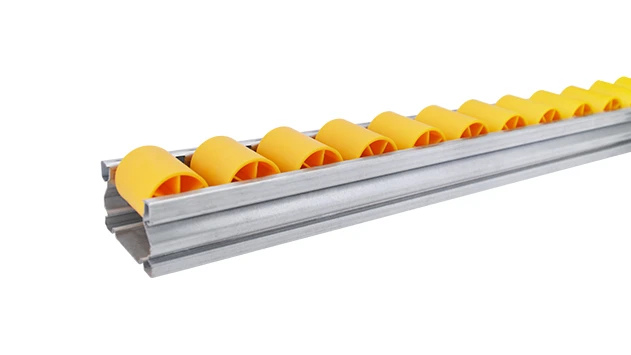
There's nothing more frustrating than a clunky material handling setup—items getting stuck, workers wasting time adjusting loads, or workflows grinding to a halt because of a poorly installed component. That's where the 60 Steel Roller Track Yellow comes in: a durable, bright-colored solution designed to keep your materials moving smoothly, whether you're building a flow rack for your warehouse or a conveyor system for your assembly line. As experts in lean systems and custom manufacturing solutions, we've put together this comprehensive guide to help you install this roller track like a pro—with practical tips, step-by-step instructions, and insights from our years of experience in industries like 3C assembly, medical device manufacturing, and warehousing logistics.
Pre-Installation Prep: What You Need to Get Started
Before you dive into installation, it's important to gather all the right tools and components to ensure a smooth process. Skipping this step can lead to delays, mistakes, or even unsafe installations—so take a few minutes to double-check everything.
Tools Required
| Tool Name | Purpose |
|---|---|
| Tape Measure (10ft/3m) | To measure the space for installation and align components |
| Spirit Level | To ensure the track and base frame are perfectly level |
| Adjustable Wrench Set | To tighten nuts and bolts on connectors and brackets |
| Phillips & Flathead Screwdrivers | To secure mounting brackets and small components |
| Rubber Mallet | To gently tap the track into place without damaging it |
| Wire Brush | To clean any dirt or debris from the track or mounting surfaces |
Components You'll Need
Depending on your setup, you may need the following components (all of which are available from our lean system product line):
- 60 Steel Roller Track Yellow (your desired length)
- Roller Track Connectors (to join multiple track sections)
- Mounting Brackets (e.g., roller track placon mount for aluminum profile flat) s
- Aluminum Profile or Lean Pipe (to build the base frame)
- Screws and Nuts (compatible with your frame material)
- Optional: Castor Wheels (if building a mobile flow rack)
Safety First
Always wear safety goggles and gloves when handling metal components to protect against cuts or debris. If you're working with power tools, follow the manufacturer's instructions carefully. Ensure the workspace is clear of obstacles to avoid tripping hazards.
Step-by-Step DIY Installation Guide
Now that you have all your tools and components ready, let's walk through the installation process step by step. These instructions are designed to be easy to follow, even if you're not a professional installer.
Step 1: Plan Your Layout
First, decide where you want to install the 60 Steel Roller Track Yellow. Consider the direction of material flow—do you want items to move from left to right, or front to back? Measure the length and width of the space to determine how many track sections you need. If you're building a flow rack, mark the positions of the tracks on your base frame (aluminum profile or lean pipe) to ensure they're evenly spaced.
Step 2: Assemble the Base Frame
If you're using an aluminum profile frame, connect the profiles using angle codes or connectors (like the 90° aluminum profile connector from our product line). Ensure the frame is stable and level—use the spirit level to check all sides. If you're using lean pipe, assemble the frame with lean pipe joints (e.g., internal rotatary aluminum joint) for flexibility. Tighten all joints securely to prevent wobbling.
Step 3: Attach Mounting Brackets
Lay the mounting brackets on the base frame according to your layout marks. For each bracket, insert the screws through the holes and tighten them with a screwdriver. Make sure the brackets are aligned straight—use a straight edge to check. If you're using roller track placon mount brackets, ensure they're positioned correctly to support the track's weight.
Step 4: Install the Roller Track Sections
Take your first section of 60 Steel Roller Track Yellow and place it onto the mounting brackets. Align the track's holes with the brackets' holes. insert the roller track connectors into the ends of the track sections to join them together (if you're using multiple sections). Use the rubber mallet to gently tap the track into place—don't apply too much force, as this could bend the rollers or damage the track.
Step 5: Secure the Track
Once the track is aligned, use the adjustable wrench to tighten the nuts and bolts on the mounting brackets and connectors. Double-check each connection to ensure it's secure. If you're using a flow rack, make sure the tracks are sloped slightly downward (1-2 degrees) to allow gravity to move items smoothly—this is a key lean principle to reduce manual effort.
Step 6: Test the Flow
Now it's time to test your installation. Take a test item (like a small box or a component tray) and roll it along the track. Does it move smoothly without getting stuck? If not, check for uneven brackets or loose connectors. Adjust the track as needed until the flow is consistent. For conveyor systems, you may need to connect the track to a motor (if using powered conveyors), but for manual flow racks, gravity should be sufficient.

Expert Tips from Our Lean System Specialists
At our company, we've been designing and installing lean systems for years—so we know a thing or two about getting the most out of your roller track. Here are our top expert tips:
Tip 1: Embrace Flexibility (Lean Principle)
One of the core benefits of using lean pipe or aluminum profile frames is their flexibility. If your workflow changes later, you can easily reposition the 60 Steel Roller Track Yellow or add more sections. This aligns with our "reusable and sustainable improvement" philosophy—so you don't have to rebuild your entire setup from scratch when your needs evolve.
Tip 2: Ensure Compatibility with Other Components
The 60 Steel Roller Track Yellow is designed to work seamlessly with other lean system components. For example, you can pair it with flow rack accessories or conveyor parts to create a complete material handling system. If you're building a workstation, consider adding an ESD workbench (from our product line) next to the track to create a smooth assembly line.
Tip 3: Optimize for Ergonomics
Ergonomics is key to reducing worker fatigue and improving productivity. Install the track at a height that's comfortable for your team—usually around elbow level for picking items. If you're using a mobile flow rack, add castor wheels with brakes to make it easy to move and lock in place. This small adjustment can make a big difference in daily operations.
Tip 4: Maintain Cleanliness
Dirt and debris can cause the rollers to stick or wear out faster. Encourage your team to wipe down the track regularly with a dry cloth. For stubborn dirt, use a wire brush (as mentioned earlier) to clean the rollers. This simple maintenance step will extend the life of your track and keep your workflow smooth.
Tip 5: Customize for Your Industry
Our company specializes in custom solutions for industries like 3C assembly, medical device manufacturing, and warehousing logistics. If you need a track setup that's tailored to your specific needs (e.g., ESD protection for sensitive electronics, or heavy-duty tracks for large components), our team can help design a system that fits your workflow perfectly.

Troubleshooting Common Installation Issues
Even with careful installation, you may encounter a few issues. Here's how to fix them:
Issue 1: Items Get Stuck on the Track
Possible causes: The track is uneven, a roller is damaged, or there's debris on the track. Solution: Check the track with a spirit level to ensure it's flat. replace any damaged rollers. Clean the track thoroughly with a dry cloth.
Issue 2: Loose Connectors or Brackets
Possible cause: The nuts and bolts weren't tightened enough. Solution: Use an adjustable wrench to tighten all connections. For added security, you can use lock washers to prevent loosening over time.
Issue 3: Noise When Rolling Items
Possible causes: Rollers are dry, or brackets are misaligned. Solution: Apply a small amount of non-corrosive lubricant to the rollers (avoid oil-based lubricants, as they can attract dirt). Check the brackets to ensure they're aligned correctly.
Issue 4: Track is Wobbly
Possible cause: The base frame is unstable. Solution: Reinforce the frame with additional lean pipe or aluminum profile sections. Tighten all frame joints to ensure stability.
Application Scenarios for 60 Steel Roller Track Yellow
The 60 Steel Roller Track Yellow is versatile and can be used in a wide range of industries. Here are some common scenarios:
1. 3C Assembly Lines
In 3C assembly (computers, communication, consumer electronics), the track is used to move small components like phone cases or circuit boards between workstations. The bright yellow color makes it easy to see the flow of materials, reducing errors.
2. Medical Device Manufacturing
For medical device manufacturing, the track is used to handle delicate components like syringes or surgical instruments. The smooth rollers prevent damage to sensitive items, and the track can be paired with ESD workbenches to protect against static electricity.
3. Warehousing and Logistics
In warehouses, the track is used in flow racks to store and pick items quickly. The gravity-fed flow reduces the time it takes to retrieve items, improving order fulfillment speed. This is especially useful for e-commerce warehouses or distribution centers.
4. Automotive Parts Manufacturing
Automotive parts manufacturers use the track to move heavy components like engine parts or tires between assembly stations. The durable steel construction can handle heavy loads, making it ideal for this industry.
Maintenance & Longevity Tips
To ensure your 60 Steel Roller Track Yellow lasts for years, follow these maintenance tips:
- Clean the track weekly with a dry cloth to remove dirt and debris.
- Inspect the connectors and brackets monthly for looseness—tighten as needed.
- replace any damaged rollers immediately to prevent further issues.
- Avoid overloading the track—check the weight capacity before using it for heavy items.
- If you're not using the track for an extended period, cover it with a dust sheet to protect it from dust.
By following these tips, you can maximize the lifespan of your track and keep your workflow efficient. Remember, our lean system philosophy emphasizes sustainable improvement—so don't be afraid to adjust your setup as your needs change.
Final Thoughts
Installing the 60 Steel Roller Track Yellow is a simple DIY project that can have a big impact on your workflow. By following our step-by-step guide and expert tips, you can create a smooth, efficient material handling system that aligns with lean principles. Whether you're building a flow rack, a conveyor system, or a custom workstation, this track is a reliable and flexible choice. If you need help with custom solutions or have any questions, our team of specialists is here to assist you. Happy installing!