- Company Articles
- Products and Technology
- Installation And Maintenance
- Nylon Swivel Roller Balls 1 Inch: DIY Installation on Lean Pipe Workbenches

Nylon Swivel Roller Balls 1 Inch: DIY Installation on Lean Pipe Workbenches
Related Product
Nylon Swivel Roller Balls 1 Inch
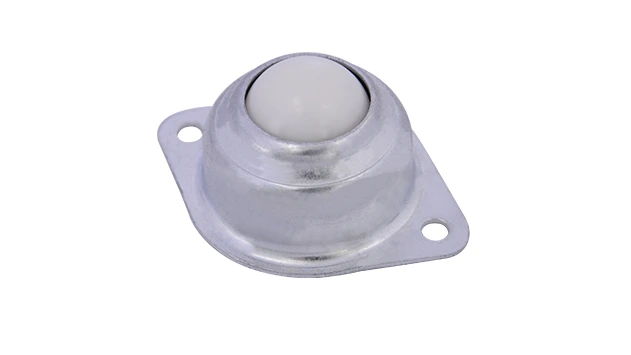
Rotation is smooth, unimpeded, and light, suitable for various scenes.The wheels are made of nylon, wide and thick to steer smoothly, has a good mute effect, and no damage to the bottom plate.
Why Bother with Roller Balls on Your Workbench?
If you've spent any time in a workshop, garage, or production space, you know the frustration of wrestling with materials on a flat workbench. Pushing a heavy box across a wooden surface? It drags. Sliding small parts from one end to another? They get stuck on every imperfection. And if you're running a lean operation—whether it's a home DIY setup or a small manufacturing line—those little inefficiencies add up fast. That's where nylon swivel roller balls 1 inch come in. These unassuming little components might just be the upgrade your lean pipe workbench has been missing.
Let me back up. Lean pipe workbenches (you might also hear them called "lean tube workbenches") are the unsung heroes of flexible workspaces. Made from lightweight, modular pipes and joints, they're easy to assemble, customize, and reconfigure. But even the best lean pipe workbench can feel clunky without the right accessories. That's where roller balls shine. Imagine sliding a bin of screws from one side of your bench to the other with zero effort. Or watching a finished assembly glide smoothly onto a roller track for transport. Nylon swivel roller balls make that possible—and the best part? Installing them yourself is easier than you think.
In this guide, I'll walk you through everything you need to know about upgrading your lean pipe workbench with 1-inch nylon swivel roller balls. We'll cover what they are, why they work, the tools you'll need, and a step-by-step installation process. By the end, you'll have a smoother, more efficient workspace that feels like it was custom-built for your workflow.
What Are Nylon Swivel Roller Balls, Anyway?
First things first: let's talk about the star of the show. Nylon swivel roller balls 1 inch are exactly what they sound like—small, spherical rollers made from durable nylon, measuring 1 inch in diameter, designed to rotate 360 degrees. Unlike metal rollers, nylon is lightweight, corrosion-resistant, and won't scratch or mar delicate materials (think: painted parts, electronics, or finished wood). The 1-inch size is a sweet spot, too—big enough to handle moderate loads (we're talking up to 50 pounds per ball, depending on the brand) but small enough to fit neatly on a standard workbench without sticking up like a speed bump.
What makes these roller balls "swivel"? Each ball sits in a housing that lets it rotate freely in any direction. That means materials can glide forward, backward, left, right—even diagonally—with minimal friction. Compare that to fixed roller tracks, which only allow movement along a straight line. With swivel balls, your workbench surface becomes a multi-directional "flow zone," perfect for quickly repositioning tools, bins, or assemblies.
And why pair them with a lean pipe workbench? Lean pipe systems are all about adaptability. The pipes and lean pipe joints let you build a bench that fits your space, and adding roller balls keeps that flexibility intact. You're not stuck with a permanent, fixed surface—if your needs change later, you can easily remove or reposition the roller balls to suit a new workflow. It's lean manufacturing at its finest: "just enough" customization, with zero waste.

Before You Start: What You'll Need
DIY projects are only fun if you're prepared. Nothing kills momentum faster than realizing you're missing a key tool halfway through. Here's a breakdown of what you'll need to install nylon swivel roller balls 1 inch on your lean pipe workbench. I've grouped them into "must-haves" and "nice-to-haves" to keep things simple.
| Category | Item | Why You Need It |
|---|---|---|
| Must-Haves | Nylon Swivel Roller Balls 1 Inch | The main component—aim for a pack of 10-20 to start (you can always add more later). |
| Lean Pipe Workbench | Your existing bench (or a new one—we won't judge if you're building from scratch!) | |
| Drill & Drill Bits | To create mounting holes in the workbench surface. | |
| Screws or Mounting Hardware | Most roller balls come with compatible screws, but double-check the thread size (usually #8 or M4). | |
| Nice-to-Haves | Measuring Tape & Marker | To ensure even spacing between roller balls (critical for smooth flow). |
| Level | To make sure the roller balls sit flat—no wobbly surfaces here! | |
| Roller Track Placon Mount Bracket | For extra stability, especially if you're mounting roller balls along the edge of the bench. | |
| Plastic Roller Track Guide Rail (Yellow or Grey) | To guide materials and prevent them from sliding off the roller ball area. | |
| Caster Wheels | Not directly for the roller balls, but adding casters to your bench makes it mobile—game-changer! |
Pro Tip: Check the weight rating of your roller balls! Most 1-inch nylon balls can handle 30-50 pounds each, but if you're moving heavy loads (like metal toolboxes), look for heavy-duty options. The packaging should list the "dynamic load capacity" (for moving weight) and "static load capacity" (for stationary weight).

Step-by-Step Installation: From Box to Bench
Okay, you've got your tools and materials. Now let's get hands-on. This process should take 1-2 hours, depending on how many roller balls you're installing and how precise you want to be. Take your time—rushing leads to uneven spacing or loose mounts, and that'll just mean redoing work later.
Step 1: Plan Your Roller Ball Layout
Start by deciding where on your workbench you want the roller balls. The most common spot is the main work surface, but you could also add them to a side shelf or a "transfer zone" between the bench and a roller track . For most people, a 2x3 foot area in the center or along one edge works best—enough to handle bins or parts without taking up the entire bench.
Next, figure out spacing. Too close, and you're wasting money on extra balls; too far apart, and materials might get stuck. A good rule of thumb: space the balls 4-6 inches apart in both directions (like a grid). For example, in a 24-inch wide area, you'd place 5 balls (spaced 6 inches apart) across the width. Grab your measuring tape and marker, and sketch a light grid on the workbench surface. Use a level to make sure your lines are straight—crooked spacing = crooked flow!
Step 2: Pre-Drill the Mounting Holes
Nylon is tough, but it's not metal. Pre-drilling holes will prevent the roller ball housings from cracking when you drive in the screws. Check the screws that came with your roller balls—they'll likely be 1/4 inch long or shorter. Use a drill bit that's slightly smaller than the screw (e.g., a 3/32 inch bit for a #8 screw). This creates a tight fit, so the screws won't loosen over time.
Line up your drill with the marks on your grid. Drill straight down, about 1/2 inch deep—you don't need to go through the entire workbench surface (unless it's super thin). If your bench has a wooden or plywood top, this is easy. If it's a metal or aluminum surface (like some industrial lean benches), use a metal drill bit to avoid dulling your tools.
Step 3: Mount the Roller Balls
Now for the fun part: attaching the roller balls. Take one nylon swivel roller ball and line up its mounting holes with the pre-drilled holes in the bench. insert the screws and tighten them with a screwdriver or drill (use a low torque setting if using a drill—nylon can strip!). You want the roller ball to sit flush with the surface, but not so tight that the housing warps (a little wiggle room is okay—remember, they need to swivel!).
Work in a pattern—left to right, top to bottom—to avoid smudging your grid lines. After mounting a few, give one a spin with your finger. It should rotate smoothly, with no sticking. If it feels stiff, check that the screws aren't too tight. If it wobbles, tighten them slightly. Consistency is key here—all roller balls should sit at the same height and spin equally well.
Step 4: Add Guides (Optional but Recommended)
If you're using the roller balls to move materials in a specific direction (e.g., from the bench to a roller track), add guide rails to keep things on track. Plastic roller track guide rail yellow or grey works great here—they're affordable, easy to cut to length, and the bright color makes them visible. Attach the guide rails along the edges of your roller ball grid using small brackets or zip ties (lean pipe joints can also work if your bench has pipe framing).
For example, if you want materials to flow toward the front of the bench, mount a guide rail along the left and right sides of the roller ball area, angling slightly downward (use a level to check the slope—1-2 degrees is enough for gravity to do the work). This prevents bins from sliding off the edge and keeps everything moving in the right direction.
Step 5: Test and Adjust
You're almost done! Grab a test item—a plastic bin, a cardboard box, or even a heavy book—and slide it across the roller balls. How does it feel? It should glide with minimal effort. If it gets stuck in one spot, check the spacing of the roller balls there—maybe add an extra one. If it veers off course, adjust the guide rails. If a roller ball isn't spinning, remove it, check for debris in the housing, and re-mount it.
Don't skip this step! Testing now saves frustration later. Spend 5-10 minutes sliding different items (heavy, light, small, large) to make sure the setup works for your actual workflow. Remember: the goal is to make your life easier, not create a new problem.
Troubleshooting Common Issues
Even the best DIY projects hit snags. Here are fixes for the most common problems you might run into:
- Roller balls won't spin: Debris (sawdust, dirt) can get trapped in the housing. Remove the ball, wipe it clean with a cloth, and add a drop of silicone lubricant (avoid oil-based lubes—they attract dust). Re-mount and test.
- Materials slide too fast: If items are zooming off the bench, reduce the slope of the guide rails or add a "stop" at the end (a small block of wood or a rubber bumper).
- Screws keep loosening: Use thread locker (like Loctite Blue) on the screw threads before re-tightening. It's temporary, so you can still remove them later if needed.
- Bench surface is too thin: If your workbench top is less than 3/4 inch thick, pre-drilling might go all the way through. Use shorter screws or add a plywood backing to the bottom of the bench for extra support.
Taking It to the Next Level: Pairing with Other Lean Accessories
Once you've got your roller balls installed, why stop there? Lean pipe systems are all about building a workspace that grows with you. Here are a few accessories that play well with your new roller ball setup:
Caster Wheels: Adding casters to your lean pipe workbench lets you roll it anywhere—perfect for moving materials between stations. Look for swivel casters with brakes to keep the bench stable when in use.
Roller Track: Connect your roller ball area to a roller track using roller track placon mount for rail connection . This turns your bench into part of a larger material flow system—great for assembly lines or order fulfillment.
Aluminum Guide Rail A or B: For heavier loads, upgrade from plastic guide rails to aluminum. They're sturdier and less likely to bend under weight, ensuring materials stay on track even with daily use.
Turnover Trolley and Rack: Use a trolley with its own roller balls to transport materials from the bench to storage. Lean pipe joints make it easy to build a custom trolley that matches your bench's height and width.
Final Thoughts: Small Upgrade, Big Results
Installing nylon swivel roller balls 1 inch on your lean pipe workbench isn't glamorous, but it's the kind of upgrade that makes you wonder how you ever lived without it. No more grunting to move heavy bins. No more chasing runaway screws across a flat surface. Just smooth, effortless movement—exactly what lean manufacturing is all about: eliminating waste (in this case, wasted effort) and focusing on what matters.
And the best part? It's a DIY project anyone can tackle. You don't need fancy tools or engineering skills—just a little patience and the right materials. So grab a pack of roller balls, dust off your drill, and give your workbench the upgrade it deserves. Your back (and your productivity) will thank you.
Now, go slide something across that new roller ball surface. I bet you'll smile. I know I did.