- Company Articles
- Products and Technology
- Installation And Maintenance
- Nylon Swivel Roller Balls 1 Inch: Troubleshooting Common Installation Issues

Nylon Swivel Roller Balls 1 Inch: Troubleshooting Common Installation Issues
Related Product
Nylon Swivel Roller Balls 1 Inch
Rotation is smooth, unimpeded, and light, suitable for various scenes.The wheels are made of nylon, wide and thick to steer smoothly, has a good mute effect, and no damage to the bottom plate.
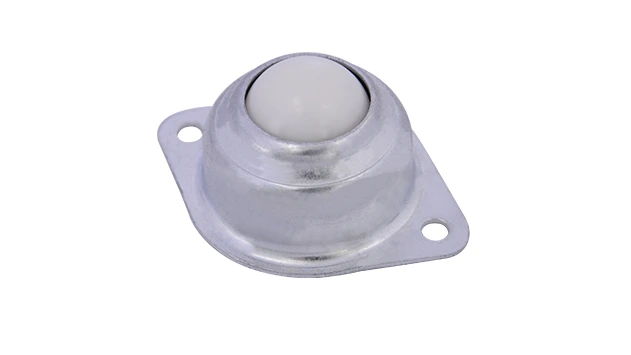
If you've ever worked in a warehouse, factory, or even a busy workshop, you've probably encountered those small but mighty components that keep materials moving smoothly: nylon swivel roller balls. Specifically, 1-inch nylon swivel roller balls are workhorses in countless setups, from lean pipe workbenches to flow racks and conveyor systems. These unassuming spheres—often made of durable, low-friction nylon—let boxes, parts, and tools glide effortlessly, reducing manual effort and speeding up workflows. But here's the thing: their performance lives or dies by how well they're installed. A tiny misalignment, a loose fastener, or a mismatched accessory can turn a seamless process into a frustrating bottleneck. In this guide, we'll dive into the most common installation headaches with 1-inch nylon swivel roller balls, why they happen, and how to fix them—so you can get back to keeping things moving.
Understanding Nylon Swivel Roller Balls 1 Inch: What They Do and Why Installation Matters
Before we jump into troubleshooting, let's make sure we're on the same page about what these roller balls are and why they're so critical. Nylon swivel roller balls (1 inch in diameter, in this case) are small, spherical components mounted on a base, designed to rotate 360 degrees with minimal friction. They're typically used in arrays—think a grid of these balls on a workbench surface or along a roller track—to allow items to slide, turn, and reposition with ease. Unlike rigid rollers, their swiveling design makes them ideal for applications where materials need to change direction, like loading stations on a lean pipe workbench or sorting areas in a warehouse.
Nylon is the material of choice here for good reason: it's lightweight, resistant to chemicals and abrasion, and won't scratch delicate parts (a big plus for electronics or polished metal components). But even the best materials can't compensate for poor installation. When these roller balls aren't set up correctly, you might notice items getting stuck, uneven wear on the balls, or even safety hazards like jamming that could lead to spills or injuries. That's why taking the time to troubleshoot installation issues isn't just about efficiency—it's about keeping your workspace safe and reliable.
Common Installation Issues: What Can Go Wrong?
Installing 1-inch nylon swivel roller balls might seem straightforward: drill some holes, screw them in, and you're done, right? Not quite. From misalignment with roller tracks to stripped fasteners, there are several pitfalls that even experienced installers can fall into. Let's break down the most frequent culprits, how to spot them, and step-by-step fixes.
Issue 1: Misalignment with Roller Tracks and Accessories
One of the most common headaches is misalignment between the roller balls and the roller track and accessories they're paired with. Roller tracks—like the plastic roller track guide rail (yellow or grey) or aluminum guide rail A/B—are designed with specific grooves, heights, and spacing to work with roller balls. If your 1-inch nylon swivel roller balls aren't aligned with these tracks, items might catch, slide unevenly, or even jump off the track entirely.
What causes it? Misalignment usually stems from one of three issues: incorrect measurement when marking mounting points, bent or warped roller tracks (common if tracks are stored improperly or dropped), or using the wrong mounting brackets. For example, if you're using a roller track placon mount for aluminum profile flat (intended for flat aluminum surfaces) but your track is curved, the balls won't sit flush. Another culprit is ignoring the track's "lead-in"—the tapered edge at the start of the track that helps guide items onto the balls. If the balls start too far from this lead-in, items might hit a "wall" instead of gliding smoothly.
How to spot it: The easiest way is to run a test item (like a empty cardboard box or a metal panel) along the track. If it wobbles, gets stuck halfway, or veers to one side, misalignment is likely the issue. You can also visually inspect the setup: the tops of the roller balls should sit slightly above the track (usually 1/8 to 1/4 inch, depending on the track type) and form a straight line parallel to the track's edge. If some balls are higher or lower than others, or if the row of balls curves when the track is straight, that's a red flag.
Troubleshooting steps:
- Check the track for damage: Lay the roller track on a flat surface (like a table) and see if it rocks—if it does, it's bent. replace bent sections or use a rubber mallet to gently straighten minor warps (be careful not to crack plastic tracks).
- Verify mounting bracket compatibility: Refer to the track manufacturer's specs to ensure you're using the right brackets. For example, roller track placon mount for rail connection is designed to link two tracks together, not mount them to a workbench. Using the wrong bracket will throw off alignment.
- Realign the balls: Use a straightedge (like a 4-foot level) to mark a reference line along the track. Then, measure the distance from this line to each roller ball's center—they should all be equal (typically 1-2 inches, depending on your setup). Adjust mounting holes as needed, and use shims (thin metal or plastic strips) if the surface is uneven to raise or lower individual balls.
- Test with a "dummy load": After adjusting, run a weighted item (similar to what you'll be moving in real use) along the track. If it glides without catching, you're good to go. If not, repeat the alignment process, focusing on the spots where it stuck.
Issue 2: Loose or Stripped Fasteners
Nothing derails a roller ball setup faster than loose or stripped fasteners. These small screws, bolts, or clips hold the roller balls to the mounting surface (like a workbench top or aluminum profile), and if they're not secure, the balls will wobble, tilt, or even pop out entirely. Stripped fasteners—where the screw head or the threads in the mounting hole are damaged—are especially frustrating because they make it impossible to tighten the ball properly.
What causes it? Loose fasteners are often due to vibration over time (common in busy workplaces) or under-tightening during installation. Stripped fasteners, on the other hand, usually happen when using the wrong tool (like a Phillips head screwdriver on a flathead screw), over-tightening (which strips the threads), or using low-quality fasteners that can't handle the torque. Another culprit is using the wrong size fastener: a screw that's too short won't grip the mounting surface, while one that's too long might protrude through the other side and interfere with the ball's rotation.
How to spot it: Wiggle each roller ball gently with your finger—if it moves side-to-side or up-and-down, the fastener is loose. For stripped fasteners, you'll notice that the screw spins freely without tightening, or the head is mangled (making it hard to remove with a tool). You might also see small cracks around the mounting hole if over-tightening has stressed the surface (common with plastic or thin aluminum).
Troubleshooting steps:
- Tighten loose fasteners (gently!): Use the correct tool (match the screwdriver or socket to the fastener head) and tighten until the ball is secure but still rotates freely. Avoid over-tightening—nylon balls can crack if squeezed too hard.
-
Fix stripped holes:
If the mounting hole is stripped (common in soft materials like plywood or aluminum), try these fixes:
- Use a larger fastener: If there's space, drill the hole slightly bigger (e.g., from 1/4 inch to 5/16 inch) and use a larger screw.
- Add a thread insert: For metal surfaces, a helical thread insert (like a Heli-Coil) can repair stripped threads. For wood or plastic, a wooden dowel coated in glue (inserted into the stripped hole and cut flush) creates a new surface to screw into.
- replace damaged fasteners: If the screw head is stripped, use a screw extractor (a tool with reverse threads) to remove it. Then, replace with a new fastener of the same size and material (stainless steel is best for corrosion resistance).
- Prevent future issues: Apply a small amount of thread locker (like Loctite) to fasteners to reduce vibration-related loosening. Avoid using power tools for final tightening—hand tools give you better "feel" to prevent over-tightening.
Issue 3: Inconsistent Rotation (Binding or Sticking)
Nylon swivel roller balls are supposed to rotate smoothly with minimal effort—if you push a ball with your finger, it should spin freely for a second or two. But if some balls bind (stick) or rotate unevenly, items will drag, requiring extra force to move. Over time, this can wear out the balls and strain workers' hands.
What causes it? Binding usually happens when something is interfering with the ball's movement. Common causes include: dirt or debris trapped in the ball's bearing (the small metal or plastic ring that lets it swivel), over-tightening the fastener (which pinches the bearing), or damage to the ball itself (like a crack or chip in the nylon). In some cases, the mounting surface is too uneven, causing the ball to sit at an angle and bind against the base.
How to spot it: Spin each ball individually with your finger. A healthy ball will rotate smoothly and stop gradually. A binding ball will feel "sticky"—it might catch mid-spin or stop abruptly. You might also hear a grinding noise if debris is trapped in the bearing. For a more thorough test, place a flat object (like a book) on top of the balls and slide it around—if it feels heavier in some areas, those balls are likely binding.
Troubleshooting steps:
- Clean the bearings: Remove the ball (by unscrewing the fastener) and pop out the bearing (if it's removable). Wipe away dirt, dust, or grease with a lint-free cloth, then rinse with rubbing alcohol (for nylon bearings) or a mild solvent (for metal bearings). Let it dry completely before reassembling.
- Adjust fastener tightness: If over-tightening is the issue, loosen the fastener by 1/4 turn—you want the ball to be secure but not clamped down. Test rotation again; if it's still binding, check if the bearing is damaged (scratches or dents mean it needs replacement).
- replace damaged balls: If the nylon ball is cracked, chipped, or warped (common if exposed to extreme heat), swap it out for a new one. Make sure to match the size (1 inch) and bearing type (some have sealed bearings for dusty environments) to the original.
- Level the mounting surface: Use a level to check if the surface (like a lean pipe workbench top) is flat. Shims can help raise low spots, or sand down high spots (for wood) to ensure the balls sit evenly.
Issue 4: Compatibility Issues with Mounting Surfaces
Not all mounting surfaces are created equal, and using 1-inch nylon swivel roller balls on the wrong surface can lead to a host of problems. Whether you're mounting them on wood, metal, plastic, or aluminum profiles (common in lean systems), compatibility matters. For example, mounting directly onto a warped plywood surface might cause uneven ball height, while using self-tapping screws on thick steel could strip the threads before the ball is secure.
What causes it? Compatibility issues often come down to not considering the surface's material, thickness, or texture. For instance, aluminum profile accessories (like aluminum guide rail B) are designed for use with aluminum extrusions (which have T-slots for easy mounting), but if you try to screw roller balls directly into the extrusion without using T-slot nuts, the screws might not hold. Similarly, rough surfaces (like unfinished concrete) can scratch the nylon balls over time, leading to uneven rotation.
How to spot it: Signs of incompatibility include fasteners pulling out of the surface (common with soft materials like particleboard), balls sinking into the surface (if it's too thin or weak), or excessive wear on the balls (scratches, dents) from rough textures. You might also notice that the mounting holes crack or deform under use, especially if the surface isn't strong enough to support the weight of items on the balls.
Troubleshooting steps:
-
Choose the right mounting hardware for the surface:
- Wood: Use wood screws with coarse threads (they grip better than fine threads). Pre-drill pilot holes (slightly smaller than the screw diameter) to prevent splitting.
- Aluminum profiles: Use T-slot nuts and bolts (part of aluminum profile accessories) to mount balls into the extrusion's T-slots. This distributes weight evenly and avoids stripping the aluminum.
- Steel: Use self-tapping screws for thin steel (1/8 inch or less) or drill and tap for machine screws in thicker steel. For painted steel, scuff the surface first to ensure the fastener holds.
- Plastic: Use self-drilling plastic screws (with sharp tips) and avoid over-tightening, as plastic can crack.
- Reinforce weak surfaces: If the surface is too thin (like a 1/4-inch plastic panel), add a backing plate (thick plywood or metal) behind it to distribute the weight. Mount the roller balls through both the surface and the backing plate for extra strength.
- Smooth rough surfaces: Sand down rough spots on wood or metal with fine-grit sandpaper (220 grit or higher) to prevent scratching the nylon balls. For concrete, consider adding a thin metal or plastic sheet over the surface before mounting the balls.
- Test weight capacity: Check the roller ball manufacturer's specs for weight limits (usually 50-100 lbs per ball, depending on the model). If your items are heavier, space the balls closer together (e.g., 2 inches apart instead of 4 inches) to distribute weight across more balls.
Issue 5: Incorrect Spacing Between Roller Balls
Spacing might seem like a minor detail, but getting the distance between 1-inch nylon swivel roller balls wrong can ruin their performance. If they're too far apart, small or lightweight items might sag between the balls and get stuck. If they're too close, there's not enough room for the balls to rotate, leading to binding and uneven wear. Finding the sweet spot is key.
What causes it? Incorrect spacing usually comes from guessing instead of measuring, or copying spacing from another setup without considering your specific needs. For example, a setup designed for large, heavy boxes (which need more space between balls for stability) won't work for small electronics components (which need tighter spacing to prevent sagging). Another mistake is ignoring the ball's diameter—1-inch balls need more space than 0.5-inch balls to rotate freely.
How to spot it: Place a small item (like a smartphone or a 6-inch plastic part) on the balls—if it sinks between them or tips over, spacing is too wide. For larger items, if they rock back-and-forth as they slide, the balls are probably too close together (causing uneven contact). You can also measure the distance between the centers of two adjacent balls—most manufacturers recommend a spacing of 2-3 times the ball diameter (so 2-3 inches for 1-inch balls), but this can vary based on load size.
Troubleshooting steps:
- Calculate ideal spacing: A general rule is to use spacing equal to 1.5-2 times the smallest item you'll be moving. For example, if you're moving parts as small as 3 inches, spacing should be 1.5-2 inches (so the item sits on at least two balls at all times). For larger items (12 inches or more), 3-4 inches spacing works.
- Mark spacing with a template: To ensure consistency, create a simple template from cardboard or wood with holes drilled at your desired spacing. Lay the template on the mounting surface and mark through the holes to get even placement.
- Adjust existing setups: If spacing is too wide, add extra balls between existing ones (you may need to drill new holes). If too close, remove every other ball and fill the old holes with wood filler (for wood) or plugs (for metal) to prevent debris buildup.
- Test with your smallest and largest items: Slide both your smallest and largest items across the balls to ensure neither sags nor rocks. Adjust spacing as needed until both move smoothly.

Quick Reference: Troubleshooting Table
| Issue | Common Causes | Key Symptoms | Quick Fix |
|---|---|---|---|
| Misalignment with roller tracks | Bent tracks, wrong mounting brackets, poor measurement | Items get stuck, veer off track, uneven sliding | Straighten tracks, use correct brackets, align with a straightedge |
| Loose/stripped fasteners | Over-tightening, wrong tool, vibration | Balls wobble, spin freely without tightening, cracked mounting holes | Tighten gently, use thread inserts for stripped holes, replace damaged screws |
| Binding rotation | Dirty bearings, over-tightened fasteners, damaged balls | Ball feels sticky, stops abruptly when spun, grinding noise | Clean bearings, loosen fastener 1/4 turn, replace cracked/chipped balls |
| Compatibility with surfaces | Wrong hardware, weak/thin surfaces, rough textures | Fasteners pull out, balls sink into surface, scratched/worn balls | Use surface-specific hardware, add backing plates, smooth rough surfaces |
| Incorrect spacing | Guessing measurements, ignoring item size | Small items sag, large items rock, uneven wear on balls | Space balls 1.5-2x smallest item size, use a template for consistency |
Pro Tips for Flawless Installation
Even after troubleshooting, a few extra steps can make your 1-inch nylon swivel roller ball setup last longer and perform better:
- Prep the surface first: Clean the mounting surface with rubbing alcohol to remove grease, dust, or debris before installing—this ensures better adhesion for fasteners and prevents dirt from getting trapped under the balls.
- Invest in quality accessories: Skimping on mounting brackets or fasteners (like using plastic brackets for heavy loads) will lead to issues down the line. Stick with reputable brands for roller track and accessories to ensure compatibility.
- Label and organize: If you're installing multiple rows of balls (common in large workbenches), label each row with its spacing (e.g., "2-inch spacing for small parts") to avoid confusion during future repairs or expansions.
- Schedule regular checks: Add a monthly inspection to your maintenance checklist—tighten loose fasteners, clean bearings, and replace worn balls before they cause bigger problems.

Conclusion: Smooth Sailing Ahead
1-inch nylon swivel roller balls might be small, but they play a huge role in keeping your workflow moving. By understanding common installation issues—like misalignment with roller tracks, loose fasteners, or binding rotation—and knowing how to troubleshoot them, you can ensure these little components deliver big results. Remember, the key is patience: take the time to measure, align, and test, and don't hesitate to adjust if something feels off. With the right approach, your roller ball setup will glide smoothly for years to come, making your workspace more efficient, safer, and less frustrating.
So the next time you're installing or maintaining these workhorses, refer back to this guide. Whether you're fixing a stuck track on a lean pipe workbench or adjusting spacing for delicate parts, a little troubleshooting know-how goes a long way. Here's to smooth slides, happy workers, and zero bottlenecks!