- Company Articles
- Products and Technology
- Product knowledge
- One Side Rotatory Parallel Lean Pipe Joints: A Guide for Lean Manufacturing Beginners

One Side Rotatory Parallel Lean Pipe Joints: A Guide for Lean Manufacturing Beginners
Related Product
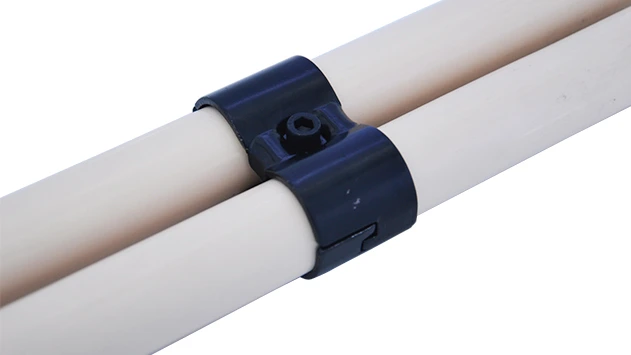
Parallel Lean Pipe Joint
Parallel lean pipe joint used for 2 pcs 28MM lean pipe connection in parallel direction to enhance frame structure, usually for heavy payload requirement for workbench. flow rack, hand trolley.
Starting out in lean manufacturing can feel like trying to assemble a puzzle with missing pieces. You've read the books about waste reduction and continuous improvement, but when you walk into your workshop, the reality hits: rigid metal shelves that can't be adjusted, clunky workbenches that take hours to reconfigure, and assembly lines that feel more like "assembly obstacles." If that sounds familiar, you're not alone. Most beginners in lean manufacturing stumble over the same hurdle: inflexibility . The good news? There's a simple, affordable solution hiding in plain sight: lean pipe systems. And at the heart of these systems—making flexibility possible—are components like the one side rotatory parallel lean pipe joint .
In this guide, we're going to demystify lean pipe systems, break down why the one side rotatory parallel joint is a game-changer for beginners, and show you how to use it to build workbenches, material racks, and assembly lines that adapt as your needs change. No engineering degree required—just a willingness to learn and a desire to make your workspace work for you, not against you.
What Even Is Lean Manufacturing, Anyway?
Before we dive into joints and pipes, let's start with the basics. Lean manufacturing isn't just a buzzword—it's a philosophy built around two core ideas: eliminating waste (anything that doesn't add value to your product) and maximizing efficiency (making sure every step in your process serves a purpose). Think of it as tidying up your workflow: you wouldn't keep a broken tool in your toolbox, right? Lean manufacturing applies that same logic to your entire operation—cutting out the "broken tools" of wasted time, space, and materials.
But here's the catch: to eliminate waste, your workspace needs to adapt . A product line that works for a batch of 100 units might need to shrink for a batch of 10, or reconfigure entirely when you launch a new product. That's where lean pipe systems come in. These modular setups use simple pipes and joints to build everything from workbenches to conveyor systems—all without welding, drilling, or calling in a contractor.
Key Takeaway: Lean manufacturing is about flexibility. If your workspace can't change, neither can your efficiency. Lean pipe systems solve this by letting you build, adjust, and rebuild structures in minutes.
Lean Pipe Systems 101: The Building Blocks of Flexibility
At first glance, a lean pipe system might look like a bunch of metal tubes held together with plastic or metal connectors—and in a way, that's exactly what it is. But don't let the simplicity fool you. These systems are designed to be strong, lightweight, and incredibly versatile. Let's break down the basics:
- Lean Pipe (or Lean Tube): The "bones" of the system. These are typically steel pipes coated in plastic (PE coated) or aluminum (aluminum lean pipe), ranging from 28mm to 40mm in diameter. They're strong enough to hold tools, materials, or even small machinery, but light enough to move by hand.
- Lean Pipe Joints: The "muscles" that hold everything together. Joints connect pipes at different angles (90°, 45°, 180°) and allow for rotation or fixed positions. This is where the magic happens—choose the right joint, and you can pivot a shelf, extend a workbench, or reangle a conveyor in seconds.
- Accessories: The "finishing touches." Casters (wheels) for mobility, roller tracks for sliding materials, and workbench tops (wood, metal, or anti-static ESD surfaces) turn basic pipe structures into functional tools.
For beginners, the most confusing part is often choosing the right joint. Walk into a lean pipe supplier's catalog, and you'll see terms like "180° fixed joint," "90° crossing joint," and "parallel double end fixed joint"—enough to make your head spin. But today, we're focusing on one that's especially useful for newbies: the one side rotatory parallel lean pipe joint .

Meet Your New Best Friend: The One Side Rotatory Parallel Lean Pipe Joint
Let's start with the name—it sounds complicated, but it's actually describing exactly what the joint does: one side rotates , and it connects pipes in parallel . Imagine two pipes running next to each other (parallel) on a workbench shelf. A fixed joint would lock them in place, but a one side rotatory parallel joint? It lets one pipe pivot while the other stays steady. Why is that useful? Let's say you're assembling small electronics on a workbench. One day, you need the shelf to hold a heavy power supply—so you angle the rotatory side upward to create a lip, preventing the supply from sliding off. The next day, you're assembling smaller parts and need more flat space—so you rotate the pipe back down, flush with the shelf. No tools, no hassle, no wasted time.
Here's what makes this joint a beginner favorite:
- Tool-Free Assembly: Most lean pipe joints require a hex key or wrench, but many one side rotatory parallel joints twist-lock into place. Just slide the pipe into the joint, twist, and you're done. Perfect for those of us who can never find the right size wrench.
- Controlled Rotation: Unlike fully swiveling joints (which can be wobbly), this joint rotates on one axis—so you can set it to 30°, 45°, or 90° and it stays put until you adjust it. No more shelves that sag or shift under weight.
- Parallel Alignment: It keeps pipes perfectly parallel, which is crucial for building stable structures like workbench frames or material racks. You won't end up with a lopsided shelf that tilts materials onto the floor.
- Durable Materials: Most are made from zinc-plated steel or aluminum, so they hold up to daily wear and tear. Even in dusty workshops or areas with occasional moisture, they resist rust and corrosion.
To put it simply: this joint takes the "frustration" out of building with lean pipes. It's like training wheels for lean manufacturing—giving you the confidence to experiment with different setups without worrying about breaking something.

Lean Pipe vs. Aluminum Lean Pipe: Which Should You Choose?
Before you run out and buy a pile of one side rotatory parallel joints, there's one more decision to make: what type of pipe will you use with them? The two most common options are traditional lean pipe (steel with a PE plastic coating) and aluminum lean pipe . Let's compare them to help you decide:
| Feature | Traditional Lean Pipe (PE-Coated Steel) | Aluminum Lean Pipe |
|---|---|---|
| Weight | Heavier (good for stability, but harder to move) | Lighter (easier to reconfigure, ideal for mobile setups) |
| Cost | More affordable upfront | Slightly pricier, but more durable long-term |
| Corrosion Resistance | Moderate (PE coating prevents rust, but can scratch) | High (aluminum naturally resists rust, even if scratched) |
| Flexibility | Stiff (bends only with tools) | Slightly flexible (absorbs minor impacts, less likely to crack) |
| Best For | Fixed workbenches, heavy-duty material racks | Mobile trolleys, cleanrooms, environments with moisture |
For beginners, aluminum lean pipe is often the better choice—especially if you plan to move structures around (like a mobile workbench) or work in a humid area (like a food processing or electronics assembly shop). It's lighter, easier to handle, and requires less maintenance. Plus, it pairs perfectly with one side rotatory parallel joints—since aluminum pipes are smoother, the joint rotates more easily, making adjustments a breeze.
Building Your First Project: A Lean Pipe Workbench with Rotatory Joints
Theory is great, but let's get hands-on. Let's walk through building a basic workbench using one side rotatory parallel joints, aluminum lean pipes, and a few simple accessories. This project will take you less than an hour and teach you the fundamentals of lean pipe assembly.
What You'll Need:
- 4 pieces of aluminum lean pipe (120cm long, 28mm diameter)
- 4 one side rotatory parallel lean pipe joints
- 4 fixed 90° lean pipe joints (for the corners)
- 1 workbench top (plywood or MDF, cut to 120cm x 60cm)
- 4 casters (optional, for mobility)
- A measuring tape and a level (to keep things straight)
Step 1: Build the Frame
Start by assembling the four corners of the workbench using the fixed 90° joints. Connect two 120cm pipes (the length) and two 60cm pipes (the width) to form a rectangle. This will be the top frame that holds the workbench top. Pro tip: Lay the pipes on the floor first to check the measurements—you don't want to realize the frame is too small after attaching the top!
Step 2: Add Height with Rotatory Joints
Now, attach the one side rotatory parallel joints to the bottom of the frame. These will connect the top frame to the legs (four more 120cm pipes, cut to your desired height—usually 80-90cm for a standard workbench). Here's where the rotatory feature shines: if you want to adjust the height later (say, to accommodate a taller worker), you can loosen the joints, rotate the legs up or down, and retighten. No need to cut new pipes!
Step 3: Attach the Workbench Top
Lay the plywood top on the frame and secure it with screws (pre-drill holes to avoid splitting the wood). If you're using casters, attach them to the bottom of the legs now. Give the workbench a shake—if it wobbles, check that the joints are tight and the legs are even (use the level here!).
Step 4: Customize with Rotatory Shelves
Want to add a shelf underneath for tools? Use two more aluminum pipes and two one side rotatory parallel joints. Attach the joints to the legs, rotate the pipes to the desired angle, and you've got a shelf that can tilt downward (to slide tools toward you) or stay flat (to hold heavy toolboxes). Experiment with different angles—you might be surprised how much more efficient your workflow becomes!
See? That wasn't so hard. In under an hour, you've built a workbench that's sturdy, adjustable, and tailored to your needs. And the best part? If you need to move it, reconfigure it, or even take it apart and rebuild it somewhere else—you can do it in minutes. That's the power of lean pipe systems.
Common Mistakes Beginners Make (and How to Avoid Them)
Even with the right tools, it's easy to trip up when you're new to lean pipe systems. Here are the most common mistakes we see beginners make—and how to steer clear of them:
Mistake #1: Overloading the Joints
Just because a joint looks strong doesn't mean it can hold 50kg of tools. Check the manufacturer's load rating (usually 20-30kg per joint for one side rotatory parallel models) and err on the side of caution. If you need to hold heavy items, use two joints instead of one—better safe than sorry.
Mistake #2: Skipping the "Dry Fit"
It's tempting to start screwing (or twisting) joints onto pipes right away, but always dry-fit first: assemble the structure without tightening anything to check for alignment. You'll save yourself the frustration of taking it apart later when you realize the shelf is 5cm too short.
Mistake #3: Using the Wrong Joint for the Job
Not all joints are created equal. A one side rotatory parallel joint is great for shelves, but if you're building a vertical rack, you'll want a fixed 90° joint for stability. When in doubt, ask your supplier: most lean pipe suppliers are happy to help beginners choose the right components.
Mistake #4: Forgetting About Ergonomics
Lean manufacturing isn't just about efficiency—it's about making work easier for your team. A workbench that's too low will lead to back pain; a shelf that's too high will cause strain. Use the rotatory joints to adjust heights to match your workers' needs (a good rule: elbows should bend at 90° when typing or assembling).
From Joints to Systems: Building a Lean Workspace
Once you've mastered the one side rotatory parallel joint, the possibilities are endless. Here are a few more projects to try as you expand your lean pipe toolkit:
Material Racks
Use rotatory joints to build racks with angled shelves, so materials slide forward as you use them (no more reaching to the back of the shelf!). Pair aluminum lean pipe with roller tracks (another lean pipe accessory) for a gravity-fed system that keeps materials flowing to your assembly line.
Assembly Lines
Connect workbenches with conveyor sections (using lean pipe and roller tracks) to create a mini assembly line. Use one side rotatory parallel joints to adjust the height of the conveyor, ensuring parts flow smoothly from one station to the next.
Mobile Trolleys
Build trolleys with rotatory shelves to transport materials between workstations. Add casters with brakes, and you've got a mobile workstation that can go wherever it's needed—perfect for small batches or custom orders.
The key here is to start small. You don't need to rebuild your entire workshop in one day. Pick one problem (a clunky workbench, a disorganized tool shelf) and solve it with lean pipes. As you see the results (less time wasted, happier workers, fewer mistakes), you'll gain the confidence to tackle bigger projects.
Final Thoughts: Lean Manufacturing is a Journey, Not a Destination
Lean manufacturing isn't about building the "perfect" workspace overnight—it's about continuous improvement. And the one side rotatory parallel lean pipe joint is your first step on that journey. It's a tool that lets you experiment, adapt, and grow—without breaking the bank or getting stuck in rigid systems.
So go ahead: grab a few aluminum lean pipes, a handful of rotatory joints, and start building. Maybe it's a simple workbench today, a material rack tomorrow, and a full assembly line next month. No matter what you build, remember: the goal isn't perfection. It's progress. And with lean pipe systems by your side, progress has never been easier.
Welcome to the world of lean manufacturing—your flexible, efficient workspace awaits.