- Company Articles
- Products and Technology
- Installation And Maintenance
- One Way Rotatory Straight Lean Pipe Joints: Installation Tools You Need

One Way Rotatory Straight Lean Pipe Joints: Installation Tools You Need
Related Product
One Way Rotatory Straight Lean Pipe Joint
Two way lean pipe joint for 2 pcs 28MM lean pipe connection in straight angle with rotatory fucntion, which used widely in workbench, flow rack, hand trolley frame connection.
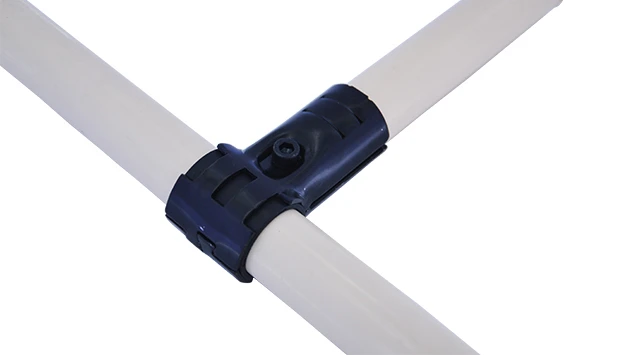
In the world of lean manufacturing, where efficiency and adaptability are the cornerstones of success, every component plays a vital role in keeping operations running smoothly. Among these components, the one way rotatory straight lean pipe joint stands out as a unsung hero. These unassuming connectors are the backbone of modular workstations, material racks, and production lines, allowing teams to build, adjust, and reconfigure structures with ease. But here's the thing: even the most durable, well-designed joint is only as good as the tools used to install it. Whether you're setting up a new assembly line, upgrading an existing workstation, or building a custom material rack, having the right installation tools isn't just a matter of convenience—it's the difference between a sturdy, long-lasting structure and one that wobbles, wears out, or fails when you need it most.
If you've ever tried to assemble furniture with the wrong screwdriver or fix a leaky faucet with pliers that were just a little too small, you know the frustration of inadequate tools. Now imagine that same scenario, but on an industrial scale, where the structures you're building support heavy materials, house sensitive equipment, or form the foundation of your production process. That's why today, we're diving deep into the world of one way rotatory straight lean pipe joints and the essential tools you need to install them properly. We'll cover everything from measuring and cutting to fastening and alignment, ensuring that by the end of this article, you'll feel confident in equipping your team with the right gear to get the job done right the first time.
Understanding the One Way Rotatory Straight Lean Pipe Joint
Before we jump into tools, let's take a moment to appreciate the star of the show: the one way rotatory straight lean pipe joint. These joints are designed to connect lean pipes (also known as or aluminum lean pipes) in a straight line while allowing for controlled rotation in one direction—hence the name "one way rotatory." This unique feature makes them incredibly versatile for applications where adjustability is key, such as conveyor systems, workbench extensions, or material flow racks. Unlike fixed joints, which lock pipes into a rigid position, the one way rotatory design lets you pivot sections of your structure to accommodate different workflows, load sizes, or operator preferences—all without disassembling the entire setup.
One common variation you might encounter is the one way rotatory straight lean pipe joint chrome. The chrome plating isn't just for aesthetics; it adds a layer of corrosion resistance, making these joints ideal for environments where moisture or chemicals are present, like food processing facilities or automotive workshops. Whether you're using the standard version or the chrome-plated one, the installation process remains largely the same, and that's where the right tools come into play.
Why the Right Tools Matter More Than You Think
You might be thinking, "How complicated can installing a pipe joint be? Can't I just use a wrench and call it a day?" While it's true that lean pipe systems are designed for quick assembly, cutting corners with tools can lead to a host of problems down the line. Let's break down why investing in proper installation tools is worth every penny:
1. Precision = Stability : One way rotatory joints rely on precise alignment to function correctly. If the joint isn't seated properly on the lean pipe, or if the fastening mechanism is over-tightened (or under-tightened), the rotation could become stiff, uneven, or even seize up. A wobbly joint doesn't just affect usability—it compromises the entire structure's stability, putting operators and materials at risk.
2. Protecting Your Investment : Lean pipe systems and their components—like the one way rotatory joint and lean pipe and accessories—aren't cheap. Using the wrong tool (say, a pair of pliers instead of a hex key) can scratch the pipe's surface, strip the joint's threads, or crack the plastic or metal components. These damages might seem minor at first, but they reduce the joint's lifespan and could force you to replace parts sooner than necessary.
3. Safety First : A poorly installed joint is a safety hazard. Imagine a material rack where a loose joint causes a shelf to collapse, or a conveyor where a seized rotatory joint jams the flow of products. The right tools ensure that every connection is secure, reducing the risk of accidents in the workplace.
4. Time and Efficiency : Using the correct tools speeds up the installation process. A properly sized torque wrench tightens a joint in seconds; a mismatched tool might take minutes (and still not get the job done right). When you're assembling an entire workstation or production line, those saved minutes add up to hours of increased productivity.

Essential Installation Tools for One Way Rotatory Straight Lean Pipe Joints
Now that we've established why tools matter, let's dive into the must-have gear for installing one way rotatory straight lean pipe joints. We'll organize these tools into categories to make it easier to build your toolkit, whether you're a seasoned facility manager or a small business owner setting up your first lean workspace.
1. Measuring and Marking Tools
Before you even pick up a joint, you need to measure and mark your lean pipes to ensure they're cut to the right length and positioned correctly. Here are the tools you'll need:
- Tape Measure with Locking Mechanism : A 25-foot (7.6-meter) tape measure with a sturdy locking tab is essential for measuring pipe lengths. Look for one with clear, easy-to-read markings in both inches and centimeters—lean pipe systems often use metric measurements, so dual units are a plus.
- Speed Square or Carpenter's Square : To ensure your cuts are straight and your joints are aligned at 90-degree angles (even for straight joints, square marking prevents).
- Marker or Pencil : A fine-tipped permanent marker or carpenter's pencil works best for marking cut lines on lean pipes. Avoid using ink that fades easily, as you don't want your marks to disappear mid-cut.
- Digital Caliper (Optional but Recommended) : For precision measurements, especially if you're working with different pipe diameters or need to check the inner diameter of the joint to ensure a snug fit with your lean pipe.
2. Cutting Tools
Unless you're buying pre-cut lean pipes, you'll need to cut your pipes to the desired length. The type of cutting tool depends on the material of your lean pipe—most are either aluminum, steel, or plastic-coated steel. Here are the best options:
- Pipe Cutter (Manual or Ratchet-Type) : A pipe cutter is designed specifically for clean, burr-free cuts on metal pipes. For aluminum lean pipes, a manual pipe cutter with a sharp wheel works well. For thicker steel pipes, opt for a ratchet-type cutter, which applies more pressure with less effort.
- Hacksaw with Fine-Tooth Blade : If you don't have a pipe cutter, a hacksaw with a 32-teeth-per-inch (TPI) blade can work, but it requires more skill to keep the cut straight. Always use a blade labeled for metal cutting to avoid dulling quickly.
- Deburring Tool : After cutting, metal pipes often leave sharp burrs on the inside and outside edges. A deburring tool (a small, hand-held tool with a rotating blade) removes these burrs, preventing injuries and ensuring the one way rotatory joint slides onto the pipe smoothly.
3. Fastening and Assembly Tools
This is where the magic happens—securing the one way rotatory straight lean pipe joint to the pipe. The right fastening tools ensure a tight, secure connection without damaging the joint or pipe.
| Tool Name | Purpose | Why It's Essential |
|---|---|---|
| Hex Key Set (Allen Wrenches) | Tightening set screws on the joint | Most lean pipe joints use hex-head set screws. A high-quality, metric hex key set (with both short and long arms) ensures you can reach screws in tight spaces without stripping the heads. |
| Torque Wrench (Adjustable) | Applying precise torque to set screws | Over-tightening can crack plastic components or strip threads; under-tightening leads to loose joints. A torque wrench lets you apply the exact amount of force recommended by the manufacturer (usually 2-5 Nm for most joints). |
| Socket Wrench Set with Deep Sockets | Fastening nuts on joints with bolt-style connections | Some one way rotatory joints use bolts instead of set screws. Deep sockets ensure you can reach nuts recessed into the joint body. |
| Rubber Mallet | Gently tapping joints into place | Sometimes joints need a little nudge to seat fully on the pipe. A rubber mallet delivers force without denting or scratching the pipe or joint (never use a metal hammer—it will damage the surface). |
| Thread Locking Compound (Optional) | Preventing set screws from loosening over time | For high-vibration environments (like near machinery), a small drop of thread locker (blue formula, removable) on the set screw threads keeps the joint secure without making future adjustments impossible. |
3. Alignment and Testing Tools
Once the joint is installed, you need to ensure it's aligned correctly and functions as intended. These tools help you verify the installation:
- Level (Bubble or Digital) : A 2-foot or 4-foot level checks if your assembled structure is straight and plumb. For one way rotatory joints, a level ensures the rotation axis is horizontal or vertical as needed, preventing uneven wear.
- String Line or Laser Level : For longer structures (like conveyor tracks), a string line or laser level helps align multiple one way rotatory joints in a straight line, ensuring smooth material flow.
- Spring Scale (Optional) : To test the rotational resistance of the joint. Most manufacturers specify a recommended force range for rotation (e.g., 5-10 N). A spring scale can help you ensure the joint isn't too stiff or too loose.
4. Safety Gear (Never Skip This!)
Installing lean pipe joints involves cutting, tightening, and handling metal components—safety should always come first. Here's the essential safety gear:
- Safety Glasses : To protect your eyes from flying metal shavings when cutting or deburring pipes.
- Work Gloves : Heavy-duty gloves (leather or cut-resistant) prevent cuts from sharp pipe edges or burrs.
- Dust Mask or Respirator : If you're cutting steel pipes, metal dust can be harmful to inhale. A simple dust mask works for occasional cutting; for frequent use, opt for a respirator with a particulate filter.
- Ear Protection : If using power tools (like a power pipe cutter), earplugs or earmuffs reduce noise exposure.
Pro Tip: Invest in a tool roll or toolbox specifically for your lean pipe installation tools. Keeping them organized not only saves time but also ensures you don't misplace small items like hex keys or deburring tools—nothing slows down a project like hunting for a missing 5mm Allen wrench!

Step-by-Step Installation Guide Using the Right Tools
Now that you have your toolkit ready, let's walk through installing a one way rotatory straight lean pipe joint. We'll use a typical scenario: attaching the joint to two lengths of aluminum lean pipe to create a rotating section of a workstation.
- Measure and Mark the Pipes : Use your tape measure to determine the length of each pipe segment. Mark the cut lines with your marker and speed square to ensure straight cuts. Double-check your measurements—measure twice, cut once!
- Cut the Pipes : Secure the pipe in a vice (if available) to prevent movement. Use your pipe cutter or hacksaw to cut along the marked line. For clean cuts with a hacksaw, use slow, steady strokes and let the blade do the work—don't apply excessive pressure.
- Deburr the Edges : Use the deburring tool to remove burrs from both the inside and outside of the cut pipes. Run your finger along the edge (with gloves on!) to ensure no sharp edges remain.
- Prepare the Joint : Inspect the one way rotatory straight lean pipe joint for any defects or debris. If it has set screws, loosen them slightly using the appropriate hex key to make inserting the pipe easier.
- insert the Pipes into the Joint : Slide one pipe into each end of the joint until it hits the internal stop (most joints have a built-in stop to ensure equal insertion on both sides). If the fit is tight, gently tap the pipe with a rubber mallet—never force it, as this could damage the joint.
- Align the Joint : Use your level or speed square to ensure the pipes are straight and the joint is centered. For one way rotatory joints, check that the rotation mechanism is facing the correct direction (look for arrows or markings indicating the allowed rotation direction).
- Tighten the Set Screws : insert the hex key into the set screw(s) and tighten them gradually. For best results, use a torque wrench set to the manufacturer's recommended torque (usually listed in the joint's manual). Tighten screws in a crisscross pattern if there are multiple to ensure even pressure.
- Test the Rotation : Gently rotate the joint in the allowed direction to ensure smooth movement. If it's too stiff, loosen the set screws slightly; if it's too loose, tighten them incrementally (avoid over-tightening).
- Final Check : Use your level to ensure the entire assembly is straight. Apply light pressure to the joint to test stability—there should be no wobbling or shifting.
Common Mistakes to Avoid (Learn from Others' Errors!)
Even with the right tools, it's easy to make mistakes during installation. Here are the most common pitfalls and how to steer clear of them:
- Using the Wrong Size Hex Key : A hex key that's too small will strip the screw head; one that's too large won't fit. Always check the screw size first—most lean pipe joints use metric sizes (e.g., 4mm, 5mm, 6mm).
- Over-Tightening Set Screws : This is the #1 cause of joint failure. Over-tightening can crack the joint's plastic or metal housing, or indent the lean pipe, making future adjustments impossible. When in doubt, use a torque wrench.
- Skipping Deburring : Sharp burrs on cut pipes can tear gloves, damage the joint's internal components, or even cause injury during handling. Always deburr—your hands (and your joint) will thank you.
- Ignoring Rotation Direction : One way rotatory joints only rotate in one direction! Installing them backwards means you'll have to disassemble and re-install, wasting time. Check for arrows or "this side up" markings on the joint.
- Using Dull Cutting Tools : A dull pipe cutter or hacksaw blade leaves jagged edges, making it harder to insert the pipe into the joint. replace blades regularly—sharp tools make cleaner cuts with less effort.
Maintaining Your Tools for Long-Term Success
Your installation tools are an investment—with proper care, they'll last for years. Here's how to keep them in top shape:
- Clean Tools After Use : Wipe off metal tools with a dry cloth to remove dust and debris. For tools used with cutting fluids (like pipe cutters), clean with a degreaser to prevent rust.
- Lubricate Moving Parts : Apply a drop of machine oil to the pivot points of pipe cutters, ratchet wrenches, and torque wrenches to keep them moving smoothly.
- Store in a Dry Place : Moisture causes rust, so keep your tools in a dry toolbox or cabinet. Consider using silica gel packets in the toolbox to absorb humidity.
- replace Worn Parts : Hacksaw blades, pipe cutter wheels, and hex keys wear out over time. replace them at the first sign of dullness or damage—using worn tools increases the risk of mistakes.
Conclusion: Tools That Build Better Workspaces
Installing a one way rotatory straight lean pipe joint might seem like a small task, but it's the foundation of a functional, efficient lean system. By investing in the right tools and following best practices, you're not just building a structure—you're creating a workspace that adapts to your team's needs, reduces waste, and stands the test of time. Remember, lean manufacturing is all about continuous improvement, and that starts with the tools you use to build your systems.
Whether you're a seasoned pro or just starting out, the key takeaway is this: don't skimp on tools. A quality hex key set, pipe cutter, and torque wrench will pay for themselves in fewer repairs, faster installations, and safer workspaces. So grab your toolbox, gather your lean pipe and accessories, and start building—with the right tools, the possibilities are endless.