- Company Articles
- Products and Technology
- Installation And Maintenance
- Parallel Lean Pipe Joint Chrome Assembly: Tools You Need for Installation

Parallel Lean Pipe Joint Chrome Assembly: Tools You Need for Installation
Related Product
Parallel Lean Pipe Joint Chrome
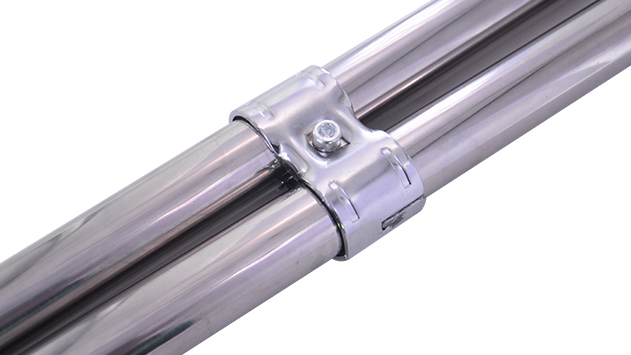
Parallel lean pipe joint used for 2 pcs 28MM lean pipe connection in parallel direction to enhance frame structure, usually for heavy payload requirement for workbench. flow rack, hand trolley.
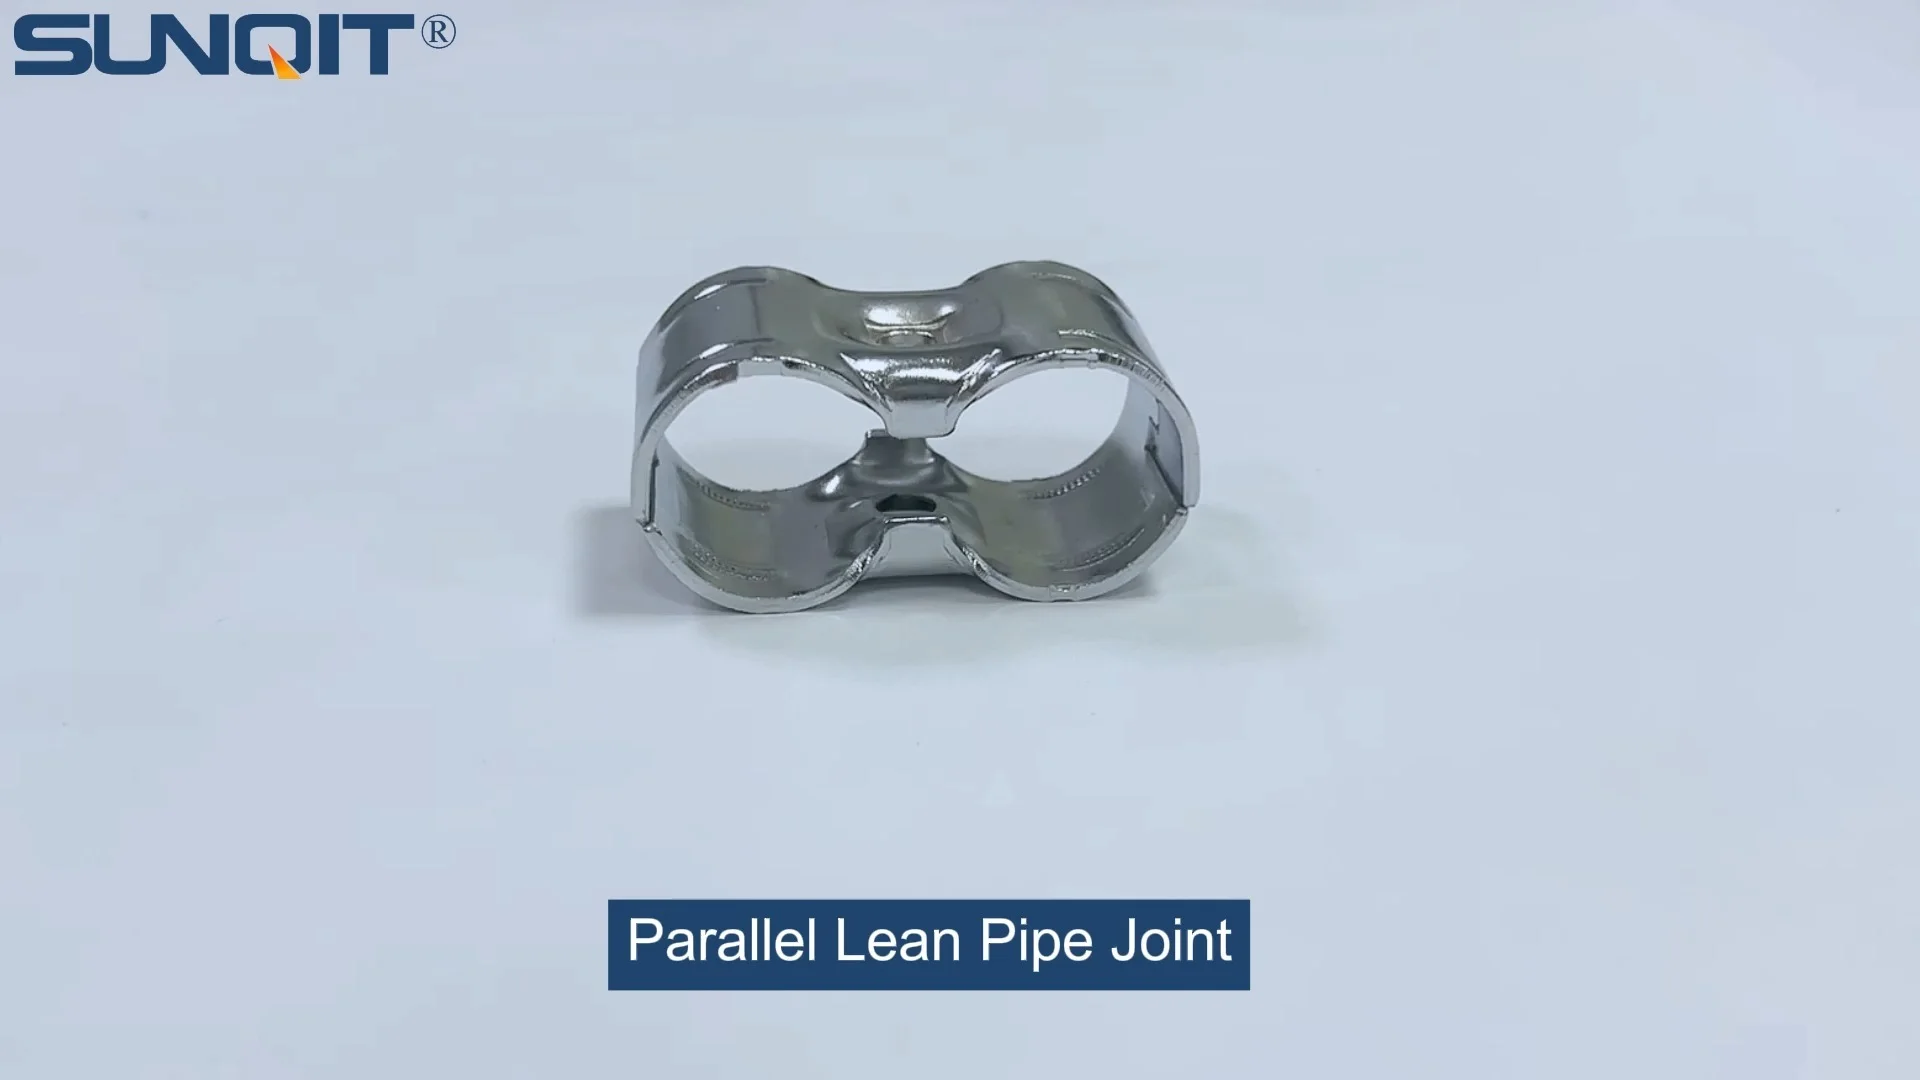
In the world of lean manufacturing, where efficiency, flexibility, and durability are the cornerstones of success, every component in your workflow setup matters. From the workbenches where your team assembles products to the flow racks that keep materials moving smoothly, the integrity of these structures relies heavily on the quality of their assembly. At the heart of many of these setups lies a small but mighty component: the parallel lean pipe joint chrome. This unassuming piece of hardware is what holds your lean pipe systems together, ensuring stability, adjustability, and long-term reliability. But here's the truth: even the best joint won't perform well if you don't have the right tools to install it properly.
Whether you're a seasoned facility manager, a small business owner setting up your first production line, or a team lead tasked with optimizing your workspace, understanding the tools needed for assembling parallel lean pipe joint chrome is critical. The right tools don't just make the job easier—they make it safer, faster, and more precise. A loose joint can lead to a wobbly workbench that disrupts productivity; a misaligned pipe can throw off your entire workflow; and a poorly cut edge can create safety hazards for your team. So, let's dive into the world of lean pipe assembly, starting with why this joint matters, and then explore the essential tools that will set you up for success.
Understanding the Parallel Lean Pipe Joint Chrome
Before we talk tools, let's take a moment to get to know the star of the show: the parallel lean pipe joint chrome. What makes this joint a staple in lean systems, and why should you care about assembling it correctly?
First, let's break down the name. "Parallel" refers to its design, which allows it to connect two lean pipes that run parallel to each other—think the horizontal supports under a workbench or the side rails of a turnover trolley. "Lean pipe" is the standard term for the tubes used in these systems, often made of steel with a plastic coating (like PE coated lean pipe) or aluminum for lightweight strength. "Chrome" indicates the finishing process: a layer of chrome plating that adds corrosion resistance, a smooth surface, and a professional look—ideal for environments where cleanliness or durability is key, such as manufacturing floors or warehouses.
But the real value of this joint lies in its functionality. Unlike fixed welds or rigid connectors, parallel lean pipe joint chrome is designed for flexibility. It lets you adjust the angle or position of pipes with minimal effort, making it easy to reconfigure your setup as your needs change—say, when you introduce a new product line or need to expand your workspace. It's compatible with a wide range of lean pipe sizes (common options include 1.2mm, 1.5mm, or 2.0mm PE coated lean pipe) and works seamlessly with aluminum profile accessories, adding to its versatility. And because it's made with chrome-plated steel, it's built to withstand the daily wear and tear of busy industrial environments, from heavy loads to occasional bumps and scrapes.
Common applications for parallel lean pipe joint chrome include building lean pipe workbenches (a central hub for assembly tasks), constructing flow racks to move materials between stations, and assembling turnover trolleys for transporting goods across the facility. In each case, the joint's ability to create stable, adjustable connections is what turns a collection of pipes into a functional, efficient system.
Why the Right Tools Matter for Assembly
You might be thinking, "It's just a joint—how complicated can it be to install?" While it's true that parallel lean pipe joint chrome is designed for user-friendliness, cutting corners with tools can lead to big problems down the line. Here's why investing in the right tools is non-negotiable:
- Safety First: A poorly assembled joint can loosen over time, causing structures to wobble or even collapse. This puts your team at risk of injury and can damage equipment or products. The right tools ensure joints are tightened to the correct torque and pipes are cut cleanly, eliminating sharp edges that could cause cuts.
- Durability: Lean systems are meant to last. Using improper tools (like a dull hacksaw that leaves jagged pipe edges) can weaken the connection between the joint and the pipe, reducing the overall lifespan of your setup. Sharp, clean cuts and properly tightened joints mean your workbench or flow rack will stand up to years of use.
- Efficiency: Trying to assemble a joint with the wrong tool is frustrating and time-consuming. Imagine using a Phillips screwdriver on a hex bolt—it's slow, imprecise, and increases the risk of stripping the fastener. The right tools let you work quickly and confidently, getting your system up and running in less time.
- Precision: Lean manufacturing thrives on precision. A misaligned workbench or a flow rack with uneven levels can throw off production timelines and lead to errors. Tools like levels and squares ensure your structure is straight, level, and properly balanced.
Now that we've covered why tools matter, let's dive into the essential toolkit you'll need to assemble parallel lean pipe joint chrome like a pro. We'll break this down into categories to make it easy to follow, and even include a handy table to reference later.
Essential Tools for Parallel Lean Pipe Joint Chrome Assembly
Assembling parallel lean pipe joint chrome requires a mix of basic hand tools, specialized lean pipe tools, and safety gear. Below, we'll walk through each category and explain why each tool is necessary, what features to look for, and pro tips for using them effectively.
1. Measuring and Marking Tools
Before you even pick up a pipe cutter, you need to know exactly how long each pipe should be. Measuring and marking tools ensure you cut pipes to the right length, which is critical for creating level, stable structures. Here are the must-haves:
Tape Measure: A 25-foot (7.6-meter) tape measure is ideal for most lean pipe projects. Look for one with a locking mechanism to keep the tape in place while measuring, clear, easy-to-read markings (both inches and centimeters, if possible), and a durable, rust-resistant blade. A tape measure with a magnetic end hook can be helpful for measuring metal pipes, as it attaches securely to the pipe's end.
Carpenter's Square: This L-shaped tool is essential for marking 90-degree angles on pipes, ensuring your cuts are straight and your joints align properly. Opt for a square made of metal (aluminum or steel) rather than plastic, as it will hold up better to heavy use. Look for one with etched markings (not printed) to prevent fading over time.
Bubble Level: Once your structure is assembled, a bubble level helps confirm it's straight and level. A 2-foot (60cm) level is versatile enough for most workbenches and small racks, but a longer level (4 feet or 1.2 meters) is better for larger setups. Choose a level with at least two vials (one for horizontal and one for vertical measurements) and a durable frame to withstand drops.
Marker or Pencil: A fine-tipped permanent marker or a mechanical pencil is best for marking cut lines on pipes. Avoid using regular pens, as the ink can smudge or fade when cutting. For dark-colored pipes (like black PE coated lean pipe), a white or silver marker will make lines easier to see.
2. Cutting Tools
Clean, precise cuts are the foundation of a strong lean pipe system. Ragged edges or uneven cuts can prevent the parallel lean pipe joint chrome from seating properly, leading to loose connections. Here are the tools you'll need to cut pipes like a pro:
Tube Cutter: For most lean pipe materials (including steel, aluminum, and PE coated pipe), a tube cutter is the best tool for the job. It creates clean, burr-free cuts with minimal effort. Look for a cutter with a ratcheting mechanism, which lets you apply pressure gradually and reduces hand fatigue. Some tube cutters come with replaceable blades, which is a cost-saver over time. Make sure the cutter is compatible with your pipe diameter—most standard lean pipes are 28mm (1.1 inches) in diameter, so check the cutter's specifications.
Hacksaw: A hacksaw is a backup option for cutting pipes, especially if you don't have a tube cutter or need to make angled cuts. Choose a hacksaw with a fine-tooth blade (32 teeth per inch) for metal pipes, as it will produce smoother cuts. A hacksaw with an adjustable frame lets you use different blade lengths, adding versatility. Pro tip: Use a miter box with your hacksaw to ensure straight, consistent cuts every time.
Deburring Tool: Even the sharpest tube cutter can leave small burrs (rough edges) on the inside or outside of a cut pipe. These burrs are not only unsightly—they can also scratch hands, catch on gloves, or prevent the parallel lean pipe joint chrome from sliding onto the pipe smoothly. A deburring tool (also called a pipe reamer) quickly removes these burrs. Look for a tool with a comfortable grip and replaceable blades. For tight spaces, a small file or sandpaper (80-120 grit) can also work, but a deburring tool is faster and more efficient.
3. Joining and Fastening Tools
Once your pipes are cut and deburred, it's time to connect them with parallel lean pipe joint chrome. These tools help you tighten, adjust, and secure the joint to the pipe:
Hex Keys (Allen Wrenches): Most parallel lean pipe joint chrome models use set screws (small screws with hexagonal sockets) to lock the joint onto the pipe. To tighten these screws, you'll need a set of hex keys (also called Allen wrenches). Look for a set that includes both metric and standard sizes, as some joints may use one or the other. A foldable hex key set is compact and easy to store, while a set with long arms provides extra leverage for stubborn screws.
Torque Wrench (Optional but Recommended): For critical applications (like heavy-duty workbenches or racks that hold large loads), a torque wrench ensures you tighten set screws to the manufacturer's recommended torque. Over-tightening can strip the screw or damage the joint, while under-tightening can lead to loosening over time. A small, adjustable torque wrench (1/4-inch drive) is sufficient for most lean pipe joints.
Adjustable Wrench: Some parallel lean pipe joint chrome models have nuts or collars that need to be tightened, and an adjustable wrench is perfect for this. Choose a wrench with a smooth jaw (to avoid scratching the chrome finish) and a comfortable grip. Look for one with a wide adjustment range to fit different nut sizes.
4. Safety Gear
Never underestimate the importance of safety when working with tools and metal pipes. Even a small mistake can lead to injury, so always wear the following gear:
Safety Glasses: Cutting pipes or tightening joints can send small metal shards flying. Safety glasses with impact-resistant lenses protect your eyes from debris. Look for glasses that fit snugly and have side shields for extra protection.
Work Gloves: Gloves protect your hands from sharp pipe edges, burrs, or the rough surface of chrome-plated joints. Leather or nitrile gloves are good options—leather offers durability, while nitrile is resistant to oils and chemicals, which is helpful if you're working in a greasy environment.
Anti-Slip Work Mat: Placing a rubber anti-slip mat on your work surface prevents pipes and tools from sliding around while you work, reducing the risk of accidents. It also protects your workbench from scratches caused by metal pipes.
5. Specialized Lean Pipe Tools (Optional but Helpful)
For more advanced setups or frequent assembly projects, these specialized tools can save time and improve precision:
Pipe Bender: If your design requires curved pipes (e.g., for a custom trolley handle), a pipe bender lets you create smooth, even bends without kinking the pipe. Look for a bender compatible with your pipe diameter and material (steel vs. aluminum).
Joint Installation Tool: Some manufacturers offer specialized tools designed specifically for their lean pipe joints. These tools may have unique shapes or grips that make tightening set screws easier, especially in hard-to-reach spots.
The Essential Tools Table
| Tool Category | Tool Name | Primary Purpose | Key Features to Look For | Pro Tips |
|---|---|---|---|---|
| Measuring & Marking | Tape Measure | Measuring pipe lengths and distances | Locking mechanism, clear markings, durable blade | Use the end hook to account for its thickness when measuring against a surface. |
| Carpenter's Square | Marking 90-degree angles | Metal construction, etched markings, right-angle accuracy | Check the square for straightness periodically by aligning it with a known straight edge. | |
| Bubble Level | Ensuring structures are level/straight | At least two vials (horizontal/vertical), durable frame | Test the level on a flat surface before use to confirm accuracy. | |
| Marker/Pencil | Marking cut lines on pipes | Fine tip, smudge-resistant ink | Mark the pipe twice (once on each side) to ensure the line is straight. | |
| Cutting & Deburring | Tube Cutter | Cleanly cutting pipes | Ratcheting mechanism, replaceable blades, pipe diameter compatibility | Rotate the cutter slowly and tighten the blade gradually to avoid crushing the pipe. |
| Hacksaw | Backup cutting tool for pipes | Fine-tooth blade (32 TPI), adjustable frame | Use a miter box to keep cuts straight; replace blades when they become dull. | |
| Deburring Tool | Removing burrs from cut pipe edges | Comfortable grip, replaceable blades | Deburr both the inside and outside of the pipe to ensure a smooth fit with joints. | |
| Joining & Fastening | Hex Keys | Tightening set screws on joints | Metric/standard sizes, foldable or long-arm design | Use the largest hex key that fits the screw to avoid stripping the socket. |
| Torque Wrench | Precision tightening of set screws | Adjustable torque settings, 1/4-inch drive | Refer to the joint manufacturer's specs for recommended torque levels. | |
| Adjustable Wrench | Tightening nuts/collars on joints | Smooth jaws, wide adjustment range, comfortable grip | Position the wrench so the force is applied to the fixed jaw to avoid damaging the tool. | |
| Safety Gear | Safety Glasses | Protecting eyes from debris | Impact-resistant lenses, side shields, snug fit | replace glasses if lenses become scratched or damaged. |
| Work Gloves | Protecting hands from sharp edges | Leather/nitrile material, snug fit, grip palms | Choose nitrile gloves if working with oils or chemicals; leather for heavy-duty tasks. | |
| Anti-Slip Mat | Preventing tools/pipes from sliding | Rubber material, textured surface | Clean the mat regularly to maintain grip; replace if it becomes worn or torn. |

Step-by-Step Assembly Guide: Building a Lean Pipe Workbench with Parallel Lean Pipe Joint Chrome
Now that you have your tools ready, let's walk through assembling a basic lean pipe workbench using parallel lean pipe joint chrome. This example will show you how to apply the tools we've discussed and highlight common best practices.
Step 1: Plan Your Design and Gather Materials
Start by sketching your workbench design, noting the dimensions of the top, legs, and any shelves. For a standard workbench, you'll need: 4 vertical legs (e.g., 36 inches tall), 4 horizontal pipes for the top frame (e.g., 60 inches long for the sides, 24 inches for the front/back), 4 horizontal pipes for the bottom frame (same length as the top), parallel lean pipe joint chrome (one for each corner joint), and aluminum profile for the work surface (to add durability and a smooth top).
Step 2: Measure and Mark the Pipes
Using your tape measure, measure and mark the pipe lengths according to your design. For the vertical legs, measure 36 inches and mark the cut line with a marker. Use the carpenter's square to draw a straight line around the pipe (marking both sides to ensure the cut is perpendicular). Repeat this for all pipes.
Step 3: Cut the Pipes
Secure the pipe in a vice or clamp (if available) to prevent it from moving. Using the tube cutter, align the blade with the marked line and tighten the cutter until it makes contact with the pipe. Rotate the cutter around the pipe, tightening the blade slightly with each rotation. Continue until the pipe is cut through. If using a hacksaw, place the pipe in a miter box and saw along the marked line, using slow, steady strokes.
Step 4: Deburr the Edges
Use the deburring tool to remove any burrs from the cut edges of the pipes. insert the tool into the pipe and twist it gently to smooth the inside edge, then run it along the outside edge. Wipe the pipe with a cloth to remove metal shavings.
Step 5: Assemble the Frame with Parallel Lean Pipe Joint Chrome
Take one vertical leg pipe and slide a parallel lean pipe joint chrome onto the top end. Position the joint so the opening for the horizontal pipe faces outward. insert a horizontal top frame pipe into the joint, then tighten the set screw on the joint using a hex key. Repeat this for the remaining three corners to assemble the top frame. Next, attach the bottom frame pipes to the lower part of the vertical legs using additional parallel lean pipe joint chrome, ensuring the legs are straight.
Step 6: Check for Level and Square
Place the frame on a flat surface and use the bubble level to check if the top frame is level. Adjust the joints as needed. Use the carpenter's square to confirm that the corners are 90-degree angles. If the frame is wobbly, check that all set screws are tight and that pipe cuts are straight.
Step 7: Attach the Aluminum Profile Top
Lay the aluminum profile sheet on top of the frame. Use screws and a drill to attach the profile to the top frame pipes, spacing screws every 12 inches for stability. Be careful not to over-tighten the screws, as this can strip the aluminum.
Step 8: Add Caster Wheels (Optional)
For mobility, attach caster wheels to the bottom of the legs. Use the adjustable wrench to tighten the caster mounting plates to the parallel lean pipe joint chrome at the base of the legs. Ensure the casters are locked when the workbench is in use to prevent movement.
Pro Tip: After assembly, give the workbench a gentle shake to test stability. If it wobbles, check for loose joints or uneven legs. Tighten any set screws that may have loosened during assembly, and use shims under the legs if the floor is uneven.
Troubleshooting Common Assembly Issues
Even with the right tools, you may run into issues during assembly. Here's how to troubleshoot common problems:
Problem:
The pipe won't fit into the parallel lean pipe joint chrome.
Solution:
Check for burrs on the pipe end—these can prevent the pipe from sliding in. Deburr the edge again. If the pipe is bent, straighten it using a pipe straightener or replace it. If the joint is too tight, check if it's the correct size for your pipe diameter (e.g., 28mm vs. 30mm).
Problem:
The set screw won't tighten.
Solution:
Ensure you're using the correct size hex key—using a smaller key can strip the screw. If the screw is stripped, replace the joint (stripped screws are difficult to repair). Apply a small amount of thread locker (like Loctite) to the screw if it keeps loosening, but avoid over-applying, as it can make future adjustments hard.
Problem:
The structure is wobbly after assembly.
Solution:
Check that all joints are tight and that the frame is square (use the carpenter's square). If the wobble is due to uneven legs, add shims under the shorter legs or adjust the caster wheels (if using) to level the structure.
Maintaining Your Tools and Joints for Longevity
To get the most out of your tools and lean pipe system, regular maintenance is key. Clean your tools after each use to prevent rust—wipe down metal tools with a dry cloth and apply a light coat of oil to moving parts (like the tube cutter blade or adjustable wrench). Store tools in a dry, organized toolbox to avoid damage.
For your parallel lean pipe joint chrome, inspect the set screws periodically and tighten them if they loosen. Clean the chrome finish with a mild soap and water to remove dirt or grease, which can cause corrosion over time. If a joint becomes damaged (e.g., a cracked body or stripped screw hole), replace it immediately—don't try to repair it, as this can compromise safety.
Sourcing Quality Tools and Accessories
When it comes to tools and lean pipe accessories, quality matters. Invest in reputable brands for tools like tape measures, levels, and tube cutters—these will last longer and perform better than cheap, disposable options. For parallel lean pipe joint chrome and aluminum profile accessories, choose a trusted lean pipe supplier with a track record of providing durable, well-made products. Look for suppliers that offer warranties on their joints, as this is a sign of confidence in their quality.
Conclusion: Empowering Your Team with the Right Tools
Assembling parallel lean pipe joint chrome may seem like a small task, but it's a critical part of building the efficient, flexible lean systems that drive modern manufacturing. By equipping yourself with the right tools—measuring tools for precision, cutting tools for clean edges, joining tools for secure connections, and safety gear to protect your team—you're not just building a workbench or a flow rack. You're building a foundation for productivity, safety, and success.
Remember, the best lean systems are those that are built to adapt, and that starts with strong, well-assembled joints. With the tools and knowledge outlined here, you're ready to tackle any assembly project with confidence. So grab your tape measure, tighten those hex keys, and get ready to create a workspace that works as hard as your team does.