- Company Articles
- Products and Technology
- Installation And Maintenance
- Parallel Lean Pipe Joint Installation Tools: Must-Have Equipment

Parallel Lean Pipe Joint Installation Tools: Must-Have Equipment
Related Product
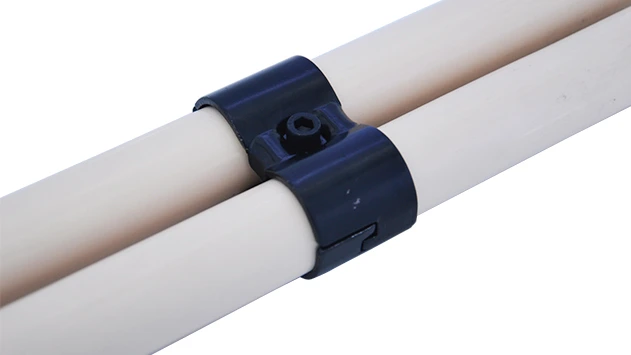
Parallel Lean Pipe Joint
Parallel lean pipe joint used for 2 pcs 28MM lean pipe connection in parallel direction to enhance frame structure, usually for heavy payload requirement for workbench. flow rack, hand trolley.
The Backbone of Lean Manufacturing: Why Installation Tools Matter
Walk into any well-run factory, and you'll notice a quiet rhythm—materials gliding smoothly along roller tracks, workbenches organized with precision, and teams moving with purpose. This isn't luck; it's the result of a lean system at work. At the heart of that system lie parallel lean pipe joints—unassuming but critical components that hold together everything from assembly workbenches to material flow racks. Yet, even the best lean pipe joint can fail if installed with subpar tools. Loose connections, misaligned pipes, or stripped threads don't just look unprofessional; they slow down production, create safety hazards, and chip away at the efficiency lean manufacturing promises.
Imagine a line worker spending 10 extra minutes each shift adjusting a wobbly workbench because the joint wasn't tightened properly. Multiply that by 50 workers, and suddenly you're losing over 40 hours of productivity a week—all because the right tools weren't used during setup. That's why parallel lean pipe joint installation tools aren't just "nice to have"—they're the unsung heroes that turn a pile of aluminum pipes and joints into a reliable, efficient workspace. In this article, we'll dive into the must-have tools for installing parallel lean pipe joints, why each one matters, and how they transform good lean systems into great ones.
Understanding Parallel Lean Pipe Joints: More Than Just a "Connector"
Before we jump into tools, let's talk about the star of the show: the parallel lean pipe joint. These small but mighty components are the reason lean systems are so flexible. Unlike fixed metal brackets, parallel lean pipe joints let you connect aluminum lean pipes at precise angles, adjust heights on the fly, and reconfigure workstations as production needs change. Whether you're building a single-deck workbench (like the "Workbench E" from many suppliers) or a multi-tier flow rack, these joints ensure stability without sacrificing adaptability.
But here's the catch: their versatility depends entirely on proper installation. A parallel lean pipe joint might look simple—a metal or plastic connector with holes for screws—but getting it right requires more than just hand-tightening a bolt. Aluminum pipe, for example, is lightweight and corrosion-resistant, but its softer material means over-tightening can strip threads or warp the pipe. Stainless steel joints, on the other hand, need enough torque to prevent loosening under heavy loads. The tools you use dictate whether your joint will hold strong for months or start wobbling after a week.

Essential Installation Tools: Your Lean System's Best Friends
Think of installing parallel lean pipe joints as putting together a high-stakes puzzle. Each tool has a specific role, and skipping even one can lead to a less-than-perfect result. Below are the tools no lean system installer should be without, along with why they're critical and how to use them effectively.
1. Hex Key Sets: The Precision Tighteners
If there's one tool you'll reach for more than any other, it's a hex key set. Parallel lean pipe joints—whether aluminum, steel, or plastic—almost always use hex (Allen) screws to lock pipes in place. A cheap, flimsy hex key can round off screw heads, turning a 2-minute job into a 20-minute struggle with pliers (and a damaged joint). Invest in a high-quality set with both long and short arms; the long arms give extra leverage for tight joints, while the short arms work in tight spaces, like when installing joints close to a workbench surface.
Pro tip: Look for hex keys with ball ends on one side. They allow you to tighten screws at a 30-degree angle, which is a lifesaver when pipes block direct access to the joint.
2. Torque Wrench: The "Goldilocks" Tool (Not Too Tight, Not Too Loose)
Over-tightening is the silent enemy of parallel lean pipe joints. Cranking a hex key until your hand aches might feel "secure," but it can stretch screws, strip threads in aluminum pipe, or even crack plastic joint components. Under-tightening, of course, leads to loose joints that wobble or shift under load. A torque wrench solves both problems by letting you set a specific torque (measured in inch-pounds or Newton-meters) to ensure screws are tightened just right.
Most lean pipe manufacturers recommend torque settings between 15-25 in-lbs for aluminum joints and 25-35 in-lbs for steel. Check your joint's specs, set the wrench, and listen for the satisfying "click" when you've hit the target. It's a small step that eliminates guesswork and drastically reduces joint failure.
3. Pipe Cutter: For Clean Cuts That Fit Like a Glove
Even the best joint can't fix a poorly cut pipe. A jagged edge or uneven cut will leave gaps between the pipe and joint, weakening the connection and creating sharp edges that risk damaging materials or injuring workers. A quality pipe cutter—either a manual ratchet-style or a powered rotary cutter—ensures straight, burr-free cuts on aluminum pipe, stainless steel pipe, or even plastic-coated lean pipe.
For aluminum lean pipe, a manual cutter with a sharp, replaceable blade works best. Rotate the cutter around the pipe, tightening the blade slightly with each turn, and the pipe will snap cleanly when ready. Avoid using hacksaws unless you have a pipe guide—they're prone to leaving uneven cuts that throw off joint alignment.
4. Deburring Tool: Safety First, Fit Second
After cutting a pipe, there's one more step before assembly: deburring. The cut leaves a sharp, ragged edge (a "burr") that can slice through gloves, catch on materials, or prevent the pipe from seating fully into the joint. A deburring tool—essentially a small, hand-held blade or file—smooths these edges in seconds. Run the tool around the inside and outside of the pipe end, and you'll have a clean, safe surface that fits perfectly into the parallel lean pipe joint.
Bonus: Deburring also removes metal shavings that can jam joint threads or scratch aluminum pipe surfaces, keeping your lean system looking professional and functioning smoothly.
5. Alignment Jig: Because "Close Enough" Isn't Close Enough
Ever tried to connect two parallel pipes only to find they're slightly off-kilter? It's frustrating, time-consuming, and results in a wobbly structure. An alignment jig—a simple metal or plastic guide with slots for pipes—solves this by holding pipes in perfect parallel (or at precise angles) while you attach the joint. Slide the pipes into the jig, clamp it down, and tighten the joint screws without worrying about shifts or twists.
Jigs come in sizes for common pipe diameters (1.5-inch, 2-inch) and can be adjusted for different lengths. They're especially useful for building flow racks or conveyor systems, where even a 1-degree misalignment can cause materials to get stuck on roller tracks.
| Tool Name | Primary Function | Best For | Pro Tip |
|---|---|---|---|
| Hex Key Set (Ball-End) | Tightening/loosening joint screws | All joint types (aluminum, steel, plastic) | Keep a magnetic tray nearby to avoid losing small screws. |
| Torque Wrench (1/4" drive) | Precision torque control for screws | Aluminum and steel joints | Calibrate annually to ensure accuracy—most home improvement stores offer this service. |
| Manual Ratchet Pipe Cutter | Clean, straight cuts on pipes up to 2" diameter | Aluminum, stainless steel, plastic-coated lean pipe | replace blades after 20-30 cuts to avoid crushing (not cutting) pipes. |
| Deburring Tool (Internal/External) | Removing sharp edges from cut pipes | All cut pipe ends | Always deburr both inside and outside the pipe—internal burrs can block joint threads. |
| Parallel Alignment Jig | Holding pipes straight during joint installation | Flow racks, conveyors, multi-pipe workbenches | Look for jigs with non-slip pads to prevent scratching aluminum pipe surfaces. |

Step-by-Step: Installing a Parallel Lean Pipe Joint (With the Right Tools)
Now that you know the tools, let's walk through installing a parallel lean pipe joint—from pipe to finished connection. We'll use a common scenario: building a section of a material flow rack using aluminum lean pipe and a parallel double-end fixed joint (a staple in many "Material Rack B" designs with 3 rows and 3 floors).
Step 1: Measure and Mark the Pipe
Start by measuring the length of pipe you need. Use a tape measure and mark the cut line with a pencil or marker. For accuracy, wrap a piece of masking tape around the pipe—this prevents the marker from smudging and gives you a straight edge to follow with the cutter.
Step 2: Cut the Pipe (and Deburr)
Clamp the pipe securely in a vice (or hold it steady with a helper). Position the pipe cutter on the marked line, tighten the blade until it touches the pipe, and rotate the cutter. After each full rotation, tighten the blade slightly. Repeat until the pipe snaps cleanly. Immediately use the deburring tool to smooth both the inside and outside edges—no exceptions.
Step 3: Align Pipes with the Jig
Place the two pipes you're connecting into the alignment jig, ensuring they're parallel and spaced to fit the joint. Clamp the jig to a workbench to keep everything steady. Slide the parallel lean pipe joint over the ends of the pipes—most joints have a "stop" inside to ensure the pipe is inserted fully (usually 1-1.5 inches).
Step 4: Tighten Screws with Hex Key and Torque Wrench
insert the screws into the joint's threaded holes (use thread locker if the joint will be moved frequently). Hand-tighten with the hex key until the screw bites into the pipe. Then, attach the torque wrench to the hex key (use an adapter if needed), set the recommended torque, and tighten until you hear the wrench click. Repeat for all screws in the joint.
Step 5: Check Alignment and Stability
Remove the jig and give the pipes a gentle shake. They should feel solid, with no movement at the joint. Use a level to ensure the pipes are straight—if not, loosen the screws slightly, adjust, and retighten. Finally, run your hand along the joint to check for sharp edges or gaps. If everything looks good, you're ready to move on to the next section!
Tool Maintenance: Keeping Your Gear Ready for Action
Even the best tools wear out if neglected. A rusty hex key, dull pipe cutter, or miscalibrated torque wrench will let you down when you need them most. Here's how to keep your installation tools in top shape:
- Hex Keys: Wipe clean after use and store in a dry case. Apply a light coat of machine oil to prevent rust. replace any keys with worn or rounded ends—they'll only strip screws.
- Torque Wrench: Store at the lowest torque setting to prevent spring fatigue. Calibrate once a year (or after 5,000 uses) to ensure accuracy. Avoid dropping it—shock can throw off the internal mechanism.
- Pipe Cutter: Clean the blade after each use to remove metal shavings. replace blades when cutting requires more than 5-6 rotations (dull blades crush pipes, leading to uneven cuts).
- Deburring Tool: Keep the blade sharp by occasionally honing it with a small file. replace the blade when it no longer removes burrs in one pass.
Choosing the Right Tools: What to Look For
With so many options on the market, how do you pick tools that won't let you down? Start by considering your needs: Are you building a single workbench, or outfitting an entire factory? For occasional use, a mid-range hex key set and manual pipe cutter will suffice. For daily use, invest in professional-grade tools—they'll save time and frustration in the long run.
Material matters too. For aluminum lean pipe, focus on tools designed for soft metals: a pipe cutter with a fine-tooth blade, hex keys with rounded ends to avoid marring the pipe. For stainless steel pipe series, opt for heavy-duty cutters and higher-torque wrenches. And don't forget compatibility—some joints use specialty screws (like metric vs. standard), so check that your hex keys match the screw heads.
Finally, buy from reputable suppliers. A $5 hex key set from a discount store might seem like a deal, but rounded keys and stripped screws will cost you far more in wasted time and materials. Look for brands known for industrial tools—they often offer warranties, and replacement parts (like cutter blades or torque wrench springs) are easy to find.
Real-World Impact: How the Right Tools Transform Workspaces
Don't just take our word for it—ask the team at a mid-sized electronics manufacturer in Ohio. A few years back, they were struggling with constant delays: workbenches wobbled, flow racks jammed, and workers spent hours adjusting joints. Their lean system was supposed to boost efficiency, but shoddy installation tools were holding them back. After investing in a torque wrench, quality pipe cutters, and alignment jigs, they saw immediate results: assembly time for new workstations dropped by 40%, joint failures fell by 75%, and workers reported less frustration (and fewer blisters from wrestling with dull tools).
Another example: a food packaging plant using stainless steel pipe series for sanitary workbenches. They switched from hacksaws to rotary pipe cutters, eliminating burrs that trapped food particles (a major safety risk). The clean cuts also made joints easier to disassemble for cleaning, helping them pass FDA inspections with zero violations. It's proof that installation tools aren't just about "building better"—they're about building smarter, safer, and more sustainably.
Conclusion: Tools That Build More Than Workbenches—They Build Success
Parallel lean pipe joints are the unsung heroes of lean manufacturing, but they can't do their job alone. The right installation tools turn these simple connectors into the backbone of efficient workspaces, reducing waste, improving safety, and boosting productivity. From hex keys to torque wrenches, each tool plays a role in ensuring your lean system lives up to its promise—flexible, reliable, and ready to adapt to whatever production throws at it.
So, the next time you're gearing up to build a workbench, flow rack, or conveyor system, remember: the tools you choose matter as much as the pipes and joints themselves. Invest in quality, maintain them well, and you'll build not just a better workspace, but a better bottom line. After all, in lean manufacturing, every detail counts—and that includes the tools in your toolbox.