- Company Articles
- Products and Technology
- Installation And Maintenance
- Parallel Lean Pipe Joints with One Side Rotatory: Installation Mistakes to Avoid

Parallel Lean Pipe Joints with One Side Rotatory: Installation Mistakes to Avoid
Related Product
Parallel Lean Pipe Joint
Parallel lean pipe joint used for 2 pcs 28MM lean pipe connection in parallel direction to enhance frame structure, usually for heavy payload requirement for workbench. flow rack, hand trolley.
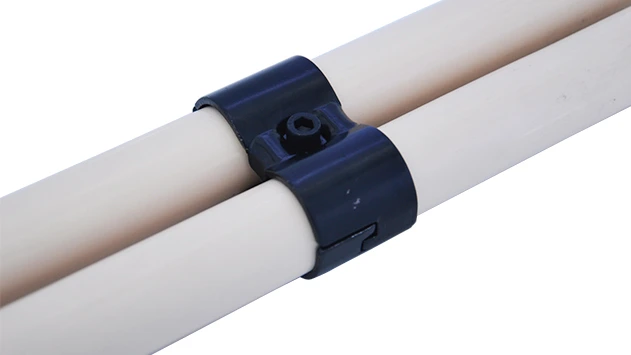
Walk into any modern manufacturing facility, warehouse, or assembly plant, and you'll likely spot a network of lean pipe structures—workbenches humming with activity, material racks neatly organizing components, and turnover trolleys gliding smoothly across the floor. At the heart of these structures lie unsung heroes: lean pipe joints. Specifically, parallel lean pipe joints with one side rotatory have become indispensable for their ability to add flexibility to rigid setups, allowing for adjustable workbenches, movable partitions, and dynamic material flow systems. But here's the thing: these small, unassuming components can make or break your entire operation. A poorly installed joint might start as a minor wobble but quickly escalate into sagging shelves, jammed roller tracks, or even safety hazards that bring production to a grinding halt.
If you've ever dealt with a workbench that tilts under load, a trolley that veers off course, or a material rack that refuses to stay aligned, chances are an installation mistake with the lean pipe joint is to blame. In this guide, we're diving deep into the most common pitfalls when installing parallel lean pipe joints with one side rotatory. We'll break down why these mistakes happen, the real-world consequences they carry, and—most importantly—how to avoid them. Whether you're a seasoned facility manager, a maintenance technician, or someone new to lean system setup, this article will arm you with the knowledge to ensure your joints are installed right the first time, keeping your workflows efficient and your team safe.
Mistake #1: Over-Tightening or Under-Tightening—The "Goldilocks Problem" of Joints
Let's start with the basics: securing the joint to the pipe. It sounds simple enough—grab a wrench, twist until it feels "tight," and call it a day. But in reality, lean pipe joints are surprisingly finicky when it comes to torque. Think of it like tightening a lid on a jar: too loose, and the contents spill; too tight, and the lid cracks. Parallel lean pipe joints with one side rotatory are no different—they need that "just right" balance.
Over-tightening is a common culprit, especially among installers who equate "tight" with "secure." Grab an adjustable spanner, crank it as hard as possible, and boom—you've just stripped the threads inside the joint or cracked the plastic or metal housing. Aluminum lean pipe, in particular, is prone to this; its softer material can deform under excessive pressure, leaving the joint loose after the initial over-tightening. On the flip side, under-tightening is equally problematic. A joint that's not secured properly will wobble with even the lightest load, leading to misalignment in connected structures like roller tracks or workbench shelves. Over time, this wobble wears down the joint's internal components, turning a minor annoyance into a full-blown failure.
Real-World Example:
A mid-sized electronics manufacturer recently expanded its assembly line, adding new workbenches using parallel lean pipe joints. The maintenance team, pressed for time, used pipe wrenches to tighten the joints, figuring "the tighter, the better." Two weeks later, operators started complaining about the workbench shelves sagging. Upon inspection, the team that several joints had cracked at the base—over-tightening had stressed the plastic housing, causing it to split. Replacing the joints and re-leveling the shelves took eight hours of downtime, costing the company thousands in lost production.
So, how do you hit that sweet spot? First, check the manufacturer's specifications. Most reputable lean pipe suppliers (yes, even the ones offering wholesale lean pipe and accessories) provide torque guidelines for their joints—typically measured in Newton-meters (Nm) or foot-pounds (ft-lbs). For example, a standard 28mm aluminum lean pipe joint might require 15-20 Nm of torque. Using a calibrated torque wrench is non-negotiable here; guesswork with a regular wrench is a recipe for disaster.
Second, do a post-installation "wiggle test." After tightening, gently shake the connected pipes. There should be zero movement—no side-to-side wobble, no up-and-down play. If you feel movement, the joint is under-tightened. If the joint feels rigid but the pipe itself seems to "give" slightly, you might have over-tightened (check for cracks or stripped threads). Finally, remember that different joint materials (plastic vs. metal) have different torque limits. A metal lean pipe joint can handle more torque than a plastic one, so always match your tool to the joint's specs.
Pro Tip:
If you don't have a torque wrench on hand (though you should invest in one!), use the "two-finger rule." Tighten the joint with a wrench until you can barely turn it using two fingers on the wrench handle. This approximates the lower end of the torque range for most plastic joints. For metal joints, you can add a third finger, but when in doubt, refer to the manufacturer's guidelines.
Mistake #2: Mismatching Joints with Pipe Material—Aluminum, Stainless Steel, or Plastic? It Matters.
Lean pipes come in a variety of materials: traditional steel with a PE coating, lightweight aluminum lean pipe, corrosion-resistant stainless steel pipe series, and even composite plastics. Each material has unique properties—hardness, flexibility, surface texture—that affect how well a joint can grip it. The mistake here? Assuming any lean pipe joint will work with any pipe.
Take aluminum lean pipe, for instance. Aluminum is softer and more malleable than steel, which means a joint designed for steel pipes (with sharp, aggressive teeth) might bite too deeply into the aluminum, weakening the pipe over time. On the flip side, using a joint with shallow teeth (intended for plastic pipes) on stainless steel will result in a loose fit, since stainless steel's smooth surface won't provide enough friction for the teeth to grip. Even within the same material category, variations matter: a 1.5mm PE coated lean pipe has a different outer diameter than a 2.0mm stainless steel pipe, so a joint sized for one won't snugly fit the other.
Real-World Example:
A food processing plant switched from steel pipes to stainless steel pipe series to meet hygiene standards. To save costs, they reused their old steel lean pipe joints instead of buying stainless steel-compatible ones. Within a month, the joints began slipping. The issue? Stainless steel is smoother than PE-coated steel, and the old joints' teeth weren't sharp enough to grip. This led to a material rack collapsing, spilling sanitized containers onto the floor and forcing a production shutdown for cleanup and replacement. The "cost savings" of reusing old joints ended up costing them ten times more in downtime and wasted materials.
So, how do you ensure compatibility? Start by checking the pipe's material and specifications. Most pipes are labeled with their diameter (e.g., 28mm, 30mm) and material (aluminum, stainless steel, PE-coated). Your lean pipe joint should match both. If you're using aluminum lean pipe, look for joints specifically marketed as "aluminum-compatible"—these often have rounded teeth or a softer grip to prevent damaging the aluminum. For stainless steel, opt for joints with serrated teeth or a clamping mechanism that applies even pressure without relying on teeth to bite into the surface.
Another tip: buy lean pipe and accessories from the same supplier. Reputable suppliers design their joints to pair seamlessly with their pipes, taking the guesswork out of compatibility. If you must mix and match, request a compatibility chart from the joint manufacturer. Most will provide a list of pipe materials and diameters their joints work with. And always test a single joint-pipe combination before full-scale installation—better to catch a mismatch on one joint than 50.
Lastly, consider the environment. If your facility is humid or exposed to chemicals, stainless steel joints are a must to prevent rust, even if your pipes are aluminum. Corroded joints lose their grip, so material compatibility extends beyond just fit—it includes long-term durability in your specific workspace.

Mistake #3: Ignoring Load Distribution When Paired with Caster Wheels
Parallel lean pipe joints with one side rotatory are often used in mobile structures: think turnover trolleys, movable workbenches, or rolling material racks. These setups rely on caster wheels to move smoothly, but here's the catch: the caster wheel's movement places unique stresses on the joints. Ignore load distribution, and you'll quickly find your joint failing under the strain.
When a trolley is stationary, the load is evenly distributed across all four caster wheels. But when it's moving—especially around corners, over uneven floors, or during sudden stops—the weight shifts. This dynamic load can jolt the joints, particularly the ones near the caster wheels. If the joint isn't reinforced or the load is centered too far from the wheels, the stress can bend the joint or loosen its connection to the pipe.
Consider this: a turnover trolley loaded with 200kg of parts. The caster wheels are swivel-type, allowing easy maneuvering. But if the parallel lean pipe joints holding the trolley's frame together are installed too close to the top of the trolley (instead of near the base, where the caster wheels attach), the weight acts like a lever, putting extra pressure on the joints. Over time, this causes the joint to rotate excessively, making the trolley wobble or even tip.
Real-World Example:
A automotive parts supplier built a series of movable material racks using parallel lean pipe joints and heavy-duty caster wheels. The racks were designed to hold small engine components, with the joints mounted midway up the vertical pipes. After a few weeks, workers reported the racks "shimmied" when pushed, and one even tipped over, spilling parts. An inspection revealed the joints near the casters had bent—because the load was too high above the wheelbase, the joints couldn't handle the lateral forces from turning. The fix? Relocating the joints closer to the caster wheels and adding diagonal bracing (using extra lean pipe and accessories) to distribute the load. This simple adjustment reduced stress on the joints by 60% and eliminated the wobble.
To avoid this mistake, start by calculating both static and dynamic loads. Static load is the weight when the structure is stationary; dynamic load is the weight plus the forces from movement (acceleration, deceleration, turning). Most caster wheel manufacturers provide dynamic load ratings—use these to determine how much weight each wheel can handle in motion, then ensure your joints are rated for at least 120% of that load (to account for unexpected jolts).
Next, position joints strategically. Mount them as close to the caster wheels as possible to minimize the lever effect. For trolleys, this means joints should be within 10-15cm of the wheel axles. If you're building a multi-shelf trolley, place horizontal support pipes (connected with parallel joints) near the bottom shelf, not just the top. This creates a lower center of gravity, reducing stress on the joints.
Finally, don't overlook the caster wheel type. Swivel casters allow 360° movement but introduce more lateral stress than fixed casters. If your structure uses swivel casters, pair them with locking mechanisms—locking the front casters when the trolley is stationary prevents unintended movement that can strain joints. Also, opt for casters with rubber wheels instead of plastic; rubber absorbs shocks better, reducing the impact on joints when rolling over cracks or uneven floors.

Mistake #4: Poor Alignment with Roller Track Systems—When "Close Enough" Isn't Good Enough
Parallel lean pipe joints often play a key role in material flow systems, particularly when paired with roller tracks. Roller tracks rely on gravity (or gentle pushes) to move items from one point to another—think of a flow rack in a warehouse, where boxes glide from the back to the front. But if the lean pipe joints holding the roller track in place are misaligned, even by a few millimeters, the whole system grinds to a halt.
Here's why alignment matters: roller tracks need a consistent slope (usually 2-5°) to ensure items flow smoothly. If the parallel joint is installed at a slight angle, the track might dip in one spot or rise in another, creating "speed bumps" that trap boxes. Worse, if the joint's rotatory side is restricted (e.g., caught on a nearby pipe), the track can't adjust to minor shifts in load, leading to jams. This isn't just a productivity issue—workers forced to manually unjam items risk strains or injuries from repetitive bending and lifting.
Real-World Example:
A distribution center installed a new flow rack using aluminum roller track and parallel lean pipe joints. The goal was to speed up order picking by letting packages slide to the front of the rack. But from day one, packages got stuck halfway down the track. The team initially blamed the roller track itself, replacing it with a new one—only to face the same problem. A closer look revealed the issue: the parallel joints holding the track's side rails were installed with a 1° twist. This made the track slope uneven, with a slight "hump" in the middle where packages caught. Fixing the joints took two hours (adjusting their rotation and re-leveling the track), after which packages flowed smoothly. The takeaway? Even tiny misalignments cause big problems with roller tracks.
So, how to ensure perfect alignment? Start with a level surface. Before installing any joints, use a spirit level to check that the base (whether it's a workbench, floor, or shelf) is flat. Even a slightly uneven base will throw off the entire track.
Next, use alignment tools during joint installation. A laser level is ideal—shine it along the length of the roller track and adjust the joints until the track's edge lines up with the laser. If you don't have a laser level, string a line between two points (e.g., the start and end of the track) and use that as a guide. Measure the distance from the string to the track at multiple points to ensure consistency.
Don't forget the joint's rotatory function. Parallel lean pipe joints with one side rotatory are designed to pivot, which can help compensate for minor alignment issues— but only if they're allowed to move freely . Avoid overcrowding the joint with adjacent pipes or accessories; leave at least 2-3cm of space around the rotatory side to prevent binding. If the joint feels stiff when rotating, check for debris (like dirt or paint) in the pivot mechanism and clean it before installation.
Finally, test the system with actual materials, not just empty boxes. A lightweight package might glide over a misaligned track, but a heavy one will get stuck. Load the track with items of varying weights (up to the maximum expected load) and observe their flow. If any item slows or stops, recheck the joint alignment and adjust as needed.
Mistake #5: Skipping Pre-Installation Inspections of Lean Pipe and Accessories
You've got your torque wrench, checked material compatibility, aligned the joints with roller tracks, and positioned them near caster wheels. You're ready to install—right? Not so fast. Even the best-laid plans can fail if you skip inspecting the lean pipe and accessories before installation. A bent pipe, a cracked joint, or a warped caster wheel accessory can turn a smooth installation into a disaster, no matter how careful you are with torque or alignment.
It's easy to overlook this step, especially when you're in a hurry. Maybe the parts arrived in a bulk shipment, and you assume they're all in perfect condition. But lean pipe and accessories take a beating during shipping and storage: pipes get bent, joint threads get stripped, caster wheel bearings get contaminated with dirt. Installing a damaged part is like building a house on a cracked foundation—it might stand for a while, but it won't last.
Real-World Example:
A manufacturing plant received a large order of lean pipe, parallel joints, and roller track accessories to build new assembly workbenches. The team unloaded the shipment and immediately started installing, eager to meet a tight deadline. By the end of the day, they'd assembled five workbenches—but noticed two of them wobbled. Upon closer inspection, they the vertical pipes in those workbenches were slightly bent (likely from being dropped during shipping). The bent pipes caused the parallel joints to sit at an angle, leading to instability. Disassembling and replacing the bent pipes took an extra day, pushing the project past deadline and frustrating the team. A quick pre-installation inspection (rolling pipes on the floor to check for bends, visually inspecting joints for cracks) would have caught the issue before any time was wasted.
So, what should you inspect? For lean pipes: check for bends (roll them on a flat surface—if they wobble, they're bent), dents (which can weaken the pipe and prevent joints from seating properly), and damage to the coating (especially on PE-coated pipes, where scratches expose the steel to rust). For parallel lean pipe joints: look for cracks in the housing, stripped threads (test by screwing on a spare pipe—if it spins freely, the threads are bad), and smooth rotation (the rotatory side should pivot without sticking).
For accessories like caster wheels: spin the wheels to ensure they rotate smoothly (no grinding or wobbling), check that the brake mechanism engages fully, and inspect the mounting plate for cracks. For roller track components: ensure the rollers spin freely, the guide rails are straight, and connectors fit snugly into the track.
Create a simple checklist to make inspections systematic. Include items like: "Pipe rolls straight on flat surface," "Joint threads grip pipe firmly," "Caster wheel spins without noise," "Roller track rollers move freely." Assign a team member to inspect each part before it's used—this takes 5-10 minutes per batch but saves hours of rework later.
Finally, store parts properly before installation. Keep pipes and joints in a dry, clean area, away from heavy equipment that could crush them. Use racks to store pipes horizontally (to prevent bending) and keep small accessories (like joint washers or caster wheel pins) in labeled bins to avoid losing or damaging them. A little care in storage goes a long way toward ensuring parts arrive in install-ready condition.
Conclusion: Getting It Right—The Foundation of Lean Efficiency
Parallel lean pipe joints with one side rotatory might seem like small components in the grand scheme of your facility's operations, but as we've explored, their installation can have a massive impact on efficiency, safety, and bottom-line costs. From the "Goldilocks" torque of tightening to the precision of aligning with roller tracks, every step matters. The mistakes we've covered—over/under-tightening, mismatched materials, poor load distribution, misalignment with roller tracks, and skipping inspections—are all avoidable with a little knowledge, patience, and attention to detail.
Remember, lean systems are built on the principle of eliminating waste—and nothing wastes time, money, and morale like a failed joint causing downtime, damaged products, or safety risks. By taking the time to torque joints properly, match materials, distribute loads wisely, align with care, and inspect parts thoroughly, you're not just installing joints—you're laying the groundwork for a smoother, more efficient workflow.
So, the next time you pick up a lean pipe joint, pause for a moment. Think about the workers who'll rely on the structure it supports, the products that will flow through the roller track it holds, and the deadlines that depend on its reliability. Then, follow the steps outlined here. Your future self (and your team) will thank you.
Here's to joints that stay tight, structures that stay strong, and workflows that stay efficient—because when it comes to lean systems, the details make all the difference.