- Company Articles
- Products and Technology
- Installation And Maintenance
- Parallel Rotatory Lean Pipe Joint Chrome Maintenance Kit: Essential Tools

Parallel Rotatory Lean Pipe Joint Chrome Maintenance Kit: Essential Tools
Related Product
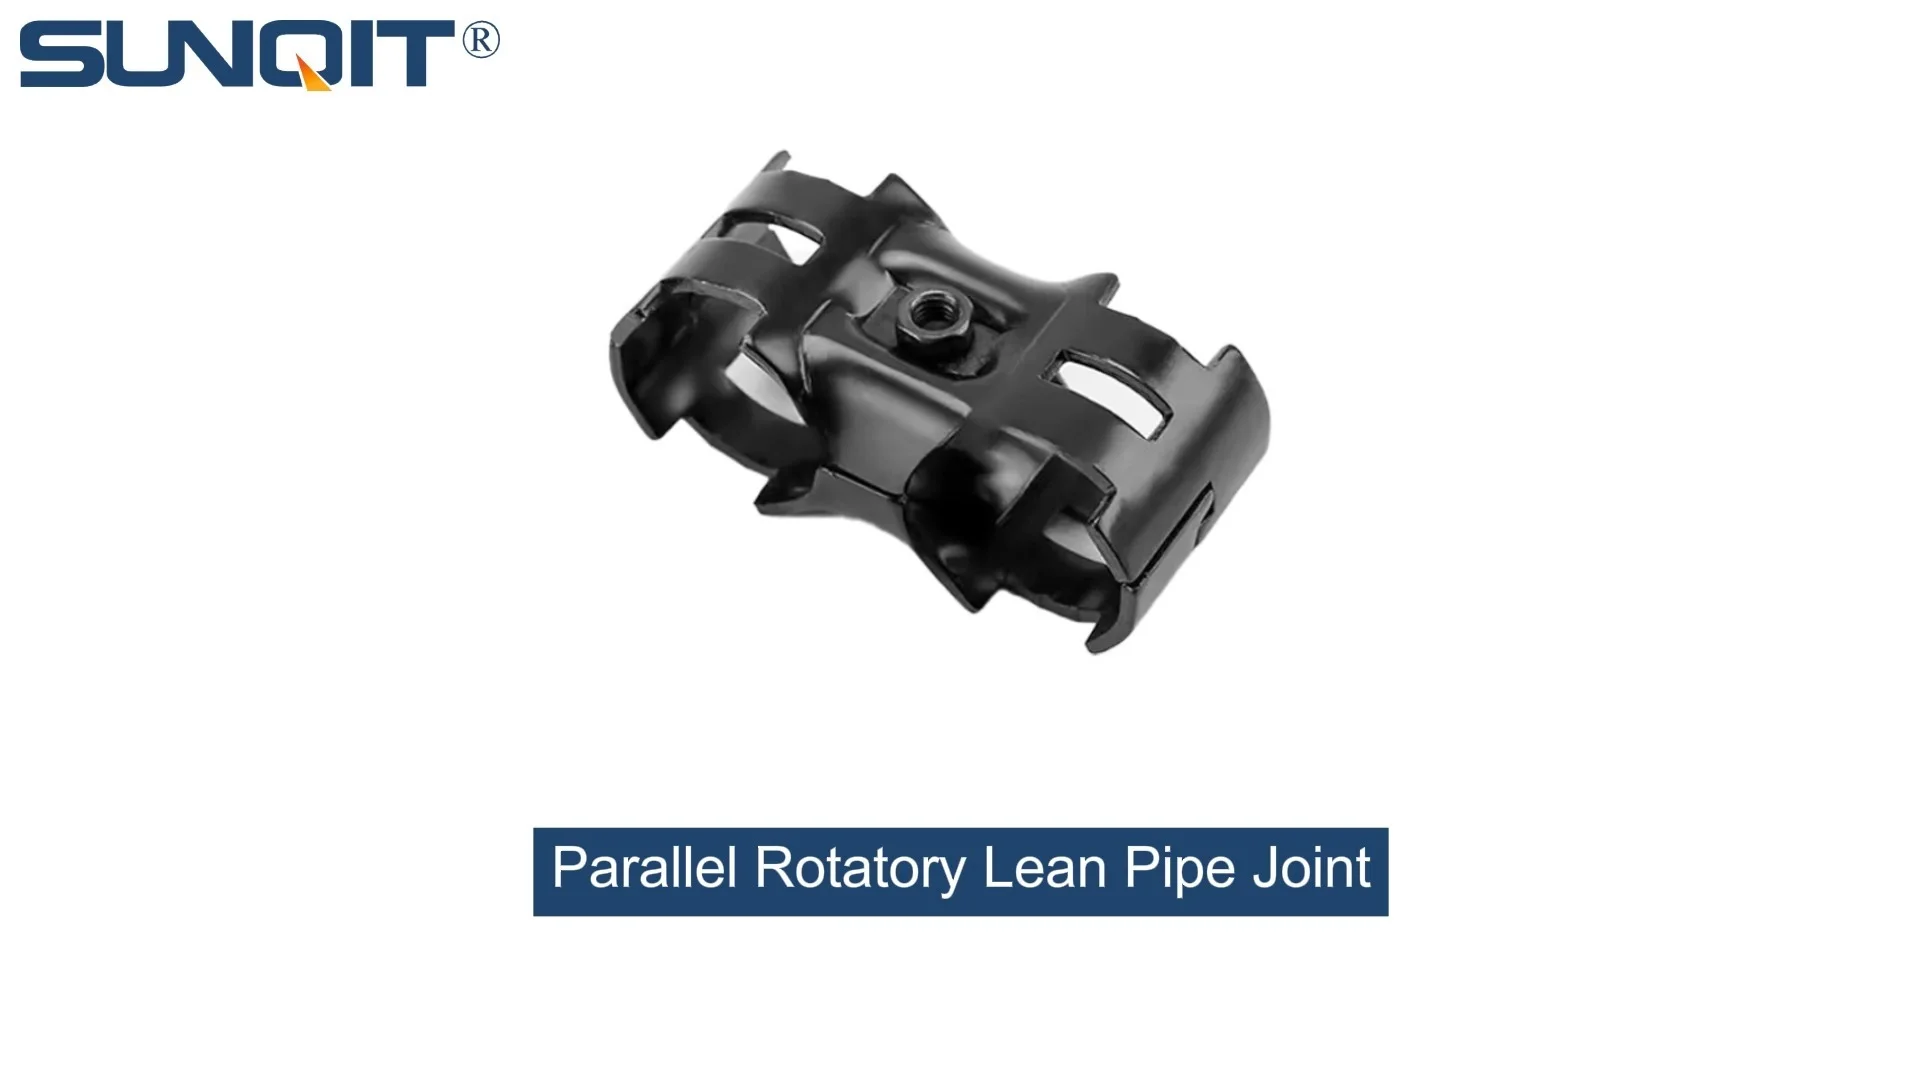
Parallel Rotatory Lean Pipe Joint
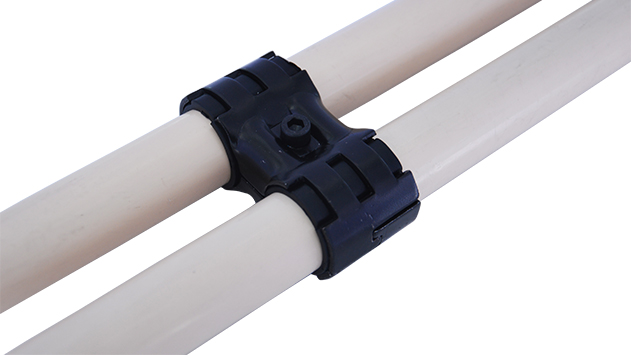
Parallel rotatory lean pipe joint, for 2 pcs pipe conenction in parallel direction with rotatory function.
In the fast-paced world of manufacturing and production, where every second counts and efficiency is the backbone of success, the components often play the biggest role in keeping operations running smoothly. Take a moment to walk through any well-organized workshop, and you'll notice a network of lean pipe structures—workbenches tailored to specific tasks, material racks holding components at just the right height, and roller tracks guiding parts from one station to the next. These systems don't just appear out of nowhere; they're built on precision, adaptability, and the quiet reliability of components like the parallel rotatory lean pipe joint chrome.
Lean pipe systems, known for their modularity and flexibility, have revolutionized how factories and workshops design their workflows. Whether you're assembling electronics on an ESD workstation, organizing inventory on a material rack, or moving goods along a roller track, the integrity of the entire structure hinges on the quality and maintenance of its joints. Among these, the parallel rotatory lean pipe joint chrome stands out for its unique ability to combine strength with movement—allowing for adjustments, rotations, and reconfigurations that keep up with evolving production needs. But like any hardworking component, it demands care. Without proper maintenance, even the sturdiest lean pipe joint can become a weak link, leading to wobbly workbenches, stuck rotations, or worse, unexpected downtime.
This is where the parallel rotatory lean pipe joint chrome maintenance kit comes into play. More than just a collection of tools, it's an investment in the longevity of your lean system, a safeguard against disruptions, and a commitment to the efficiency your team relies on. In this article, we'll dive deep into why maintaining these joints matters, what tools belong in your maintenance kit, and how to use them to keep your lean pipe structures performing at their best—day in and day out.
Why Maintenance Matters: Beyond "If It Ain't Broke, Don't Fix It"
It's easy to fall into the trap of reactive maintenance—waiting until a joint squeaks, a workbench wobbles, or a rotation jams before taking action. But in manufacturing, downtime isn't just an inconvenience; it's a costly problem. A single hour of halted production can mean missed deadlines, overtime pay to catch up, and frustrated teams scrambling to troubleshoot. The parallel rotatory lean pipe joint chrome, with its chrome-plated finish and moving parts, is particularly vulnerable to wear and tear if neglected. Let's break down why proactive maintenance isn't just a good idea—it's essential.
1. Cost Savings: Maintenance vs. Replacement
Consider this: A high-quality parallel rotatory lean pipe joint chrome isn't cheap, and replacing one might seem manageable. But multiply that by dozens of joints across a workshop, and the costs add up quickly. A maintenance kit, on the other hand, costs a fraction of the price of even a single replacement joint. Regular cleaning, lubrication, and tightening can extend the lifespan of each joint by years, turning a small upfront investment in tools into significant long-term savings. It's simple math: spending $50 on a kit to maintain 20 joints is far better than spending $200+ on replacing those joints prematurely.
2. Safety First: Wobbly Joints = Risky Workspaces
Safety is non-negotiable in any industrial setting. A loose or damaged lean pipe joint isn't just a productivity issue—it's a hazard. Imagine a workbench used for assembling heavy machinery: if the parallel rotatory joint holding the upper shelf starts to wobble, tools or components could fall, risking injury to workers below. Similarly, a material rack with weakened joints might collapse under the weight of inventory, causing damage to goods and endangering staff. Regular maintenance ensures that every joint is secure, every rotation is smooth, and every structure is stable—keeping your team safe and compliant with safety regulations.
3. Efficiency Uninterrupted: Smooth Rotations, Smooth Workflows
The beauty of lean pipe systems lies in their adaptability. Need to reposition a workbench to accommodate a new assembly line? Adjust the parallel rotatory joints. Want to angle a material rack for easier access? Rotate the joints into place. But if those joints are stiff, corroded, or clogged with debris, that adaptability disappears. Workers waste time struggling with stuck rotations, or worse, avoid reconfiguring the system altogether—leading to inefficient workflows and missed opportunities for optimization. A well-maintained joint rotates smoothly, allowing your team to adjust, adapt, and innovate without interruption.
Inside the Kit: Essential Tools for Parallel Rotatory Lean Pipe Joint Chrome Care
Now that we understand why maintenance matters, let's explore the tools that make it possible. A parallel rotatory lean pipe joint chrome maintenance kit isn't a one-size-fits-all solution, but it should include a curated selection of tools designed to clean, inspect, lubricate, and repair these specialized joints. Below is a breakdown of the must-have components, along with their purposes and pro tips for getting the most out of each.
| Tool Name | Purpose | How to Use | Pro Tip |
|---|---|---|---|
| Hex Key Set (Metric & Standard) | Tightening/loosening bolts on the joint | select the correct size hex key, insert into bolt head, and turn clockwise to tighten or counterclockwise to loosen. Use steady, even pressure to avoid stripping. | Choose a set with ball-end hex keys for better access to bolts in tight spaces—common in crowded lean pipe structures. |
| Wire Brush (Nylon Bristles) | Removing debris, dust, and rust from joint surfaces | Gently scrub the joint's moving parts, paying special attention to crevices where dirt accumulates. For stubborn grime, dampen the brush with mild soapy water. | Avoid metal-bristle brushes—they can scratch the chrome plating, leading to corrosion over time. |
| Silicone-Based Lubricant Spray | Ensuring smooth rotation and preventing corrosion | Spray a small amount directly onto the joint's pivot points and moving surfaces. Wipe away excess with a clean cloth to avoid attracting dust. | Opt for a lubricant labeled "food-grade" if working in environments where contamination is a concern (e.g., pharmaceutical or food production). |
| Torque Wrench (Adjustable) | Precisely tightening bolts to manufacturer specifications | Set the torque wrench to the recommended value (check the joint's manual), place the hex socket on the bolt, and pull slowly until the wrench clicks—indicating the correct torque. | Over-tightening can strip threads or damage the joint; under-tightening leaves bolts loose. A torque wrench takes the guesswork out. |
| Inspection Mirror (Telescoping) | Checking hard-to-see areas of the joint | Extend the mirror to reach joints behind material racks or under workbenches. Angle the mirror to inspect for cracks, rust, or hidden debris. | Pair with a flashlight for better visibility in dimly lit corners of the workshop. |
| Replacement Washers & O-Rings | Replacing worn or damaged parts | Remove old, cracked washers from the joint's bolt holes and replace with new ones. Ensure a snug fit to prevent wobbling. | Store washers in labeled compartments to avoid mixing sizes—joints may use different washer thicknesses. |
| Microfiber Cloths | Cleaning chrome surfaces and wiping excess lubricant | Use dry cloths to polish chrome and remove fingerprints; dampen with water to wipe away lubricant residue or soap from cleaning. | Microfiber cloths are lint-free, so they won't leave debris behind on sensitive joint components. |
Honorable Mentions: Optional Tools for Specialized Needs
Depending on your workshop's environment and the specific demands of your lean pipe system, you might want to add a few extra tools to your kit:
- ESD-Safe Brushes and Lubricants: If your workspace includes ESD workstations (common in electronics manufacturing), standard tools can generate static electricity. ESD-safe versions prevent electrostatic discharge that could damage sensitive components.
- Rust Remover (Mild Acid-Based): For joints exposed to moisture or humidity, a mild rust remover can dissolve surface corrosion—just be sure to neutralize it with water and dry thoroughly before lubricating.
- Digital Caliper: For precision checks, a digital caliper can measure bolt tightness or joint wear, ensuring components meet manufacturer specs.
Step-by-Step Maintenance: How to Care for Your Parallel Rotatory Lean Pipe Joint Chrome
With your maintenance kit assembled, it's time to put it into action. Regular maintenance doesn't have to be a time-consuming chore—in fact, with a systematic approach, you can keep your joints in top shape with minimal effort. Below is a step-by-step guide to maintaining your parallel rotatory lean pipe joint chrome, broken down into quick weekly checks and more thorough monthly deep cleans.
Weekly Quick Check: 10 Minutes to Peace of Mind
Weekly checks are all about catching issues early before they escalate. Set aside 10–15 minutes each week to walk through your lean pipe structures and inspect key joints:
- Visual Inspection: Start by looking at each parallel rotatory joint. Are there any obvious signs of damage—cracks in the chrome plating, bent bolts, or missing washers? Note any issues for follow-up.
- Manual Check for Movement: Gently rotate the joint by hand. It should move smoothly without sticking, grinding, or squeaking. If it feels stiff or makes noise, add it to your list for deeper cleaning.
- Bolt Tightness: Using your hex key, give each bolt a light twist to check for looseness. If a bolt turns easily, it needs tightening (but don't overdo it—save precise torque checks for monthly maintenance).
- Debris Wipe-Down: Use a microfiber cloth to quickly wipe away dust, grease, or debris from the joint's surface and moving parts. This prevents buildup that can lead to corrosion or jamming.
Monthly Deep Clean: 30 Minutes for Long-Term Performance
Once a month, dedicate 30 minutes to a more thorough maintenance session for your most heavily used joints. Follow these steps for a deep clean and tune-up:
- Disassemble (If Needed): For joints that are stiff or visibly dirty, carefully disassemble the outer components using your hex key set. Lay parts out in order to avoid confusion during reassembly.
- Scrub Away Debris: Use the nylon wire brush to clean crevices and moving parts. Pay special attention to the pivot points where dust and grime tend to accumulate. For stubborn dirt, dampen the brush with mild soapy water, then dry thoroughly with a microfiber cloth.
- Inspect for Wear: Use the telescoping inspection mirror to check hidden areas of the joint for rust, cracks, or excessive wear. If you notice pitting in the chrome or worn threads on bolts, it may be time to replace the joint or its components.
- Lubricate Moving Parts: Apply a small amount of silicone-based lubricant to the pivot points and any other moving surfaces. Rotate the joint several times to distribute the lubricant evenly, then wipe away excess with a clean cloth.
- Reassemble and Torque Bolts: Put the joint back together, replacing any worn washers or O-rings from your kit. Use the torque wrench to tighten bolts to the manufacturer's recommended specifications—this ensures a secure fit without damaging the joint.
- Final Test: Rotate the joint again to confirm smooth movement. It should feel light, responsive, and free of squeaks. If issues persist, repeat the cleaning process or consult the manufacturer for further guidance.
Pro Maintenance Schedule: Create a checklist for each lean pipe structure in your workshop, noting the location of every parallel rotatory lean pipe joint chrome. Assign team members to perform weekly checks and rotate monthly deep cleans to ensure consistency. Post the schedule near the maintenance kit for easy reference—accountability is key to making maintenance a habit.

Troubleshooting Common Issues: When Your Joint Needs Extra Attention
Even with regular maintenance, you might encounter occasional issues with your parallel rotatory lean pipe joint chrome. The good news is that most problems are easy to diagnose and fix with the tools in your kit. Below are the most common issues, their causes, and step-by-step solutions to get your joint back in working order.
Issue 1: Stiff or Stuck Rotation
Symptoms: The joint resists movement when rotated by hand, feels gritty, or makes a grinding noise.
Cause: Debris (dust, grease, metal shavings) has built up in the pivot points, or the lubricant has dried out or become contaminated.
Solution:
- Disassemble the joint using your hex key set.
- Use the nylon wire brush to scrub away debris from the pivot points and moving parts.
- Wipe all components with a microfiber cloth dampened with mild soapy water, then dry thoroughly.
- Apply fresh silicone-based lubricant to the pivot points.
- Reassemble and test rotation—if it's still stiff, check for bent or damaged components (e.g., a warped washer) and replace as needed.
Issue 2: Wobbling or Loose Joint
Symptoms: The joint shifts or when pressure is applied, or the connected lean pipe feels unstable.
Cause: Bolts have loosened over time, washers are worn or missing, or the joint's internal components are damaged.
Solution:
- Use the torque wrench to check bolt tightness—tighten to manufacturer specs if loose.
- Inspect washers for cracks, flattening, or deformation. replace any worn washers with new ones from your kit.
- If tightening and replacing washers doesn't fix the wobble, disassemble the joint and check for bent bolts or cracked housing. If damage is severe, replace the joint entirely.
Issue 3: Chrome Plating Peeling or Corroding
Symptoms: The chrome finish on the joint is flaking, discolored, or showing signs of rust.
Cause: Exposure to moisture, chemicals, or abrasive cleaning tools (like metal brushes) has damaged the chrome layer, leaving the underlying metal vulnerable to corrosion.
Solution:
- Use a microfiber cloth and mild soapy water to clean the affected area—avoid harsh chemicals or abrasive tools.
- Dry thoroughly to prevent further moisture damage.
- Apply a thin coat of clear, corrosion-resistant spray (compatible with chrome) to protect the exposed metal.
- If corrosion is widespread or the joint's structural integrity is compromised, replace the joint to avoid safety risks.

Extending the Life of Your Joint: Pro Tips for Long-Term Durability
Maintenance is about more than fixing problems—it's about preventing them in the first place. With a few simple habits and proactive measures, you can significantly extend the lifespan of your parallel rotatory lean pipe joint chrome, ensuring it serves your workshop for years to come.
1. Train Your Team to Treat Joints with Care
Your workers interact with lean pipe structures daily, so they're your first line of defense against avoidable damage. Train them to handle joints gently—avoiding sudden, forceful rotations or using joints as leverage points when moving heavy objects. Encourage them to report issues like stiffness or wobbling immediately, rather than ignoring them until they worsen. A 10-minute training session can go a long way in fostering a culture of care.
2. Control the Environment: Keep Joints Dry and Clean
Chrome plating and metal components don't mix well with excessive moisture or humidity. If your workshop is prone to dampness (e.g., near water-based processes), take steps to protect your lean pipe joints: install dehumidifiers, use rust-resistant lubricants, and cover unused structures with tarps during downtime. Similarly, in dusty environments, schedule more frequent wipe-downs to prevent debris from building up in pivot points.
3. Avoid Overloading: Respect Weight Limits
Every lean pipe joint has a weight capacity specified by the manufacturer. Exceeding this limit strains the joint's bolts, washers, and internal components, leading to premature wear and potential failure. Post weight limits clearly on material racks and workbenches, and train staff to distribute weight evenly across structures—avoid piling all heavy items on one side, which creates uneven stress on joints.
4. Stock Spare Parts: Don't Wait for Emergencies
Even with the best maintenance, parts wear out. Keep a small inventory of spare parallel rotatory lean pipe joints, washers, bolts, and O-rings in your workshop. This way, if a joint fails unexpectedly, you can replace it immediately instead of waiting for a shipment from your lean pipe supplier. Label and organize the spares near your maintenance kit for quick access—downtime is expensive, and preparedness minimizes it.
5. Regularly Review and update Maintenance Practices
As your workshop evolves—new equipment, updated workflows, different materials—your maintenance needs may change. Set aside time quarterly to review your maintenance schedule and adjust as needed. Did you add more roller tracks, increasing the load on nearby joints? Maybe you need to check those more frequently. Has a new team member joined? Schedule a refresher on maintenance protocols. Staying flexible ensures your maintenance practices keep up with your workshop's needs.
Conclusion: Invest in Maintenance, Invest in Success
The parallel rotatory lean pipe joint chrome may not be the most glamorous component in your workshop, but it's undeniably one of the most critical. It's the unsung hero that keeps your lean pipe system adaptable, your workbenches stable, and your workflows efficient. And like any hero, it needs a little care to keep performing at its best.
A parallel rotatory lean pipe joint chrome maintenance kit isn't just a box of tools—it's an investment in your workshop's productivity, safety, and longevity. By taking the time to inspect, clean, and lubricate your joints regularly, you'll avoid costly downtime, reduce the risk of accidents, and ensure your lean pipe system remains as flexible and functional as the day it was installed. Whether you're a small workshop owner or a manager at a large manufacturing plant, the message is clear: maintenance matters, and the right tools make it easy.
So, take the first step today. Assemble your maintenance kit, post your schedule, and train your team. Your joints will thank you, your workers will stay safe, and your production line will keep humming along—because in the world of lean manufacturing, the smallest components often make the biggest difference.