- Company Articles
- Products and Technology
- Installation And Maintenance
- Plastic Pipe End Cap Installation Guide: Step-by-Step for Assembly Lines

Plastic Pipe End Cap Installation Guide: Step-by-Step for Assembly Lines
Related Product
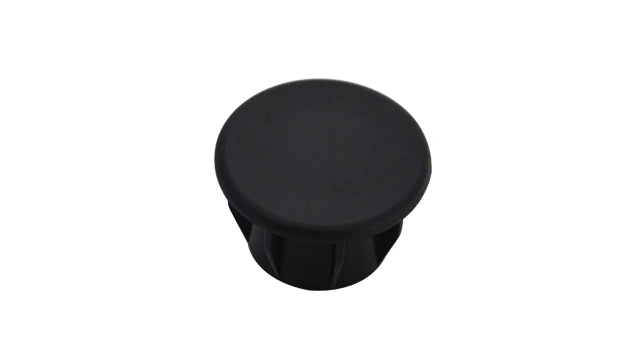
Plastic pipe end cap
Plastic pipe cover, used for 28mm two end cover and protection, to avoid any scratch from sharp metal surface.
Introduction: The Unsung Hero of Lean Pipe Systems
In the fast-paced world of manufacturing and assembly lines, every component plays a critical role in ensuring efficiency, safety, and longevity. Among these components, plastic pipe end caps might seem at first glance—but their impact on the performance of lean pipe systems is undeniable. Whether you're building a workbench, a conveyor, or a custom flow rack, these small caps are the finishing touch that protects your lean pipes, enhances workplace safety, and extends the lifespan of your entire setup.
Lean systems thrive on precision and durability, and plastic pipe end caps are a testament to that philosophy. They seal the ends of lean pipes, preventing dust, debris, and moisture from entering—common culprits that can weaken pipes over time. More importantly, they eliminate sharp edges, reducing the risk of cuts or scratches for workers who interact with the equipment daily. For anyone managing an assembly line, investing time in proper end cap installation isn't just about following best practices; it's about safeguarding your team and your tools.
Understanding Plastic Pipe End Caps: More Than Just a "Cap"
Before diving into installation, it's essential to understand what plastic pipe end caps are and why they matter. These caps are typically made from high-density polyethylene (HDPE) or polypropylene, materials chosen for their resistance to impact, chemicals, and temperature fluctuations—perfect for the harsh conditions of a factory floor. They come in various sizes to fit different lean pipe diameters, from small 0.5-inch pipes used in lightweight workbenches to larger 1-inch pipes in heavy-duty conveyors.
What sets quality plastic end caps apart is their design. Many are engineered with a slight taper or ribbed interior, allowing them to grip the lean pipe tightly without the need for adhesives or fasteners. This "press-fit" design makes installation quick and reduces the risk of damage to the pipe itself. Some caps also feature reinforced edges for added durability, ensuring they stay in place even when the lean pipe is moved or bumped—common in dynamic environments like turnover trolleys or material racks.
Tools and Materials: What You'll Need for a Smooth Installation
Installing plastic pipe end caps doesn't require fancy equipment, but having the right tools on hand will make the process faster and more precise. Below is a breakdown of the essentials:
| Tools | Materials | Safety Gear |
|---|---|---|
| Measuring tape (12-inch or longer) | Plastic pipe end caps (matching lean pipe diameter) | Work gloves (to protect hands from sharp edges) |
| Clean, lint-free cloth | Lean pipe (cut to desired length) | Safety glasses (when handling cut pipes) |
| Rubber mallet (optional, for tight fits) | Lean pipe joints (if assembling a larger structure like a workbench) | Non-slip shoes (to prevent slips on factory floors) |
| Deburring tool (to smooth pipe edges) | Isopropyl alcohol (for cleaning pipe ends) |
Pro tip: Always double-check that your end caps match the diameter of your lean pipe. A cap that's too small won't fit, while one that's too large will slip off—both can compromise safety and system integrity. If you're unsure, measure the outer diameter of your lean pipe with a caliper or measuring tape before purchasing.
Pre-Installation Preparation: Setting the Stage for Success
Like any assembly task, preparation is key to a successful end cap installation. Rushing this step can lead to misalignment, loose caps, or even damage to the lean pipe. Follow these steps to ensure your workspace and materials are ready:
Step 1: Inspect the Lean Pipe
Start by examining the end of the lean pipe where the cap will be installed. Look for burrs, dents, or deformities—these can prevent the cap from seating properly. If you notice sharp edges (common after cutting pipes), use a deburring tool to smooth them out. Even a small burr can tear the cap's interior, causing it to loosen over time.
Step 2: Clean the Pipe End
Dust, oil, and grease on the pipe's surface can create a barrier between the cap and the pipe, weakening the grip. Wipe the end of the lean pipe with a cloth dampened with isopropyl alcohol, then let it dry completely. This ensures a clean, friction-free surface for the cap to adhere to.
Step 3: Check Cap Compatibility
If you're installing end caps as part of a larger lean system—say, building a workbench with lean pipe joints—now is the time to confirm compatibility. Some joints, like the 90° fixed lean pipe joint or parallel lean pipe joint, may sit close to the pipe end. Ensure the end cap doesn't interfere with joint placement; if it does, you may need to trim the pipe slightly or choose a shorter cap.
Step-by-Step Installation: How to Fit a Plastic Pipe End Cap Like a Pro
With preparation complete, it's time to install the cap. This process is straightforward, but attention to detail will ensure a snug, long-lasting fit. Follow these steps:
Step 1: Align the Cap and Pipe
Hold the plastic end cap in one hand and the lean pipe in the other. Position the cap so that its open end faces the pipe's end, ensuring the cap is centered. A slight misalignment here can cause the cap to go on crooked, leading to gaps or uneven wear. If you're struggling to align, mark the pipe's center with a pencil—this visual guide can help keep things straight.
Step 2: Apply Even Pressure to Press the Cap On
Using your palms, press the cap firmly onto the pipe. Start with light pressure to seat the cap, then gradually increase force. You should feel a slight "pop" or resistance as the cap's ribbed interior grips the pipe. For larger caps or tighter fits, a rubber mallet can help—tap the cap gently (never hard!) around its edges to distribute pressure evenly. Avoid using a metal hammer, as this can crack the plastic.
Step 3: Test the Fit
Once the cap is on, give it a gentle tug to check for looseness. It should stay in place without shifting. If it slides off easily, the cap may be too large, or the pipe end may still have debris. Remove the cap, re-clean the pipe, and try again with a new cap if needed. For press-fit caps, a secure fit means no gaps between the cap and pipe—light should not be visible through any spaces.
Step 4: Secure (If Needed)
In most cases, the press-fit design is sufficient. However, for high-vibration applications (like conveyors with roller tracks), you may want extra security. A small drop of industrial-grade adhesive (compatible with plastic and lean pipe materials) can be applied to the pipe end before capping. Be sparing—too much adhesive can squeeze out and create a messy finish, or even weaken the cap over time.
Integrating End Caps with Lean Pipe Joints and Workbenches
Now that your end caps are installed, let's talk about how they fit into the bigger picture: your lean system. For example, when building a workbench (like the "Workbench E (Single Deck-Without Caster)" from your product list), lean pipe joints connect the vertical and horizontal pipes, while end caps seal the exposed ends of the horizontal pipes. This not only looks clean but also prevents tools or small parts from getting caught on open pipe ends—a common hazard in busy workspaces.
Conveyors are another area where end caps shine. Roller tracks and accessories, like the plastic roller track guide rail (yellow or grey), rely on smooth, debris-free lean pipes to move products efficiently. End caps on the conveyor's frame pipes ensure dust doesn't clog the roller bearings, keeping the system running smoothly with minimal maintenance. Even in material racks (like "Material Rack B (3 Row and 3 Floor)"), end caps protect stored items from scratches caused by sharp pipe edges.
Common Installation Issues and Troubleshooting
Even with careful preparation, issues can arise during installation. Here are the most common problems and how to solve them:
Issue 1: The Cap Won't Fit Over the Pipe
If the cap is too tight, check for burrs or debris on the pipe end—these can create extra friction. Use a deburring tool to smooth the edge, then try again. If the cap is still stuck, it may be the wrong size. Always verify the pipe diameter (e.g., 1-inch lean pipe vs. 0.8mm stainless steel pipe) before purchasing caps.
Issue 2: The Cap Falls Off Easily
A loose cap is often due to a dirty pipe or a cap that's too large. Clean the pipe with alcohol and dry thoroughly. If the problem persists, measure the pipe's diameter and compare it to the cap's specifications—you may need a smaller size. For temporary fixes (e.g., until a new cap arrives), wrap a thin layer of electrical tape around the pipe end to add thickness, then reapply the cap.
Issue 3: The Cap Cracks During Installation
Cracking usually happens when too much force is applied, or the cap is made from low-quality plastic. If using a mallet, reduce the force and tap only the edges, not the center. For brittle caps, consider upgrading to a higher-density plastic or a reinforced design—these are better suited for tight fits and heavy use.
Maintenance: Keeping Your End Caps (and Lean Pipes) in Top Shape
Once installed, plastic pipe end caps require minimal maintenance, but a little care goes a long way. Inspect them monthly for cracks, looseness, or signs of wear—especially in high-traffic areas like conveyor ends or workbench corners. If a cap is damaged, replace it immediately; a cracked cap can allow moisture into the pipe, leading to rust (for metal lean pipes) or weakening (for plastic-coated pipes).
Cleaning is simple: wipe the caps with a damp cloth to remove dirt or oil. Avoid harsh chemicals (like bleach or solvents), as these can degrade the plastic over time. For caps on outdoor or heavily used equipment, consider applying a UV-resistant spray to prevent fading and brittleness from sunlight exposure.
Conclusion: The Final Touch That Makes a Big Difference
Plastic pipe end caps may be small, but their role in lean pipe systems is vital. They protect your equipment, keep your team safe, and ensure your assembly line runs efficiently—all with minimal effort and cost. By following this guide, you'll install end caps that stand up to the demands of manufacturing, from the busiest conveyor belts to the most heavily used workbenches.
Remember, lean systems are about continuous improvement, and that includes the little things. A well-installed end cap isn't just a "nice-to-have"—it's a reflection of your commitment to quality, safety, and efficiency. So the next time you reach for a lean pipe and a cap, take a moment to do it right. Your team, your equipment, and your bottom line will thank you.