- Company Articles
- Products and Technology
- Installation And Maintenance
- Pro Tips for Installing 3030 Aluminum Profile End Caps Securely

Pro Tips for Installing 3030 Aluminum Profile End Caps Securely
Related Product
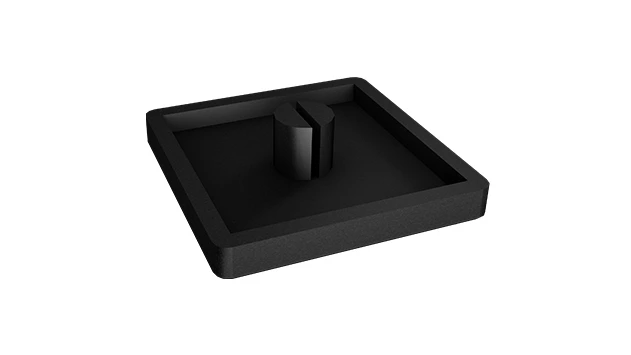
3030 Aluminum Profile End Cap
The aluminum profile end cap adds a finishing touch to your project and closes off profile ends to limit dust and debris buildup, also it can avaid some scratch for material and labor during the assemble work.
Why End Caps Matter More Than You Think
Let's set the scene: You've just spent hours assembling a sleek aluminum profile workbench for your garage or workshop. The aluminum extrusion profile gleams under the lights, the joints are tight, and everything feels sturdy. You step back, ready to call it a job well done—until you notice something off. The ends of the 3030 aluminum profile are sharp, unfinished, and one wrong bump could leave a nasty scratch (or worse, a cut). That's where 3030 aluminum profile end caps come in. They're not just tiny pieces of plastic or metal; they're the finishing touch that turns a "good" project into a "professional, safe, and polished" one.
I remember my first time skipping end caps. I was building a small material rack for my home workshop, eager to finish quickly, and thought, "Who needs 'em? They're just for looks." Big mistake. A week later, I brushed against the rack while carrying tools and ended up with a gash on my arm from a sharp aluminum edge. Not only that, dust and debris started collecting inside the hollow profile, making it a hassle to clean later. End caps, I learned, do double duty: they protect you from sharp edges and shield the profile's interior from dirt, moisture, and corrosion. Over time, that simple addition can extend the life of your aluminum profile setup by years.
But here's the thing: installing end caps isn't as straightforward as slapping them on and calling it a day. I've seen plenty of DIYers (and even some pros) rush the process, only to have end caps pop off, crack, or sit unevenly. If you want your end caps to stay put—whether on a workbench, a conveyor system, or a material rack—you need to do it right. Let's dive into the pro tips that'll make your end cap installation seamless, secure, and long-lasting.
Tools You'll Need (And Why Each One Matters)
Before we get to the step-by-step, let's talk tools. You don't need a fully stocked workshop, but having the right gear will save you frustration and ensure a tight fit. Here's my go-to toolkit for end cap installation, honed from years of trial and error:
| Tool | Purpose | Pro Tip |
|---|---|---|
| Deburring Tool or Sandpaper (220-grit) | Smoothing sharp edges inside the profile | Always deburr before cleaning—you don't want metal shavings ruining your end cap fit. |
| Isopropyl Alcohol (70%+) | Cleaning the profile's end to remove oil, dust, or residue | Use a lint-free cloth—paper towels can leave tiny fibers behind. |
| Rubber Mallet | Gently tapping the end cap into place (for press-fit styles) | Wrap the mallet head in a soft cloth to avoid marring the end cap's surface. |
| Hex Key Set | Tightening screws (for end caps with pre-drilled holes) | Invest in a magnetic hex key—it'll save you from dropping screws into the profile. |
| Adhesive (Optional: Epoxy or Double-Sided Tape) | Extra security for loose-fitting end caps | Go for industrial-grade adhesive if your setup will face vibration (like near a conveyor). |
Pro move: Lay out your tools and end caps before starting. There's nothing worse than fumbling for a hex key mid-installation and accidentally misaligning the end cap. Trust me—I've been there, and it's a quick way to crack a perfectly good end cap.

Step-by-Step: Installing 3030 Aluminum Profile End Caps Like a Pro
Now, let's walk through the installation process. I'll break it down into four key steps, each with details that'll make all the difference in how secure your end caps stay.
Step 1: Prep the Profile—Clean, Deburr, and Inspect
Start with the basics: the end of your 3030 aluminum profile needs to be
pristine
and smooth. Even the smallest burr or speck of dust can prevent the end cap from seating properly. Here's how to do it:
Deburr first:
Aluminum extrusion profiles often have tiny burrs along the cut edges, left over from manufacturing or cutting. Grab your deburring tool (or a piece of 220-grit sandpaper) and gently run it around the inside and outside of the profile's end. You're not trying to remove material—just smooth out any sharp points. I like to run my finger along the edge afterward to check for rough spots; if it catches, keep sanding.
Clean thoroughly:
Next, dampen a lint-free cloth with isopropyl alcohol and wipe the end of the profile. This removes oil from your fingers, machining residue, and dust that could act as a barrier between the end cap and the profile. Let it dry for 30 seconds—alcohol evaporates fast, so you won't be waiting long.
Inspect for damage:
While you're at it, check the profile end for dents or warping. If the end is bent, the end cap won't sit flush, no matter how hard you try. A quick fix? Use a rubber mallet to gently tap the edge back into shape (be careful not to dent it further!).
Pro Tip:
If you're working with a used aluminum profile (say, repurposing parts from an old setup), take an extra minute to clean inside the profile with a pipe cleaner or compressed air. Old dirt or rust can build up inside, making it hard to press the end cap in fully.
Step 2: Choose Your Securing Method (Press-Fit, Adhesive, or Screws?)
3030 aluminum profile end caps come in a few styles, and the best securing method depends on the end cap type and your project's needs. Let's break down the three most common options:
Press-Fit End Caps (The Most Common):
These are the "pop-on" style—flexible plastic or rubber caps designed to snugly fit the profile's inner or outer dimensions. They're quick, easy, and great for low-vibration setups like workbenches or static material racks.
To install press-fit caps: Align the cap with the profile end, making sure any notches or tabs (if present) line up with the profile's T-slot. Then, use your palms to press firmly and evenly around the edges. If it's tight, tap the cap gently with a rubber mallet (wrapped in cloth!)—start at the center, then work your way around to avoid bending the cap. The goal is a snug fit where the cap doesn't wiggle or pop off when you tug on it lightly.
Adhesive-Backed End Caps:
These have a sticky backing (like double-sided tape) for extra hold. They're ideal for profiles that might see light movement, like a mobile turnover trolley or a conveyor side rail.
Installation here is similar to press-fit, but with a twist: After cleaning the profile end, peel off the adhesive backing and align the cap. Press firmly for 30 seconds to ensure the adhesive bonds—pay extra attention to the edges, where air bubbles often form. For maximum strength, let the adhesive cure for 24 hours before putting the setup to use.
Screw-On End Caps:
These have pre-drilled holes and use small self-tapping screws to secure to the profile. They're the toughest option, perfect for high-vibration environments (think conveyor systems or heavy-duty material racks).
For screw-on caps: First, mark the screw holes on the profile using the end cap as a guide (a pencil works fine). Drill pilot holes with a tiny drill bit (smaller than the screw diameter) to avoid splitting the aluminum. Then, align the cap, insert the screws, and tighten with a hex key—
don't over-tighten
! Aluminum is soft, and stripping the threads is easy. Stop when you feel resistance, then give it a quarter-turn more for a secure fit.
Step 3: Check the Fit (And Fix It If It's Off)
You've pressed, glued, or screwed the end cap on—now what? Time to test it. Grab the cap with your thumb and forefinger and give it a gentle wiggle. If it moves, you've got a problem. Let's troubleshoot:
Wobbly Press-Fit Cap:
Chances are, there's debris or a burr you missed. Remove the cap, re-deburr the profile end, and clean again with alcohol. If it still wiggles, try a drop of super glue around the edge (sparingly!)—just enough to hold it without making it permanent.
Adhesive Cap Peeling:
Air bubbles are the culprit here. Peel the cap off (gently—you don't want to damage the adhesive), clean the profile again, and reapply, pressing out bubbles with a credit card or your finger as you go.
Screw-On Cap Loose:
Either the screws are too small, or the pilot holes are too big. Swap for slightly longer screws (but not so long they poke through the other side!) or add a drop of thread-locking fluid (like Loctite) to the screw threads before tightening.
Step 4: Finishing Touches (Because Details Matter)
Once the end cap is secure, take a step back and inspect the alignment. Is it sitting flush with the profile edge? If it's slightly, gently tap it with a rubber mallet. If it's sunken, check for debris inside the profile blocking the cap (a quick blast of compressed air should fix that).
Finally, wipe the end cap with a soft cloth to remove fingerprints or smudges. If you're using colored end caps (some come in black, white, or gray to match aluminum profile accessories), a quick polish with a microfiber cloth will make them shine like new.

Common Mistakes to Avoid (I've Made Them All!)
Even with the best steps, it's easy to slip up. Here are the mistakes I've learned the hard way, so you don't have to:
Rushing the Prep Work:
Skipping deburring or cleaning is the #1 reason end caps fail. A tiny burr can prevent the cap from seating, and oil from your fingers can break down adhesive over time. Spend 2 extra minutes here—you'll thank yourself later.
Using the Wrong Size End Cap:
Aluminum profiles come in different sizes (2020, 3030, 4040, etc.), and end caps are size-specific. I once grabbed a 2020 end cap by mistake and wondered why it wouldn't fit my 3030 profile. Always check the label! If you're unsure, measure the profile's outer width (for outer caps) or inner width (for inner caps) with a caliper.
Over-Tightening Screws:
Aluminum extrusion profile is strong, but it's not steel. Cranking down on screws can strip the threads or crack the profile—both of which mean starting over with a new piece. Tighten until snug, then stop.
Ignoring Temperature:
Plastic end caps can shrink or expand with temperature changes. If you're installing them in a cold garage, the cap might feel loose once the temperature rises. Wait for a mild day, or warm the cap slightly with a hair dryer (on low!) before pressing it on (this softens the plastic for a tighter fit).
Troubleshooting: When End Caps Go Wrong
Even with perfect installation, things can go sideways. Here's how to fix the most common issues:
-
Issue: End cap pops off after a few days.Solution: Check if the profile end was clean—oil or dust might have weakened the bond. Clean with alcohol, then reattach with a small amount of epoxy (for plastic caps) or thread-locking fluid (for screw-on caps).
-
Issue: End cap cracks or splits during installation.Solution: You probably used too much force with the mallet. For press-fit caps, warm the plastic slightly (as mentioned earlier) to make it more flexible. If it's cracked, replace it—damaged caps won't hold securely.
-
Issue: End cap is misaligned and sticks out at an angle.Solution: Debris inside the profile is likely blocking it. Remove the cap, use a pipe cleaner to clear the inside, then re-align and press evenly. If the profile itself is bent, gently straighten it with a mallet first.
Where End Caps Shine: Real-World Applications
End caps aren't just for workbenches—they're essential in any setup using aluminum profiles. Here are a few places where a secure end cap installation makes a big difference:
Workbenches:
Whether it's a single-deck workbench E or a custom setup, end caps prevent tools from slipping into the profile's T-slot and protect your forearms from scrapes during projects.
Conveyor Systems:
Roller track and accessories move fast, and loose end caps can catch on products or even jam the system. Screw-on caps with adhesive backup are a must here for vibration resistance.
Material Racks:
From 3-row, 3-floor material rack B to small parts storage, end caps keep dust out of the profile and prevent small items from falling into hollow ends.
Turnover Trolleys:
Mobile setups bounce and vibrate, so adhesive-backed or screw-on caps are better than press-fit here. You don't want end caps falling off mid-transport!
Final Thoughts: End Caps Are the "Little Things" That Matter
Installing 3030 aluminum profile end caps might seem like a small step, but it's the kind of detail that separates a weekend DIY project from a professional-grade setup. Take your time, prep properly, and choose the right securing method for your needs—and you'll end up with end caps that stay put, look great, and protect your aluminum profile investment for years to come.
And remember: If you ever run into trouble, don't hesitate to reach out to your aluminum profile supplier. They've seen it all and can help you pick the right end caps, tools, or aluminum profile accessories for the job. Happy building!