- Company Articles
- Products and Technology
- Installation And Maintenance
- Pro Tips for Maximizing Aluminum Workbench B Lifespan in Heavy-Duty Environments

Pro Tips for Maximizing Aluminum Workbench B Lifespan in Heavy-Duty Environments
Related Product
Aluminum Workbench B
Aluminum tube workbench is more flexible and durable, compared with traditional PE/ABS coated steel tube. It is easy to assemble, anti corrosion, rust protection, and recycle use after disassemble.
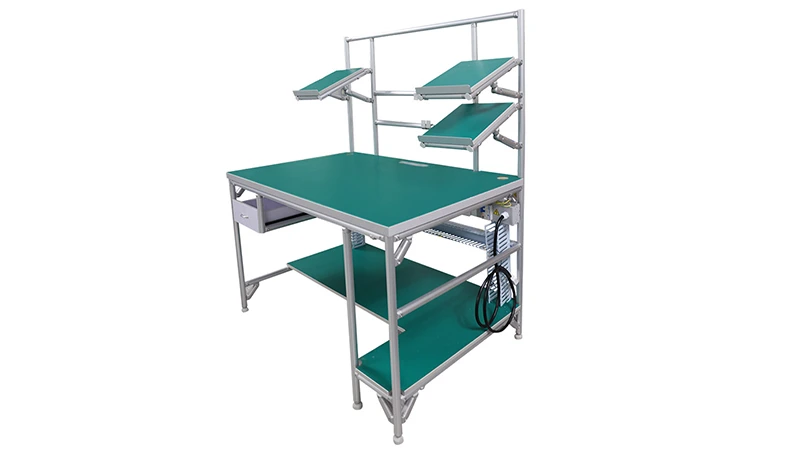
Walk into any busy manufacturing plant, automotive workshop, or electronics assembly line, and you'll likely spot the unsung hero of productivity: the workbench. But not just any workbench—aluminum workbench B, with its sleek aluminum profile and robust design, has become a staple in heavy-duty environments. It's where parts are assembled, tools are organized, and deadlines are met. Yet, even the sturdiest workbench can wear down prematurely if overlooked. The difference between a workbench that lasts 3 years and one that serves reliably for a decade often comes down to intentional care and smart usage. In this guide, we'll dive into practical, actionable tips to help you extend the lifespan of your aluminum workbench B, ensuring it remains a cornerstone of your workflow for years to come.
1. Start Strong: The Foundation of Proper Setup
The lifespan of your aluminum workbench B begins long before the first tool hits its surface—it starts with setup. Rushing through assembly or cutting corners here is like building a house on sand: it might stand for a while, but cracks will appear sooner than later. Let's break down the critical steps to get your workbench off to the right start.
Leveling Matters: The Role of Adjustable Leveling Feet
Picture this: You've just unboxed your aluminum workbench B, eager to put it to use. You slap it on the floor, tighten a few bolts, and start working. A month later, you notice the surface is slightly tilted, causing tools to roll off and parts to slide unevenly. Over time, that tilt strains the frame, weakens joints, and even warps the aluminum profile. The culprit? Skipping the leveling step.
Aluminum workbench B (single deck-without caster) relies on stable ground contact to distribute weight evenly. That's where adjustable leveling feet come in. These small but mighty accessories let you fine-tune the workbench's balance, even on uneven floors. Here's how to do it right:
Step 1:
Place the workbench in its permanent location. Avoid temporary spots—moving it later can loosen bolts and stress the frame.
Step 2: Use a spirit level across the surface and along the legs. Twist the adjustable leveling feet clockwise or counterclockwise until the bubble centers in all directions.
Step 3: Once level, lock the feet in place (if they have locking nuts) to prevent them from shifting under heavy loads.
Pro Tip: Check leveling quarterly. Floors can settle, especially in older buildings, and a quick 5-minute check can save you from bigger issues down the line.
Step 2: Use a spirit level across the surface and along the legs. Twist the adjustable leveling feet clockwise or counterclockwise until the bubble centers in all directions.
Step 3: Once level, lock the feet in place (if they have locking nuts) to prevent them from shifting under heavy loads.
Pro Tip: Check leveling quarterly. Floors can settle, especially in older buildings, and a quick 5-minute check can save you from bigger issues down the line.
Caster Care: When Mobility Meets Durability
While aluminum workbench B is often used as a stationary unit (single deck-without caster), many teams add casters for flexibility—moving it to different workstations or clearing floor space for deep cleaning. If you're using casters, choosing the right ones and maintaining them is non-negotiable. Caster accessories like brake pads, axle caps, and wheel bearings play a huge role in preventing premature wear.
Start by selecting casters rated for your typical load. If your workbench regularly holds 500 lbs of tools and materials, don't skimp on casters with a 300-lb capacity—opting for heavy-duty casters (800+ lbs rating) adds a safety buffer. Once installed:
Clean casters monthly:
Wipe away dust, grease, and metal shavings that can jam wheels. For stubborn grime, use a toothbrush to dislodge debris from wheel axles.
Lubricate moving parts: Apply a silicone-based lubricant to caster bearings every 3 months to reduce friction. Avoid oil-based lubricants—they attract more dust.
Inspect brakes: If your casters have brakes, test them weekly. A stuck brake can cause the workbench to drag, straining both the caster and the workbench legs. replace worn brake pads promptly using compatible caster accessories.
Lubricate moving parts: Apply a silicone-based lubricant to caster bearings every 3 months to reduce friction. Avoid oil-based lubricants—they attract more dust.
Inspect brakes: If your casters have brakes, test them weekly. A stuck brake can cause the workbench to drag, straining both the caster and the workbench legs. replace worn brake pads promptly using compatible caster accessories.
2. Daily Habits: Small Actions, Big Impact
Heavy-duty environments are tough on equipment. Oil spills, metal shavings, and constant use can take a toll on your aluminum workbench B. But with daily habits that protect the surface and structure, you can slow wear and tear dramatically. Think of it like brushing your teeth: small, consistent efforts prevent major problems later.
Keep It Clean: Beyond Wiping Down
Aluminum is naturally resistant to rust, but that doesn't make it invincible. Spills—especially acidic substances like battery fluid or cleaning agents—can corrode the aluminum profile over time. Even water, if left standing, can leave mineral deposits that etch the surface. The key is to clean smarter, not just harder.
Immediate spill response:
Wipe up oil, chemicals, or water within 10 minutes. Use a microfiber cloth—abrasive sponges or steel wool can scratch the aluminum finish, creating spots for corrosion to take hold.
Weekly deep clean: Mix mild dish soap with warm water and gently scrub the surface with a soft cloth. For tough grime (like dried paint or adhesive), use a plastic scraper at a 45-degree angle to avoid scratching. Rinse with a damp cloth and dry thoroughly.
Avoid harsh cleaners: Stay away from bleach, ammonia, or abrasive cleaners. These break down the aluminum's protective layer, making it more vulnerable to damage.
Weekly deep clean: Mix mild dish soap with warm water and gently scrub the surface with a soft cloth. For tough grime (like dried paint or adhesive), use a plastic scraper at a 45-degree angle to avoid scratching. Rinse with a damp cloth and dry thoroughly.
Avoid harsh cleaners: Stay away from bleach, ammonia, or abrasive cleaners. These break down the aluminum's protective layer, making it more vulnerable to damage.
Mind the Weight: Distribute, Don't Overload
Aluminum workbench B is built to handle heavy loads, but "heavy-duty" doesn't mean "unlimited." Overloading the workbench—especially concentrating weight in one area—can bend the aluminum profile, warp the deck, or loosen joints. Most manufacturers specify a weight limit (often 1,000–1,500 lbs for the entire surface), but even within that range, distribution matters.
Spread the load:
Avoid placing all your heaviest tools (like power drills or metal vices) in one corner. Instead, distribute weight evenly across the deck. For example, if you use a vice, position it near the center or bolt it to a reinforced section.
Use shelf liners: Rubber or silicone shelf liners not only prevent tools from sliding but also cushion the surface against impact. Dropping a metal part onto a bare aluminum deck can cause dents; a liner absorbs some of that force.
Know the limits of accessories: If you've added a material rack B (3 row and 3 floor) to the side of your workbench, check its weight capacity too. Overloading the rack can pull on the workbench's frame, straining joints over time.
Use shelf liners: Rubber or silicone shelf liners not only prevent tools from sliding but also cushion the surface against impact. Dropping a metal part onto a bare aluminum deck can cause dents; a liner absorbs some of that force.
Know the limits of accessories: If you've added a material rack B (3 row and 3 floor) to the side of your workbench, check its weight capacity too. Overloading the rack can pull on the workbench's frame, straining joints over time.

3. Protect Against the Elements: Environmental Threats
Heavy-duty environments are rarely "ideal." High humidity, extreme temperatures, and airborne particles (like sawdust or metal dust) can all shorten your workbench's lifespan. By addressing these environmental factors, you'll shield your aluminum workbench B from silent damage.
Humidity and Corrosion: A Silent Enemy
Aluminum resists rust better than steel, but it's still susceptible to corrosion in high-humidity environments (like coastal factories or outdoor workshops). When aluminum reacts with moisture and oxygen, it forms a thin oxide layer—but in humid conditions, this layer can thicken unevenly, leading to pitting or discoloration.
Control the environment:
Use dehumidifiers if humidity levels regularly exceed 60%. Aim for 40–50% humidity to balance comfort and equipment protection.
Apply a protective coating: Every 1–2 years, treat the workbench surface with a clear aluminum sealant (look for products designed for industrial use). This adds an extra barrier against moisture and chemicals.
Inspect for hidden moisture: Check under the workbench deck and around legs monthly. If you notice water pooling (from leaks or floor cleaning), address the source immediately and dry the area thoroughly.
Apply a protective coating: Every 1–2 years, treat the workbench surface with a clear aluminum sealant (look for products designed for industrial use). This adds an extra barrier against moisture and chemicals.
Inspect for hidden moisture: Check under the workbench deck and around legs monthly. If you notice water pooling (from leaks or floor cleaning), address the source immediately and dry the area thoroughly.
Dust and Debris: The Hidden Abrasive
In woodworking shops, metal fabrication plants, or even busy garages, dust and debris are constant companions. What might seem harmless—like a layer of sawdust or metal shavings—can act like sandpaper when trapped between tools and the workbench surface. Over time, this abrasion wears down the aluminum, dulling its finish and weakening its structure.
Daily dusting:
Use a soft-bristled broom or a vacuum with a brush attachment to remove dust from the surface and corners. Pay extra attention to crevices where debris accumulates (like around the edges of the deck or near joints).
Cover when not in use: If the workbench sits idle for more than a week (e.g., during shutdowns), cover it with a breathable canvas tarp. Plastic sheets trap moisture, so avoid them.
Install dust collection: If possible, position a dust collector near the workbench to reduce airborne particles. Even a small, portable unit can make a big difference in debris buildup.
Cover when not in use: If the workbench sits idle for more than a week (e.g., during shutdowns), cover it with a breathable canvas tarp. Plastic sheets trap moisture, so avoid them.
Install dust collection: If possible, position a dust collector near the workbench to reduce airborne particles. Even a small, portable unit can make a big difference in debris buildup.

4. Maintain the Structure: Tighten, replace, and Reinforce
An aluminum workbench B is only as strong as its weakest link—often, the joints and fasteners that hold its aluminum profile together. Over time, vibration from heavy use, temperature changes, and regular wear can loosen bolts, weaken connections, or even bend components. By staying ahead of these issues, you'll prevent small problems from turning into costly repairs.
Regular Inspections: Catch Issues Early
Set a calendar reminder to inspect your workbench every 2–3 months. It's a quick 15-minute task that can save hours of repair work later. Focus on these key areas:
Joints and fasteners:
Check all bolts, screws, and aluminum profile accessories (like brackets or corner codes). Tighten any loose fasteners with the correct tool—over-tightening can strip threads, while under-tightening leaves the joint weak. If a bolt is stripped or corroded, replace it immediately with a compatible part (using OEM or high-quality aftermarket replacements).
Aluminum profile integrity: Look for dents, bends, or cracks in the frame or legs. Even small dents can weaken the structure, especially if they're near joints. If you spot a bend, contact the manufacturer—attempting to straighten it yourself can cause further damage.
Deck stability: Press down firmly on different areas of the deck. If it flexes excessively or makes creaking sounds, the support structure may need reinforcement. Adding a cross-brace (using aluminum profile accessories) can often resolve this issue.
Aluminum profile integrity: Look for dents, bends, or cracks in the frame or legs. Even small dents can weaken the structure, especially if they're near joints. If you spot a bend, contact the manufacturer—attempting to straighten it yourself can cause further damage.
Deck stability: Press down firmly on different areas of the deck. If it flexes excessively or makes creaking sounds, the support structure may need reinforcement. Adding a cross-brace (using aluminum profile accessories) can often resolve this issue.
replace Worn Parts Proactively
No part lasts forever, and that's okay. The secret to extending your workbench's lifespan is replacing worn components before they fail. Common parts that need attention include:
Adjustable leveling feet:
If the rubber pads are cracked or worn, replace them. Worn pads reduce stability and can scratch floors.
Caster wheels: If wheels wobble, squeak, or don't roll smoothly, swap them out. Damaged casters strain the workbench legs and make movement difficult.
Drawer slides or accessories: If your workbench has drawers or tool hooks, check that slides glide smoothly and hooks are secure. replace bent or broken slides with ones designed for heavy loads.
Caster wheels: If wheels wobble, squeak, or don't roll smoothly, swap them out. Damaged casters strain the workbench legs and make movement difficult.
Drawer slides or accessories: If your workbench has drawers or tool hooks, check that slides glide smoothly and hooks are secure. replace bent or broken slides with ones designed for heavy loads.
5. Troubleshooting Common Issues: Quick Fixes for Longevity
Even with the best care, issues can pop up. The key is to address them quickly to prevent further damage. Here's a handy troubleshooting guide for common problems with aluminum workbench B:
| Issue | Cause | Solution |
|---|---|---|
| Wobbly workbench | Loose leveling feet or uneven floor | Retighten leveling feet; use a spirit level to realign. If the floor is uneven, add shims under the feet (use rubber shims to prevent slipping). |
| Sticky or scratched surface | Abrasive cleaning or debris buildup | Polish the surface with aluminum cleaner (follow manufacturer instructions). For deep scratches, contact a professional to refinish the area. |
| Bent aluminum profile | Overloading or impact damage | replace the bent section with a new aluminum profile. Do not attempt to bend it back—this weakens the metal. |
| Loose joints | Vibration or worn fasteners | Tighten bolts with a torque wrench (follow manufacturer torque specs). If bolts strip, drill out the old ones and install larger, compatible fasteners. |
6. Long-Term Care: Investing in the Future
As your aluminum workbench B ages, it may need more than just maintenance—it may need upgrades to keep up with changing workflows. For example, if your team starts using heavier tools, adding a reinforced shelf or upgrading to thicker aluminum profile can extend its useful life. Similarly, if you move to a new facility, take time to reassemble the workbench carefully, replacing any worn parts during the process.
Another long-term strategy is to document your maintenance efforts. Keep a log of when you cleaned, tightened bolts, or replaced parts. This helps you spot patterns (e.g., "casters wear out every 18 months") and plan replacements proactively. It also makes it easier to train new team members on proper care, ensuring consistency even as staff changes.
Final Thoughts: Your Workbench, Your Partner
Aluminum workbench B isn't just a piece of equipment—it's a partner in productivity. It stands with you through early mornings, tight deadlines, and the chaos of daily operations. By following these tips—from proper setup with adjustable leveling feet to proactive part replacement—you're not just extending its lifespan; you're investing in the efficiency, safety, and success of your workspace. Remember, a well-cared-for workbench doesn't just last longer—it works harder, keeping your team focused on what matters most: getting the job done right.