- Company Articles
- Products and Technology
- Installation And Maintenance
- Recommended Tools for Installing 3060 National Standard Profile A Structures

Recommended Tools for Installing 3060 National Standard Profile A Structures
Related Product
3060 National Standard Profile A
Workbench, production line, logistic rack, warehouse rack Industry: Manufacturer workshop, Automobile, Electronic, Assembling, logistic
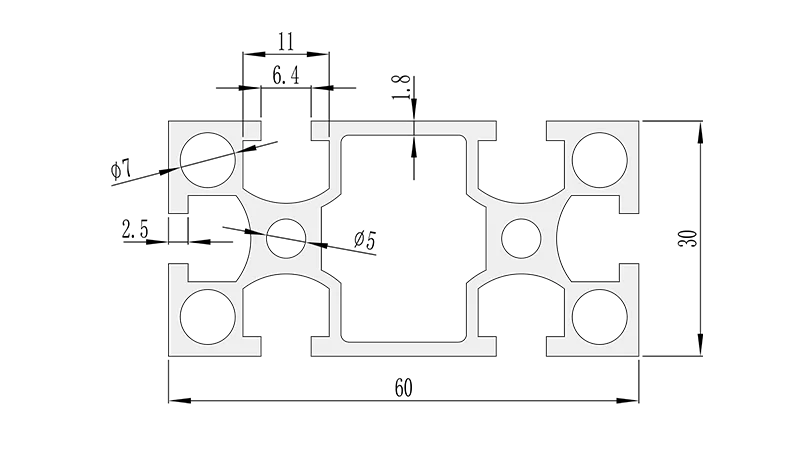
If you've ever stepped into a modern factory, warehouse, or even a well-organized workshop, you've probably seen them: sleek, modular structures that seem to adapt to every need—workbenches that hold heavy machinery, material racks that keep inventory neat, or assembly lines that flow like clockwork. Chances are, many of those structures are built with aluminum profiles, and one of the most versatile players in this space is the 3060 National Standard Profile A . Its 30mm x 60mm cross-section strikes the perfect balance between strength and flexibility, making it a go-to choice for everything from lightweight workstations to sturdy production lines. But here's the thing: even the best profile is only as good as the tools you use to install it. Without the right gear, assembling a 3060 Profile A structure can quickly turn from a satisfying project into a frustrating battle with misaligned holes, stripped fasteners, and wobbly frames. In this guide, we'll walk you through the essential tools, tips, and tricks to make your installation process smooth, efficient, and—dare we say—enjoyable.
Why 3060 National Standard Profile A Matters in Lean Systems
Before diving into tools, let's take a moment to appreciate why the 3060 National Standard Profile A is so widely used, especially in lean system setups. Lean systems thrive on efficiency: minimizing waste, streamlining workflows, and adapting quickly to change. The 3060 Profile A fits this philosophy like a glove. Its T-slot design allows for easy attachment of accessories—think shelves, brackets, or even conveyor tracks—without welding or drilling new holes. This modularity means you can reconfigure a workbench into a material rack or extend a production line in hours, not days. Plus, its aluminum construction keeps it lightweight enough to move (with the right casters) but strong enough to support heavy loads—up to 200kg per meter, depending on the setup. For manufacturers and workshop owners, this translates to lower costs, faster turnaround, and a workspace that grows with their needs. But again, to unlock all these benefits, you need to install it correctly. And that starts with having the right tools.
Essential Hand Tools: The Foundation of Precision
Hand tools are the unsung heroes of any assembly project. They're often the first tools you reach for, and they set the stage for a precise, stable structure. Here are the must-haves for working with 3060 National Standard Profile A:
Hex Keys (Allen Wrenches): Your T-Slot Best Friend
If there's one tool you can't live without when installing aluminum profiles, it's the hex key. The T-slots in 3060 Profile A are designed to work with hex-head fasteners (like T-slot nuts and bolts), and a good set of hex keys will make tightening these fasteners a breeze. Look for a set with both standard and ball-end keys. Ball-end hex keys are a game-changer because they allow you to approach the fastener at an angle—perfect for tight spaces where a straight key won't fit. Opt for hex keys made from chrome-vanadium steel; they're stronger and less likely to strip than cheaper carbon steel options. Pro tip: Get a set with a foldable handle or a magnetic holder to keep them organized—nothing slows you down like rummaging through a toolbox for the right size.
Combination Wrenches: Grip and Torque for Sturdy Joints
While hex keys handle T-slot fasteners, combination wrenches (open-end on one side, box-end on the other) are essential for tightening nuts and bolts on aluminum profile accessories like corner brackets or end caps. The 3060 Profile A often uses M5, M6, or M8 bolts, so a set covering 5mm to 10mm will cover most cases. The box-end side is great for applying maximum torque without slipping, while the open-end is useful for quick adjustments. Look for wrenches with a slim profile—some aluminum accessories have tight clearances, and a bulky wrench will only frustrate you. A rubberized grip also helps when your hands get sweaty (and they will, if you're working on a big project).
Rubber Mallet: Gentle Persuasion for Alignment
Even with careful measuring, profiles and accessories sometimes need a little nudge to line up perfectly. That's where a rubber mallet comes in. Unlike a steel hammer, a rubber mallet delivers force without damaging the aluminum finish or deforming the profile. Use it to tap a bracket into place, align holes, or seat a T-slot nut firmly in the slot. Go for a 16-ounce mallet—heavy enough to get the job done, but light enough to control. Avoid wooden mallets; they can splinter, and the wood fibers might leave marks on the aluminum.
Deburring Tool: Smooth Edges, Safe Hands
If you're cutting 3060 Profile A to length (we'll cover cutting tools later), you'll almost always end up with sharp burrs on the cut edges. These burrs aren't just annoying—they can slice through gloves, scratch surfaces, or even throw off the fit of accessories. A deburring tool (sometimes called a "chamfer tool") quickly removes these burrs, leaving smooth, safe edges. Look for one with a replaceable blade and a comfortable grip. For extra precision, get a tool with a 45-degree angle guide to ensure consistent chamfering.
Tape Measure and Carpenter's Pencil: Measure Twice, Cut Once
This might seem obvious, but a reliable tape measure is non-negotiable. When working with 3060 Profile A, even a 1mm error in measurement can lead to misaligned holes or a skewed frame. Opt for a 5-meter (or 16-foot) tape with a locking mechanism and a clear, easy-to-read scale. A tape with a magnetic hook is a bonus—it sticks to the aluminum profile, leaving your hands free to mark measurements. Pair it with a carpenter's pencil (the flat lead won't roll away) or a fine-tip marker for crisp, visible marks. Remember the golden rule: measure twice, cut once. It's cliché, but it saves you from wasting expensive profiles.
Power Tools: Speeding Up the Process Without Sacrificing Quality
Hand tools are great for precision, but when you're assembling multiple structures or working with heavy-duty fasteners, power tools become indispensable. They reduce fatigue, speed up installation, and ensure consistent torque—key for long-lasting stability.
Cordless Drill/Driver: The Workhorse of Assembly
A cordless drill/driver is a must for driving T-slot bolts, screws, and other fasteners into 3060 Profile A. Look for a model with variable speed control—lower speeds (around 300 RPM) for tightening fasteners, higher speeds (up to 1500 RPM) for drilling pilot holes if needed. A torque adjustment feature is crucial too; you want to tighten fasteners enough to hold the structure together, but not so much that you strip the threads or warp the profile. For aluminum, a torque setting of 3-5 Nm is usually sufficient for M5 bolts, and 5-8 Nm for M6. Pro tip: Invest in a set of hex-shank drill bits and driver bits—they fit snugly into the T-slot fasteners and reduce the risk of slipping.
Impact Driver: For Stubborn Fasteners and Heavy-Duty Joints
If you're working with larger fasteners (M8 or above) or attaching accessories to thick aluminum profile walls, a cordless impact driver is worth every penny. Unlike a regular drill, an impact driver delivers short, powerful bursts of torque that loosen or tighten stubborn fasteners without straining your wrist. This is especially useful when installing aluminum profile accessories like heavy-duty brackets or corner codes, which often require extra torque to stay secure. Just be careful not to overdo it—aluminum is softer than steel, and too much impact can damage the threads. Stick to impact drivers with adjustable torque settings, and start with the lowest setting, increasing as needed.
Angle Grinder with Cutting Disc: Trimming Profiles to Size
While many suppliers will cut 3060 Profile A to your exact specifications, there are times when you need to make on-site adjustments—maybe a profile is slightly too long, or you need a custom angle for a corner joint. An angle grinder with a 115mm (4.5-inch) aluminum cutting disc is the tool for the job. Aluminum cutting discs are designed to cut through soft metals without clogging, leaving clean, burr-free edges (though you'll still want to deburr afterward). Always wear safety glasses, gloves, and a dust mask when cutting—aluminum dust is fine and can irritate your lungs. Secure the profile in a vice or clamp before cutting to prevent it from moving, and let the grinder do the work—applying too much pressure can overheat the disc or warp the profile.
Laser Level: Ensuring a Straight, Level Structure
A wobbly workbench or a slanted material rack isn't just annoying—it's a safety hazard. A laser level takes the guesswork out of alignment, ensuring your 3060 Profile A structure is straight, level, and plumb. For most assembly projects, a cross-line laser (which projects both horizontal and vertical lines) is ideal. Place it on a stable surface or mount it on a tripod, and use the laser lines to align profiles before tightening fasteners. This is especially useful for long runs, like a production line or a wall-mounted shelf system. Look for a laser level with a self-leveling feature—it automatically adjusts if it's slightly off-kilter, saving you time and frustration.
Specialized Tools and Accessories: Tailored for 3060 Profile A
Beyond the basics, there are a few specialized tools and accessories designed specifically for aluminum profiles that can take your installation to the next level. These tools address the unique challenges of working with T-slots and modular systems, ensuring a professional finish.
T-Slot Nut Installation Tool: No More Fumbling
T-slot nuts are what make the 3060 Profile A so versatile—they slide into the T-slot and lock in place when you tighten a bolt. But getting them into the slot, especially in long profiles or hard-to-reach areas, can be tricky. A T-slot nut installation tool (sometimes called a "nut feeder") solves this problem. It's a simple tool with a magnet or a clamp that holds the nut in place, allowing you to slide it into the T-slot without dropping it. Some models even have a long handle, making it easy to reach the middle of a 2-meter profile. If you're installing more than a handful of T-slot nuts, this tool will save you countless minutes (and curse words).
Profile Cutting Jig: For Perfect 90-Degree Angles
If you're cutting 3060 Profile A yourself, a profile cutting jig is a game-changer. It clamps onto the profile and guides your angle grinder, ensuring straight, square cuts every time. Most jigs are adjustable, so they work with different profile sizes (including 3060, 2040, and 4040). This is especially useful if you're making multiple cuts—consistency is key for a stable structure. Some jigs even have angle guides, letting you cut 45-degree miters for clean corner joints. For around $50, it's a small investment that pays off in professional-looking results.
3060 Aluminum Angle Yards: Reinforcing Joints the Right Way
While not a tool, 3060 aluminum angle yards (or corner codes) are essential accessories for strengthening joints in 3060 Profile A structures. These L-shaped brackets fit into the T-slots of intersecting profiles, distributing weight evenly and preventing the joint from flexing. They're especially important for load-bearing structures like workbenches or material racks. To install them, you'll need to use T-slot nuts and bolts (hence the need for hex keys and a drill/driver). Pro tip: Always use two angle yards per joint—one on each side of the profile—to ensure symmetry and stability.
Safety Gear: Protecting Yourself While You Build
No tool list is complete without safety gear. Working with aluminum profiles, power tools, and fasteners can expose you to risks like cuts, flying debris, or repetitive strain injuries. Here's what you need to stay safe:
- Safety Glasses: A must when cutting, drilling, or deburring—aluminum shards can fly at high speeds.
- Work Gloves: Protect your hands from sharp edges, burrs, and hot surfaces (from grinding).
- Dust Mask/Respirator: Aluminum dust is fine and can irritate your lungs—wear a mask when cutting or sanding.
- Ear Protection: Power tools like impact drivers and angle grinders are loud—earplugs or earmuffs prevent hearing damage.
- Steel-Toe Boots: If you're working with heavy profiles or tools, steel-toe boots protect your feet from drops.
Step-by-Step Installation Example: Building a 3060 Profile A Workbench
To put all these tools into context, let's walk through a common project: building a basic workbench using 3060 National Standard Profile A. This will show you how each tool comes into play.
Step 1: Gather Materials and Tools
For a simple 120cm x 60cm workbench, you'll need: 4 pieces of 3060 Profile A (120cm long for the top and bottom rails), 4 pieces (60cm long for the legs), 8 3060 aluminum angle yards , 16 T-slot nuts (M6), 16 M6 bolts (20mm long), a plywood or aluminum top (120cm x 60cm), and 4 casters (optional, for mobility). Tools needed: tape measure, carpenter's pencil, cordless drill/driver with hex bits, hex keys, rubber mallet, combination wrench, laser level, and deburring tool.
Step 2: Cut Profiles (If Needed) and Deburr
If your profiles aren't pre-cut, use the angle grinder with a cutting disc and profile cutting jig to cut them to length. Deburr all cut edges with the deburring tool to remove sharp burrs.
Step 3: Assemble the Frame
Lay out the 120cm and 60cm profiles on a flat surface to form a rectangle (the top frame). insert T-slot nuts into the T-slots of the 120cm profiles, then align the 60cm profiles at the ends. Attach the angle yards to the corners using M6 bolts, tightening with the drill/driver (set to low torque). Repeat for the bottom frame. Use the rubber mallet to tap profiles into alignment if needed.
Step 4: Attach the Legs
Stand the top and bottom frames upright, then connect them with the 60cm leg profiles. Use angle yards at each joint (top frame to leg, bottom frame to leg) for stability. Tighten the bolts with the combination wrench for extra torque.
Step 5: Level the Frame
Place the laser level on the top frame and adjust the legs until the frame is level (use shims under the legs if needed). Tighten all bolts fully with the hex keys.
Step 6: Attach the Top and Casters
Lay the plywood/aluminum top on the frame and secure it with T-slot nuts and bolts (pre-drill holes in the top if using wood). If adding casters, attach them to the bottom frame using the manufacturer's hardware and a drill/driver.
And just like that, you've built a sturdy, modular workbench—all thanks to the right tools and a little patience.
Troubleshooting Common Installation Issues
Even with the best tools, you might run into hiccups. Here's how to fix the most common problems:
- Stripped T-slot Nut: If a nut spins without tightening, try using a larger bolt or add a washer to increase friction. If the T-slot is damaged, fill it with epoxy and re-drill (as a last resort).
- Misaligned Holes: Use the rubber mallet to gently tap the profiles into alignment. If holes are off by more than 2mm, you may need to drill a new hole (use a center punch to mark the spot first).
- Wobbly Frame: Check if all bolts are tight, and add angle yards to weak joints. If the floor is uneven, use adjustable feet or shims.
Conclusion: Tools That Turn Profiles into Productivity
Installing a 3060 National Standard Profile A structure isn't just about putting pieces together—it's about creating a workspace that fuels efficiency, adapts to change, and stands the test of time. With the right tools—from hex keys and laser levels to impact drivers and aluminum profile accessories —you can transform raw profiles into workbenches, material racks, or entire production lines that make your lean system sing. Remember, investing in quality tools isn't a luxury; it's a smart move that saves you time, reduces frustration, and ensures your structures are safe and stable. So grab your tools, measure twice, and start building—your more efficient workspace awaits.
Recommended Tools at a Glance
| Tool Category | Essential Tools | Key Features | Pro Tip |
|---|---|---|---|
| Hand Tools | Hex keys (ball-end), combination wrenches, rubber mallet, deburring tool | Chrome-vanadium steel (hex keys), 16-ounce head (mallet), replaceable blade (deburring tool) | Keep hex keys organized in a foldable set to avoid losing sizes. |
| Power Tools | Cordless drill/driver, impact driver, angle grinder, laser level | Variable speed (drill), adjustable torque (impact driver), self-leveling (laser level) | Use low torque on aluminum to prevent stripping fasteners. |
| Specialized Accessories | T-slot nut installation tool, profile cutting jig, 3060 aluminum angle yards | Magnetic tip (nut tool), adjustable for multiple profiles (jig), L-shaped design (angle yards) | Use two angle yards per joint for maximum stability. |
| Safety Gear | Safety glasses, work gloves, dust mask, ear protection | Shatterproof lenses (glasses), cut-resistant material (gloves), N95 rating (mask) | Never skip safety glasses when cutting or drilling. |