- Company Articles
- Products and Technology
- Installation And Maintenance
- Recommended Tools for Installing 60 Steel Roller Track Grey: A Practical List

Recommended Tools for Installing 60 Steel Roller Track Grey: A Practical List
Related Product
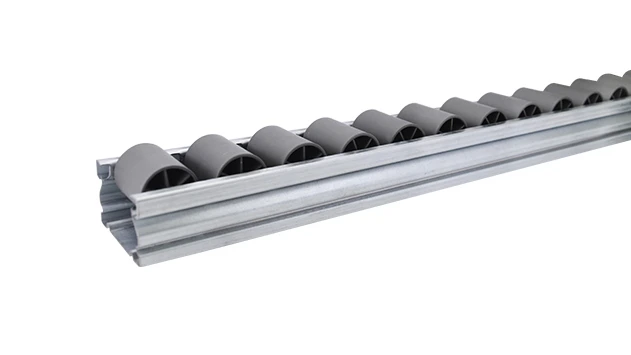
60 Steel Roller Track Grey
The roller track can be installed with multiple accessories to create different slopes and configurations of flow racks.All steel conveyor 60 roller track accessories are engineered to perfectly fit the sliding rail.
Recommended Tools for Installing 60 Steel Roller Track Grey: A Practical List
If you've ever worked with lean systems in manufacturing or warehouse setups, you know how critical roller tracks are to keeping operations running smoothly. The 60 Steel Roller Track Grey is a staple in many flow racks, conveyor systems, and production lines—its durable steel construction and smooth rolling surface make it ideal for moving parts, products, and materials efficiently. But installing it correctly isn't just about putting pieces together; it requires the right tools to ensure alignment, stability, and long-term performance. In this guide, we'll walk you through the essential tools you need, along with practical tips to avoid common mistakes and get the job done right the first time.
Pre-Installation: Safety & Material Check
Before diving into tools, let's cover the basics. Safety should always come first—wear heavy-duty gloves to protect your hands from sharp steel edges, safety goggles to shield your eyes from debris, and closed-toe shoes to prevent injuries from falling tools or metal pieces. Next, check your materials: make sure you have the 60 Steel Roller Track Grey sections, all necessary roller track accessories (like connectors, screws, and end caps), and the supporting frame (whether it's part of a flow rack or a conveyor system). Missing even one small accessory can delay your installation, so double-check your kit before starting.
Core Tools for Installation: A Detailed Breakdown
The tools below are divided into categories to help you organize your workspace and ensure you don't miss anything. Each tool plays a unique role in making your installation efficient and effective.
1. Measurement & Marking Tools
Accurate measurements are the foundation of a successful installation. Even a small error can lead to misaligned tracks, stuck products, or unstable structures.
| Tool Name | Purpose | Practical Tips |
|---|---|---|
| 25-Foot Tape Measure | Measure track lengths, spacing between sections, and installation positions. | Hold the tape straight and tight against the surface; avoid slack to prevent incorrect readings. For long conveyor systems, use a laser measure if available for even greater accuracy. |
| 12-Inch & 24-Inch Spirit Level | Ensure tracks are horizontal (for flow racks) or inclined (for gravity conveyors) correctly. | Place the level on top of the track: for flow racks, the bubble should be centered; for gravity conveyors, adjust the angle to the recommended slope (usually 1-2 degrees) so items flow smoothly without speeding too fast. |
| Square Ruler | Make straight, 90-degree marks for cutting or fastening. | Use it to mark cut lines on the steel track—crooked cuts will prevent proper fitting with roller track accessories like connectors. |
| Mechanical Pencil | Mark cut lines, screw positions, and alignment points. | Use a 0.5mm lead for fine marks; avoid using regular pencils as their marks can smudge or fade. |
2. Cutting & Trimming Tools
The 60 Steel Roller Track Grey often needs to be cut to fit custom setups (like a small flow rack for a warehouse corner or a short conveyor section in a production line). These tools help you make clean, precise cuts and prepare the track for assembly.
| Tool Name | Purpose | Practical Tips |
|---|---|---|
| Metal Cutting Saw | Cut the steel track to the desired length. | Use a blade designed for steel; wear a dust mask to avoid inhaling metal particles. Secure the track with a clamp before cutting to prevent it from moving. |
| Deburring Tool | Remove sharp edges and burrs from cut ends. | Run the tool along the cut edge in a circular motion until all burrs are gone—this prevents injuries and ensures the track fits snugly with accessories. |
| Sandpaper (120-Grit) | Smooth rough surfaces after cutting or deburring. | Use it to polish the cut end; this helps in inserting the track into connectors without damaging the accessory. |
3. Fastening & Assembly Tools
Securing the track to its frame and connecting sections requires tools that provide enough leverage and precision to ensure stable, long-lasting joints.
| Tool Name | Purpose | Practical Tips |
|---|---|---|
| Phillips & Flathead Screwdrivers | Tighten screws from roller track accessories (like end caps or connectors). | Use the right size screwdriver to avoid stripping the screw heads—for example, a #2 Phillips screwdriver works for most standard screws in roller track kits. |
| Socket Wrench Set | Fasten bolts that hold the track to the supporting frame. | Use a torque wrench if available to tighten bolts to the recommended torque (usually 10-15 Nm for steel tracks) to prevent over-tightening or loosening over time. |
| Power Drill with Metal Bits | Drill holes in the frame for fastening the track (if needed). | Use a cobalt drill bit for steel frames; start with a small pilot hole before drilling the final size to avoid cracking the frame. |
| Clamp Set | Hold track sections together while fastening them. | Use two clamps to secure both ends of the track section—this ensures alignment while you tighten the screws or bolts. |
4. Alignment & Adjustment Tools
Even with accurate measurements, track sections can shift during assembly. These tools help you align sections correctly and adjust the track for optimal performance.
| Tool Name | Purpose | Practical Tips |
|---|---|---|
| Rubber Mallet | Tap track sections into place without damaging the steel surface. | Use light, even taps—heavy hits can bend the track or damage the rollers. |
| Alignment Tool | Ensure multiple track sections are in a straight line. | Place the tool along the top of the tracks; if there's a gap between the tool and the track, adjust the section until it's aligned. |
| Adjustable Spanner | Adjust the height of the supporting frame to level the track. | Turn the spanner slowly to avoid sudden movements—this helps in fine-tuning the track's levelness. |
Practical Installation Tips for Common Scenarios
Now that you have the tools, let's look at how to use them in real-world setups—like installing the 60 Steel Roller Track Grey in a flow rack or a conveyor system.
Scenario 1: Flow Rack Installation
Flow racks are a key part of lean systems, as they help organize inventory and reduce picking time. To install the track in a flow rack:
- Use the tape measure to mark the positions of the track on the flow rack's shelves.
- Place the spirit level on the shelf to ensure it's horizontal.
- Clamp the track to the shelf and use the power drill to fasten it with screws from the roller track accessories kit.
- Check the track's levelness again—if it's not horizontal, adjust the shelf's height using the adjustable spanner.
- Repeat for all track sections, using the alignment tool to ensure they're in a straight line.
Scenario 2: Conveyor System Installation
Conveyors use roller tracks to move products from one part of the production line to another. For this setup:
- Cut the track to the desired length using the metal cutting saw and deburr the ends.
- Align the track sections using the alignment tool and clamp them together.
- Fasten the sections with roller track connectors using the socket wrench.
- Attach the track to the conveyor frame using the power drill and bolts.
- Check the track's slope (for gravity conveyors) using the spirit level—adjust the frame until the slope is 1-2 degrees.
Troubleshooting Common Issues
Even with the right tools, you might face some issues during installation. Here's how to fix them:
- Issue: Items get stuck on the track. Solution: Check if the track is level (use the spirit level) or if there's debris in the rollers (clean with a brush). If the track is bent, use the rubber mallet to straighten it.
- Issue: Track sections don't align. Solution: Use the alignment tool to adjust the sections and clamp them together before fastening.
- Issue: Screws keep loosening. Solution: Use a torque wrench to tighten the screws to the recommended torque, or add lock washers from the roller track accessories kit.
Conclusion
Installing the 60 Steel Roller Track Grey doesn't have to be a daunting task—with the right tools and practical tips, you can get it done efficiently and effectively. The tools listed here (like the spirit level, socket wrench, and alignment tool) are essential for ensuring your track is stable, level, and aligned correctly. Whether you're setting up a flow rack, a conveyor system, or any other lean system, these tools will help you create a setup that improves productivity and reduces waste. So gather your tools, check your materials, and start installing—your lean system will thank you!