- Company Articles
- Products and Technology
- Installation And Maintenance
- Repairing Damaged Four Way Straight Lean Pipe Joint: DIY vs. Professional Service

Repairing Damaged Four Way Straight Lean Pipe Joint: DIY vs. Professional Service
Related Product
Four Way Straight Lean Pipe Joint
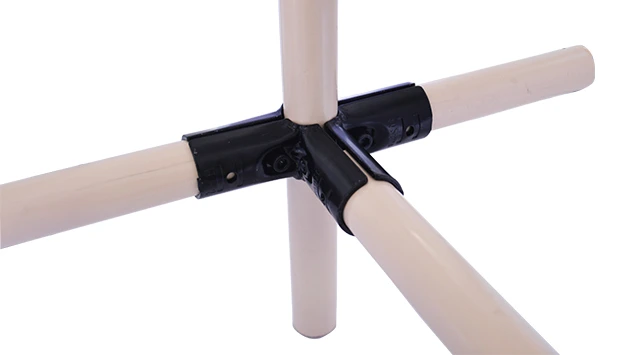
Four way lean pipe joint for 4 pcs 28MM lean pipe connection in straight angle, which used widely in workbench, flow rack, hand trolley frame connection.
Picture this: It's a Tuesday morning at your production facility. The assembly line is humming, workers are moving in sync, and materials glide smoothly from station to station—all thanks to your trusty lean pipe system. But suddenly, there's a jolt. A section of the flow rack lurches, and a bin of components crashes to the floor. You rush over, and there it is: a cracked four way straight lean pipe joint, the unsung hero that's been holding that corner of the system together for years. Now, your entire workflow is bottlenecked, and you're faced with a critical question: Do you fix it yourself, or call in the pros?
If you've ever managed a production floor, warehouse, or manufacturing plant, you know lean pipe systems are the backbone of efficiency. They're the reason your workbenches stay organized, your conveyor belts move without hitches, and your turnover trolleys glide where they need to go. And at the heart of these systems? Joints. Specifically, the four way straight lean pipe joint—a small but mighty component that connects pipes, supports weight, and keeps everything aligned. When it fails, even temporarily, the ripple effects can be costly: delayed orders, frustrated teams, and unexpected downtime.
In this article, we're diving deep into the world of repairing a damaged four way straight lean pipe joint. We'll break down when a do-it-yourself approach makes sense, when it's smarter to call a lean pipe supplier or professional service, and how to decide which path is right for your business. Along the way, we'll touch on common causes of joint failure, the tools you'll need (spoiler: lean pipe accessories matter!), and real-world scenarios to help you weigh your options. Let's get started.
First Things First: What Even Is a Four Way Straight Lean Pipe Joint?
Before we jump into repairs, let's make sure we're all on the same page. A four way straight lean pipe joint is exactly what it sounds like: a connector designed to join four lean pipes at 90-degree angles, forming a sturdy, straight intersection. Think of it as the "cornerstone" of your lean system—whether it's holding up a workbench, stabilizing a flow rack, or keeping a conveyor frame rigid. These joints are typically made from metal (like steel or aluminum) or high-grade plastic, and they come in various designs, including fixed, swivel, or internal rotation models (you might have heard of internal rotatory aluminum joints if you use aluminum lean pipe).
What makes them so crucial? Unlike simpler two-way or three-way joints, four way joints distribute weight evenly across multiple pipes, making them ideal for high-stress areas. For example, a material rack B (3 row and 3 floor) setup often relies on these joints to support heavy loads without bending. But here's the catch: because they take on so much pressure, they're also prone to wear and tear. Over time, even the sturdiest joint can crack, loosen, or corrode—especially if it's not maintained properly.
Real Talk: Mark, a production manager at a small electronics plant, once told me about a four way joint failure that cost his team 8 hours of downtime. "We thought it was just a loose bolt," he said. "Turns out, the joint had a hairline crack we didn't notice until the whole shelf sagged. By then, we had to halt assembly, clear the area, and scramble to find a replacement. If we'd checked it during our weekly walkthroughs, we could've avoided the mess."
Why Do Four Way Straight Lean Pipe Joints Fail? Common Culprits
Before deciding to DIY or hire a pro, it helps to understand why your joint failed. This isn't just about assigning blame—it's about preventing future issues. Let's break down the usual suspects:
1. Wear and Tear (The "Slow Burn"): Even the best lean pipe joint isn't built to last forever. Every time a trolley bumps into the rack, every time you load a heavier bin than usual, every vibration from nearby machinery—all of it adds up. Over months (or years), the metal or plastic can fatigue, leading to cracks or stripped threads. If your joint is over five years old and in a high-traffic area, this is probably the cause.
2. Overloading (Pushing It Too Far): We've all been there: you need to stack just one more box, or you're in a hurry and skip checking the weight limit. But four way joints have a maximum load capacity, usually listed by the lean pipe supplier (pro tip: always keep those specs handy!). Exceeding that limit—even once—can warp the joint or loosen the connections. For example, a joint rated for 200 lbs might handle 250 lbs once, but do that regularly, and it'll fail faster than you can say "lean system."
3. Improper Installation (A Bad Start): Maybe your joint wasn't installed right from the get-go. If the bolts weren't tightened evenly, or if the pipes weren't cut to the exact length, the joint might have been under stress from day one. This is common with DIY setups or when a new team member unfamiliar with lean pipe accessories does the installation.
4. Environmental Factors (Nature's Wrath): Moisture, humidity, and corrosive chemicals can eat away at metal joints over time. If your facility is in a damp area (like a basement warehouse) or handles liquids (think food processing or automotive plants), stainless steel pipe series joints might hold up better than standard steel ones. Plastic joints, on the other hand, can degrade if exposed to direct sunlight or extreme temperatures.
5. Poor Maintenance (Out of Sight, Out of Mind): When was the last time you cleaned or lubricated your joints? If you're like most people, the answer is "never." Dust, grime, and even rust can build up in the crevices, making it harder to tighten bolts and causing friction that wears down the material. A quick wipe with a damp cloth and a drop of lubricant every few months can add years to a joint's life.
Now that you know why it failed, let's explore your repair options.

DIY Repair: When to Roll Up Your Sleeves (and When to Think Twice)
If you're handy with tools, have a bit of time, and the damage seems minor, a DIY repair might be the way to go. Let's walk through what that looks like, step by step.
Signs a DIY Repair Is Feasible
Not all joint damage is created equal. Here's when you can confidently grab your wrench:
- Minor Cracks or Looseness: If the joint is cracked but still mostly intact (no pieces missing) or just loose (not bent or broken), you can likely fix it with a replacement joint and basic tools.
- You Have the Right Parts On Hand: Do you keep spare lean pipe joints in your maintenance closet? If yes, and they match the size/type of your damaged joint (e.g., same diameter, same material), you're golden. If not, you'll need to order from a lean pipe supplier—which might take days, negating the "quick fix" benefit of DIY.
- Low-Stakes Location: Is the joint in a non-critical area? For example, a small material rack B (3 row and 3 floor) that's used once a day is less risky to DIY than a joint holding up a conveyor over a busy assembly line.
- You (or Your Team) Have Experience: If you've assembled lean pipe systems before, or if your maintenance tech has replaced joints in the past, you know what you're doing. If not, even a "simple" repair can turn into a disaster.
DIY Repair Step-by-Step: From Problem to Solution
Assuming you've checked the boxes above, let's get to work. Here's a foolproof guide to replacing a four way straight lean pipe joint:
Step 1: Safety First (No Cutting Corners!) Before touching anything, clear the area around the damaged joint. Unload any materials from the rack or workbench—you don't want extra weight shifting while you work. If the joint is above head height, grab a stable ladder (not a wobbly chair). And always wear gloves—sharp metal edges or plastic shards can cut!
Step 2: Assess and Document the Damage Take a photo of the joint before you start. This helps if you need to reference it later (or ask a lean pipe supplier for advice). Note where the crack is, if any pipes are bent, and if there's rust or corrosion. This will also help you avoid making the same mistake with the new joint.
Step 3: Gather Your Tools and Parts You'll need:
- A replacement four way straight lean pipe joint (same material and size as the old one—don't mix steel and aluminum unless your system is designed for it!)
- Adjustable wrench or socket set (to loosen/tighten bolts)
- Wire brush (to clean rust or debris from the pipes)
- Lean pipe accessories like pipe clamps (if the pipes are loose)
- Thread locker (optional, but recommended to prevent future looseness)
Step 4: Remove the Damaged Joint Start by loosening the bolts or screws holding the joint to the pipes. Go slow—if the joint is rusted, spray a little penetrating oil (like WD-40) and wait 10 minutes. Once loose, carefully slide the joint off the pipes. If it's stuck (thanks to corrosion), gently tap it with a rubber mallet—don't yank, as you might bend the pipes.
Step 5: Clean and Prep the Pipes Use the wire brush to scrub the ends of the pipes where the joint was attached. Remove rust, dirt, or old thread locker. If the pipes are bent, use a pipe straightener (or a vice and gentle pressure) to fix them—even a small bend can throw off the new joint's alignment.
Step 6: Install the New Joint Slide the new four way straight lean pipe joint onto the pipes, making sure it's aligned straight (use a level if you're unsure). Tighten the bolts evenly—don't crank one side all the way first, as this can warp the joint. A good rule: tighten each bolt a little at a time, alternating sides, until they're snug but not stripped. If you're using thread locker, apply a small drop to each bolt before tightening.
Step 7: Test It Out Give the joint a gentle shake. It should feel solid—no wobbling. Load a light bin onto the rack and check for movement. If it holds, gradually add more weight (up to the joint's rated capacity) to ensure stability. If something feels off, double-check the alignment and bolt tightness.
The Pros and Cons of DIY Repairs
DIY repairs can save time and money, but they're not without risks. Let's weigh the ups and downs:
Pros:
- Cost-Effective: A replacement joint costs $10–$30, plus tools you probably already own. Hiring a pro? That could be $100–$200 for labor alone.
- Quick Turnaround: If you have the parts, you can fix it in an hour or two—no waiting for a service tech to schedule a visit.
- Empowerment: Learning to repair your own lean system gives you more control over your facility. You'll spot issues faster and feel confident handling minor problems in the future.
Cons:
- Risk of Improper Installation: If the joint isn't aligned straight or bolts aren't tightened correctly, it could fail again—this time, possibly causing injury or more damage.
- No Warranty: If you buy a joint from a lean pipe supplier and install it wrong, the supplier might not honor the warranty. Pros often provide a guarantee on their work.
- Hidden Damage: A cracked joint might be a symptom of a bigger problem (e.g., overloaded racks, unstable flooring). DIYers might miss this, leading to repeat failures.

Professional Service: When to Call in the Lean Pipe Experts
Sometimes, even the most DIY-savvy managers need to admit: this one's beyond my skill set. That's where professional lean pipe suppliers or service techs come in. They're not just "expensive wrench-turners"—they're problem-solvers with the tools, experience, and parts to get the job done right the first time.
Signs You Need a Professional
Here are the red flags that mean it's time to pick up the phone:
1. Major Damage (The Joint Is "Totaled"): If the joint is shattered (pieces missing), the pipes are bent beyond repair, or the entire section of the lean system is leaning, DIY is risky. Professionals have the equipment to straighten pipes, replace multiple components, and ensure structural integrity.
2. You're Unsure of the Cause: If you can't figure out why the joint failed (e.g., no obvious cracks, but it keeps loosening), a pro can perform a thorough inspection. They might spot issues like corrosion inside the pipes, improper weight distribution, or even a manufacturing defect in the original joint.
3. Critical Location: If the joint is holding up a conveyor belt, a workbench with heavy machinery, or a rack over a walkway, you can't afford a "good enough" repair. A failed joint here could lead to injuries or costly equipment damage. Professionals offer warranties—so if something goes wrong, they'll fix it at no extra cost.
4. Time Is Money: If your facility can't afford hours of downtime (e.g., you're in the middle of a rush order), a pro can often arrive within 24 hours with all the parts needed. They'll have the job done in half the time it would take you to troubleshoot and repair, getting your line back up faster.
What to Expect When Hiring a Lean Pipe Supplier or Service
Wondering what happens when you call a pro? Here's the typical process:
Step 1: The Assessment (They'll Ask Questions!) The service tech will start by asking for details: What type of joint is it? How old is the system? What was the joint supporting? They might even ask for photos (so keep that picture you took earlier!). This helps them diagnose the issue and bring the right parts.
Step 2: On-Site Inspection When they arrive, they'll examine the damaged joint, check the surrounding pipes and connections, and test the system's stability. They might use tools like torque wrenches (to measure bolt tightness) or load testers (to check weight capacity). This is where they'll uncover hidden issues—like a rusted pipe you didn't notice or a misaligned rack that's been stressing the joint.
Step 3: Repair or Replacement Most pros will repair the joint on the spot. They'll have high-quality replacement joints (often better than the generic ones you might buy at a hardware store) and specialized lean pipe accessories to ensure a perfect fit. If the damage is severe, they might recommend replacing the entire section of the system—better to invest now than risk another failure later.
Step 4: Testing and Follow-Up After the repair, they'll test the joint with your typical load, check for alignment, and even offer maintenance tips (like how often to lubricate or inspect joints). They'll also provide a warranty—usually 6–12 months—so if the joint fails again, you're covered.
The Pros and Cons of Professional Repairs
Professional repairs come with peace of mind, but they're not cheap. Let's break it down:
Pros:
- Expertise: Pros see damaged joints every day—they know the tricks to fix even the trickiest issues.
- Warranty Protection: Most repairs come with a warranty, so you're not on the hook if something goes wrong.
- Time Savings: They'll get the job done faster, minimizing downtime.
- Preventive Insights: They'll teach you how to avoid future failures (e.g., "Your joint failed because of moisture—here's a stainless steel upgrade").
Cons:
- Higher Cost: Labor and parts can range from $150–$500, depending on the damage.
- Scheduling Delays: If you're in a remote area or the lean pipe supplier is busy, you might wait a day or two for service.
- Overhead: Some companies charge for travel or after-hours service, adding to the bill.
DIY vs. Professional Service: The Ultimate Comparison
| Aspect | DIY Repair | Professional Service |
|---|---|---|
| Cost | $10–$50 (parts + tools you own) | $150–$500 (parts + labor + warranty) |
| Time to Complete | 1–3 hours (if parts are on hand) | 1–2 hours (on-site, once scheduled) |
| Skill Required | Basic handyman skills; familiarity with lean systems | Expertise in lean pipe repair; specialized tools |
| Risk of Mistakes | Higher (e.g., misalignment, stripped bolts) | Lower (backed by experience and warranty) |
| Best For | Minor damage, low-stakes locations, spare parts on hand | Major damage, critical systems, hidden issues |
| Long-Term Value | Good for temporary fixes; no warranty | Better for durability; includes preventive insights |
Making the Call: How to Decide What's Right for You
At this point, you might be thinking, "Okay, I know the pros and cons—but how do I choose?" Here's a simple framework to guide your decision:
Ask Yourself:
- What's the worst that could happen if I mess up? If the answer is "a few broken parts" or "an hour more of downtime," DIY is okay. If it's "someone gets hurt" or "we miss a big order," call a pro.
- Do I have the right parts? If you need to order a joint and wait 3 days, a pro might arrive faster. If you have spares, DIY saves time.
- Am I confident in my repair skills? Be honest. If you've never replaced a lean pipe joint before, even a "simple" fix can go wrong. It's okay to admit you need help!
Here's a quick cheat sheet:
- Choose DIY if: Minor cracks/looseness + parts on hand + low-stakes location + basic skills.
- Choose Professional if: Shattered joint + bent pipes + critical location + unsure of cause + need for warranty.
Final Thoughts: Keeping Your Lean System Strong
Repairing a damaged four way straight lean pipe joint isn't just about fixing a part—it's about protecting your team's productivity, your bottom line, and the efficiency of your entire operation. Whether you choose to DIY or call a lean pipe supplier, the key is to act fast (downtime waits for no one!) and prioritize quality. A shoddy repair today can lead to bigger problems tomorrow.
And remember: prevention is always cheaper than repair. Take 10 minutes each week to inspect your lean pipe joints. Tighten loose bolts, clean away rust, and replace joints that look worn. Keep a few spare four way straight lean pipe joints and lean pipe accessories in stock. Your future self (and your production team) will thank you.
So, back to that Tuesday morning crisis. What would you do? If it were me, I'd start by assessing the damage. If it's a small crack and I have a spare joint, I'd grab my wrench and fix it myself. But if the joint is shattered and the rack is leaning over the assembly line? I'd call my trusted lean pipe supplier before the first coffee break. Because in the world of lean manufacturing, the goal isn't just to fix problems—it's to keep them from stopping you in the first place.