- Company Articles
- Products and Technology
- Installation And Maintenance
- Repairing Damaged Lean Pipe Clamp Chrome: When to replace vs Fix

Repairing Damaged Lean Pipe Clamp Chrome: When to replace vs Fix
Related Product
Lean Pipe Clamp Chrome
Lean pipe clamp is used for rack system hang monitor or other panel for workbenck, flowrack in production daily use.
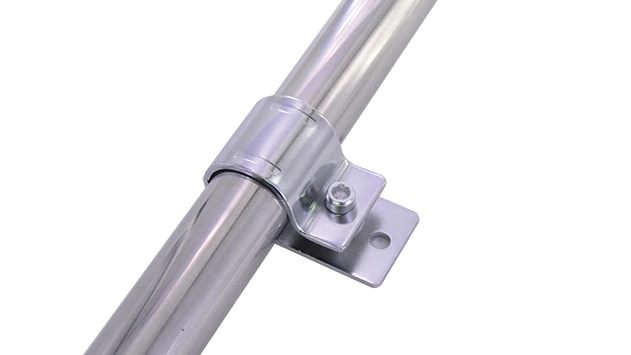
Walk into any manufacturing plant where lean principles drive productivity, and you'll witness a symphony of efficiency: components gliding along flow racks, assembly teams working at sturdy lean pipe workbenches, and materials moving seamlessly through production lines. What keeps this harmony intact? It's often the smallest parts—the ones you don't notice until they fail. Among these unsung heroes are lean pipe clamp chromes. These unassuming connectors are the backbone of lean systems, linking pipes, joints, and structures to create everything from workstations to material racks. But when rust creeps in, a crack forms, or threads strip, the question arises: Can this clamp be saved, or is it time to replace it? Let's dive into the nuances of repairing vs. replacing these critical components, and why getting the answer right matters for your team's safety, workflow, and bottom line.
What Is a Lean Pipe Clamp Chrome, Anyway?
Before we weigh repair vs. replacement, let's ground ourselves in what a lean pipe clamp chrome actually does. These clamps are precision-engineered metal fasteners, typically coated in chrome for corrosion resistance, designed to connect lean pipes (aluminum, steel, or stainless steel) and joints. Think of them as the "hinges" of lean systems: they secure pipes at 90°, 45°, or straight angles, ensuring stability in structures like ESD workstations (where static control is critical) or heavy-duty flow racks. A well-made clamp can withstand years of vibration, load stress, and daily use— but even the toughest ones wear down.
Chrome plating isn't just for shine; it's a protective barrier. In factories where moisture, oils, or chemicals are present, that chrome layer prevents rust from eating away at the metal underneath. For ESD workstations, some clamps even have conductive coatings to dissipate static, safeguarding sensitive electronics from damage. When that coating chips or the metal beneath weakens, the clamp's ability to do its job—hold things together safely—diminishes.
Common Ways Lean Pipe Clamps Get Damaged
Lean pipe clamps are built to last, but they're not indestructible. Here are the most frequent issues maintenance teams encounter:
Surface Corrosion (Rust)
Chrome plating resists rust, but scratches or chips in the coating expose the underlying steel. In humid environments or areas with chemical spills, rust starts as tiny orange spots and spreads. Left unchecked, it can pit the metal, weaken threads, or even seize the clamp, making disassembly impossible.
Hairline Cracks
Over-tightening during installation, accidental impacts from forklifts or trolleys, or repeated stress from heavy loads can cause tiny cracks. These often start near the clamp's "neck" (where it bends to grip the pipe) or around bolt holes. At first, they're barely visible—but under continued pressure, they grow, turning a minor flaw into a structural hazard.
Stripped Threads
Ever tried tightening a bolt only to have it spin endlessly? That's stripped threads, usually caused by cross-threading during installation or over-tightening with power tools. Once threads are stripped, the clamp can't grip the pipe securely, leaving structures wobbly and unsafe.
ESD Coating Damage
For clamps used in ESD workstations, the conductive coating is non-negotiable. Scratches, abrasion from tools, or chemical exposure can wear away this layer, turning a static-safe clamp into one that risks frying circuit boards or sensitive components.
Bent or Deformed Components
A dropped tool, a collision with a turnover trolley, or even leaning on a workbench the wrong way can bend a clamp's "jaws"—the part that wraps around the pipe. Bent jaws won't grip evenly, creating weak points in the structure.

When to Repair: Small Fixes for Big Savings
Not every blemish means a clamp is destined for the trash. Minor damage can often be repaired, saving money and reducing downtime—if you know what qualifies as "repairable." Here are scenarios where a little elbow grease (or epoxy) goes a long way:
Surface Rust (No Pitting)
Light surface rust—think orange speckles without deep pits—is usually fixable. Start by sanding the affected area with 400-grit sandpaper to remove loose rust, then switch to 600-grit to smooth the surface. Wipe away dust with a clean cloth, then apply a chrome polish (like Mothers Mag & Aluminum Polish) using a microfiber pad. For extra protection, finish with a thin coat of clear metal sealant. This works best if the rust is limited to non-threaded areas and hasn't compromised the clamp's shape.
Pro Tip: Do this repair on a workbench with a rag underneath to catch rust dust—no one wants rust particles contaminating nearby components, especially in ESD workstations.
Loose Threads (Mild Stripping)
If a bolt spins but still catches some threads, try using a thread repair kit (like a Helicoil) for metal threads or applying a thread-locking compound (such as Loctite Blue) for temporary fixes. For plastic-threaded clamps (rare, but possible), a small amount of plastic epoxy can fill in gaps. Let the epoxy cure 24 hours before reusing the clamp, and avoid over-tightening afterward—gentle pressure is key to preventing re-stripping.
Minor ESD Coating Scratches
For ESD workstation clamps with scratched conductive coatings, specialized sprays (like 3M ESD Conductive Coating) can restore conductivity. Clean the area with isopropyl alcohol first, let it dry, then apply two thin coats, allowing 30 minutes between coats. Test conductivity with a multimeter afterward—aim for a resistance between 10⁶ and 10⁹ ohms, per ESD Association standards.
Bent Jaws (Minor Deformation)
If the clamp's jaws are slightly bent but not cracked, you can gently bend them back using adjustable pliers with rubber tips (to avoid scratching the chrome). Apply slow, even pressure—never force it, as this can create cracks. Check alignment by fitting the clamp onto a spare lean pipe; it should grip snugly without gaps.
When to replace: Knowing When to Let Go
Some damage crosses the line from "repairable" to "risky." Ignoring these red flags can lead to wobbly workbenches, collapsed flow racks, or even injuries. Here's when replacement is non-negotiable:
Structural Cracks (Any Size in Load-Bearing Areas)
A crack—even a hairline one—in the clamp's load-bearing zones (like the base, bolt holes, or where the jaws meet the body) is a dealbreaker. Metal epoxy might hold temporarily, but under the stress of daily use, it will fail. Imagine a lean pipe workbench loaded with 50 lbs of components: a cracked clamp could give way, sending tools and parts crashing to the floor. Save the epoxy for emergencies (like bridging a gap until a replacement arrives), but always replace the clamp within 24–48 hours.
Deep Pitting or Advanced Rust
If rust has eaten pits into the metal—you can feel indentations with your finger—or spread to the threads, replacement is safer. Pitted metal weakens the clamp's integrity, and rust in threads means the clamp can't grip pipes securely. Even if it feels tight initially, rust will continue to spread, leading to sudden failure. When in doubt, ask: Would I trust this clamp to hold my own weight? If the answer is no, replace it.
Total Thread Failure
Threads that are completely stripped—no amount of tightening or epoxy will make them grip—mean the clamp is done. A clamp without functional threads can't secure pipes, turning a sturdy workbench into a leaning hazard. This is especially critical for overhead structures, like ceiling-mounted flow racks, where a fall could injure someone below.
ESD Coating Failure (Beyond Repair)
If the ESD coating is peeling, flaking, or tests outside the 10⁶–10⁹ ohm range after repair, replace the clamp. In electronics manufacturing, a single static discharge can ruin $1,000+ components—far costlier than a $20 clamp. Don't gamble with sensitive parts; a new ESD-compliant clamp is cheap insurance.
Repeated Repairs
Clamps are like old shoes: patch them too many times, and they'll never fit right. If you've repaired the same clamp twice (e.g., fixed rust, then stripped threads, then a small crack), it's time to retire it. Repeated repairs weaken the metal and create unseen stress points—you're better off investing in a new clamp than risking a catastrophic failure.
The Hidden Costs of Cutting Corners
It's tempting to patch a clamp to save $20, but the true cost of a failed repair can be staggering. Consider these real-world scenarios from factories we've worked with:
Case Study 1: The Collapsed Flow Rack
A mid-sized electronics plant tried to repair a cracked lean pipe clamp on a 3-tier flow rack using epoxy. Two weeks later, during a morning rush, the clamp failed, sending 200 lbs of circuit boards crashing to the floor. The damage: $12,000 in broken components, 4 hours of downtime while the rack was rebuilt, and a near-miss injury to a line worker. The replacement clamp? $22. The lesson: Skimping on a $22 part cost them over $15,000 in damages and lost productivity.
Case Study 2: ESD Failure in Assembly
A medical device manufacturer reused a clamp with worn ESD coating on an ESD workstation, assuming "it's just a little scratch." Over three days, static buildup from the clamp damaged 14 pacemaker sensors, costing $8,500 per unit. By the time the issue was traced to the clamp, 12 sensors were already shipped to hospitals—resulting in a recall and reputational damage. A new ESD clamp would have cost $35.
Fix vs. replace: A Quick Decision Guide
| Damage Type | Repairable? | Repair Method | replace If... | Cost: Repair vs. replace |
|---|---|---|---|---|
| Surface rust (no pitting) | Yes | Sand with 400-600 grit, apply chrome polish + sealant | Rust has pitted metal or spread to threads | Repair: $5–$15 (polish, sandpaper); replace: $15–$30 |
| Hairline crack (non-load-bearing area, <1mm) | Temporarily | Apply metal epoxy (e.g., J-B Weld), cure 24hrs | Crack is in load zone, >2cm long, or reappears | Repair: $8–$15 (epoxy); replace: $20–$40 |
| Minor ESD coating scratches | Yes | Clean with alcohol, apply ESD conductive spray (2 coats) | Coating is peeling, or resistance >10⁹ ohms post-repair | Repair: $15–$25 (spray); replace: $30–$50 (ESD-rated clamp) |
| Stripped threads (partial) | Yes | Use thread repair kit or Loctite Blue (temporary) | Threads are completely smooth (no grip) | Repair: $8–$20 (kit); replace: $20–$40 |
| Bent jaws (no cracks) | Yes | Gently bend back with rubber-tipped pliers; test fit on pipe | Jaws are bent >10° or won't grip pipe snugly post-repair | Repair: $0 (tools on hand); replace: $15–$35 |
| Deep cracks (>1mm), pitted rust, or ESD failure | No | — | Always replace | replace: $15–$50 (varies by type) |
Choosing the Right Replacement: Partnering with a Trusted Lean System Supplier
When replacement is the only option, not all clamps are created equal. A cheap, low-quality clamp from a discount supplier might save a few dollars upfront, but it'll fail faster, costing you more in the long run. Here's what to look for when sourcing replacements from a lean system supplier:
Material Quality
Opt for clamps made from high-carbon steel with a thick chrome plating (at least 0.0005 inches) to resist corrosion. For ESD workstations, ensure the clamp has a certified conductive coating (look for ESD S20.20 compliance). Avoid "generic" clamps with thin plating or vague material specs—ask suppliers for test reports if needed.
Load Rating
Check the clamp's load rating (usually listed in kg or lbs) and match it to your needs. A clamp for a light-duty flow rack (50 lbs max) won't cut it for a workbench holding 200 lbs of tools. Reputable suppliers will clearly label load ratings—if a supplier can't provide this, walk away.
Consistency
Look for clamps with uniform threading, smooth jaw alignment, and no burrs. Inconsistent manufacturing leads to loose fits, which weaken structures over time. Ask for a sample before ordering in bulk to test fit and finish.
Lead Times
A great clamp does you no good if it takes 6 weeks to arrive. Choose a lean system supplier with local inventory or short lead times (2–5 business days) to minimize downtime when clamps fail unexpectedly.
Preventing Damage: Extend Clamp Life with Proactive Care
The best way to avoid the repair vs. replace dilemma? Keep your clamps in top shape from day one. Here are simple maintenance habits that pay off:
Inspect Regularly
Add clamp checks to your weekly 5S walkthroughs. Look for rust, cracks, or loose bolts—catch issues early before they escalate. For ESD workstations, test conductivity monthly with a multimeter.
Clean and Lubricate
Wipe clamps with a damp cloth monthly to remove dust and debris. For threaded clamps, apply a drop of dry lubricant (like graphite spray) to threads twice a year to prevent seizing. Avoid oil-based lubricants—they attract dust and can damage ESD coatings.
Install Correctly
Train teams to hand-tighten clamps (no power tools!) using the "two-finger rule": tighten until you can't twist the bolt with two fingers. Over-tightening is the #1 cause of stripped threads and cracks.
Protect from the Elements
For clamps in humid or chemical-exposed areas, add a layer of clear vinyl tape over chrome plating (replace every 6 months) to block moisture. In ESD zones, avoid abrasive cleaners—stick to isopropyl alcohol for degreasing.
Final Thoughts: Invest in Reliability
At the end of the day, a lean pipe clamp chrome is more than just a piece of metal—it's a guardian of productivity. Repairing minor damage makes sense, but when safety or functionality is on the line, replacement is the only responsible choice. By knowing the difference, partnering with a trusted lean system supplier, and maintaining your clamps proactively, you'll keep your lean systems running smoothly, your team safe, and your bottom line healthy. After all, in lean manufacturing, efficiency starts with the parts that hold everything together.