- Company Articles
- Products and Technology
- Installation And Maintenance
- Solving Stability Issues: Tightening Techniques for Four Way Straight Lean Pipe Joint

Solving Stability Issues: Tightening Techniques for Four Way Straight Lean Pipe Joint
Related Product
Four Way Straight Lean Pipe Joint
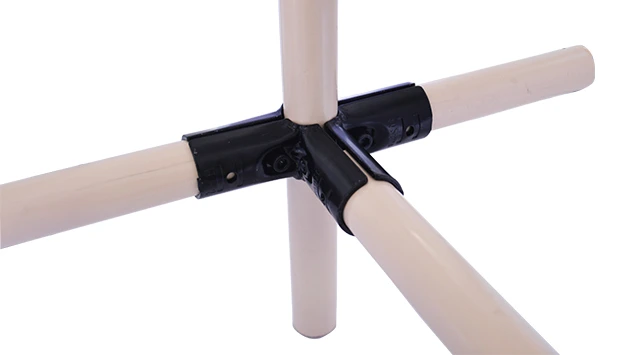
Four way lean pipe joint for 4 pcs 28MM lean pipe connection in straight angle, which used widely in workbench, flow rack, hand trolley frame connection.
In the world of lean manufacturing, where efficiency and precision are everything, even the smallest components can make or break your workflow. One such unsung hero (and occasional troublemaker) is the four way straight lean pipe joint. These unassuming connectors hold together the backbone of your lean system—from workbenches to flow racks—but when they loosen, they don't just cause wobbles; they disrupt productivity, compromise safety, and undermine the very principles of lean management. Let's dive into why these joints matter, the common stability issues they face, and the practical tightening techniques that will keep your operations running smoothly.
Understanding the Backbone: Four Way Straight Lean Pipe Joints
Before we talk about tightening, let's get to know the star of the show: the four way straight lean pipe joint. Imagine you're building a modular structure—say, a lean pipe workbench for your assembly line. You need pipes to connect in multiple directions: left, right, forward, backward. Enter the four way joint, designed to anchor four pipes at 90-degree angles, creating a sturdy, customizable framework. These joints are the glue (literally and figuratively) that turns simple aluminum lean pipes into functional workstations, material racks, and conveyor supports.
Most four way straight joints are made from durable materials like chrome-plated steel or aluminum, with threaded holes to secure pipes via bolts or set screws. Their design simple, but precision is key: a poorly made joint or one that's not tightened correctly will quickly become a weak link. Think of them as the joints in your own body—if your knee is loose, walking becomes a struggle; if a lean pipe joint is loose, your entire system wobbles, slow down tasks, and risks damaging products or injuring workers.
Why do these joints loosen in the first place? Blame it on daily wear and tear: vibrations from machinery, the weight of materials shifting on a flow rack, even temperature changes that cause metal to expand and contract. Over time, these small stresses can turn a snug joint into a sloppy one. The good news? With the right techniques, you can keep them tight and your lean system stable.
The Cost of Loose Joints: More Than Just a Wobble
Loose four way straight lean pipe joints might seem like a minor annoyance, but their impact ripples through your entire operation. Let's break down the real costs:
- Safety Risks: A wobbly workbench isn't just annoying for the operator—it's a hazard. Tools slide off, materials topple, and in extreme cases, a weakened structure could collapse. No one wants to explain a workplace injury caused by a preventable loose joint.
- Productivity Drain: When a flow rack tilts, workers slow down to steady materials. When a conveyor support shakes, items get stuck or misaligned, leading to downtime. Every second spent adjusting for instability is a second not spent adding value to your products.
- Premature Wear: A loose joint doesn't just affect itself—it puts extra stress on adjacent pipes and connectors. Over time, this can bend pipes, strip threads, or crack other components, turning a $5 fix into a $500 replacement.
- Morale Matters: Ever tried working at a desk that wobbles with every keystroke? It's frustrating. The same goes for a lean pipe workbench that shifts when you lean on it. Unstable equipment erodes worker confidence and focus, making even simple tasks feel like a chore.
Take it from a manufacturer I worked with last year: Their assembly line relied on a series of flow racks connected by four way joints. Over six months, they noticed workers were taking longer to load parts onto the racks, and small components kept falling through gaps caused by misaligned rollers. A quick inspection revealed half the joints were loose—some so badly that the racks had started to sag. After tightening and reinforcing the joints, their line speed increased by 12% within a week. The message? Stability isn't just about "not wobbling"—it's about protecting your bottom line.

Tightening Techniques That Actually Work
Now, let's get practical. Tightening a four way straight lean pipe joint isn't as simple as cranking a wrench until it "feels tight." It's about precision, the right tools, and knowing when to use a little extra help (like thread locker). Here are the techniques that will keep your joints secure for the long haul.
1. Manual Tightening: Torque, Not "Feel"
Most people tighten joints by hand, using a hex key or wrench, and stop when it "feels snug." But "snug" is subjective—and that's the problem. Under-tighten, and the joint will loosen with vibration; over-tighten, and you'll strip the threads or crack the joint (especially with aluminum lean pipe, which is softer than steel). The solution? Use a torque wrench.
A torque wrench lets you tighten to a specific torque value (measured in inch-pounds or newton-meters), ensuring consistency across all joints. Below is a quick reference table for common four way joint materials and bolt sizes—always check your joint manufacturer's specs for exact values, but this will get you started:
| Joint Material | Bolt Size | Recommended Torque (in-lbs) | Notes |
|---|---|---|---|
| Chrome-Plated Steel | M6 (1/4") | 18–22 | Steel bolts; use anti-seize if in humid environments |
| Chrome-Plated Steel | M8 (5/16") | 35–40 | Common for heavy-duty flow racks |
| Aluminum Lean Pipe | M6 (1/4") | 12–15 | Aluminum bolts; avoid over-tightening to prevent stripping |
| Aluminum Lean Pipe | M8 (5/16") | 25–30 | Use with aluminum washers to distribute pressure |
2. Sequential Tightening: The "Crisscross" Rule
Four way joints often have two or more bolts per connection point (e.g., one bolt for each pipe). Tightening them one after the other in a straight line might seem logical, but it's a recipe for uneven pressure. Instead, use the "crisscross" method—like tightening the lug nuts on a car tire.
For a joint with four bolts (one at 12 o'clock, 3 o'clock, 6 o'clock, 9 o'clock), tighten them in the order: 12 → 6 → 3 → 9. This ensures the joint seats evenly against the pipes, preventing gaps that lead to loosening. If you're working with a joint that has six bolts, alternate between opposite sides. Think of it as giving the joint a "hug" from all directions—balanced pressure means a stable hold.
3. Thread Locker: Your Secret Weapon Against Vibration
Even perfectly torqued bolts can loosen over time, especially in high-vibration environments (looking at you, near stamping machines or heavy conveyors). That's where thread locker comes in. This adhesive compound fills the gaps between threads, creating friction that resists loosening—without making disassembly impossible (most are removable with heat or extra torque).
Here's how to use it right:
- Clean first: Wipe the bolt threads and joint holes with a degreaser to remove oil or dirt—thread locker sticks best to clean surfaces.
- Apply sparingly: A drop or two on the bolt threads is enough. Too much will squeeze out and make a mess (or even glue parts you don't want glued).
- Choose the right type: Blue thread locker (like Loctite 242) is removable and ideal for most lean pipe joints. Red thread locker is permanent—save that for joints you never plan to disassemble (rare in lean systems, where flexibility is key).
- Let it cure: Most thread lockers take 24 hours to fully set, so avoid putting heavy loads on the joint immediately after application.
4. Regular Inspection: Catch Loosening Early
Even the best tightening job won't last forever. That's why regular inspections are non-negotiable. Add a quick 5-minute check of four way joints to your weekly maintenance routine—focus on high-traffic areas like workbenches and conveyor supports. What should you look for?
- Visual clues: Gaps between the joint and pipe, rust around bolts (a sign of movement), or bent/warped pipes (a red flag that the joint has been loose for a while).
- The "wiggle test": Gently push and pull on the connected pipes. If there's any movement at the joint, it's time to retighten.
- Bolt heads: Are they recessed into the joint, or sticking out? A bolt that's backed out even 1/8" can cause instability.
Pro tip: Mark tight bolts with a dot of paint (matching the joint color) after tightening. During inspections, if the dot has shifted, you'll know the bolt has loosened—no guesswork needed.

Tools and Materials: What You'll Need to Get the Job Done
You wouldn't use a butter knife to tighten a bolt, right? Having the right tools makes all the difference in getting (and keeping) joints tight. Here's your essential toolkit:
- Torque wrench: A 1/4" drive torque wrench works for most M6 bolts; step up to a 3/8" drive for M8 and larger. Look for one with a range of 10–50 in-lbs for lean pipe work.
- Hex keys (Allen wrenches): Get a set with both short and long arms—long arms give better leverage for tight bolts, while short arms fit in tight spaces.
- Thread locker: As mentioned, blue (removable) is your go-to. Keep a small bottle in your maintenance kit.
- Degreaser/cleaner: For prepping threads before applying thread locker or retightening.
- Replacement bolts/washers: It's inevitable—you'll strip a bolt or lose a washer. Keep a stash of common sizes (M6, M8) in steel and aluminum (for aluminum lean pipe) on hand.
- Anti-seize compound: For joints in humid or corrosive environments (like near washing stations). A thin layer on threads prevents rust and makes future disassembly easier.
And don't forget the materials themselves: Not all four way joints are created equal. If you're replacing old joints, opt for high-quality ones from a reputable lean pipe supplier. Cheap joints often have inconsistent threading or weak metal, making them prone to loosening or breaking—you'll save money in the long run by investing in durability.
Case Study: From Wobbles to Wins at Precision Parts Co.
Precision Parts Co., a mid-sized manufacturer of automotive components, was struggling with a critical issue: their main assembly lean pipe workbench kept wobbling, causing workers to slow down and increasing the risk of dropped parts. The workbench, used to hold tools and semi-finished components, was built with aluminum lean pipe and four way joints—but after six months of use, the joints had loosened to the point where the top shelf shifted by nearly an inch when leaned on.
Their maintenance team tried retightening the joints with a regular wrench, but the wobble returned within a week. Frustrated, they reached out for help. Here's what we did:
- Inspection: We found that the original joints had been tightened "by feel," with no torque control. Some bolts were over-tightened (stripping the aluminum threads), others under-tightened. A few bolts were even missing washers, leading to uneven pressure.
- Fix: We replaced the stripped bolts with new aluminum ones, added washers to all connections, and used a torque wrench to tighten each bolt to 14 in-lbs (per the aluminum joint specs). We also applied blue thread locker to the bolts on the legs, which bore the most weight.
- Prevention: We trained the team on the crisscross tightening method and added a weekly "wiggle test" to their checklist. We also marked the bolt heads with red paint so they could quickly spot loosening.
The results? Three months later, the workbench was still stable. The team reported a 15% faster tool-retrieval time, and dropped parts decreased by 70%. One worker even joked, "It's like having a new workbench—now I can focus on building parts, not balancing them."
Troubleshooting: When Joints Keep Loosening
Even with the best techniques, some joints might seem determined to loosen. Don't panic—here's how to troubleshoot:
Issue: Bolts keep backing out, even with thread locker.
Possible cause: The joint is under constant vibration (e.g., near a loud machine). Solution: Add a lock washer between the bolt head and joint. Lock washers have teeth that dig into the metal, creating extra friction. For extreme cases, try a nylon-insert lock nut (the nylon grips the bolt threads to resist loosening).
Issue: Joint threads are stripped, so bolts won't tighten.
Possible cause: Over-tightening or using steel bolts in aluminum joints (steel is harder and can strip aluminum threads). Solution: replace the joint—stripped threads can't be fixed, and a new joint is cheaper than replacing the entire pipe structure. Next time, use aluminum bolts with aluminum joints and stick to the torque specs.
Issue: The joint itself is cracked or bent.
Possible cause: Impact damage (e.g., a forklift bumping the rack) or overloading. Solution: replace the joint immediately—cracked metal can fail suddenly, leading to collapse. Check the surrounding pipes too; if the joint bent, the pipes might be damaged too.
Issue: Pipes are misaligned, making joints hard to tighten evenly.
Possible cause: Rushing installation or using bent pipes. Solution: Disassemble the section, straighten or replace bent pipes, then reassemble, aligning pipes carefully before tightening. Use a level to ensure pipes are straight and square—proper alignment makes for even pressure on the joint.
Wrapping Up: Stability as a Foundation for Lean Success
At the end of the day, a stable lean system isn't just about tight joints—it's about respecting the people who use it, protecting your investments, and staying true to the lean philosophy of eliminating waste (including the waste of time, materials, and energy caused by instability). The four way straight lean pipe joint might be small, but its role is huge.
By mastering these tightening techniques—using torque wrenches for precision, thread locker for vibration resistance, and regular inspections for early detection—you'll transform wobbly workbenches and shaky flow racks into reliable, rock-solid assets. And when your equipment is stable, your team is more efficient, your products are safer, and your lean system lives up to its promise: smooth, uninterrupted, value-driven production.
So grab your torque wrench, check those joints, and remember: In lean manufacturing, the little things do matter. Your bottom line (and your workers) will thank you.