- Company Articles
- Products and Technology
- Product knowledge
- Space Planning Tips: Sizing Aluminum Workbench C for Workshop Layouts

Space Planning Tips: Sizing Aluminum Workbench C for Workshop Layouts
Related Product
Aluminum Workbench C
aluminum-tube-workbench-is-more-flexible-and-durable,-compared-with-traditional-pe/abs-coated-steel-tube.-it-is-easy-to-assemble,-anti-corrosion,-rust-protection,-and-recycle-use-after-disassemble.
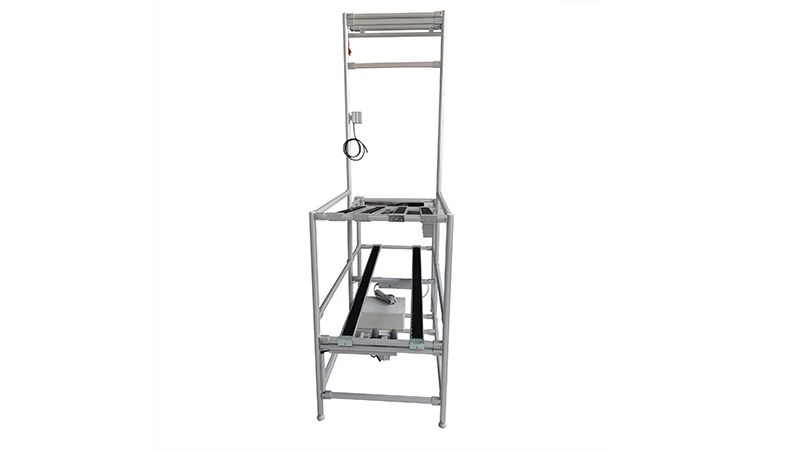
Walk into any well-run workshop, and you'll notice something immediately: the workbench isn't just a piece of furniture. It's the command center. It's where ideas turn into prototypes, where teams collaborate, and where the rhythm of production hums along. But here's the thing: a workbench that's too small clogs workflows like a traffic jam. One that's too large? It devours space, turning your shop into a maze of wasted potential. And when it comes to aluminum workbench C —a staple in modern manufacturing, electronics, and even small-scale crafts—getting the size right isn't just about measurements. It's about building a foundation for efficiency, safety, and growth.
In this guide, we're diving deep into the art and science of sizing Aluminum Workbench C for your workshop. Whether you're outfitting a cozy 300 sq ft garage or a sprawling industrial facility, these tips will help you avoid the "oops, we should've measured that" moments. We'll start by understanding why this workbench stands out (hint: it's all about the aluminum profile ), then walk through step-by-step planning, real-world examples, and even common mistakes to dodge. By the end, you'll not only know how to pick the perfect dimensions but also how to make that workbench the heartbeat of your operation.
Getting to Know Aluminum Workbench C: More Than Just a Table
Before we grab the tape measure, let's talk about why Aluminum Workbench C has become a favorite among workshop owners. It's not just because aluminum looks sleek (though that's a bonus). It's about what's under the hood—or rather, under the work surface. This workbench is built on aluminum extrusion profile —those modular, T-slot frames that make customization a breeze. Unlike clunky wooden benches or heavy steel ones, aluminum extrusion profiles are lightweight but surprisingly tough, resistant to rust, and designed to grow with your needs. Need to add a shelf? Drill-free. Attach a tool holder? Snap it into the T-slot. It's like building with giant, industrial Legos—and that flexibility is key when sizing.
Aluminum Workbench C typically comes in a "single deck-without caster" design (if you're eyeing the "Workbench E (single deck-without caster)" from supplier catalogs), but don't let the "without caster" part fool you. Its fixed structure is a strength here: it stays put during heavy tasks, from welding small parts to assembling electronics. And because it's made with aluminum profile, it's easy to tweak later—say, adding casters down the line if you need mobility. But first, we need to make sure it fits today before worrying about tomorrow's upgrades.
Step 1: Map Your Workshop Space Like a Pro (No Architecture Degree Needed)
Imagine trying to bake a cake without knowing the size of your oven. That's what sizing a workbench without mapping your space feels like. The first rule? Measure twice, cut once—literally. Here's how to do it right:
Tools You'll Need (Yes, Even the "Old-School" Ones)
You don't need fancy software (though apps like Floorplanner or SketchUp can help). Start with the basics: a 25-foot tape measure (the retractable kind—no tangled strings, please), a roll of painter's tape, and a notebook. For visual learners, graph paper (1 square = 1 foot) or a whiteboard works wonders. If you're tech-savvy, snap photos of your workshop from every angle—you'll catch details later that your memory might miss (like that random pipe sticking out of the wall near the south corner).
Measure Like You Mean It: Walls, Obstacles, and "Fixed" Equipment
Grab that tape measure and start with the obvious: the room's dimensions. Note the length and width of your workshop, then mark fixed obstacles: load-bearing walls, electrical outlets, HVAC vents, and equipment that's not going anywhere (think: a large CNC machine or a ventilation system). Don't forget the little things, too—like that water line for your 3D printer or the fire extinguisher that legally needs 3 feet of clearance. These "small" details are the ones that turn a "perfect" workbench on paper into a "can't open the door" disaster in real life.
Let's walk through an example. Say your workshop is 20ft x 25ft (500 sq ft). There's a window on the east wall (2ft from the north corner, 4ft wide), a fixed tool cabinet along the west wall (6ft long, 2ft deep), and a door on the south wall that swings inward (3ft wide, needs 2ft clearance to open fully). Jotting this down, you'll already see "no-go" zones: you can't put a workbench in front of the window (light matters!) or the door (safety first). The tool cabinet? It leaves 14ft of space along the west wall—but you'll need at least 3ft of walkway between the cabinet and the workbench, so that's 11ft of usable length there.
Pro tip: Use painter's tape to mark the workbench's footprint on the floor. Stand in it. Walk around it. Can you open the tool cabinet without bumping into the bench? Can two people pass each other behind it? If not, adjust the tape—this is way cheaper than buying a workbench and then having to return it.

Step 2: Analyze Workflow to Avoid Costly Mistakes (It's Not Just About Space—It's About People)
A workbench isn't an island. It's part of a ecosystem: workers move around it, tools get passed across it, materials flow to and from it. Ignore this, and you'll end up with a layout that looks great on paper but feels like a game of Twister in real life. Let's break down how to map workflow for Aluminum Workbench C.
Understanding Your Team's "Dance"
Think about how your team uses the workbench. Are they assembling small parts (like circuit boards) where precision matters most? Then you need enough surface area for tools, a magnifying lamp, and maybe a bin for screws—without everything feeling cramped. Are they working in shifts, with one person finishing a task and passing it to the next? Then the workbench needs to connect smoothly to flow rack or material carts, so there's no "handing over the wall" delays.
Ergonomics play a role here, too. A workbench that's too narrow forces workers to hunch or stretch, leading to fatigue (and mistakes). The sweet spot for depth? 24–30 inches for most tasks. Any wider, and tools at the back become "out of sight, out of mind" (read: wasted time searching). For length, consider how many people will use it at once. A solo operator might thrive with a 48-inch bench, but a team of three? You're looking at 72 inches or more—plus space between each worker to avoid elbow collisions.
Case Study: When "Too Small" Killed a Production Line
Let's take a real example. A small electronics workshop in Ohio once set up two 48-inch Aluminum Workbench C units side by side, thinking they'd save space. Their team assembled smartphone chargers: one person soldered, another tested, another packaged. Sounds efficient, right? Wrong. The benches were 24 inches deep, but with soldering irons, testers, and bins of components, there was no room to lay out the circuit boards flat. Workers had to stack parts, leading to mix-ups. Worse, the benches were so close together (only 2ft apart) that the tester couldn't turn around without bumping into the solderer. Production slowed by 30%, and errors spiked. After re-sizing to two 72-inch benches (with 4ft of space between them) and 30-inch depth, they cut errors by half and boosted output—all because they matched the workbench size to how the work got done, not just where .

Step 3: Choose the Right Size for Your Space and Goals (The Numbers Behind the Magic)
Now, let's put it all together. Below is a breakdown of common Aluminum Workbench C sizes, who they work best for, and how to match them to your workshop. Remember: these are starting points—your unique needs might call for tweaks (hello, custom aluminum profile modifications!).
| Workbench Size (Length x Depth x Height) | Ideal Workshop Space | Best For | Key Considerations |
|---|---|---|---|
| 48" x 24" x 36" | Small workshops (300–500 sq ft) | Solo workers, precision tasks (e.g., jewelry making, small electronics repair) | Leaves 3–4ft of walkway on all sides; fits against a wall. Great for tight spaces but limited storage. |
| 60" x 30" x 36" | Medium workshops (500–800 sq ft) | 2–3 workers, assembly lines (e.g., drone parts, woodworking small projects) | Adds 6" of depth for tools; enough length for side-by-side tasks. Pair with under-bench shelves for storage. |
| 72" x 30" x 36" | Large workshops (800+ sq ft) | Team collaboration, heavy-duty tasks (e.g., automotive parts, metal fabrication) | Requires 5ft of clearance behind for material carts; ideal for attaching flow racks to the side for easy part access. |
| Custom (e.g., 96" x 36" x 38") | Industrial facilities, specialized needs | High-volume production, custom workflows (e.g., aerospace components) | Built with extra-deep aluminum profile frames; often includes cutouts for machinery or integrated tool rails. |
Let's translate this into your workshop. Suppose you run a small woodworking shop (400 sq ft) with one full-time worker and occasional helpers. A 48" x 24" Aluminum Workbench C would fit nicely along the north wall, leaving 3ft of space to the south (for moving lumber) and 2.5ft on the east (near the miter saw). But if you plan to hire a second worker next year? Skip the 48"—go for 60". The extra 12 inches now will save you the hassle of replacing the bench later.

Common Mistakes to Dodge (Because Even Pros Slip Up)
Even with careful planning, it's easy to fall into traps. Here are the ones we see most often—and how to avoid them:
Mistake #1: Forgetting "Breathing Room"
You measure the workbench, note the walls, and call it a day. But what about the space around it? OSHA recommends at least 3ft of clear walkway for safety (more if you're using heavy machinery). Ignore this, and you're not just risking inefficiency—you're risking accidents. A worker rushing to grab a tool shouldn't have to squeeze past the bench like a subway commuter.
Mistake #2: Overlooking the "Growth Spurt"
"We'll start small and upgrade later," sounds smart—until "later" comes and you realize the new, larger workbench won't fit because you filled the space with other equipment. If you plan to expand your team or take on bigger projects in the next 1–2 years, size up now. Aluminum Workbench C's aluminum profile frame is durable enough to grow with you—add a shelf, extend the length with extra extrusions, or bolt on accessories later. But you can't make the floor bigger.
Mistake #3: Ignoring the "Third Dimension" (Height Matters!)
Most Aluminum Workbench C units come standard at 36 inches high (average elbow height for most adults). But if your team is taller (or shorter), that 36 inches can lead to back pain., by an inch or two. Don't skip this step—ergonomics isn't a luxury; it's a productivity booster.
Final Checklist: Your Workbench, Perfectly Sized
You've measured, mapped, and analyzed. Now, run through this quick checklist to confirm you're ready to roll:
- I've measured my workshop, including fixed obstacles and required clearances.
- I've watched my team work (or simulated workflows) to understand how many people need space at once.
- I've chosen a workbench size that leaves at least 3ft of walkway around it.
- I've considered future growth (team size, project scale) and sized up if needed.
- I've tested the footprint with painter's tape and had my team walk through it.
If you can check all these boxes, congratulations—you're ready to bring home (or order) your Aluminum Workbench C. And when it arrives, you'll know it's not just a piece of equipment. It's a tool that fits your space, your team, and your goals—because you took the time to size it right.
Wrapping Up: Your Workshop, Transformed
Sizing Aluminum Workbench C isn't about numbers on a tape measure. It's about creating a workshop where every square foot works for you. It's about the solderer who no longer knocks over parts, the team that collaborates without crowding, and the business that grows because its foundation—literally—is built to scale. With the right size, this workbench becomes more than a surface. It becomes the reason your workshop feels like a well-oiled machine.
So go ahead—grab that tape measure, sketch your layout, and trust the process. Your future self (and your team) will thank you. After all, a workshop is only as good as its heart. And now, you're ready to make that heart beat stronger than ever.