- Company Articles
- Products and Technology
- Product knowledge
- Step-by-Step: Building a Workbench with Aluminum Profile 3 Way Connectors

Step-by-Step: Building a Workbench with Aluminum Profile 3 Way Connectors
Related Product
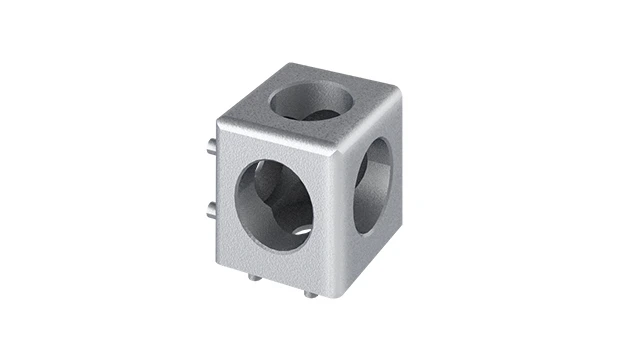
Aluminum Profile 3 Way Connector
The 3 way - squared corner connector is an external fastening method that is typically used to create a corner connection between three profiles. It is a heavy-duty connection that is simple to use and provides a polished look.
There's something deeply satisfying about building something with your own two hands—especially when it's a tool that'll serve you for years. If you've ever wished for a workbench that fits your space *perfectly*, adapts to your projects, and doesn't cost a small fortune, you're in the right place. Today, we're diving into how to build a custom workbench using aluminum profiles and 3 way connectors—a project that's surprisingly doable even if you're new to DIY. Aluminum profiles are a game-changer here: lightweight yet sturdy, rust-resistant, and infinitely customizable thanks to their T-slot design. Add in 3 way connectors, and you've got a system that clicks together without welding, drilling, or fancy tools. Whether you need a garage workbench, a lab station, or a hobby table, this guide will walk you through every step. Let's get started.
Why Aluminum Profiles? A Quick Love Letter
Before we grab our tools, let's talk about why aluminum profiles are the unsung heroes of DIY workbenches. Unlike wood, they won't warp or rot. Unlike steel, they're light enough to move (even with a worktop!) but strong enough to hold heavy tools. And that T-slot running along their length? It's like a built-in puzzle system—you can slide in connectors, brackets, shelves, or even tool holders whenever you want. Plus, aluminum profile accessories (think end caps, cable clips, and brackets) make it easy to add finishing touches. Trust me, once you build with these, you'll wonder why you ever used anything else.
Tools & Materials You'll Need
No need to raid a hardware store—most of these tools are probably already in your garage. Here's what you'll need to gather before starting:
| Item | Quantity | Notes |
|---|---|---|
| Aluminum Profile (e.g., 4040 EU standard) | 4 pieces (legs), 4 pieces (frame rails) | Choose length based on your design—we'll use 80cm legs and 120cm rails for a 120x60cm top. |
| 3 Way Aluminum Profile Connector | 8 pieces | These join profiles at 90° angles—look for ones with set screws for a tight fit. |
| Caster Wheel (with brake) | 4 pieces | Locking casters let you move the workbench, then lock it in place. Aim for 50mm+ wheels for smooth rolling. |
| Worktop Material | 1 piece | Plywood (18mm), aluminum honeycomb panel, or even a thick MDF board. Cut to 120x60cm. |
| Aluminum Profile Accessories | Assorted | End caps (to cover sharp T-slot edges), hex keys (for tightening connectors), and L-brackets (to mount the worktop). |
| Tools | — | Measuring tape, pencil, level, rubber mallet (to seat connectors), and a hacksaw or miter saw (if cutting profiles). |
Pro tip: Most aluminum profile suppliers sell pre-cut lengths, so if you don't have a saw, just specify your measurements when ordering. Saves time and avoids wonky cuts!

Step-by-Step: Building Your Workbench
1 Plan Your Design (Measure Twice, Build Once!)
The first rule of DIY: measure your space *before* buying materials. Grab your measuring tape and figure out where the workbench will live. Will it tuck into a corner? Do you need to roll it under a shelf? For most home garages or workshops, a 120cm (length) x 60cm (depth) x 80cm (height) workbench is a sweet spot—it's big enough for projects but not so large it dominates the room. Sketch a quick diagram: legs at the corners, a rectangular frame connecting them, and a top sitting on the frame. Jot down the profile lengths you need (e.g., 4 legs at 80cm, 2 long rails at 120cm, 2 short rails at 60cm). Trust me, a 5-minute sketch now saves hours of frustration later.
2 Prep the Aluminum Profiles
If you ordered pre-cut profiles, skip to the next step! If you're cutting your own, now's the time. Lay the profiles on a flat surface (a sawhorse works great) and mark your measurements with a pencil. Use a miter box to keep cuts straight, or clamp the profile to a work surface to avoid wiggling. A hacksaw with a fine-tooth blade works, but a miter saw with a metal-cutting blade is faster. After cutting, gently file the edges with sandpaper to remove burrs—you don't want sharp metal edges later! Wipe the profiles with a dry cloth to remove dust, and you're ready to assemble.
3 Assemble the Frame with 3 Way Connectors
Now for the fun part: clicking the frame together. Start with the base frame—the rectangle that will sit on the floor (or casters, later). Take two long rails (120cm) and two short rails (60cm). Grab a 3 way connector and slide it into the end of one long rail—make sure the connector's "arms" point perpendicular to the rail (one up, one to the side). Do this for both ends of both long rails. Now, connect the short rails: slide one end of a short rail into the side arm of the 3 way connector on the long rail. It should click into place, but don't tighten yet—we'll adjust for square corners first. Repeat until you have a rectangle.
Now, check if the frame is square. Measure the diagonals—if they're equal, it's square. If not, gently push the corners until the measurements match. Once square, grab your hex key and tighten the set screws on the 3 way connectors. Tighten them a little at a time, alternating corners—this keeps the frame from warping. Pro move: Use a rubber mallet to tap connectors into place before tightening—they'll seat better, and you won't strip the screws.
Next, add the legs. Take the 4 leg profiles (80cm) and attach a 3 way connector to the top of each—this time, the connector's arms should point horizontally (to connect to the top frame). Flip the base frame upside down, then align the leg connectors with the corners of the base frame. Slide the legs into the base frame's 3 way connectors and tighten. Now you've got a basic frame: base, legs, and all! Stand it up—if it wobbles, check that all connectors are tight and the legs are the same length.
4 Add Caster Wheels for Mobility
Want to roll your workbench out of the way when not in use? Caster wheels are a must. Flip the frame back upside down so the base frame is facing up. Line up each caster with the corner of the base frame—most casters have a plate with holes that fit into the T-slot of the aluminum profile. Slide T-nuts into the T-slot (they'll click into place), then place the caster plate over the nuts and secure with bolts. Tighten with a wrench—you want these *snug* (casters take a lot of weight!). Do this for all four corners. Now, flip the frame right-side up and give it a push—if it rolls smoothly and locks when you flip the brake levers, you're golden.
5 Mount the Worktop
The worktop is the star of the show, so let's mount it securely. If you're using plywood or MDF, sand the edges first for a smooth finish. Place the worktop on top of the frame—center it so there's equal overhang on all sides (about 5cm overhang looks nice). Now, attach it using L-brackets (part of your aluminum profile accessories). Slide T-nuts into the T-slot of the top frame rails, then screw the L-brackets into the nuts. Place the brackets every 30cm along the rails to distribute weight evenly. Once the brackets are in place, drill pilot holes into the worktop (to avoid splitting) and screw the top to the brackets. Give it a shake—if it doesn't budge, you're good!
Pro upgrade: Use an aluminum honeycomb panel for the top. It's lighter than wood, impervious to spills, and matches the aluminum frame perfectly. Just mount it the same way with L-brackets—no sanding required!
6 Finishing Touches with Aluminum Profile Accessories
Now's the time to make your workbench feel polished. Pop aluminum profile end caps into the open ends of the profiles—they cover sharp T-slot edges and give a clean look. If you're running power tools, use T-slot cable clips to route cords under the bench—no more tripping over wires! Want a shelf? Cut two more short rails and attach them to the legs with 3 way connectors, then lay a piece of plywood across. Add a tool holder by sliding a bracket into the T-slot—suddenly, your screwdrivers and pliers have a home. The best part? You can add these later—aluminum profiles grow with your needs.
Pro Tips for a Stellar Workbench
Keep it level:
Use a spirit level on the worktop after assembly. If it's wobbly, add shims under the legs or adjust the caster wheels (some have height-adjustable feet!).
Don't over-tighten:
Aluminum is soft—over-tightening 3 way connectors can strip the T-slot or crack the connector. Tighten until snug, then stop.
Customize the height:
Too tall? Shorten the leg profiles. Too short? Add extenders with extra profiles and connectors. No rules here!
Clean regularly:
Wipe aluminum profiles with a damp cloth to remove dust and grease. For tough stains, use mild soap—avoid abrasive cleaners that scratch the finish.
Upgrade later:
Add a pegboard on the back with aluminum profile brackets, or install a LED light strip in the T-slot under the top shelf. The T-slot makes it easy!

Troubleshooting Common Hiccups
Even the best DIY projects hit snags. Here's how to fix the most common issues:
Wobbly frame? Check if all 3 way connectors are fully seated. If a connector is loose, tap it with a rubber mallet and retighten. If legs are uneven, measure them again—one might be cut shorter than the others.
Casters won't lock? Make sure the caster plate is mounted straight. If the brake lever hits the frame, loosen the bolts and reposition the caster slightly.
Worktop sagging? Add a center support rail between the long frame rails—just cut a short profile, attach 3 way connectors, and bolt it in the middle. Instant reinforcement!
And there you have it—a custom workbench built with aluminum profiles and 3 way connectors, no welding required. Stand back and admire your handiwork: sturdy, sleek, and *yours*. The best part? This is just the beginning. Want to add a shelf? Slide in more connectors. Need a taller bench? Swap out the legs. Aluminum profiles and their accessories make it easy to adapt as your projects change. Whether you're fixing cars, building electronics, or crafting, this workbench will be your trusty sidekick for years. Now go grab a project—and enjoy the satisfaction of working on something you built yourself. Happy DIY-ing!