- Company Articles
- Products and Technology
- Installation And Maintenance
- Step-by-Step Installation Guide for 3060 National Standard Profile A Structures

Step-by-Step Installation Guide for 3060 National Standard Profile A Structures
Related Product
3060 National Standard Profile A
Workbench, production line, logistic rack, warehouse rack Industry: Manufacturer workshop, Automobile, Electronic, Assembling, logistic
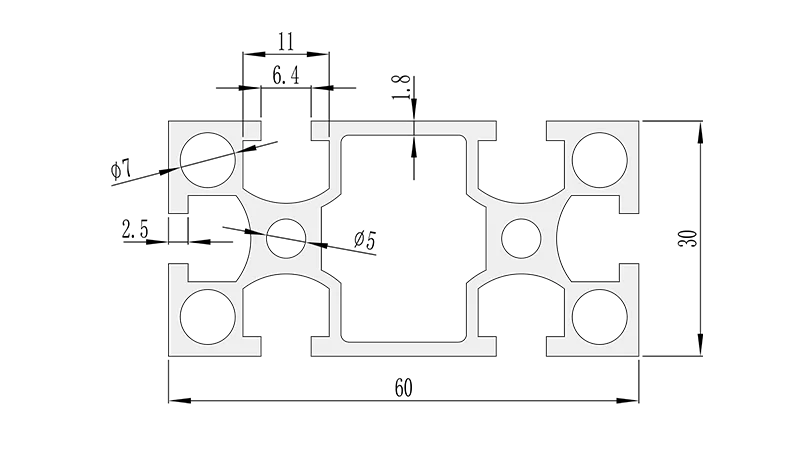
Introduction: Why 3060 National Standard Profile A Matters in Your Workshop
If you've ever walked into a well-organized workshop, factory floor, or even a home garage that feels like it "just works," there's a good chance aluminum profiles played a silent role in that magic. And among those profiles, the 3060 National Standard Profile A stands out as a workhorse—sturdy, versatile, and surprisingly easy to assemble once you know the ropes. Whether you're building a workbench for your DIY projects, a material rack for inventory, or a custom workstation for a production line, this guide will walk you through installing 3060 Profile A structures with confidence. No fancy engineering degree required—just a bit of patience, the right tools, and a willingness to learn as you go.
What makes 3060 Profile A so popular? For starters, its dimensions (30mm width, 60mm height) strike a perfect balance between strength and flexibility. It's strong enough to hold heavy tools or materials but lightweight enough to maneuver during assembly. Plus, it's compatible with a wide range of aluminum profile accessories—think connectors, end caps, and angle yards—that let you customize your structure to fit your exact needs. No more one-size-fits-all solutions that leave you frustrated. With 3060 Profile A, you're the designer, and the possibilities are nearly endless.
Gathering Your Tools and Materials: What You'll Need Before You Start
Before diving into assembly, let's make sure you have everything you need. Skipping this step is like baking a cake without checking if you have flour—you'll end up stopping halfway, and no one wants that. Here's a breakdown of tools and materials to round up:
| Category | Items | Why You Need Them |
|---|---|---|
| Tools | Allen wrenches (2.5mm, 3mm, 4mm), rubber mallet, tape measure, carpenter's level (24-inch minimum), pencil, utility knife, work gloves | Allen wrenches tighten the T-slot bolts; rubber mallet gently seats joints without damaging profiles; level ensures your structure isn't wobbly; tape measure and pencil mark cuts/positions. |
| Materials | 3060 National Standard Profile A (cut to your desired lengths), aluminum profile accessories (connectors, 3060 aluminum angle yards, end caps), T-slot bolts (M5 or M6, depending on your accessories), nuts, washers, workbench top (optional, if building a workbench) | Profiles are the "bones" of your structure; accessories like angle yards connect profiles at 90° angles; end caps protect edges and add a finished look. |
| Safety Gear | Safety glasses, dust mask (if cutting profiles) | Aluminum shavings can irritate eyes; a dust mask keeps small particles out of your lungs during cutting. |
Pro Tip:
Lay out all your materials on a clean, flat surface (like a plywood sheet or existing table) before starting. This helps you spot missing parts early—nothing kills momentum like realizing you're short a connector halfway through assembly!
Pre-Installation Prep: Measure Twice, Cut Once (and Other Smart Habits)
You've heard the saying "measure twice, cut once," and it's worth repeating here. Rushing through prep work is the #1 cause of lopsided frames or profiles that are too short (or too long) to fit. Let's break this down into actionable steps:
Step 1: Map Out Your Design
Grab a piece of paper (or open a notes app) and sketch your structure. Even a rough drawing helps. For example, if you're building a workbench, note the height (standard is 36 inches, but adjust for your height), width (maybe 60 inches), and depth (24 inches). Mark where vertical supports (legs) and horizontal rails will go. This sketch becomes your roadmap—refer to it whenever you feel unsure.
Step 2: Measure Your Space
It sounds obvious, but measure the area where your structure will live. A 6-foot workbench might look great on paper, but if your garage only has 5 feet of free wall space, you'll regret not checking first. Use your tape measure to note ceiling height too—especially if you're building a tall material rack. Leave a few inches of clearance on all sides for easy access.
Step 3: Sort and Inspect Your Profiles
Unpack your 3060 Profile A pieces and sort them by length. Check each profile for dents, scratches, or bent edges—most suppliers will replace damaged parts if you catch it early. Also, inspect the T-slots (the grooves running along the profile length) to ensure they're clean and free of debris. A quick wipe with a dry cloth removes dust or factory residue that could block bolts later.
Step 4: Cut Profiles (If Needed)
If your profiles aren't pre-cut to size, you'll need to trim them. Use a miter saw with a metal-cutting blade (or a hacksaw for small jobs). Clamp the profile to a work surface first to prevent it from moving. Cut slowly to avoid bending the aluminum, and wear safety glasses—those shavings fly! After cutting, use a utility knife to smooth any sharp edges (this is where aluminum profile end caps will go later, but sharp edges can still scratch you during assembly).
Step-by-Step Assembly: Building Your 3060 Profile A Structure
Now for the fun part: putting it all together. We'll use a simple workbench as our example, but the same principles apply to racks, shelves, or any other structure. Let's get started.
Step 1: Assemble the Frame (Vertical Legs + Horizontal Rails)
Start with the basics: four vertical legs (we'll use 36-inch lengths for our workbench) and four horizontal rails (60-inch lengths for the top and bottom). Lay the legs on your work surface, parallel to each other, with the 60mm side facing up (this gives the legs more stability). Now, take one horizontal rail and position it across the top of two legs, forming a rectangle corner. This is where 3060 aluminum angle yards come into play—these small, L-shaped brackets connect the rail to the leg at a 90° angle.
Slide an angle yard into the T-slot of the horizontal rail, aligning its holes with the holes in the vertical leg. insert an M5 T-slot bolt through the angle yard and into the leg's T-slot, then hand-tighten a nut on the other side. Repeat this for the other end of the rail, attaching it to the second leg. Now you have one side of your frame—do the same for the opposite side (two legs + one rail). You should now have two "U" shapes.
Pro Tip:
Don't fully tighten bolts yet! Leave them hand-tight so you can adjust angles and positions later. You'll do a final tightening pass once the frame is square.
Step 2: Connect the Two Frames with Cross-Rails
Now, connect the two "U" frames using horizontal cross-rails (24-inch lengths for our workbench depth). Stand the frames upright and position them parallel, about 24 inches apart (the length of your cross-rails). Place a cross-rail across the top of the two frames, near the front, and attach it using angle yards—same as before. Add another cross-rail across the top, near the back, to stabilize the top. Repeat this for the bottom rails (near the floor) to keep the legs from splaying out.
At this point, your frame should look like a rectangular cube. Grab your carpenter's level and check for squareness: place the level on top of the front rail—if the bubble is centered, it's level left-to-right. Do the same for the back rail and the side rails (front-to-back). If it's wobbly, gently push or pull the frame until the level reads straight. Once it's square, tighten all bolts with your Allen wrench—snug, but not so tight you strip the threads (aluminum is softer than steel, so over-tightening is a real risk).
Step 3: Add Reinforcements (Optional but Recommended)
For extra stability—especially if your structure will hold heavy loads—add diagonal braces. Cut two 3060 profiles to fit diagonally across the back corners of the frame (measure the distance between the top-back rail and bottom-front rail to get the length). Attach them using angle yards, forming an "X" shape on the back of the frame. This prevents the structure from twisting under weight, which is a game-changer for workbenches holding power tools or material racks stacked with inventory.
Step 4: Install Aluminum Profile End Caps
Now that the frame is solid, let's add the finishing touches: aluminum profile end caps. These small plastic or rubber caps snap onto the ends of the profiles, covering sharp edges and keeping dust, dirt, and moisture out of the T-slots. To install them, simply align the cap with the end of the profile and press firmly—you'll hear a "click" when it's seated. If it's tight, tap it gently with your rubber mallet (no need to swing hard; aluminum dents easily!).
Step 5: Attach the Workbench Top (If Building a Workbench)
If you're building a workbench, now's the time to add the top. Plywood (3/4-inch thick) or a solid wood slab works well. Place the top on the frame and center it (leave equal overhang on all sides for a clean look). Drill pilot holes through the top into the frame's top rails (use a drill bit slightly smaller than your T-slot bolts). Then, insert bolts through the top and into the T-slots, tightening them with nuts from below. This secures the top without visible screws—sleek and functional.
Troubleshooting: Fixing Common Hiccups
Even with careful prep, things can go sideways. Here's how to solve the most common issues:
- Bolts won't thread into T-slots: Check if the T-slot is blocked by debris—use a toothpick to clear out dust. If the bolt still sticks, try a different nut (sometimes threads get crossed during manufacturing).
- Frame is wobbly after tightening:
- Angle yards don't align with profile holes:
- End caps keep falling off:
You might have skipped the "square before tightening" step. Loosen the bolts, realign with the level, and retighten.
Most aluminum profile accessories are adjustable within the T-slot—slide the angle yard along the slot until the holes line up, then tighten.
They might be the wrong size (double-check that you have caps for 3060 profiles). If they're the right size, apply a tiny drop of super glue to the inside of the cap before pressing it on (just enough to hold, not enough to make it permanent—you might need to remove them later for maintenance).
Maintenance Tips: Keeping Your 3060 Structure Strong for Years
Your 3060 Profile A structure is built to last, but a little care goes a long way:
- Clean regularly: Wipe down the profiles with a damp cloth to remove grease, sawdust, or spills. Avoid harsh chemicals—mild soap and water work best.
- Check bolts quarterly: Over time, vibrations (from tools or movement) can loosen bolts. Give them a quick tighten with your Allen wrench every few months.
- replace worn accessories: If angle yards crack or end caps fall off, replace them ASAP. Most suppliers sell replacement aluminum profile accessories individually, so you don't need to rebuild the whole structure.
- Protect from moisture: While aluminum resists rust, prolonged exposure to water (like in a damp garage) can cause T-slots to corrode. If your structure is outdoors or in a humid area, consider painting the profiles with a clear aluminum sealant.
Conclusion: You Did It—Now Enjoy Your Custom Structure
Take a step back and admire your handiwork. That sturdy, sleek structure you just built? It's more than metal and bolts—it's a reflection of your ability to create something functional and tailored to your needs. Whether it's a workbench that will host your next DIY project, a material rack that keeps your inventory organized, or a workstation that makes your team more efficient, the 3060 National Standard Profile A has proven its worth.
And here's the best part: this is just the beginning. Once you're comfortable with basic assembly, you can expand—add shelves, hooks, lighting, or even casters (yes, aluminum profile accessories include caster mounts!) to make it mobile. The only limit is your imagination.
So go ahead—load it up, use it hard, and remember: every scratch or tool mark tells a story of projects completed, problems solved, and progress made. You've got this, and your 3060 structure has your back.