- Company Articles
- Products and Technology
- Installation And Maintenance
- Step-by-Step Installation Guide for Four Way Straight Lean Pipe Joint

Step-by-Step Installation Guide for Four Way Straight Lean Pipe Joint
Related Product
Four Way Straight Lean Pipe Joint
Four way lean pipe joint for 4 pcs 28MM lean pipe connection in straight angle, which used widely in workbench, flow rack, hand trolley frame connection.
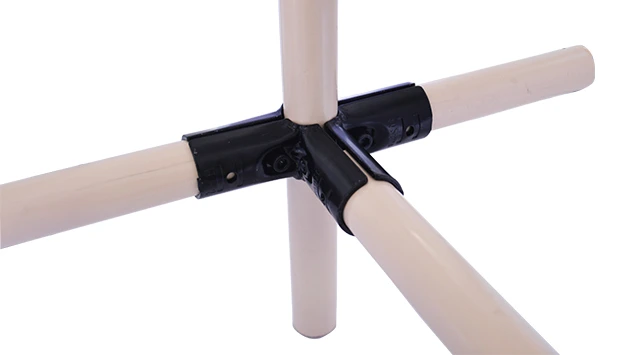
Introduction: Why the Four Way Straight Lean Pipe Joint Matters in Your Lean System
If you've ever walked through a well-organized production floor, warehouse, or workshop, you've probably seen them—those sleek, modular structures that seem to effortlessly hold tools, materials, and products in just the right place. Chances are, many of those structures are built with lean pipes and joints, the unsung heroes of lean manufacturing and efficient workspace design. And among the most versatile of these components is the
four way straight lean pipe joint
.
Whether you're assembling a workbench, a flow rack, a turnover trolley, or a custom material handling system, this joint is the backbone that holds everything together. It's the connector that lets you build in four directions—up, down, left, right—with precision, stability, and the flexibility to reconfigure later if your needs change. But here's the thing: even the best components fall short if they're not installed correctly. A loose joint can throw off an entire workbench's alignment. A misaligned pipe can slow down your workflow. And a poorly secured structure might even compromise safety.
That's why we've put together this guide. We're going to walk you through every step of installing a four way straight lean pipe joint, from unboxing the parts to integrating the finished structure into your
lean system
. No jargon, no shortcuts—just clear, actionable advice that'll help you build something that's not only functional but built to last. Whether you're a seasoned facility manager, a DIY enthusiast setting up a home workshop, or a new team member tasked with optimizing your production line, this guide is for you. Let's dive in.
Tools and Materials You'll Need (Don't Skip This List!)
Before you start twisting pipes and tightening screws, let's make sure you have everything you need. Skipping a tool or forgetting a part mid-installation is not only frustrating—it can also lead to mistakes. Here's your checklist:
| Category | Items | Why You Need It |
|---|---|---|
| Tools | Hex key (Allen wrench) set | Most lean pipe joints use hex-head set screws—you'll need the right size to tighten them without stripping. |
| Rubber mallet | Gently taps pipes into place without damaging the joint or pipe coating (plastic or aluminum). | |
| Level (2-foot or longer) | Ensures your structure is straight and plumb—critical for stability and functionality. | |
| Tape measure and pencil | To mark pipe lengths and ensure pipes are inserted evenly into the joint. | |
| Wire brush or sandpaper (fine grit) | Cleans off burrs, rust, or debris from pipe ends for a snug fit. | |
| Materials | Four way straight lean pipe joint | The star of the show! Double-check that it's the correct model (some have fixed prongs, others rotate—we're focusing on straight, fixed prongs here). |
| Lean pipes | Typically 28mm or 30mm in diameter (check your joint's specs!). Options include aluminum pipe , stainless steel pipe, or PE-coated steel pipe—choose based on your load capacity and environment (e.g., aluminum for lightweight, stainless steel for corrosion resistance). | |
| Aluminum pipe accessories (optional) | End caps (to cover sharp pipe ends), pipe clamps (for attaching shelves or tools), or plastic/metal gussets (for extra stability in heavy-load setups). | |
| Thread locker (medium-strength, e.g., Loctite 242) | Prevents set screws from loosening over time due to vibration (especially useful in high-traffic areas). | |
| Miscellaneous | Clean cloth, work gloves, safety glasses | Cloth for wiping dirt off parts; gloves to protect hands from sharp edges; safety glasses in case of flying debris (unlikely, but better safe than sorry). |
Pro Tip:
Lay out all your parts on a clean, flat surface (like a table or workbench) before you start. This lets you inspect everything for damage (cracks in the joint, bent prongs, dented pipes) and ensures you're not missing anything. A quick 2-minute check now can save you hours of frustration later.

Pre-Installation Prep: Measure Twice, Install Once
You've got your tools and materials. Now, let's set the stage for success. Installation isn't just about putting parts together—it's about planning to avoid mistakes. Here's what to do before you even touch the joint:
1. Inspect Every Part for Damage
Take your four way straight lean pipe joint and give it a thorough once-over. Look for cracks in the plastic or metal (most joints are made of die-cast aluminum or reinforced plastic). Check the prongs (the "arms" where the pipes insert)—they should be straight, with no bends or deformities. If a prong is bent, even slightly, it won't hold the pipe securely. Next, look at the set screws (the small screws that tighten against the pipe). Are they stripped? Are the threads clean? If a screw is stripped, replace it before you start—you can usually get replacements from your lean pipe supplier . Now check your pipes. Roll them on a flat surface to see if they're bent (a bent pipe will wobble). Feel the ends for burrs—those sharp metal or plastic bits left over from cutting. Burrs can scratch you, damage the joint's interior, or prevent the pipe from seating fully. If you find burrs, gently sand them off with fine-grit sandpaper until the end is smooth.
Warning:
Never use a damaged joint or pipe! A cracked joint might fail under load, and a bent pipe will throw off your structure's alignment. It's better to wait for a replacement than to risk a wobbly or unsafe setup.
2. Measure and Mark Your Pipes
Before cutting or inserting pipes into the joint, you need to know how long each pipe should be. Let's say you're building a simple square frame with the four way joint in the center (common for workbench legs or shelf supports). For example, if you want the frame to be 24 inches wide and 18 inches tall, each pipe segment would be 24 inches (left/right) and 18 inches (up/down). But here's the key: measure from the end of the pipe to the point where it will meet the joint's base , not the very end of the joint. Most four way joints have a central "block" where the prongs meet—measure from that block to the end of the prong, then subtract that length from your total pipe length. For example, if the prong is 2 inches long, a 24-inch pipe segment would actually be 24 inches minus 2 inches = 22 inches (since 2 inches will insert into the joint). Mark the pipe with a pencil or masking tape at your measured length. If you need to cut the pipe (most suppliers will cut to length, but if you're doing it yourself), use a pipe cutter or hacksaw with a fine-tooth blade for clean edges. After cutting, sand the ends again to remove burrs.3. Set Up Your Work Area
You'll need a flat, stable surface to work on—a workbench, a sturdy table, or even the floor (if it's clean and level). Lay down a piece of cardboard or a towel to protect the joint and pipes from scratches, especially if you're using aluminum pipe (aluminum is softer and more prone to scuffing than steel). Make sure you have enough space to lay out all four pipes in their final positions—you don't want to be cramped when aligning everything.
Step-by-Step Installation: Let's Build Something Solid
Now for the fun part—putting it all together. Follow these steps, and you'll have a perfectly installed four way straight lean pipe joint in no time.
Step 1: Prepare the Joint for Pipe Insertion
Start by loosening the set screws on all four prongs of the joint. Most joints have one set screw per prong, located near the base (where the prong meets the central block). Use your hex key to turn the screws counterclockwise until they're loose enough that you can insert the pipe without resistance. Don't remove the screws entirely—you don't want to lose them! Just back them out 2-3 turns.
Pro Tip:
If the set screws are stuck (common if the joint is new and has been sitting in a box), tap the hex key gently with a rubber mallet to loosen them. Avoid using a metal hammer—you might damage the screw head.
Step 2: insert the First Pipe (Start with a "Base" Direction)
Let's start with the horizontal pipes (left and right, if you're building a vertical structure) or the vertical pipes (up and down, if horizontal). Pick one direction to focus on first—we'll call this the "base" direction. Take one of your pre-cut pipes and align the marked end with the prong of the joint. Push the pipe into the prong as far as it will go. You should feel it hit the base of the prong (the part where the prong meets the central block). If it stops short, check for debris inside the prong—blow it out or wipe it with a cloth. If the pipe still won't seat, double-check that you sanded the burrs off the pipe end. Once the pipe is fully inserted, hold it steady with one hand and use your other hand to finger-tighten the set screw. Turn it clockwise until it just touches the pipe—don't tighten it all the way yet; we'll do that after aligning all pipes.Step 3: insert the Opposite Pipe (Balance the Base)
Now insert the pipe that will be opposite the first one (e.g., if you did the left prong, now do the right prong). This balances the joint and prevents it from tipping as you add more pipes. Repeat the process: align the pipe with the prong, push it in until it seats, then finger-tighten the set screw.Step 4: Check for Straightness (Use the Level!)
Before adding the remaining two pipes, check if the two base pipes are straight. Lay your level across the top of the pipes (if horizontal) or along the side (if vertical). The bubble should be centered. If it's not, gently twist the pipes or adjust their insertion depth until they're level. This is crucial—if the base is crooked, the rest of the structure will be too.Step 5: insert the Remaining Two Pipes (Vertical or Horizontal)
Now it's time to add the pipes in the other two directions (e.g., up and down if you started with left/right). Repeat the insertion process: align, push until seated, finger-tighten set screws. Again, don't fully tighten yet—we need to align all four pipes first.Step 6: Align All Four Pipes (The "Square" Check)
Now you have four pipes sticking out of the joint in four directions. It's time to make sure they're all aligned correctly. Here's how: - For right angles: If you're building a square or rectangular structure, the pipes should form 90-degree angles with each other. Use a carpenter's square or the corner of a straight object (like a hardcover book) to check the angle between adjacent pipes. If it's not 90 degrees, gently bend the pipes (don't force them!) until they align. - For straightness: Use your level again to check each pipe individually. The vertical pipes should be plumb (straight up and down), and the horizontal pipes should be level (left to right). - For equal length: Measure the distance from the joint to the end of each pipe. They should all be the length you marked earlier. If one is shorter, pull it out slightly (loosening the set screw if needed) and reinsert to the correct depth. This step might take a few minutes—patience is key! A well-aligned structure will be more stable and look cleaner.Step 7: Tighten the Set Screws (Finally!)
Once everything is aligned, it's time to lock the pipes in place. Grab your hex key and start with one pipe. Turn the set screw clockwise until it's snug—you'll feel resistance. Then give it a 1/4 turn more (but no more than that!). Over-tightening can strip the screw or crack the joint's prong. Repeat this for all four set screws.
Pro Tip:
For extra security (especially in high-vibration areas like production lines), apply a drop of medium-strength thread locker to the set screw before tightening. Let it dry for 10-15 minutes before moving the structure.
Step 8: Test the Joint's Stability
Now, give the structure a gentle shake. It should feel solid—no wobbling, no creaking, no pipes sliding in the joint. Grab each pipe and try to twist it; it shouldn't move. If a pipe feels loose, check the set screw—maybe it wasn't tightened enough. If twisting the pipe moves the joint, double-check your alignment (it might be off-center).Step 9: Add Accessories (Optional but Useful)
With the joint secure, you can add aluminum pipe accessories to finish off your structure. For example: - End caps: Snap or screw end caps onto the exposed pipe ends to prevent scratches and protect hands. - Caster wheels: If you're building a trolley, attach casters to the bottom pipes (use caster mounting plates and ensure they're rated for your load). - Clamps or brackets: Use pipe clamps to attach shelves, tool hooks, or bins to the pipes. - Workbench tops: For a workbench, lay a plywood or aluminum honeycomb panel across the horizontal pipes and secure it with brackets.Troubleshooting: Common Issues and How to Fix Them
Even with careful planning, things can go wrong. Here are the most common problems you might run into and how to solve them:
Solution: Sand the pipe end again to remove burrs. Use compressed air or a pipe cleaner to clear debris from the prong. Check the pipe diameter against the joint's specs—if it's too big, you'll need a larger joint.
Solution: Loosen the set screws, push the pipes in until they seat against the prong base, then retighten. If misaligned, adjust the pipes with the level and retighten.
Solution: Use a hex key that fits snugly (no wobble). If stripped, use a screw extractor to remove it, then replace with a new set screw (most lean pipe suppliers sell replacement screws).
Solution: replace with thicker pipes (e.g., 2.0mm PE-coated lean pipe or aluminum pipe) or add support brackets between joints to distribute weight.
Problem 1: Pipes Won't insert All the Way into the Joint
Causes: Burrs on the pipe end, debris inside the joint's prong, or the pipe is the wrong diameter (e.g., using a 30mm pipe with a 28mm joint).Solution: Sand the pipe end again to remove burrs. Use compressed air or a pipe cleaner to clear debris from the prong. Check the pipe diameter against the joint's specs—if it's too big, you'll need a larger joint.
Problem 2: Joint is Wobbly After Tightening
Causes: Pipes not fully inserted, set screws not tight enough, or misaligned pipes putting stress on the joint.Solution: Loosen the set screws, push the pipes in until they seat against the prong base, then retighten. If misaligned, adjust the pipes with the level and retighten.
Problem 3: Set Screw Strips or Breaks
Causes: Using the wrong size hex key, over-tightening, or a defective screw.Solution: Use a hex key that fits snugly (no wobble). If stripped, use a screw extractor to remove it, then replace with a new set screw (most lean pipe suppliers sell replacement screws).
Problem 4: Pipes Bend Under Load
Causes: Pipes are too thin (e.g., 1.0mm wall thickness instead of 1.5mm) or the load exceeds the pipe's capacity.Solution: replace with thicker pipes (e.g., 2.0mm PE-coated lean pipe or aluminum pipe) or add support brackets between joints to distribute weight.
Maintenance: Keep Your Joint (and Lean System) in Top Shape
Installing the joint is just the first step—proper maintenance ensures it stays tight and reliable for years. Here's what to do:
1. Tighten Set Screws Regularly
Over time, vibration from daily use can loosen set screws. Check them every 1-2 months (more often in high-traffic areas) and give them a 1/8 turn with the hex key if they're loose.2. Clean the Joint and Pipes
Dust, oil, and debris can build up on the joint and pipes, making them harder to adjust later. Wipe them down with a damp cloth every few weeks. For aluminum pipes, avoid harsh cleaners—mild soap and water work best.3. Inspect for Wear and Tear
Every 6 months, do a thorough inspection: - Check the joint for cracks, especially around the prongs and set screw holes. - Look for dents or corrosion on pipes (replace if severe). - Ensure accessories like caster wheels or clamps are still secure.4. Reconfigure When Needed (Lean Systems Are Flexible!)
One of the best things about lean pipe systems is their flexibility. If your workflow changes, you can take the joint apart, re-cut pipes, and rebuild. Just remember to loosen set screws fully before removing pipes—forcing them out can damage the joint.Conclusion: You've Got This!
Installing a four way straight lean pipe joint might seem intimidating at first, but as you've seen, it's really just a matter of preparation, patience, and attention to detail. By following these steps—inspecting parts, measuring carefully, aligning with a level, and tightening set screws properly—you'll build structures that are strong, stable, and tailored to your needs.
Remember, the goal of a
lean system
is to eliminate waste, improve efficiency, and make work easier. A well-installed joint contributes to all three: it reduces the time spent fixing wobbly structures, keeps materials where they need to be, and creates a workspace that adapts to you, not the other way around.
So go ahead—grab your tools, gather your parts, and start building. And if you run into a snag, refer back to this guide. You've got this. Happy building!