- Company Articles
- Products and Technology
- Installation And Maintenance
- Step-by-Step: Replacing a Worn Castor Install Base on Your Material Handling Cart

Step-by-Step: Replacing a Worn Castor Install Base on Your Material Handling Cart
Related Product
Castor Install Base
Castor install base, used for connection between pipe and castor, it can connect 4 pcs pipe by 1 pcs castor base, to make the structure strong and stable.
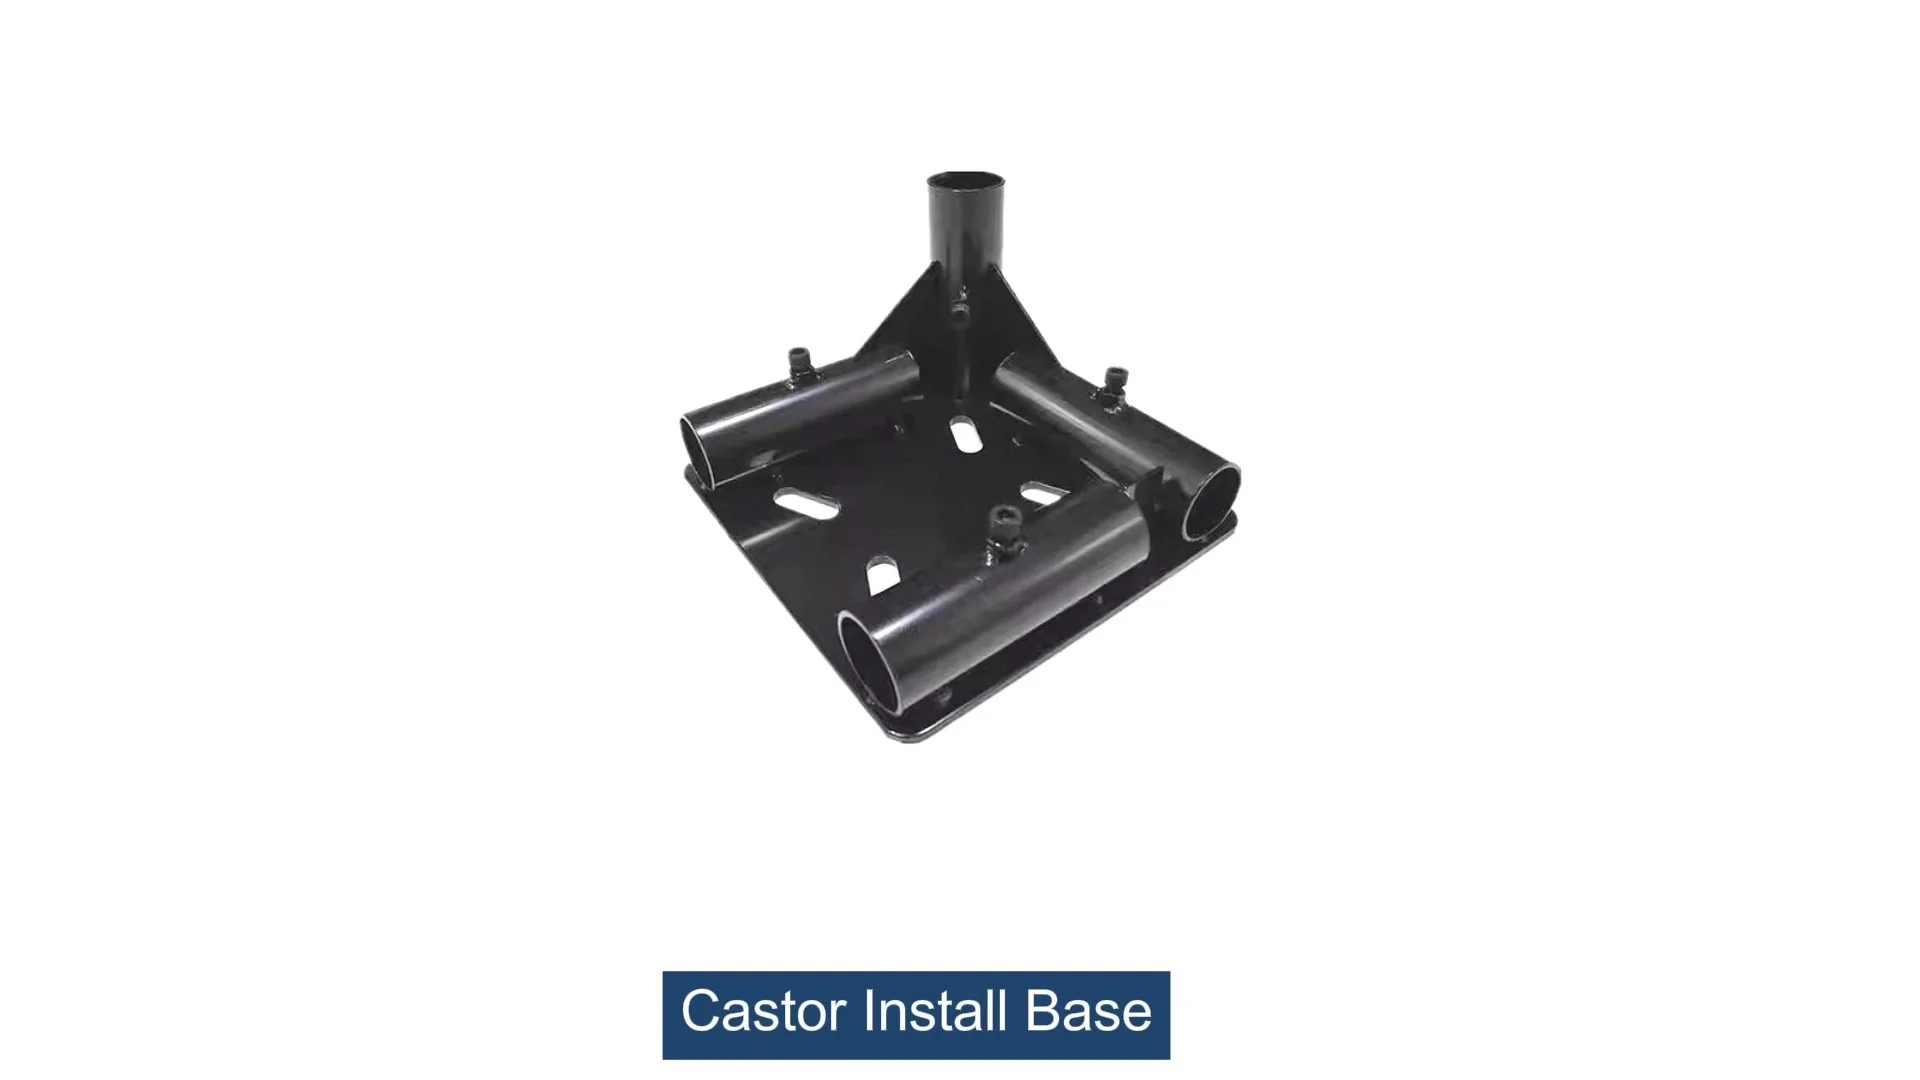
If you've spent any time around warehouses, workshops, or manufacturing floors, you know how crucial material handling carts are to keeping operations running smoothly. These workhorses ferry parts, tools, and finished products from one station to another, making sure deadlines are met and workflows stay efficient. But even the toughest carts have weak points—and one of the most overlooked yet vital components is the castor install base . This unassuming piece connects the caster wheel to the cart frame, bearing the brunt of daily use, heavy loads, and constant movement. When it wears out, what was once a reliable cart can become a safety hazard, a productivity killer, or both.
Whether you're managing a fleet of turnover trolley and rack systems or just maintaining a single workshop cart, knowing how to replace a worn castor install base is a skill that'll save you time, money, and headaches. In this guide, we'll walk through the process step by step, from spotting the warning signs of a failing base to testing your newly repaired cart. No fancy tools or years of mechanical experience required—just a little patience and the right caster and accessories to get the job done right.
How to Tell If Your Castor Install Base Is Worn Out
Before you grab a wrench, you need to confirm that the castor install base is actually the problem. Sometimes, a wobbly cart or a stuck wheel can be caused by a damaged caster wheel or loose bolts, not the base itself. Here are the key signs that it's time to replace the base:
1. The Cart Wobbles or Leans to One Side
Ever pushed a cart that feels like it's about to tip over, even when it's not loaded? That's a classic red flag. A worn castor install base can bend or crack, throwing the cart off balance. If the wobble gets worse when you turn or hit a small bump, the base is likely the culprit—especially if the caster wheel itself looks straight and undamaged.
2. Unusual Noises: Squeaks, Grinds, or Rattles
Carts aren't silent, but they shouldn't sound like a rusty gate. If you hear grinding, squeaking, or rattling coming from the wheel area—even after lubricating the caster wheel—it could mean the install base is loose or cracked. The metal-on-metal friction happens when the base can't hold the wheel steady, causing parts to rub together abnormally.
3. Visible Damage: Cracks, Bends, or Rust
Take a close look at the castor install base (you might need to kneel down or tilt the cart slightly). Are there hairline cracks in the metal? Is the base bent out of shape, so it no longer sits flush against the cart frame? Heavy rust that's eating through the material is another warning sign—rust weakens the base, making it prone to sudden failure under load.
4. The Caster Wheel Moves Side-to-Side (Play in the Base)
Grab the caster wheel with one hand and try to wiggle it from side to side. A small amount of movement is normal, but if the wheel shifts more than 1/4 inch, the base is probably worn. This "play" happens when the base's mounting holes stretch or the metal fatigues, letting the wheel pivot beyond its intended range.
5. Difficulty Steering or Rolling Straight
Does the cart pull to one side, even on a flat floor? Or do you have to wrestle with it to keep it on track? A damaged install base can misalign the caster wheel, making steering a chore. Over time, this not only slows you down but also puts extra strain on other parts of the cart, leading to more repairs down the line.
Tools and Materials You'll Need
Replacing a castor install base is a straightforward job, but having the right tools on hand will make it go much faster. Here's what you'll need to gather before starting:
| Tool/Material | Why You Need It | Pro Tip |
|---|---|---|
| New castor install base (matching your cart's model) | The star of the show! Make sure it's compatible with your cart's frame and caster wheel size. | Check the old base for part numbers or measurements (length, width, bolt hole spacing) to ensure a perfect fit. |
| Socket wrench set (with both metric and standard sizes) | To remove and tighten the bolts securing the base to the cart frame. | Most carts use metric bolts, but bring standard sizes too—you never know! |
| Screwdriver (flathead and Phillips, or a multi-bit driver) | For prying off any plastic covers or loosening screws holding the base in place. | Magnetic tips help catch dropped screws—no more fishing around under the cart! |
| Rubber mallet | To gently tap the old base loose if it's stuck (avoid using a metal hammer—you might damage the cart frame). | Wrap the mallet head in a cloth to prevent scratches on the cart's finish. |
| Wire brush or sandpaper (medium grit) | To clean rust, dirt, or debris from the cart frame's mounting area. | A clean surface ensures the new base sits flush and bolts tighten properly. |
| Thread locker (blue, removable type) | To keep bolts from loosening over time, especially if the cart is used on rough floors. | Avoid red thread locker—it's permanent and hard to remove if you need to adjust later. |
| Work gloves | To protect your hands from sharp metal edges, rust, or grease. | Leather or nitrile gloves work best—they grip tools better than cotton. |
| Flashlight or headlamp | To tight spaces under the cart, where bolts or rust might be hidden. | A headlamp leaves your hands free to work—game-changer for this job! |
Pro tip: Lay out all your tools and materials on a clean towel or workbench before starting. This way, you won't have to stop mid-job to hunt for a missing wrench.

Step-by-Step: Replacing the Castor Install Base
Now that you've got your tools and a new base, let's dive into the replacement process. We'll break it down into 7 simple steps, with extra tips to avoid common mistakes.
Step 1: Safety First—Secure the Cart
Before you start tinkering, make sure the cart is safe to work on. Park it on a flat, level surface (avoid slopes!) and chock the opposite wheels with blocks of wood or heavy books to prevent it from rolling. If the cart has a brake, engage it. If it's loaded with materials, unload it first—you don't want 50 pounds of parts crashing down while you're under there!
Also, wear your work gloves now. The cart frame might have sharp edges, and old bolts can be rusty and slippery.
Step 2: Remove the Caster Wheel (If Needed)
In some carts, the caster wheel is attached directly to the install base. In others, the wheel might need to be removed first to access the base's mounting bolts. Here's how to check:
- Look at the bottom of the base: If the wheel is bolted or clipped to the base, you'll need to remove it. Use your socket wrench to take off the nut or bolt securing the wheel axle.
- If the wheel and base are a single unit (common in lightweight carts), skip this step—you'll remove them together.
Set the wheel aside in a safe place (a small box works great) so you don't lose any washers or bearings.
Step 3: Loosen and Remove the Old Castor Install Base
Now, it's time to say goodbye to the old base. Locate the bolts or screws that attach it to the cart frame—there are usually 4 (one at each corner), but some carts have 2 or 6, depending on size.
Use your socket wrench to loosen each bolt. If they're rusted, spray a little penetrating oil (like WD-40) and let it sit for 5 minutes—this will make turning them much easier. Avoid forcing a stuck bolt; you could strip the head. If it won't budge, tap the wrench gently with a rubber mallet to break the rust loose.
Once all bolts are removed, the base should lift off easily. If it's stuck (thanks to years of grime or minor rust), tap it lightly with the rubber mallet. Be careful not to bend the cart frame—apply pressure evenly around the base until it comes free.
Step 4: Clean the Mounting Area
With the old base gone, take a look at the cart frame where it was mounted. Chances are, there's a layer of dirt, rust, or dried grease. Grab your wire brush or sandpaper and scrub the area until it's clean and smooth. This step is crucial—if there's gunk under the new base, it won't sit flat, leading to wobbles or loose bolts later.
Wipe away dust with a rag, then check for any damage to the frame itself. Are the bolt holes stretched or stripped? If so, you might need to use larger bolts or repair the holes with a thread tap (a job for a pro if you're not comfortable with it). For minor damage, a little JB Weld epoxy can help reinforce the area.
Step 5: Install the New Castor Install Base
Now, it's time to put the new base in place. Line up its bolt holes with the holes on the cart frame—this should be a perfect match if you bought the right replacement. If the holes are off by even a little, double-check that you have the correct base model (mix-ups happen!).
Once aligned, insert the bolts through the base and into the frame. Don't tighten them all the way yet—just screw them in enough to hold the base in place. This "finger-tight" step lets you adjust the base to ensure it's centered and level. Sit back and eye it from the front and side—no tilting allowed!
When the base looks straight, start tightening the bolts with your socket wrench. Follow the "star pattern" (tighten opposite bolts first) to distribute pressure evenly. For example, if there are 4 bolts, tighten the top-left, then bottom-right, then top-right, then bottom-left. This prevents warping the base or frame.
How tight is "tight enough"? Snug the bolts until they won't turn anymore, then give them a 1/4-turn more. Overtightening can strip the threads or crack the base—err on the side of firm but not forceful.
Step 6: Reattach the Caster Wheel
If you removed the caster wheel earlier, now's the time to put it back on the new base. Slide the wheel's axle through the base's mounting holes, then secure it with the nut or bolt you removed. Tighten it until the wheel spins freely but doesn't wobble. A little play is okay, but if it's loose, it will rattle.
While you're here, take a second to inspect the caster wheel itself. Is the tread worn down? Are the bearings dry or gritty? If so, now's a great time to replace the wheel too—you'll save yourself another repair later. A quick spin test: Give the wheel a flick with your finger. It should roll smoothly for 5-10 seconds without grinding or stopping abruptly.
Step 7: Test the Cart (And Celebrate!)
You're almost done! Remove the wheel chocks, disengage the brake (if you used one), and give the cart a test drive. Push it forward, backward, and turn it in circles. Does it roll straight? Is there any wobbling? Stand behind it and push down gently on each corner—no creaking or shifting means the base is secure.
Load the cart with a moderate weight (about half its maximum capacity) and test again. Heavy loads can reveal issues that light testing misses. If everything feels solid, you're good to go! If not, double-check the bolts—they might need a little more tightening—or the base alignment.

Pro Tips to Keep Your Castor Install Base (and Cart) in Top Shape
Now that your cart is rolling like new, let's make sure it stays that way. With a little regular maintenance, your new castor install base can last for years—saving you from repeat repairs.
1. Clean and Lubricate Quarterly
Every 3 months, wipe down the base and caster wheel with a damp rag to remove dirt and debris. Then, apply a few drops of lubricating oil (like 3-in-1 oil) to the wheel bearings and the base's pivot points. This keeps things moving smoothly and prevents rust.
2. Check Bolts Monthly
Take 2 minutes each month to snug up the base's bolts with your socket wrench. Vibrations from daily use can loosen them over time, leading to wobbles. A quick tighten now beats a full replacement later!
3. Avoid Overloading
Every cart has a weight limit (check the manufacturer's label). Exceeding it puts extra strain on the castor install base, causing it to bend or crack. If you're not sure, weigh your load before moving it—better safe than sorry.
4. replace Worn Caster Wheels Promptly
A damaged caster wheel doesn't just make rolling hard—it also puts extra stress on the install base. If you notice flat spots, cracks, or uneven wear on the wheel, swap it out ASAP. Most caster and accessories kits include replacement wheels at an affordable price.
5. Store Carts Properly When Not in Use
If you're not using the cart for a while, park it on a dry, flat surface and engage the brake. Avoid leaving it outside or in damp areas—moisture is the enemy of metal parts like the castor install base.

Troubleshooting Common Issues After Replacement
Even with careful work, you might run into a few hiccups after installing the new base. Here's how to fix them:
| Problem | What's Causing It | How to Fix It |
|---|---|---|
| Cart still wobbles | Base isn't sitting flat (dirt under it) or bolts are unevenly tightened. | Loosen bolts, clean the mounting area again, then retighten in the star pattern. |
| Caster wheel won't roll smoothly | Wheel is misaligned, bearings are dry, or the base is bent. | Check wheel alignment, lubricate bearings, or replace the wheel if bent. |
| Bolts keep coming loose | No thread locker used, or bolts are too small for the holes. | Apply blue thread locker to the bolts and retighten, or upgrade to larger bolts. |
| Base creaks when turning | Metal-on-metal friction between the base and frame. | Apply a thin layer of lithium grease between the base and frame (avoid getting it on the bolts). |
Final Thoughts: Your Cart, Reimagined
Replacing a castor install base might not sound glamorous, but it's one of those small repairs that makes a huge difference. A cart with a solid base rolls smoother, steers easier, and keeps your team safe—all while extending the life of your equipment. And the best part? You did it yourself, without calling in a pricey repair service.
Whether you're maintaining a single workshop cart or a fleet of turnover trolley and rack systems, remember: the key to success is paying attention to the little parts, like the castor install base. With the right tools, a quality replacement, and a little elbow grease, you'll keep your material handling carts rolling strong for years to come.
Now go give that cart a high-five (or a gentle pat). It's earned it.