- Company Articles
- Products and Technology
- Installation And Maintenance
- Storage Tips for Lean Pipe Clamp Chrome: Preventing Damage

Storage Tips for Lean Pipe Clamp Chrome: Preventing Damage
Related Product
Lean Pipe Clamp Chrome
Lean pipe clamp is used for rack system hang monitor or other panel for workbenck, flowrack in production daily use.
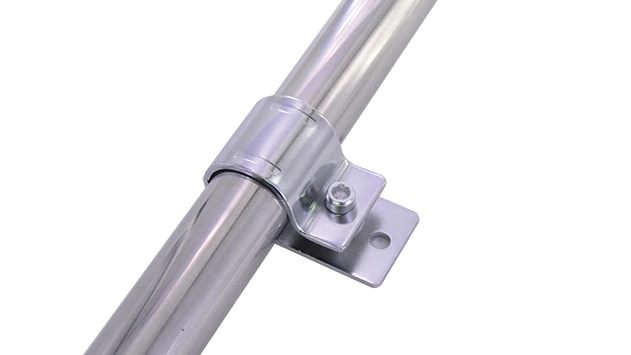
In the bustling world of manufacturing and assembly lines, there are heroes we rarely stop to acknowledge—the small, unassuming components that hold everything together. Among these unsung champions is the lean pipe clamp chrome . Sleek, durable, and designed to withstand the rigors of daily use, these clamps are the backbone of lean systems, securing pipes, supporting workbenches, and ensuring that production flows smoothly. But here's the thing: even the toughest tools have a breaking point. And more often than not, that breaking point isn't on the assembly line—it's in the storage room.
Imagine walking into a workshop where lean pipe clamps are haphazardly tossed into a rusty bin, stacked under heavy equipment, or left to bake in the sun. Chances are, those clamps won't last a fraction of their intended lifespan. Dents, rust, chipped chrome, bent threads—these aren't just cosmetic issues. A damaged clamp can compromise the stability of an entire workbench, slow down production, or even lead to accidents. The good news? Most of these problems are preventable. With the right storage habits, you can keep your lean pipe clamps in top shape, save money on replacements, and keep your team's workflow uninterrupted. Let's dive into the how.
Understanding Your Lean Pipe Clamp Chrome: Why It Matters
Before we talk about storage, let's get to know the star of the show: the lean pipe clamp chrome. These clamps are typically made from high-grade steel with a chrome plating, a combination that gives them two critical advantages: strength and corrosion resistance. The steel core ensures they can handle heavy loads, while the chrome layer acts as a shield against moisture, chemicals, and wear. But chrome, for all its toughness, is surprisingly delicate. A sharp knock can chip it, exposing the steel underneath to rust. Similarly, the lean pipe joint —the moving part that allows the clamp to adjust and grip—relies on smooth, undamaged threads to function properly. A bent thread or a jammed joint? That clamp is as good as useless.
So, why does this matter for storage? Because the way you treat your clamps when they're not in use directly impacts how they perform when you need them. A clamp stored in a damp corner might look fine today, but in a month, you'll notice tiny rust spots eating through the chrome. One stored under a pile of tools could have a bent body, making it impossible to tighten properly. And a clamp left with its joint under tension (e.g., clamped shut around a pipe for storage) might weaken over time, losing its grip when you need it most. The bottom line: storage isn't just about "putting things away"—it's about preserving functionality.
Pro Tip: Not all clamps are created equal! Check the manufacturer's specs for your lean pipe clamp chrome. Some may have thicker chrome plating or reinforced joints, which might influence how you store them (e.g., heavier-duty clamps can handle slightly more weight in storage, but still avoid piling!).
The Hidden Costs of Poor Storage: It's More Than Just Money
Let's talk about the real-world impact of bad storage. I once visited a small electronics assembly plant where the storage room was, to put it kindly, chaotic. Lean pipe clamps were mixed in with stainless steel pipe series components, tossed into cardboard boxes that had absorbed moisture from a leaky roof, and some were even stacked under a shelf that regularly dumped dust and debris. When I asked the plant manager about their clamp replacement schedule, he sighed and said, "We order new ones every quarter. They just… wear out fast."
What he didn't realize was that he was throwing away money—and time. A single lean pipe clamp chrome costs anywhere from $5 to $20, depending on size and quality. If you're replacing 50 clamps every three months, that's $200–$1000 down the drain annually. But the bigger cost? Downtime. When a clamp fails mid-assembly, the line stops. Workers scramble to find a replacement, deadlines get pushed, and frustration builds. And let's not forget safety: a loose clamp on a workbench could lead to tools or materials slipping, risking injury. Poor storage isn't just about broken clamps—it's about broken workflows and broken trust in your tools.
The flip side? A factory I worked with in Germany had a storage system so meticulous, their clamps lasted 3–5 years. Their secret? They treated storage as part of the production process, not an afterthought. And that's the mindset we're aiming for.

Environmental Control: Your Clamps' First Line of Defense
Your storage room's environment is the single biggest factor in how long your lean pipe clamps last. Let's break it down into two enemies: moisture and temperature.
Moisture: The Silent Rust-Maker
Chrome hates moisture. Even a little humidity can seep under a chipped chrome layer and start rust forming. So, what's the ideal humidity level for storage? Aim for 40–60%. Any higher, and you're inviting condensation; any lower, and the air gets too dry, which can cause the chrome to become brittle over time.
How do you keep humidity in check? Start with the basics: fix leaks. A dripping pipe or a roof that leaks during rain is a disaster waiting to happen. Next, invest in a dehumidifier if your storage area tends to get damp (think basements or rooms with poor ventilation). I've seen small dehumidifiers (around $100) cut clamp replacement costs by 50% in humid climates. If you're on a budget, silica gel packets in storage bins work wonders—just remember to replace them every 2–3 months.
Another moisture trap? The floor. Never store clamps directly on concrete or bare ground. Concrete absorbs moisture from the air and releases it slowly, creating a damp microclimate at floor level. Instead, use pallets, shelves made from aluminum profile (which resists rust), or even wooden boards to elevate bins off the ground. Trust me, your clamps will thank you.
Temperature: Avoid the Extremes
Extreme heat or cold can also wreak havoc on your clamps. High temperatures (over 35°C/95°F) can cause the chrome plating to expand and crack, especially if the clamp is near a heat source like a furnace or a window with direct sunlight. Cold temperatures (below 0°C/32°F) make metal brittle, increasing the risk of bending or chipping when the clamp is handled.
The solution? Keep your storage room at a consistent, moderate temperature. If you can't control the climate (e.g., a garage workshop in a snowy area), at least insulate the storage space. Use foam board insulation on walls and ceilings to buffer against temperature swings. And never store clamps near radiators, air conditioners, or drafty windows—these are hotspots (literally) for damage.
Quick Check: Place a cheap hygrometer (humidity gauge) and thermometer in your storage area. Check it weekly. If humidity spikes above 60% or temp drops below 10°C/50°F, take action immediately!
Handling: How to Move Clamps Without Breaking Them
Storage isn't just about where you put clamps—it's about how you get them there. Even the best storage system can't save a clamp that's been dropped, kicked, or crushed during transport. Let's talk about handling habits that protect your clamps.
Lifting and Carrying: Slow and Steady Wins the Race
It's easy to rush when you're grabbing a clamp for a project. You yank it out of the bin, toss it into a toolbox, and off you go. But that split second of carelessness is all it takes to damage a clamp. Instead, make a habit of handling clamps with intention: grip them firmly but gently, one hand on the body and the other on the adjustment knob. Avoid squeezing the lean pipe joint —excess pressure can bend the threads. And never carry a handful of clamps loose; they'll knock against each other, chipping chrome and denting bodies. Use a small bucket or a padded tool belt to carry them individually.
Using the Right Tools for Transport
For larger batches of clamps (e.g., when restocking storage or moving between workstations), skip the "armful" method. Invest in a sturdy trolley with caster accessories like non-slip mats or dividers. Caster wheels with locks are a must—you don't want the trolley rolling and spilling clamps everywhere. Line the trolley with foam padding to cushion the clamps during transport. I've seen teams use old yoga mats cut to size for this—cheap, effective, and eco-friendly!
And here's a pro move: label the trolley. A simple "LEAN PIPE CLAMPS—HANDLE WITH CARE" sign reminds everyone to take it slow. It might seem silly, but visual cues work wonders for building good habits.
Organizing Your Storage Space: A Place for Everything
A messy storage area is a breeding ground for damaged clamps. When clamps are piled on top of each other, squeezed into overstuffed bins, or hidden under other tools, they're guaranteed to get banged up. The solution? A storage system that's organized, accessible, and tailored to your clamps' needs.
Shelving: Get Clamps Off the Floor
The first rule of clamp storage: keep them off the ground. Floor space is for heavy equipment, not delicate components. Instead, install shelves. The best options are adjustable shelves made from aluminum profile—lightweight, rust-resistant, and easy to customize. Aim for shelves that are at waist height to avoid bending or stretching when grabbing clamps (less fumbling = fewer drops). Space the shelves at least 30cm apart vertically to prevent overcrowding.
If you're short on space, wall-mounted racks are a game-changer. Install pegboards with hooks or small baskets to hold clamps individually. This not only keeps them visible but also prevents them from touching. Just make sure the racks are securely anchored—you don't want them pulling out of the wall under the weight of clamps.
Bins and Dividers: No More Clamp-on-Clamp Violence
Shelves are great, but without bins, clamps will still slide around and collide. Use plastic or metal bins with dividers to separate clamps by size, type, or frequency of use. For example: one bin for 1-inch clamps, another for 0.5-inch, and a third for specialty clamps like those used with aluminum pipe. Dividers (you can make them from cardboard or foam board if you're on a budget) keep clamps from shifting during storage. Pro tip: line the bottom of each bin with felt or foam—this adds an extra layer of cushioning and prevents the clamps from sliding around.
Labeling: Because "I'll Remember" Never Works
You've got shelves, bins, dividers—now, label everything. Clear, visible labels save time and reduce frustration. Use color-coded labels: red for large clamps, blue for small, green for new stock, yellow for clamps that need inspection. Include the clamp size, quantity, and last inspected date. I've seen teams go the extra mile and add QR codes that link to a digital inventory system—scan the code, and you know exactly how many clamps are in the bin and when they were last used. Fancy? Maybe. But effective.
| Storage Method | Pros | Cons | Best For |
|---|---|---|---|
| Wall-mounted pegboards with hooks | Visible, easy to access, prevents collisions | Limited weight capacity, needs wall space | Small batches, frequently used clamps |
| Aluminum profile shelves with divided bins | Sturdy, customizable, protects from dust | More expensive upfront, needs floor space | Large inventories, long-term storage |
| Lockable plastic cabinets | Protects from moisture/dust, secure | Less visible, can get stuffy if not ventilated | Specialty clamps, backup stock |
Protective Measures: Going the Extra Mile
Even with perfect handling and organization, there are extra steps you can take to shield your clamps from damage. Think of these as insurance policies for your tools.
Padding and Covers: Softening the Blow
For clamps that aren't used often (e.g., backup stock), consider wrapping them individually in acid-free tissue paper or breathable fabric. This prevents dust buildup and protects the chrome from scratches. Avoid plastic bags—they trap moisture, which is the enemy. For bins that hold multiple clamps, line the dividers with foam pipe insulation (the kind used for plumbing). Cut it to size and slit it lengthwise to slide over the divider—it's cheap, reusable, and adds a soft barrier between clamps.
Avoiding Chemical Exposure
Storage rooms often double as catch-alls for cleaning supplies, oils, and solvents. Big mistake. Chemicals like WD-40, paint thinner, or even strong detergents can eat through chrome plating or corrode the steel core. Keep clamps far away from these products—ideally in a separate cabinet or on a different shelf. If you must store them in the same room, use airtight containers for chemicals and ensure the area is well-ventilated.
Separating from Other Metals
Here's a lesser-known fact: storing chrome clamps next to uncoated steel or stainless steel pipe series components can cause galvanic corrosion. This happens when two different metals react in the presence of moisture, accelerating rust. To avoid this, keep clamps in their own bins, separate from other metal parts. If you must share a shelf, use a non-conductive barrier like wood or plastic between the clamps and other components.
Inspection: Catching Problems Before They Worsen
Even with the best storage, clamps can develop issues over time. That's why regular inspections are non-negotiable. Set a schedule—weekly for high-use clamps, monthly for backup stock—and stick to it. Here's what to look for:
- Chrome damage: Chips, scratches, or peeling. If you spot a small chip, clean the area with alcohol and apply a thin coat of clear nail polish to seal it (temporary fix, but buys time until replacement).
- Rust: Tiny red spots, especially around joints or chips. Use a wire brush to remove surface rust, then treat with a rust inhibitor.
- Bent threads: Run your finger along the lean pipe joint threads—they should feel smooth. A bent thread will catch or feel rough. These clamps are unsafe to use—set them aside for repair or disposal.
- Loose parts: Check if the adjustment knob or joint wiggles more than usual. Tighten screws if needed, but replace if the looseness is due to wear.
Keep a logbook or a digital spreadsheet to track inspections. Note the date, clamp ID (if labeled), and any issues found. Over time, this log will help you spot patterns—e.g., clamps stored near a window always rust faster, or a certain bin divider isn't providing enough protection. Knowledge is power, and this data will help you tweak your storage system for even better results.
Team Tip: Turn inspections into a group activity! Assign a "Clamp Captain" each week to lead the check. It builds accountability and ensures no clamps slip through the cracks.
Common Mistakes to Avoid: Learn from Others' Pain
Even with the best intentions, it's easy to fall into bad habits. Let's highlight a few common storage mistakes—and how to steer clear of them.
Mistake #1: Overcrowding Bins
We've all done it: you need to put away one last clamp, and the bin is full. So you jam it in, reasoning, "It'll be fine for now." But "for now" turns into "forever," and soon the bin is bulging. Clamps get crushed, chrome gets chipped, and joints get bent. The fix? Size your bins properly—leave at least 2cm of space at the top to avoid overstuffing. If you're consistently running out of space, it's time to add more bins or adjust your inventory levels.
Mistake #2: Ignoring "Minor" Damage
"It's just a small scratch—no big deal." Wrong. A small scratch is an open invitation for rust. Address damage immediately, even if it seems trivial. A 2-minute nail polish seal today can save you from replacing a rusted clamp next month.
Mistake #3: Using Cardboard Boxes
Cardboard is cheap and easy, but it's a moisture magnet. Even in a dry room, cardboard absorbs humidity from the air, creating a damp environment for clamps. Swap cardboard for plastic bins with drainage holes (yes, drainage—if moisture does get in, it can escape). Bonus: plastic bins are stackable, saving space.
Mistake #4: Forgetting to Rotate Stock
If you always grab clamps from the top of the bin, the ones at the bottom might sit unused for months. Over time, they collect dust, and their joints can seize up. Practice FIFO (First In, First Out): label bins with "NEWEST" and "OLDEST" sides, and always take clamps from the "OLDEST" side first. It ensures even use and keeps joints moving freely.
Long-Term Storage: Protecting Clamps You Don't Use Often
What about clamps you only use seasonally or for special projects? These need extra TLC. Start by cleaning them thoroughly: wipe off grease, dust, and debris with a dry cloth, then apply a light coat of machine oil to the lean pipe joint (this prevents seizing). Wrap each clamp in acid-free paper, then place them in a plastic bin with silica gel packets to absorb moisture. Seal the bin tightly and label it with the contents and storage date. Store the bin on a high shelf, away from windows, vents, or heating sources. Every 6 months, open the bin, check for moisture, and replace the silica gel. It's a bit of work, but it ensures your backup clamps are ready to go when you need them.
Wrapping Up: Storage as a Habit, Not a Chore
At the end of the day, storing lean pipe clamps properly isn't about being perfect—it's about being consistent. It's about taking 30 extra seconds to place a clamp in its labeled bin instead of tossing it on a shelf. It's about noticing a chip in the chrome and taking action before it becomes rust. It's about treating your tools with the respect they deserve, because they work hard for you.
Think of it this way: every time you store a clamp correctly, you're not just saving money—you're investing in your team's productivity, safety, and peace of mind. A well-organized storage room isn't just tidy; it's a sign that you care about the details that make your business run. And in lean manufacturing, the details are everything.
So, go ahead—grab a bin, some foam padding, and a label maker. Your lean pipe clamp chrome (and your future self) will thank you.