- Company Articles
- Products and Technology
- Installation And Maintenance
- T Slot Aluminum Pipe with Board Holder Installation: Step-by-Step Instructions

T Slot Aluminum Pipe with Board Holder Installation: Step-by-Step Instructions
Related Product
T Slot Aluminum Pipe with Board Holder
T slot Aluminum pipe with board holder,the pipe one side connected by a joint, the other side with a slot which can hold a tray or a aluminum pannel
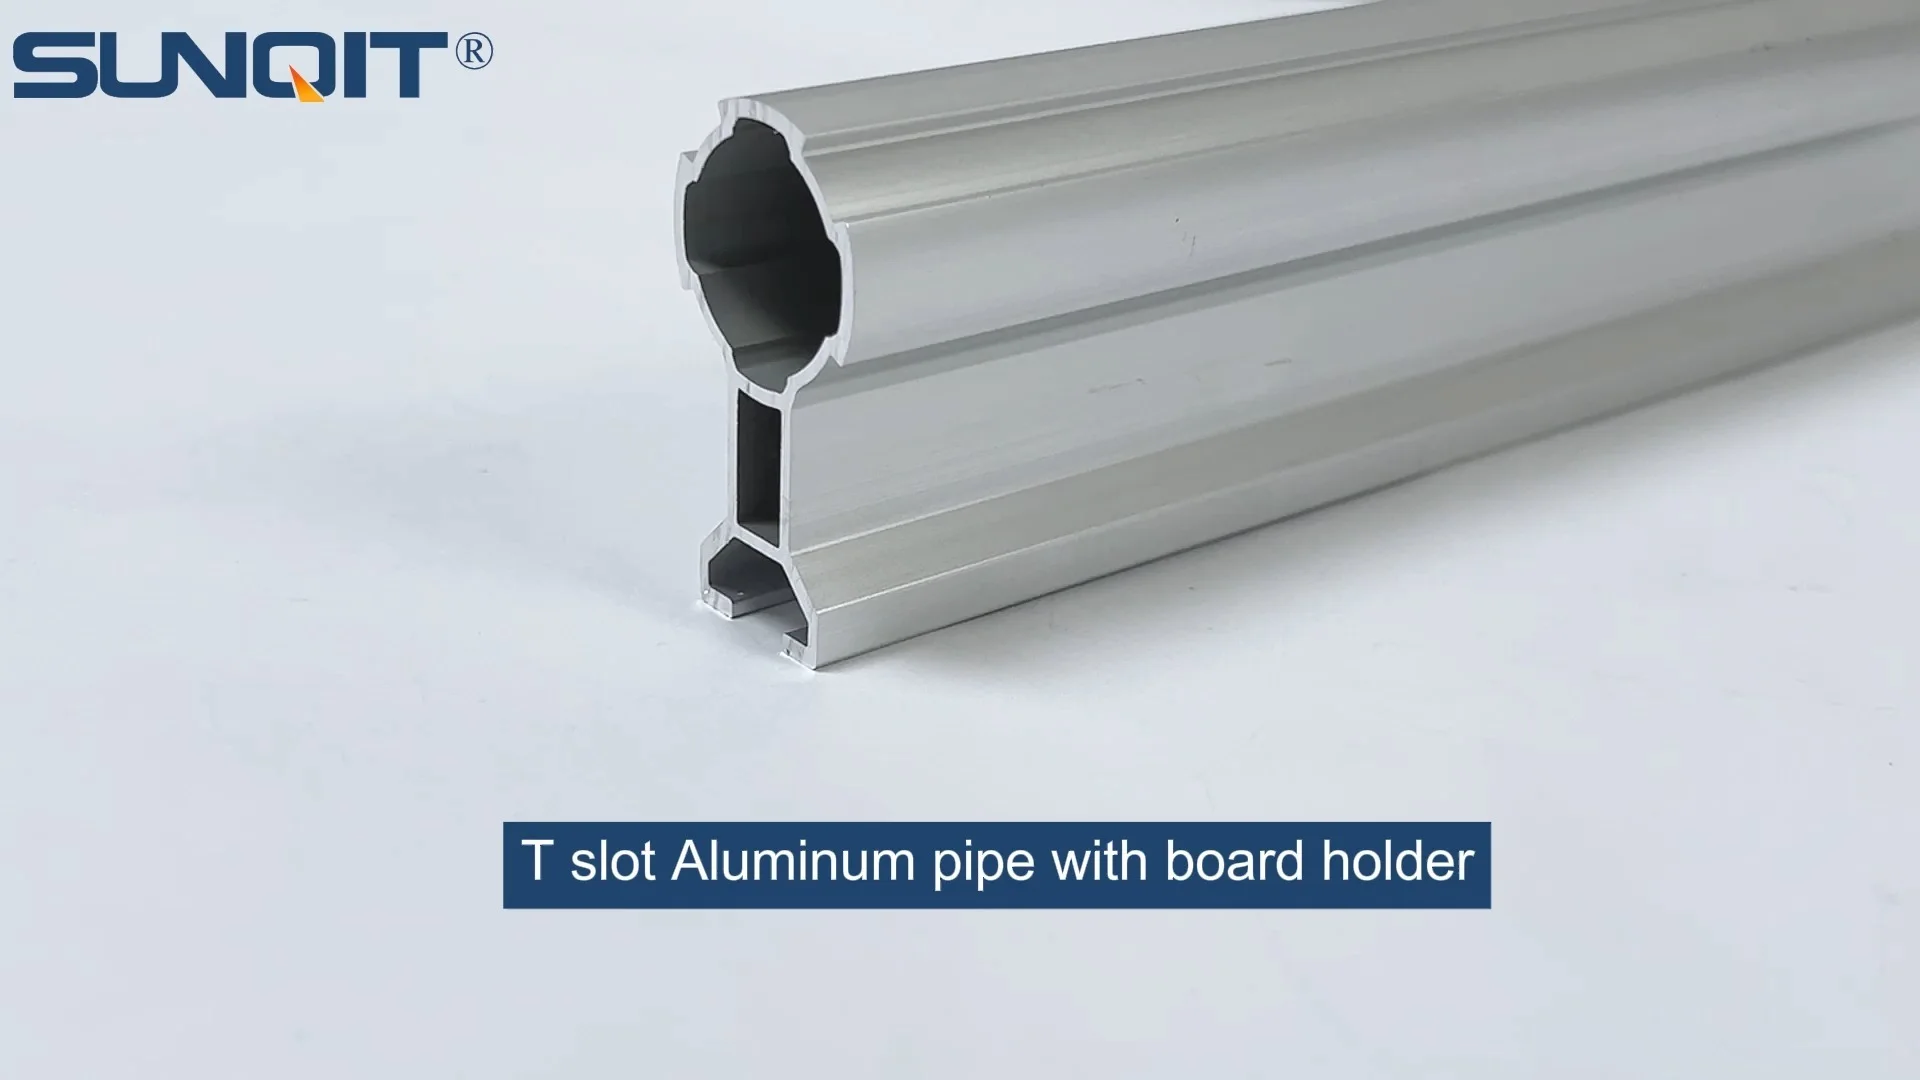
If you've ever walked into a well-organized workshop, manufacturing floor, or even a home garage that runs like a well-oiled machine, chances are you've seen the quiet hero behind that efficiency: the T Slot Aluminum Pipe with Board Holder. This unassuming yet versatile component is the backbone of modular workbenches, material racks, and lean system setups, offering the flexibility to customize, adapt, and optimize spaces for productivity. Whether you're building a small workbench for your hobby corner or outfitting a production line to streamline assembly, understanding how to install this system properly can make all the difference between a wobbly, frustrating setup and a sturdy, efficient workspace that grows with your needs.
In this guide, we're going to walk through the entire process of installing a T Slot Aluminum Pipe with Board Holder—no jargon, no skipped steps, just practical advice from someone who's spent years troubleshooting wobbly joints and celebrating perfectly aligned workbenches. We'll cover everything from gathering your tools to testing the final setup, with plenty of tips to avoid common pitfalls. By the end, you'll not only have a functional board holder but also the confidence to tackle more complex aluminum profile projects down the line.
What Exactly Is a T Slot Aluminum Pipe with Board Holder?
Before we dive into the how-to, let's make sure we're on the same page about the what. A T Slot Aluminum Pipe (sometimes called a T-groove aluminum pipe) is exactly what it sounds like: a lightweight, durable aluminum extrusion with a T-shaped groove running along its length. This groove isn't just for show—it's designed to slide in T-slot nuts, brackets, and other aluminum profile accessories, letting you attach shelves, boards, tools, or just about anything else without drilling permanent holes. It's the "modular" in modular workbenches, giving you the freedom to reconfigure your setup as your needs change.
The Board Holder, then, is the piece that turns that pipe into a functional surface. It's a bracket or frame that attaches to the T Slot Aluminum Pipe, providing a stable platform for a wooden, plastic, or metal board—perfect for assembling parts, placing tools, or storing materials. Together, they form the core of workbenches, material racks, and even turnover trolleys, making them indispensable in lean manufacturing, where minimizing waste and maximizing efficiency are key.
Tools and Materials You'll Need
Before you start, gather these tools and materials. I've learned the hard way that skipping this step leads to mid-project runs to the hardware store (and a lot of muttered frustration). Lay everything out on a clean, flat surface—you'll thank yourself later.
| Tools | Materials |
|---|---|
| Measuring tape (a 25-foot retractable one works best) | T Slot Aluminum Pipe (length depends on your project—we'll cover measuring later) |
| Marker or pencil (permanent marker for dark aluminum, pencil for light) | Aluminum Profile (for the frame—choose a width that matches your pipe, like 2020 or 3030 series) |
| Miter saw or hacksaw with a metal-cutting blade (a miter saw is faster, but a hacksaw works if you're patient) | Board Holder (pre-cut to match your pipe length; check for compatible slot size) |
| Deburring tool or sandpaper (to smooth rough edges after cutting) | Aluminum Profile Accessories: T-slot nuts, hex bolts (M5 or M6 are standard), washers, end caps |
| Hex key set (metric sizes—M5 and M6 are the most common for these systems) | Rubber mallet (for gently seating parts without scratching the aluminum) |
| Level (a 2-foot bubble level is ideal for checking straightness) | Optional: Caster wheels if building a mobile workbench (look for ones with brake locks) |
| Drill with a 3/16-inch bit (only if pre-drilling is needed for stubborn T-slot nuts) | Optional: Anti-slip matting for the board surface (great for keeping tools from sliding) |
Pro Tip:
Not all aluminum profile accessories are created equal! Cheap bolts or ill-fitting T-slot nuts can strip the grooves in your pipe over time. Stick with reputable brands or suppliers—your future self (and your workbench) will appreciate it.

Pre-Installation Prep: Safety First, Mess Later
I once skipped the prep step to "save time" and ended up with a pipe that was 2 inches too short and a minor scratch on my forearm from a sharp aluminum edge. Don't be me. Take 10 minutes to do these things first:
1. Clear Your Workspace
You'll need a flat, stable surface to cut the aluminum profile and assemble the pipe. A workbench (even a temporary one made of plywood on sawhorses) works best. Clear away clutter, sweep the floor, and make sure there's enough room to move around—you don't want to trip over a tool while balancing a 10-foot pipe.
2. Put On Safety Gear
Aluminum shavings are sharp, and cutting metal can send bits flying. Grab safety glasses to protect your eyes, work gloves to shield your hands from burrs, and a dust mask if you're using a saw (those tiny aluminum particles add up). Trust me, a few minutes of setup is worth avoiding a trip to the ER.
3. Inspect Your Parts
Open the packages for your T Slot Aluminum Pipe, aluminum profile, and board holder. Check for dents, bent edges, or cracks—especially in the T-slot grooves (a damaged groove will make it impossible to slide in nuts). If something looks off, contact your supplier now—don't try to "make it work" with a flawed part. Also, verify that the board holder's slot size matches your pipe's T-slot width (most are standardized, but it never hurts to double-check).
4. Measure Twice, Cut Once (Yes, It's a Cliché for a Reason)
Decide where your board holder will go. Will it be the top shelf of a workbench? A side rack for tools? Measure the space where it will live, then subtract 1/4 inch from both ends to account for any gaps (this prevents the pipe from sticking out awkwardly). Mark the measurement clearly on your aluminum profile with a pencil or marker—use a straightedge to draw a line around the pipe so you can cut evenly. I like to make a small "X" on the side of the line that needs to be cut off, so I don't accidentally cut the wrong end.

Step-by-Step Installation: Let's Build This Thing
Step 1: Cut the Aluminum Profile to Length
If you're using a miter saw: Secure the aluminum profile in the saw's clamp, aligning your marked line with the saw blade. Double-check that the pipe is straight and won't wiggle during cutting. Start the saw, let it reach full speed, then gently lower the blade into the pipe—don't force it. Let the blade do the work to avoid bending the profile.
If you're using a hacksaw: Clamp the pipe to your workbench with the marked line hanging over the edge. Hold the saw at a 45-degree angle and use long, smooth strokes. Let the weight of the saw carry the blade—pressing too hard will make the cut uneven. When you're about to finish, slow down to avoid bending the remaining metal.
After cutting: Use a deburring tool or sandpaper to smooth the edges. Run your finger along the cut—if it catches, keep sanding. Sharp edges aren't just dangerous; they can also tear up T-slot nuts as you slide them in later.
Step 2: Prepare the T-Slot Nuts and Bolts
T-slot nuts are the magic that holds this system together. They slide into the T-shaped groove of the aluminum pipe, allowing you to attach brackets, boards, or just about anything else anywhere along the length. Here's how to prep them:
- Slide the T-slot nuts into the groove of your cut aluminum profile. You'll need one nut for each bolt hole in your board holder—typically 2-4 per holder, depending on length. For example, a 3-foot board holder might need 3 nuts (one at each end and one in the middle) for stability.
- Position the nuts roughly where the board holder's holes will align. Don't tighten them yet—you'll want to adjust their position once the holder is in place.
- Thread a washer onto each hex bolt, then screw the bolt into the T-slot nut by hand until it's snug. The washer helps distribute pressure and prevents the bolt head from digging into the board holder.
Step 3: Attach the Board Holder to the Aluminum Pipe
Lay the aluminum profile flat on your workbench, T-slot side up. Place the board holder on top, aligning its bolt holes with the T-slot nuts you just inserted. Now, gently push down on the board holder to seat the bolts into the holder's holes. If the bolts don't line up perfectly, slide the T-slot nuts along the groove until they do—this is why we didn't tighten them earlier!
Once aligned: Use the hex key to tighten the bolts. Start with the middle bolt first, then work your way out to the ends. Tighten until the bolt head is flush with the board holder—over-tightening can strip the T-slot nut or warp the holder. A good rule of thumb: Stop when you feel resistance, then give it a 1/4 turn more.
Pro move: Tap the board holder lightly with a rubber mallet after tightening each bolt. This helps seat the holder firmly against the aluminum profile, reducing wobble later.
Step 4: Mount the Assembly to Your Frame (Workbench, Rack, etc.)
Now it's time to attach your T Slot Aluminum Pipe with Board Holder to its final home—whether that's the uprights of a workbench or the sides of a material rack. For this, you'll use more T-slot nuts and bolts, plus aluminum profile accessories like angle brackets if needed.
Example: If mounting to a workbench frame made of the same aluminum profile: Slide T-slot nuts into the frame's grooves at the height where you want the board holder. Hold the pipe assembly against the frame, aligning the nuts with the pipe's existing T-slot (or pre-drilled holes, if your frame has them). insert bolts through the frame and into the pipe's nuts, then tighten with a hex key. Use a level to check that the board holder is straight—adjust the nuts up or down if it's tilting.
If mounting to a wall: Use wall-mount brackets (another type of aluminum profile accessory) screwed into studs. Attach the brackets to the pipe assembly first, then mount the whole unit to the wall. Make sure the brackets are rated for the weight you'll put on the board—no sense in building a holder that rips out of the wall under a load of tools!
Step 5: Add End Caps (for Safety and Style)
End caps are small, rubber or plastic covers that snap onto the ends of the aluminum profile. They're optional, but I highly recommend them. Not only do they hide sharp edges and give the setup a finished look, but they also keep dust, debris, and even small tools from falling into the T-slot grooves. To install: Press the end cap firmly onto the pipe—you should hear a "snap" when it's seated. If it's loose, apply a tiny bit of super glue to the inside (but be careful not to get glue on the T-slot itself).
Step 6: Test for Stability
Grab the board holder with both hands and give it a gentle shake. A little movement is normal, but it shouldn't wobble or shift significantly. If it does:
- Check if any bolts are loose—retighten them.
- Verify that the T-slot nuts are fully seated in the grooves (sometimes they pop out during tightening).
- If the issue is with the frame mount, add more brackets or bolts for extra support—especially if the holder will hold heavy items.
Next, place a weight on the board—something close to what you'll actually use (a toolbox, a stack of materials, etc.). Let it sit for 10-15 minutes, then check again for sagging or shifting. Aluminum is strong, but overloading a single pipe can cause bending over time—if you're unsure about weight limits, check the manufacturer's specs for your aluminum profile.
Step 7: Add Extras (Casters, Anti-Slip Matting, etc.)
If you're building a mobile workbench, now's the time to attach caster wheels (another aluminum profile accessory). Flip the setup upside down, attach caster mounting plates to the bottom of the frame using T-slot nuts, then screw the casters into the plates. Make sure two of the casters have brake locks—this keeps the bench from rolling away when you're working.
For anti-slip matting: Cut a piece of rubber or foam matting to fit the board holder, then secure it with double-sided tape or small screws (be careful not to drill through the pipe!). This is a game-changer for keeping tools or materials from sliding around during use.
Troubleshooting: When Things Go Sideways (and How to Fix Them)
Even with careful prep, things can go wrong. Here are the most common issues I've run into, and how to fix them:
Problem: T-slot Nuts Won't Slide in the Groove
Possible causes: Debris in the groove, a bent profile, or nuts that are too big. Solution: Use a small brush or compressed air to clean out the groove. If the profile is bent, gently straighten it with pliers (aluminum is malleable, but don't overdo it). If the nuts still won't fit, check that you have the right size—T-slot nuts come in different widths (e.g., 8mm, 10mm) to match different groove sizes.
Problem: Board Holder Wobbles Side-to-Side
Possible causes: Not enough bolts, bolts too loose, or the holder is too long for the pipe. Solution: Add more T-slot nuts and bolts—aim for one every 12-18 inches along the pipe. Tighten existing bolts, and use a rubber mallet to seat the holder again. If the holder is overhanging the pipe ends, trim it to match the pipe length (better to have a shorter holder than a wobbly one).
Problem: Pipe Bends Under Weight
Possible causes: Pipe is too thin (e.g., using 2020 profile for heavy loads) or span between supports is too long. Solution: Upgrade to a thicker aluminum profile (3030 or 4040 series) for heavier loads. Add a center support bracket (another aluminum profile accessory) to reduce the span—for example, a 6-foot pipe should have a support in the middle to prevent sagging.
Maintenance: Keep Your Setup in Top Shape
Your T Slot Aluminum Pipe with Board Holder isn't a "set it and forget it" system—it needs a little love to stay efficient. Here's how to maintain it:
- Check bolts monthly: Aluminum expands and contracts with temperature changes, which can loosen bolts over time. Give each bolt a quick tighten with a hex key.
- Clean the aluminum: Wipe down the profile with a damp cloth and mild soap to remove grease, dust, or sawdust. Avoid abrasive cleaners—they'll scratch the finish.
- replace worn accessories: If T-slot nuts start to strip, or caster wheels get wobbly, swap them out. Most aluminum profile accessories are inexpensive, and replacing them early prevents bigger issues later.
- Lubricate moving parts: If you have sliding components (e.g., adjustable shelves), apply a small amount of silicone lubricant to the T-slot grooves to keep them sliding smoothly.
Final Thoughts: Your Workspace, Reimagined
Installing a T Slot Aluminum Pipe with Board Holder might seem like a small project, but it's a gateway to bigger things. Once you understand how these modular systems work, you can start dreaming up custom workbenches with built-in tool racks, mobile material carts for your production line, or even a wall-mounted storage system that frees up floor space. The beauty of aluminum profile setups is that they grow with you—today's simple board holder can become tomorrow's complex lean system with a few extra pipes and accessories.
Remember, the goal here isn't perfection on the first try—it's progress. If your first joint is a little wobbly, or your cuts aren't perfectly straight, that's okay. What matters is that you took the time to learn, adapt, and build something that makes your space work for you. So go ahead—grab your tools, slide in those T-slot nuts, and start creating a workspace that's as unique and hardworking as you are. I'll be here cheering you on.