- Company Articles
- Products and Technology
- Product knowledge
- The Complete Guide to Four Way Straight Lean Pipe Joint: Selection, Installation & Maintenance

The Complete Guide to Four Way Straight Lean Pipe Joint: Selection, Installation & Maintenance
Related Product
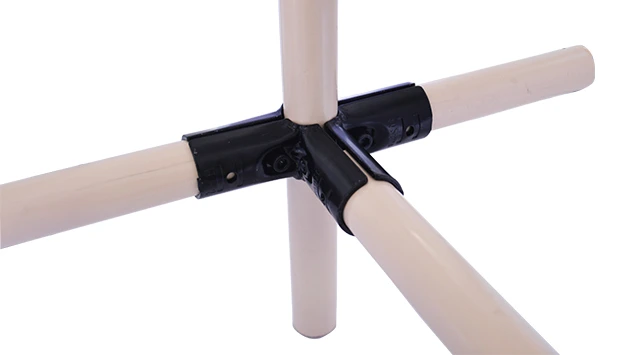
Four Way Straight Lean Pipe Joint
Four way lean pipe joint for 4 pcs 28MM lean pipe connection in straight angle, which used widely in workbench, flow rack, hand trolley frame connection.
Introduction: The Unsung Hero of Lean Systems
In the bustling world of manufacturing and production, where every second counts and efficiency is king, it's easy to overlook the small components that hold everything together. We marvel at high-tech machinery and streamlined workflows, but rarely pause to appreciate the quiet workhorses that make flexibility and adaptability possible. Today, let's shine a light on one such unsung hero: the four way straight lean pipe joint. This unassuming connector is the backbone of lean systems, the silent architect of modular workspaces, and a critical link in the chain of efficient material handling.
Whether you're setting up a new lean pipe workbench, reconfiguring a flow rack, or building a custom conveyor system, the four way straight lean pipe joint plays a pivotal role. It's the piece that turns basic aluminum pipe or lean tube into a dynamic structure—one that can grow, shrink, or change shape as your needs evolve. In this guide, we'll walk through everything you need to know about this essential component: from understanding its design and functionality to selecting the right type for your application, installing it with precision, and maintaining it for long-term reliability. By the end, you'll see why this small joint deserves a spot in your lean toolkit.
Understanding the Four Way Straight Lean Pipe Joint: Design & Purpose
At first glance, a four way straight lean pipe joint might look like little more than a metal connector with holes. But its design is deceptively thoughtful, engineered to solve a specific challenge in lean manufacturing: how to create strong, stable structures that can be easily reconfigured. Unlike fixed joints or welded connections, this joint lets you attach four lean pipes (or aluminum profile) in a straight line or perpendicular directions, all while maintaining structural integrity.
Most four way straight joints are cylindrical or cubic in shape, with pre-drilled holes spaced at 90-degree angles. Inside these holes, you'll typically find threads or a clamping mechanism that grips the lean pipe securely when tightened. Some models, especially those made for aluminum lean pipe, use a friction-fit design with internal teeth that bite into the pipe's surface, ensuring a tight hold without damaging the material. This versatility is why you'll find them in everything from simple workbenches to complex material rack setups—they adapt to almost any layout.
Did You Know? The "four way" in the name refers to the joint's ability to connect pipes in four directions (usually up, down, left, right), but many models can also accommodate additional angles with the right lean pipe accessories. This makes them a favorite for building multi-tiered racks or asymmetrical workstations.

Selection Guide: Choosing the Right Four Way Straight Lean Pipe Joint
Selecting the right four way straight lean pipe joint isn't just about picking the first one you see. The wrong choice can lead to wobbly structures, frequent breakdowns, or even safety risks. To make the best decision, consider these key factors:
1. Material Compatibility
Four way joints are made to work with specific pipe materials—most commonly lean pipe (PE-coated steel), aluminum pipe, or stainless steel pipe. Using a joint designed for aluminum lean pipe with a heavier stainless steel pipe, for example, could result in a loose fit or stripped threads. Always check the manufacturer's specs to ensure compatibility with your existing or planned pipe type.
2. Load Capacity Needs
How much weight will your structure support? A joint used in a lightweight turnover trolley will have different load requirements than one holding heavy machinery parts on a material rack. Most suppliers list load ratings (usually in kilograms or pounds) for their joints. When in doubt, opt for a higher capacity than you think you'll need—it's better to have extra strength than to risk failure.
3. Environmental Conditions
Will the joint be used in a damp warehouse? A cleanroom? An ESD-sensitive area (like an electronics assembly line with an ESD workbench)? For humid or corrosive environments, stainless steel or aluminum joints are better than standard steel, which can rust. For ESD workstations, look for joints with anti-static coatings to prevent static buildup that could damage sensitive components.
4. Material Comparison: Which Pipe Type Works Best?
| Pipe Material | Best For | Pros | Cons |
|---|---|---|---|
| PE-Coated Lean Pipe | General manufacturing, low-to-medium load applications | Affordable, lightweight, easy to handle, corrosion-resistant coating | Lower load capacity than metal; coating can wear over time |
| Aluminum Lean Pipe | Cleanrooms, food processing, lightweight but rigid structures | Lightweight, rust-proof, sleek appearance, compatible with aluminum profile accessories | More expensive than PE-coated pipe; can dent under heavy impact |
| Stainless Steel Pipe | High-moisture environments, heavy loads, medical facilities | Extremely durable, corrosion-resistant, high load capacity | Heavy, harder to reconfigure, higher cost |

Installation: Step-by-Step for a Secure Setup
Installing a four way straight lean pipe joint is a straightforward process, but attention to detail is key. Rushing or cutting corners can lead to loose connections that compromise the entire structure. Follow these steps for a safe, stable installation:
Tools You'll Need
Gather these tools before starting: hex key (size depends on the joint—most use 5mm or 6mm), rubber mallet (for gentle adjustments), level (to ensure pipes are straight), measuring tape, and a torque wrench (optional but recommended for consistent tightness).
Pre-Installation Checks
Before assembling, inspect the joint and pipes for defects: cracks in the joint, bent pipe ends, or stripped threads. Even small damage can weaken the connection. Also, confirm that all pipes are cut to the correct length—ill-fitting pipes will stress the joint and cause instability.
Assembly Steps
Step 1: Align the pipes. insert the ends of the lean pipes into the joint's holes. For aluminum or stainless steel pipes, apply a small amount of anti-seize lubricant to the threads (if applicable) to prevent galling. For PE-coated pipes, ensure the coating isn't peeled or folded at the ends—this can create gaps.
Step 2: Tighten gradually. Using the hex key, tighten the joint's set screws or bolts. Tighten in a crisscross pattern (like tightening a car tire) to ensure even pressure. Avoid over-tightening—this can strip threads or crack the joint. A good rule of thumb: stop when you feel resistance, then give a quarter-turn more.
Step 3: Check for straightness. Place the level along the pipes to ensure they're aligned horizontally and vertically. A misaligned joint will cause the entire structure to lean, leading to uneven weight distribution.
Step 4: Test stability. Gently shake the structure to check for wobbling. If it moves, recheck the tightness of the joint and pipe alignment. For heavy-duty setups, apply a test load (slightly heavier than the expected daily load) and let it sit for 24 hours—this reveals any settling or loosening.
Pro Tip: For frequently reconfigured workspaces, mark the joint and pipe with a permanent marker after installation. This makes it easier to realign the same components later, saving time and ensuring consistency.
Maintenance: Keeping Your Joints in Top Condition
A well-maintained four way straight lean pipe joint can last for years, even in high-traffic production environments. Neglecting maintenance, however, can lead to premature wear, loose connections, and costly downtime. Here's how to keep your joints performing their best:
Regular Inspection Routines
Schedule monthly inspections for joints in moderate-use areas (like a standard workbench) and weekly checks for high-use areas (like conveyor systems or material racks). During inspections, look for:
- Loose screws/bolts: Tighten with a hex key if needed.
- Corrosion: For steel joints, check for rust spots—treat with a rust inhibitor and repaint if necessary.
- Cracks or deformation: If the joint is bent or cracked, replace it immediately—damaged joints can't be repaired safely.
- Worn pipe ends: If pipes are frayed or the PE coating is peeling at the joint, trim the pipe or replace it to ensure a tight fit.
Cleaning and Lubrication
Dirt and debris can build up in the joint's threads or clamping mechanism, making it harder to tighten or loosen. Clean joints with a soft brush and mild detergent, then dry thoroughly. For joints with moving parts (like swivel or rotating models), apply a light machine oil or silicone lubricant every 3 months to prevent seizing.
When to replace a Joint
Even with proper care, joints eventually wear out. replace a joint if you notice:
- Persistent looseness, even after tightening.
- Visible cracks in the joint body.
- Stripped threads that no longer grip the pipe.
- Excessive corrosion that can't be cleaned or treated.
Real-World Applications: How Four Way Joints Power Lean Systems
To see the four way straight lean pipe joint in action, look no further than these common scenarios:
1. ESD Workstations for Electronics Manufacturing
In electronics production, static electricity is the enemy—it can fry sensitive components in an instant. ESD workstations require stable, grounded structures, and four way joints play a key role here. By connecting aluminum lean pipe (which conducts electricity) with ESD-safe joints, manufacturers create workbenches that dissipate static, protecting products during assembly.
2. Flow Racks for Just-In-Time (JIT) Material Handling
JIT manufacturing relies on materials arriving exactly when needed, and flow racks make this possible by gravity-feeding parts to the assembly line. Four way joints connect the rack's vertical supports and horizontal roller tracks, ensuring the tracks stay aligned for smooth product flow. A well-placed joint here prevents jams and keeps the line moving.
3. Custom Turnover Trolleys
Turnover trolleys transport materials between workstations, and their design often needs to match the shape of the products they carry. Four way joints let teams build trolleys with adjustable shelves, side rails, or custom heights—all without welding. When production needs change, the trolley can be disassembled and reconfigured in hours, not days.
Conclusion: Investing in Quality for Lean Success
The four way straight lean pipe joint may be small, but its impact on your lean system is huge. It's the difference between a rigid workspace that resists change and a flexible one that adapts to new products, higher demand, or shifting workflows. By choosing the right joint, installing it carefully, and maintaining it regularly, you're not just building structures—you're building a foundation for efficiency, safety, and long-term success.
When shopping for joints, don't settle for the cheapest option. A quality joint from a reputable lean pipe supplier may cost a few dollars more upfront, but it will save you time, money, and headaches down the line. After all, in lean manufacturing, every component counts—and the best systems are built on the strongest connections.