The Manufacturing Process of Four Way Straight Lean Pipe Joint: From Raw Material to Assembly
Related Product
Four Way Straight Lean Pipe Joint
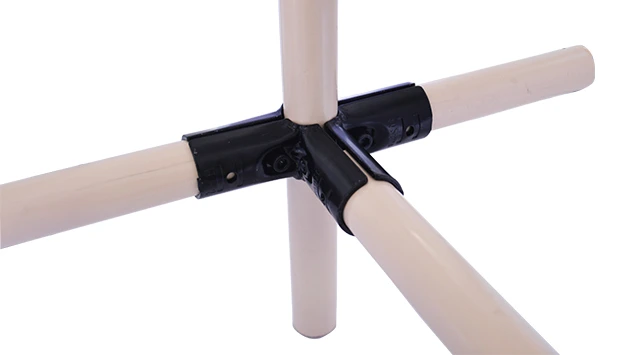
Four way lean pipe joint for 4 pcs 28MM lean pipe connection in straight angle, which used widely in workbench, flow rack, hand trolley frame connection.
Four Way Straight Lean Pipe Joint
The Manufacturing Process of Four Way Straight Lean Pipe Joint: From Raw Material to Assembly
Introduction: The Unsung Hero of Lean Manufacturing

In the bustling world of manufacturing, where assembly lines hum and productivity metrics reign supreme, there's a quiet workhorse that rarely gets the spotlight: the four way straight lean pipe joint. It's small, unassuming, and easy to overlook—but without it, the entire framework of lean manufacturing systems would crumble. Think about the workbenches where technicians assemble intricate electronics, the flow racks that glide components from station to station, or the turnover trolleys that keep materials moving smoothly across the factory floor. Every one of these structures relies on the humble lean pipe joint to hold it all together.

As a critical part of lean pipe and accessories , this joint isn't just a piece of metal or plastic. It's a bridge between efficiency and reliability, a testament to the idea that even the tiniest components can have a massive impact on a factory's performance. For lean pipe suppliers , crafting these joints is a labor of precision and care—because they know that a single faulty joint can disrupt production, delay deadlines, and erode the trust of manufacturers who depend on their products.

In this article, we'll pull back the curtain on how a four way straight lean pipe joint goes from raw material to a finished, factory-ready component. We'll explore the careful selection of materials, the intricate machining processes, and the rigorous quality checks that ensure each joint can withstand the demands of a busy manufacturing environment. Along the way, we'll see why this unassuming part is so vital to keeping the wheels of lean manufacturing turning.

Step 1: Raw Material Selection – The Foundation of Strength

The journey of a four way straight lean pipe joint begins long before any machines start whirring. It starts with choosing the right raw materials—because a joint is only as strong as what it's made of. Most manufacturers today opt for either high-grade stainless steel (from the stainless steel pipe series ) or aluminum, each with its own set of advantages depending on the application.

Stainless steel is a favorite for heavy-duty environments. It's resistant to corrosion, can handle high weight loads, and stands up well to the wear and tear of daily use in factories where moisture, chemicals, or frequent cleaning are part of the routine. Aluminum, on the other hand, is lighter and more flexible, making it ideal for applications where portability is key—like mobile workbenches or lightweight flow racks. It's also easier to machine, which can speed up production without sacrificing durability.

Why Material Quality Matters

Imagine a factory where a workbench collapses because the lean pipe joints couldn't support the weight of tools and components. Not only does this halt production, but it also risks injury to workers. That's why lean pipe suppliers never cut corners on raw materials. They source from trusted mills, test samples for tensile strength and corrosion resistance, and reject any batches that don't meet strict standards. For example, stainless steel joints must often pass salt spray tests to ensure they won't rust in humid or wet conditions—a small detail that makes a big difference in longevity.

To better understand the choices, let's look at a comparison of the two most common materials used in four way straight lean pipe joints:

Material Key Properties Best For
Stainless Steel (304 or 316 Grade) High tensile strength (600-800 MPa), corrosion-resistant, heat-resistant Heavy-duty workbenches, outdoor or wet environments, high-load flow racks
Aluminum (6061-T6 Alloy) Lightweight (1/3 the density of steel), good machinability, moderate strength (310 MPa) Mobile trolleys, lightweight assembly stations, cleanrooms (no rust risk)

Once the material is selected, it's time to transform it from a raw bar or coil into a shape that will eventually become a joint. This is where the art of manufacturing truly begins.

Step 2: Material Preparation – Shaping the Canvas

Raw materials rarely arrive at the factory in the perfect shape for making a lean pipe joint. Stainless steel might come as a thick cylindrical bar, while aluminum could arrive as an extrusion or a sheet. Before any machining can happen, these materials need to be cut, cleaned, and prepared to ensure consistency across every batch.

The first step is cutting the raw material to size. For stainless steel bars, this is often done with a precision saw or a laser cutter. Laser cutting is especially popular because it produces clean, burr-free edges—critical for ensuring that the joint will fit seamlessly with lean pipe and accessories later on. Aluminum, being softer, can sometimes be cut with a bandsaw or a CNC router, but manufacturers still prioritize accuracy: even a 0.1mm deviation in length can throw off the alignment of the joint's holes.

After cutting, the material moves to a cleaning station. Any oil, dirt, or debris from the cutting process is removed using ultrasonic cleaning or a chemical bath. This step might seem trivial, but it's essential for the next phase: machining. A dirty surface can damage cutting tools, create uneven finishes, or even cause defects in the final product. For example, if a speck of dirt is left on the material, it might scratch the surface during drilling, weakening the joint over time.

Once clean, the material is inspected again. Technicians check for cracks, dents, or irregularities that might have been introduced during cutting. A small crack in a stainless steel bar, for instance, could expand during machining, leading to a joint that snaps under pressure. By catching these issues early, suppliers save time and resources—and ensure that only the best materials move forward.

Step 3: Machining – Carving Precision into Metal

Machining is where the four way straight lean pipe joint starts to take its iconic shape. This step involves using specialized tools to drill holes, thread surfaces, and shape the material into a cross-like structure with four connection points—hence the name "four way straight." It's a process that demands both skill and technology, as even the smallest mistake can render the joint useless.

Let's break down the key machining steps:

Drilling the Connection Holes

The most critical part of the joint is its four connection holes, which allow it to attach to lean pipes. These holes must be perfectly aligned and sized to match the diameter of the pipes they'll hold (typically 28mm or 30mm for standard lean pipes). To achieve this, manufacturers use CNC drilling machines—computer-controlled tools that can drill holes with an accuracy of ±0.02mm. The operator programs the machine with the exact coordinates of each hole, and the machine does the rest, ensuring that every joint in a batch is identical.

For stainless steel, high-speed steel (HSS) drills or carbide-tipped drills are used to cut through the tough material. The machine applies coolant during drilling to prevent overheating, which can warp the metal or dull the drill bit. Aluminum, being softer, requires less aggressive drilling, but the focus is still on precision: a hole that's too large will make the joint loose, while one that's too small will make it impossible to attach the pipe.

Threading the Holes (If Needed)

Some lean pipe joints use threads to screw onto pipes, while others rely on friction or clamping mechanisms. If threading is required, the next step is to tap the holes. Tapping is the process of cutting spiral grooves (threads) into the inside of the hole, allowing a pipe with matching threads to screw in securely. This is done with a tap tool, which is also guided by CNC machines for consistency. The threads must be deep enough to hold the pipe firmly but not so deep that they weaken the joint's structure.

Shaping the Joint Body

After drilling and threading, the joint's body is shaped to its final form. This might involve milling the edges to remove sharp corners (for safety) or adding recesses where nuts or washers will sit. For example, some joints have a flange around the holes to prevent the pipe from slipping out. This shaping is often done with a CNC mill, which can carve complex shapes with precision.

Throughout the machining process, operators monitor the machines closely. They check the first few joints in a batch with calipers and gauges to ensure the holes are aligned, the threads are correct, and the dimensions match the design specs. If something is off—a drill bit might be dull, or the machine might need recalibration—they make adjustments before the entire batch is ruined.

Step 4: Surface Treatment – Protecting and Perfecting

Once the joint is machined, it's time to give it a finishing touch that enhances both its appearance and its durability. Surface treatment is more than just making the joint look good; it's about protecting it from corrosion, improving grip, and ensuring it can withstand the harsh conditions of a factory environment.

The type of surface treatment depends on the material. For stainless steel joints, passivation is a common choice. Passivation involves treating the surface with an acid solution (like nitric acid) to remove any free iron particles left behind during machining. These particles can cause rust spots, even on stainless steel, so removing them creates a protective oxide layer that makes the joint more corrosion-resistant.

Aluminum joints often undergo anodization. Anodizing is an electrolytic process that thickens the natural oxide layer on aluminum, making it harder and more resistant to scratches. It also allows for coloring—many aluminum joints are anodized black or silver to match factory aesthetics. Some manufacturers even add a textured finish to the surface to improve grip, ensuring that pipes don't slip when attached.

For joints that will be used in ESD (electrostatic discharge) sensitive environments—like electronics manufacturing—an additional step might be added: applying an ESD-safe coating. This coating prevents static electricity from building up on the joint, which could damage sensitive components like circuit boards. The coating is usually a thin layer of conductive material, like nickel or graphite, and it's tested to ensure it meets ESD standards (typically 10^6 to 10^9 ohms of resistance).

After surface treatment, the joint is inspected once more. Technicians check for uniform coloring, smooth edges, and any signs of damage from the treatment process. A joint with a patchy anodized finish, for example, might be rejected because the uneven oxide layer could wear off prematurely.

Step 5: Assembly – Bringing It All Together (For Multi-Part Joints)

Not all lean pipe joints are made from a single piece of material. Some four way straight joints have moving parts, like a rotating collar or a locking mechanism, that require assembly. For example, a joint might have a plastic insert to grip the pipe more tightly, or a spring-loaded pin that locks the pipe in place. Assembling these components is a delicate process that demands steady hands and attention to detail.

The assembly line for these multi-part joints is often staffed by skilled workers who specialize in precision fitting. They start by placing the main joint body in a fixture to hold it steady, then carefully insert the smaller components. For plastic inserts, this might involve heating the joint slightly to expand the hole, inserting the plastic, and letting it cool so the plastic contracts and fits snugly. For metal components like springs or pins, workers use tweezers or small tools to avoid bending or damaging the parts.

One common challenge during assembly is ensuring that moving parts work smoothly. A rotating collar, for instance, should spin freely but not wobble. Workers test each joint by hand, spinning the collar or pressing the locking mechanism to make sure it operates as intended. If a part is too tight, they might apply a small amount of lubricant or adjust the fit; if it's too loose, they replace the component entirely.

Even for single-piece joints (the most common type), assembly might involve attaching labels or packaging materials. Each joint is marked with the manufacturer's logo, the material type, and sometimes a batch number for traceability. This helps lean pipe suppliers track down any issues if a batch is later found to have defects.

Step 6: Quality Control – The Final Gatekeeper

Before a four way straight lean pipe joint leaves the factory, it must pass through the strictest test of all: quality control (QC). QC is the last line of defense against defective products, and for lean pipe suppliers , it's non-negotiable. A single bad joint can cost a manufacturer thousands of dollars in downtime, so suppliers invest heavily in ensuring every product meets their standards.

QC involves a series of tests and inspections, including:

Dimension Check

Technicians use calipers, micrometers, and coordinate measuring machines (CMMs) to verify that the joint's dimensions match the design specs. They check the diameter of the holes, the distance between holes, and the overall length of the joint. Any joint that deviates by more than 0.1mm from the blueprint is rejected.

Strength Test

Random samples from each batch are subjected to stress tests. A hydraulic press might pull on the joint to simulate the weight of a fully loaded workbench, ensuring it doesn't bend or break under pressure. For threaded joints, a torque tester measures how much force is required to unscrew the joint from a pipe—too little torque means it might loosen during use, too much means it could strip the threads.

Corrosion Test (For Stainless Steel)

Stainless steel joints are often tested with a salt spray chamber. The joint is placed in a chamber where a salty mist is sprayed continuously for 24-48 hours. Afterward, it's inspected for rust or pitting. If any corrosion is found, the entire batch might be re-passivated or scrapped.

Fit Test

Finally, the joint is tested with actual lean pipes to ensure a perfect fit. Technicians try attaching the joint to a pipe, checking that it slides on easily but stays in place once secured. They might shake the assembly or apply light pressure to see if the joint holds firm. If the fit is too loose or too tight, the joint is sent back for rework.

The Human Touch in QC

While machines handle much of the testing, there's still a role for human intuition in QC. Experienced inspectors can often spot defects that machines miss—a tiny scratch that could weaken the joint, or a subtle misalignment in the holes. These inspectors take pride in their work, knowing that their attention to detail helps keep factories running smoothly.

Only after passing all these tests is the joint deemed ready for shipment.

Step 7: Packaging and Distribution – Getting Ready for the Factory Floor

The final step in the journey is packaging and distribution. Lean pipe joints are small, so they're often packed in bulk—hundreds per box—to reduce shipping costs. But even packaging requires care: joints are separated by foam or cardboard dividers to prevent them from scratching or denting each other during transit. For ESD-sensitive joints, the boxes are lined with anti-static material to protect the coating.

Once packed, the boxes are labeled with the product name, batch number, quantity, and destination. Many lean pipe suppliers use barcode systems to track shipments, so manufacturers can monitor when their order will arrive. For international shipments, joints might be packed in moisture-proof containers to protect against humidity during long voyages.

When the joints finally arrive at a factory, they're unboxed, inspected once more by the manufacturer, and put to work. A technician picks up a four way straight lean pipe joint, slides it onto a pipe, and tightens it into place—never stopping to think about the journey it took to get there. But for the suppliers who made it, that joint represents hours of work, precision, and pride.

Conclusion: The Joint That Keeps Lean Manufacturing Moving

The four way straight lean pipe joint is more than just a piece of hardware. It's a symbol of the craftsmanship and dedication that goes into lean manufacturing. From the careful selection of stainless steel or aluminum to the precision machining, surface treatment, and quality checks, every step in its creation is designed to ensure reliability, durability, and efficiency.

For lean pipe suppliers , making these joints is about more than selling a product—it's about partnering with manufacturers to build better, more efficient factories. It's about understanding that the smallest components can have the biggest impact, and that quality is never an afterthought.

So the next time you walk through a factory and see a workbench, a flow rack, or a trolley, take a moment to look at the joints holding it all together. You'll be looking at the unsung heroes of lean manufacturing—the quiet, reliable four way straight lean pipe joints that keep the world of production moving forward.


Get In Touch with us

Hey there! Your message matters! It'll go straight into our CRM system. Expect a one-on-one reply from our CS within 7×24 hours. We value your feedback. Fill in the box and share your thoughts!