- Company Articles
- Products and Technology
- Installation And Maintenance
- The Ultimate Guide to Aluminum Workbench D: From Structure to Assembly Steps

The Ultimate Guide to Aluminum Workbench D: From Structure to Assembly Steps
Related Product
Aluminum Workbench D
Aluminum tube workbench is more flexible and durable, compared with traditional PE/ABS coated steel tube. It is easy to assemble, anti corrosion, rust protection, and recycle use after disassemble.
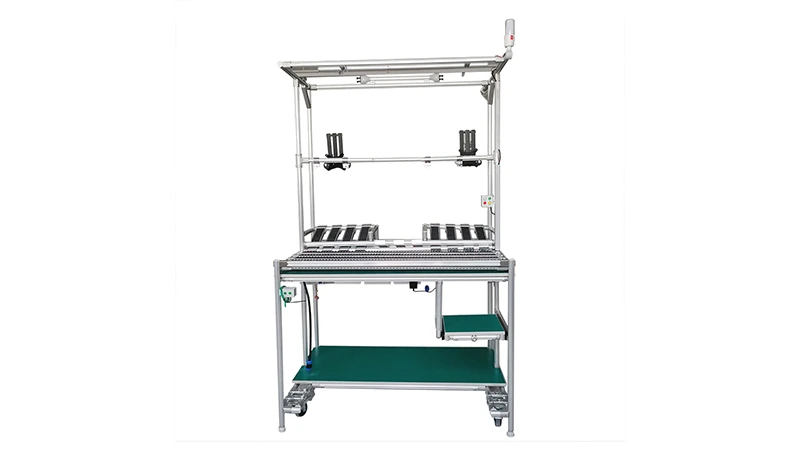
Walk into any busy workshop, manufacturing floor, or assembly line, and you'll quickly spot the unsung hero keeping everything moving: the workbench. It's more than just a flat surface—it's where ideas take shape, parts come together, and productivity finds its rhythm. But not all workbenches are created equal. If you've ever struggled with a wobbly table that scratches easily, or a rigid setup that can't adapt when your workflow changes, you know the difference a well-designed workbench can make. Enter the Aluminum Workbench D—a modern, modular solution built to grow with your needs, stand up to daily wear, and turn chaos into order. In this guide, we'll unpack everything from its clever structure to how you can assemble it in your own space, so you can stop fighting your workspace and start focusing on what matters: getting the job done right.
What Exactly Is Aluminum Workbench D?
Think of Aluminum Workbench D as the Swiss Army knife of workbenches. It's not a one-size-fits-all tool; it's a flexible, build-your-own system designed to fit your workflow. Whether you're assembling circuit boards in a tech lab, packing orders in a warehouse, or prototyping parts in a maker space, this workbench adapts. Unlike clunky wooden tables or heavy steel setups that stay stuck in one spot, Aluminum Workbench D is built on the principles of lean manufacturing—prioritizing efficiency, adaptability, and user comfort. It's part of a larger ecosystem of tools that includes flow racks, conveyors, and turnover trolleys, but even on its own, it's a game-changer. Let's break down what makes it tick.
Core Structure: The Building Blocks of Durability & Flexibility
At first glance, Aluminum Workbench D might look like a simple table, but its magic lies in the details. Every part is intentional, from the lightweight frame to the adjustable feet. Let's break down its key components and how they work together:
| Component | Function | Material |
|---|---|---|
| Workbench Frame | The skeleton that holds everything together; supports the worktop and accessories | Aluminum extrusion profile (typically 4040 or 3030 series) |
| Worktop Surface | Provides the main workspace; resistant to scratches, heat, and chemicals | Aluminum honeycomb panel or high-density particleboard with aluminum laminate |
| Adjustable Legs | Supports the frame and allows height customization; prevents wobbling | Aluminum pipe with anti-slip adjustable leveling feet |
| Connection Joints | Links frame components; enables tool-free assembly and reconfiguration | Aluminum or nylon internal rotary joints, 90°/45° aluminum profile connectors |
| Optional Add-Ons | Enhances functionality (mobility, storage, tool access) | Casters (swivel with brakes), side shelves, tool hooks, LED light bars |
What stands out here is the modularity . Unlike welded steel frames that are fixed forever, Aluminum Workbench D uses aluminum profile accessories—like 90° aluminum profile connectors and T-slot rubber seal covers—to snap together. Need to add a shelf? Just slide in a new aluminum profile. Want to move it to another corner? Swap the fixed feet for casters. It's designed to evolve with your workspace, not hold it back.

Why Aluminum? The Secret Behind Its Strength & Versatility
You might be wondering: Why aluminum? Why not stick with good old wood or steel? Let's start with the basics. Aluminum extrusion profile—the star material here—is a marvel of engineering. It's made by pushing heated aluminum through a die to create custom cross-sections (like the T-slots that run along the profiles). This process makes the material incredibly strong for its weight—stronger than wood, lighter than steel, and resistant to rust and corrosion. That means if you spill oil,, or even water on your Aluminum Workbench D, it won't warp, rot, or develop unsightly stains. Perfect for messy workshops or labs where spills happen.
But aluminum's real superpower is its adaptability . The T-slots on the aluminum profiles act like built-in tracks, letting you slide in accessories—tool holders, monitor arms, even small conveyors—without drilling holes. Pair that with aluminum profile accessories like end caps (to smooth rough edges) and rubber strips (to dampen noise), and you've got a workbench that's as functional as it is finished. Compare that to a wooden workbench, which needs sanding and refinishing every few years, or a steel one that dents easily and requires heavy tools to modify. Aluminum Workbench D is built to last, but it's also built to change —and that's a game-changer for dynamic workspaces.

Step-by-Step Assembly: Building Your Workbench (No Expertise Required)
Here's the best part: You don't need to be a DIY pro to put together Aluminum Workbench D. The designers thought of everything, from pre-drilled holes to color-coded joints. Let's walk through the process, step by step, with tips to make it even smoother.
Step 1: Unbox & Inventory Your Parts
First things first: Open the boxes and lay out all the components. You should have aluminum profiles (for the frame and legs), a worktop, connection joints (like internal straight aluminum joints and 90° connectors), adjustable feet, and any optional accessories you ordered (casters, shelves, etc.). Check the included manual to make sure nothing's missing—better to catch a missing joint now than halfway through assembly. Pro tip: Use a clean, flat surface (like a large table or the floor) to organize parts by type. This saves you from hunting for that one tiny connector later.
Step 2: Build the Frame—Start with the Base
The frame is the backbone of your workbench, so let's start there. Most Aluminum Workbench D kits come with four main frame profiles (two for the front/back, two for the sides) and shorter cross-braces for stability. Take two long profiles (say, 120cm each) and connect them with two shorter ones (80cm) using 90° aluminum profile connectors. Just slide the connector into the T-slot of one profile, align the second profile, and tighten the bolt with the included hex key. It should click into place—no need for brute force. Repeat this to build a rectangular frame. If you're adding a lower shelf, now's the time to attach the cross-braces for it, using parallel aluminum joint A or B connectors.
Step 3: Attach the Legs & Level the Workbench
Next, screw the adjustable legs into the corners of the frame. Each leg has a threaded end that twists into the frame's bottom joints, and a rubber anti-slip foot at the bottom. Once all four legs are attached, stand the frame upright. Now, grab a spirit level and check if the frame is even. If it rocks, twist the adjustable feet up or down until the bubble is centered. This might take a minute, but trust us—an uneven workbench leads to wobbly tools and frustrated workers later. If you ordered casters (like flat swivel castor wheels with brakes), swap out the fixed feet for the casters now—just unscrew the feet and screw in the caster stems. Lock the brakes once they're on to keep the frame steady while you finish assembly.
Step 4: Mount the Worktop—The Final Touch
Now for the worktop. Most Aluminum Workbench D models come with a pre-cut aluminum honeycomb panel or a laminate-topped board that fits perfectly on the frame. Lift it (get a friend to help if it's large!) and center it on the frame. The worktop should have pre-drilled holes that align with the T-slots on the frame. Use the included bolts and T-slot nuts to secure it—just drop the nuts into the T-slots, align the worktop holes, and tighten the bolts. No need to over-tighten; you want it snug, not warped. Once attached, give the worktop a gentle shake to make sure it's secure. If it moves, check the bolts—you might have missed a T-slot nut.
Step 5: Add Accessories & Make It Yours
Now comes the fun part: customizing. Slide tool hooks into the T-slots along the back of the frame to hang wrenches or tape measures. Attach a small shelf using aluminum guide rail A for extra storage. If you're using the workbench for electronics assembly, add an ESD (electrostatic discharge) mat to the worktop to protect sensitive components. The beauty here is there's no wrong way—add what you need today, and reconfigure tomorrow. Just remember: T-slot nuts are your friends. They let you move accessories anywhere along the profiles, so you're never stuck with a "one-and-done" setup.
Why It Stands Out: The Benefits of Aluminum Workbench D
By now, you might be thinking, "This sounds great, but is it really worth upgrading?" Let's break down the real-world perks that make Aluminum Workbench D more than just a pretty table.
1. It Grows with Your Workspace
Remember that time you added a new machine to the shop and suddenly your old workbench was in the way? With Aluminum Workbench D, you won't have that problem. Need to make it shorter? Unscrew a few joints and remove a section. Want to add a second tier for parts storage? Slide in new aluminum profiles and connectors. It's like building with giant, industrial Legos—no demolition required. This flexibility is a lifesaver for small businesses or startups where space and needs change fast.
2. It's Built to Outlast Your Workday
Workbenches take a beating. Drills, hammers, heavy parts—they all land on that surface day in and day out. Aluminum Workbench D laughs this off. The aluminum extrusion profile frame can handle hundreds of pounds without bending, and the worktop resists scratches, dents, and heat. We've seen these workbenches in 24/7 factories still looking new after five years. Compare that to a particleboard workbench that starts chipping after six months, or a steel one that rusts if you forget to paint it. This isn't just a purchase—it's an investment.
3. It's Kind to Your Body (and Your Team)
Ergonomics matter. A workbench that's too low leads to back pain; too high, and your shoulders ache. Aluminum Workbench D's adjustable legs let you set the height to fit your team—whether you're 5'2" or 6'4". Add anti-fatigue mats underfoot, and suddenly those 10-hour shifts feel a little easier. Happy workers are productive workers, and this workbench is designed to keep morale (and output) high.
4. It Plays Well with Others (Lean System Compatibility)
If you're already using lean manufacturing tools—like flow racks for parts or conveyors for moving products—Aluminum Workbench D fits right in. Its T-slots and aluminum profile accessories are designed to connect with these systems seamlessly. For example, you can attach a small roller track to the side of the workbench to feed parts directly from a flow rack, cutting down on walking time. It's not just a workbench; it's a hub that ties your entire workflow together.
Where It Shines: Real-World Uses for Aluminum Workbench D
Aluminum Workbench D isn't just for big factories. It's versatile enough to thrive in all kinds of spaces. Here are a few examples of where it makes a real difference:
Electronics Assembly Lines
In electronics manufacturing, precision is everything. Aluminum Workbench D's stable surface and ESD-compatible options (like ESD worktop mats) protect sensitive components from static damage. Add tool rails with magnetic holders for tiny screws and tweezers, and suddenly your assembly line is organized and efficient. Plus, the lightweight frame makes it easy to reposition when reconfiguring the line for new products.
Small-Batch Workshops
Crafters, woodworkers, and makers love Aluminum Workbench D for its adaptability. One day, it's a jewelry-making station with a small vice clamped to the edge; the next, it's a packaging table with shelves for boxes. The T-slots let you mount jigs, clamps, or even a small CNC router—whatever your project needs. And since it's easy to take apart, you can store it compactly if space is tight.
Laboratories & Testing Facilities
Labs need clean, durable surfaces that can handle chemicals and frequent cleaning. Aluminum Workbench D's corrosion-resistant aluminum frame and non-porous worktop make it perfect for this. Add a sink (using aluminum pipe accessories to plumb it in) or a fume hood mount, and you've got a custom lab station that meets safety standards without sacrificing functionality.
Troubleshooting: Common Hiccups & How to Fix Them
Even the best designs hit snags sometimes. Here are a few common issues and quick fixes to keep your Aluminum Workbench D running smoothly:
Wobbly Frame?
Check the joints. Over time, bolts can loosen with vibration. Grab your hex key and tighten all the connectors—pay extra attention to the corners. If it still wobbles, add cross-braces between the legs using parallel aluminum joint B connectors. This adds diagonal support and stops the frame from swaying.
Worktop Sliding?
T-slot nuts might have shifted. Remove the worktop, reposition the nuts so they're directly under the bolt holes, and retighten. If the worktop is still loose, add a small bead of silicone caulk between the frame and worktop (just enough to hold it, not enough to make it permanent). Wipe away excess caulk with a damp cloth before it dries.
Accessories Won't Stay Put?
Make sure you're using the right T-slot nuts. Some accessories need flanged nuts to prevent spinning. If a tool hook slides, try adding a second T-slot nut on the other side of the hook to lock it in place. You can also tighten the nut with a wrench (not just the hex key) for extra grip—just don't overdo it, or you might strip the threads.
Final Thoughts: More Than a Workbench—A Workspace Upgrade
Aluminum Workbench D isn't just a piece of equipment. It's a statement that your workspace matters—that efficiency, flexibility, and comfort are worth investing in. Whether you're running a factory, a small shop, or a home garage, it adapts to you , not the other way around. With its durable aluminum extrusion profile, modular design, and endless customization options, it's built to keep up with the way you work—today, tomorrow, and for years to come. So why settle for a workbench that holds you back? Upgrade to one that helps you move forward.