- Company Articles
- Products and Technology
- Installation And Maintenance
- The Ultimate Guide to Installing Aluminum Profile 3 Way Connectors

The Ultimate Guide to Installing Aluminum Profile 3 Way Connectors
Related Product
Aluminum Profile 3 Way Connector
The 3 way - squared corner connector is an external fastening method that is typically used to create a corner connection between three profiles. It is a heavy-duty connection that is simple to use and provides a polished look.
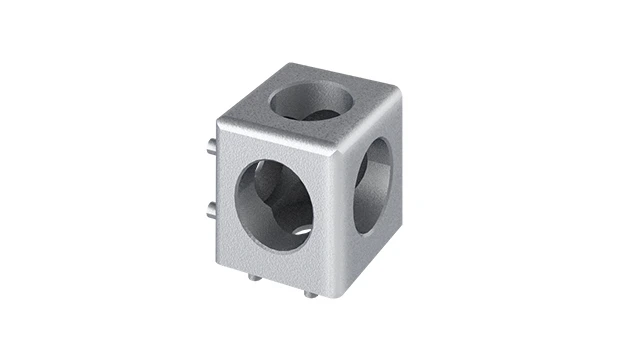
If you've ever walked through a workshop, a manufacturing plant, or even a well-organized garage, you've probably seen them: sturdy, sleek structures built from shiny metal frames—shelves that hold heavy tools, workbenches that withstand daily use, or material racks that keep inventory neat. Chances are, those structures are made from aluminum profiles. Lightweight yet surprisingly strong, aluminum extrusion profiles have become the backbone of modern modular construction, thanks to their versatility and ease of assembly. But here's the thing: even the best aluminum profile is only as good as the connectors holding it together. And when it comes to building structures with branches—like a workbench with a side shelf or a material rack with multiple levels—there's one connector that stands out: the 3 way aluminum profile connector.
In this guide, we're going to dive deep into everything you need to know about installing 3 way aluminum profile connectors. Whether you're a DIY enthusiast setting up a home workshop, a small business owner building custom storage, or a facility manager upgrading your production line, this step-by-step walkthrough will turn you from a novice to a pro. We'll cover the tools you need, the materials to gather, common pitfalls to avoid, and even real-world examples of how these connectors bring projects to life. Let's get started.
1. Understanding Aluminum Profiles and 3 Way Connectors: The Basics
Before we jump into installation, let's make sure we're on the same page about the star players here: aluminum profiles and 3 way connectors. Let's start with the foundation: the aluminum extrusion profile itself. These profiles are created through a process called extrusion, where heated aluminum is pushed through a die to form specific cross-sectional shapes. Most profiles designed for modular construction have T-slots—long, narrow grooves running along their length—that allow accessories like bolts, brackets, and yes, connectors, to slide in and lock into place. This T-slot system is what makes aluminum profiles so adaptable; you can reconfigure a structure in minutes by simply loosening a few bolts and moving the parts around.
Now, onto the connectors. Aluminum profile accessories come in all shapes and sizes—from simple end caps to complex hinges—but 3 way connectors are unique because they let you join three profiles at once. Think of them as the "Y-junction" of the modular world. Need to add a vertical support to a horizontal beam? A 3 way connector can do that. Want to branch off a shelf from a main frame? That's another job for a 3 way. They're available in different materials (usually aluminum or high-strength plastic) and sizes, each designed to fit specific profile widths—so a 3 way connector for a 2020 profile (20mm x 20mm) won't work with a 4040 profile (40mm x 40mm). It's crucial to match the connector size to your profile size, which we'll cover more later.
Pro Tip:
When shopping for 3 way connectors, check the product specs for "profile compatibility." Most manufacturers list the profile sizes (e.g., 3030, 4040) that the connector works with. Mixing sizes is a common rookie mistake that leads to wobbly structures!
2. Tools and Materials: What You'll Need to Get Started
Installing 3 way aluminum profile connectors isn't rocket science, but having the right tools on hand will make the process smooth and frustration-free. Below is a breakdown of the essential tools and materials you'll need, along with why each one matters.
| Tool/Material | Purpose | Pro Tips |
|---|---|---|
| Aluminum Profiles | The base structure (e.g., 3030 or 4040 aluminum extrusion profiles). | Measure twice, cut once! Use a miter saw with a metal-cutting blade for clean, straight cuts. |
| 3 Way Aluminum Profile Connectors | Joins three profiles at 90° or custom angles (check if the connector is fixed or adjustable). | Opt for aluminum connectors for heavy-duty projects; plastic works for lighter loads (e.g., shelving for small parts). |
| Hex Keys (Allen Wrenches) | Tightens the bolts that secure the connector to the profile's T-slots. | Get a set with ball-end tips—they allow you to reach bolts at awkward angles. |
| Deburring Tool | Removes sharp edges from cut aluminum profiles (safety first!) | Run the tool along both the inside and outside of the cut end to avoid snags or cuts. |
| Measuring Tape & Pencil | Marks where the connector will attach to the profiles. | Use a pencil with a light touch—aluminum is easy to scratch, but marks can be wiped off with a cloth. |
| Level (Bubble or Digital) | Ensures the structure is straight and stable (no one wants a leaning shelf!) | Check level in both horizontal and vertical directions for each connected profile. |
| Aluminum Profile Accessories | Bolts, washers, end caps, and T-slot nuts (most connectors come with bolts, but extras are handy). | End caps aren't just for looks—they cover sharp T-slot edges, making the structure safer to handle. |
| Rubber Mallet | Gently taps profiles into place if they're snug (avoid using a metal hammer—you'll dent the aluminum). | Wrap the mallet head in a cloth for extra protection against scratches. |
Optional extras: If you're working with longer profiles (over 6 feet), a helper to hold them steady will save you from strained arms. For heavy-duty projects (like a workbench that will hold power tools), consider thread-locking fluid—apply a small drop to the bolt threads before tightening to prevent loosening over time.

3. Step-by-Step Installation: Building a Stable Structure with 3 Way Connectors
Now that you've got your tools and materials ready, let's walk through the installation process step by step. For this example, we'll build a simple "T-shaped" structure: a horizontal base profile with a vertical profile branching off the middle (think of the start of a workbench with a leg). This is a common use case for 3 way connectors and will teach you the core skills needed for more complex projects.
Step 1: Prepare Your Aluminum Profiles
Start by cutting your aluminum profiles to the desired length. If you're new to cutting aluminum, don't worry—most hardware stores will cut them for you if you provide measurements. If you're cutting them yourself, use a miter saw with a metal-cutting blade (a 10-inch blade with 80+ teeth works best). After cutting, use the deburring tool to smooth the edges. Even a small burr can prevent the 3 way connector from sliding into place, so take your time here.
Next, mark the positions where the 3 way connector will attach. For our T-shape, measure the horizontal profile and mark the center (this is where the vertical profile will branch off). On the vertical profile, mark the bottom end (where it will connect to the horizontal profile). Use a straightedge to draw light lines across the profile—this helps align the connector later.
Step 2: insert T-Slot Nuts into the Profiles
Most 3 way connectors attach to aluminum profiles using bolts that thread into T-slot nuts. T-slot nuts are small, rectangular nuts that slide into the profile's T-slot and lock in place when tightened. Here's how to insert them:
- Turn the horizontal profile so the T-slot is facing up.
- Slide the T-slot nut into the T-slot, aligning it with the mark you made earlier (the center of the horizontal profile).
- Do the same for the vertical profile: slide a T-slot nut into its T-slot, aligning it with the bottom mark.
If your 3 way connector has multiple bolt holes (most have 2-4 per arm), repeat this step for each hole. For example, a typical 3 way connector has two arms at 90° and one at 180°; each arm will need its own T-slot nut and bolt.
Step 3: Position the 3 Way Connector
Now it's time to attach the connector. Take the 3 way connector and align its arms with the marks on your profiles. For the T-shape:
- Place one arm of the connector over the horizontal profile, lining up the connector's bolt holes with the T-slot nuts you inserted.
- Place the vertical profile into the connector's perpendicular arm, ensuring the vertical profile's mark lines up with the connector's base.
At this point, the connector should loosely hold the profiles together. Don't tighten the bolts yet—you'll need to adjust the alignment first.
Step 4: Align and Tighten the Bolts
Alignment is critical for a stable structure. Grab your level and place it on the horizontal profile—does it sit flat, or is it tilted? Adjust the connector slightly until the bubble in the level is centered. Then, check the vertical profile: hold the level against it to ensure it's straight up and down (plumb).
Once aligned, use the hex key to tighten the bolts. Start with the horizontal profile bolts, then move to the vertical one. Tighten them until they're snug—you'll feel resistance, but don't overtighten! Stripping the threads on the T-slot nut is a common mistake. A good rule of thumb: tighten until the bolt head is flush with the connector, then give it a quarter-turn more.
Common Mistake:
Rushing the alignment. If you tighten the bolts before checking with a level, you'll end up with a wobbly structure that's hard to fix later. Take 30 extra seconds to align—your back (and your tools) will thank you.
Step 5: Test the Stability
Now, give your T-shaped structure a gentle shake. Does it wobble? If yes, here's how to troubleshoot:
- Loose bolts: Check if any bolts have come loose during alignment—retighten them.
- Misaligned T-slot nuts: If the connector feels "crooked," the T-slot nuts might have shifted. Loosen the bolts, slide the nuts back into place, and retighten.
- Debris in the T-slot: A tiny metal shard or piece of dust can prevent the nut from seating properly. Use a dry cloth to wipe out the T-slot and try again.
If the structure feels solid, congratulations—you've successfully installed a 3 way aluminum profile connector! Pat yourself on the back, then repeat the process to add more branches (like a second vertical leg for a workbench or extra shelves for a material rack).

4. Beyond the Basics: Creative Projects with 3 Way Connectors
Once you've mastered the T-shape, the possibilities are endless. 3 way connectors are the building blocks for all kinds of modular structures. Here are a few real-world examples to spark your creativity:
Example 1: A Custom Workbench
Workbenches are the workhorses of any workshop, and aluminum profiles make building one a breeze. Start with a frame: four vertical legs (aluminum profiles) connected by horizontal profiles at the top and bottom (this is called the "base frame"). Then, use 3 way connectors to add a shelf halfway up the legs (for storing tools) and a side arm for a monitor stand or tool rack. The beauty of using 3 way connectors here is that you can customize the height, width, and depth to fit your space—no more settling for a one-size-fits-all workbench from the store.
For extra stability, add diagonal braces (using 45° aluminum profile connectors) between the legs. Top it off with a plywood or aluminum honeycomb panel for the work surface, and you've got a bench that can handle everything from woodworking to electronics assembly.
Example 2: Material Rack B (3 Row and 3 Floor)
If you've ever struggled with keeping inventory organized, a multi-level material rack is a game-changer. A "3 row and 3 floor" rack (like the "material rack b" you might see in supplier catalogs) uses 3 way connectors to add horizontal shelves at three different heights, with three vertical columns for stability. Here's how it works:
- Start with two vertical "side frames" (each made of four tall aluminum profiles connected by horizontal profiles at the top, middle, and bottom).
- Use 3 way connectors to attach horizontal shelf profiles between the side frames. Place connectors at the 1st, 2nd, and 3rd floor marks to create three levels.
- Add cross-braces (horizontal profiles between the vertical columns) using 3 way connectors to prevent the rack from swaying when loaded with heavy boxes.
This design is perfect for warehouses or garages—adjust the shelf heights using 3 way connectors to fit tall boxes, small parts bins, or even bulky equipment.
Example 3: A Mobile Cart with Side Rails
Need to move tools or materials around your workspace? Build a mobile cart using aluminum profiles, casters, and 3 way connectors. The base is a simple rectangle of aluminum profiles, with casters (and caster accessories like brake levers) attached to the corners. Then, use 3 way connectors to add vertical rails around the cart—these prevent items from sliding off during transport. For extra utility, add a small shelf halfway up using (you guessed it!) 3 way connectors.
5. Troubleshooting Common Issues: When Things Don't Go as Planned
Even with careful planning, you might run into hiccups during installation. Here are the most common issues and how to fix them:
Issue 1: The Connector Won't Slide onto the Profile
If the 3 way connector feels like it's "stuck" when you try to slide it onto the profile, the problem is usually one of two things: either the profile has burrs you missed, or the connector is the wrong size. Grab your deburring tool and check the edges of the profile again—even a tiny burr can cause resistance. If deburring doesn't help, double-check the connector's profile compatibility. Remember: a 3030 connector won't fit a 4040 profile, even if they look similar at first glance.
Issue 2: The Structure Wobbles Even After Tightening
A wobbly structure is often caused by uneven weight distribution or missing cross-braces. If your project has vertical profiles (like legs), add diagonal braces between them using 45° connectors—this "triangulates" the structure, making it far more stable. Another culprit: loose T-slot nuts. Over time, vibration (from tools, for example) can loosen nuts, so check them periodically and retighten as needed.
Issue 3: The Connector Bolts Keep Stripping
Stripped bolts are frustrating, but they're avoidable. Always use the correct size hex key—using a key that's too small will round off the bolt head. Also, never use power tools (like a cordless drill) to tighten the bolts—they're too powerful and will strip the threads. Stick to hand-tightening with a hex key, and stop when you feel resistance.
6. Maintenance: Keeping Your Aluminum Profile Structures in Top Shape
Aluminum profiles and 3 way connectors are built to last, but a little maintenance goes a long way in extending their lifespan. Here's how to care for your structures:
- Clean Regularly: Wipe down profiles and connectors with a damp cloth to remove dust and grime. For stubborn dirt, use a mild soap and water solution—avoid harsh chemicals like bleach, which can damage the aluminum's finish.
- Check for Loose Bolts: Every few months (or more often if the structure is used heavily), give the bolts a quick tighten with your hex key. This prevents wobbling and reduces wear on the T-slot nuts.
- replace Worn Connectors: Plastic connectors can crack over time (especially if exposed to sunlight or extreme temperatures). Metal connectors might rust if used in damp environments. Inspect connectors for cracks, rust, or deformation, and replace them if needed.
- Lubricate Moving Parts: If your structure has moving parts (like casters or adjustable shelves), apply a small amount of silicone lubricant to keep them sliding smoothly. Avoid oil-based lubricants—they attract dust!
Conclusion: You're Ready to Build!
Installing 3 way aluminum profile connectors might seem intimidating at first, but as you've learned, it's all about preparation, alignment, and patience. With the right tools, a little practice, and a creative mindset, you can build everything from simple shelves to complex workbenches that are tailored to your needs. Remember: the best projects start small. Begin with a simple T-shape or a small shelf, then work your way up to bigger ideas like a custom workbench or material rack.
Aluminum extrusion profiles and their accessories—especially 3 way connectors—have revolutionized how we build. They put the power of customization in your hands, letting you create structures that grow and change with your needs. So grab your hex key, measure your space, and start building—your perfect workspace is just a few connectors away.