- Company Articles
- Products and Technology
- Installation And Maintenance
- Tools Needed for 2040 Aluminum Profile End Cap Installation

Tools Needed for 2040 Aluminum Profile End Cap Installation
Related Product
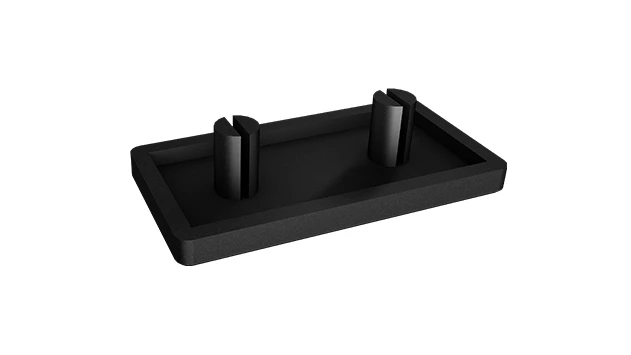
2040 Aluminum Profile End Cap
The aluminum profile end cap adds a finishing touch to your project and closes off profile ends to limit dust and debris buildup, also it can avaid some scratch for material and labor during the assemble work.
A Practical Guide to Finishing Your Aluminum Extrusion Projects with Precision
Why 2040 Aluminum Profile End Caps Matter
Aluminum extrusion profiles have become the backbone of countless DIY and industrial projects, from custom workbenches and shelving units to machine guards and production line frames. Among the most popular sizes is the 2040 aluminum profile—a versatile, lightweight, and durable option that balances strength and flexibility. But even the most well-engineered aluminum extrusion profile isn't complete without one small but crucial detail: the end cap.
2040 aluminum profile end caps are more than just cosmetic add-ons. They serve three key purposes that make them indispensable. First, safety: the cut ends of aluminum profiles can be sharp, with tiny burrs or rough edges that pose a risk of cuts during handling. End caps smooth these edges, turning a potential hazard into a safe, finished surface. Second, protection: without end caps, dust, debris, and moisture can seep into the hollow interior of the profile, leading to corrosion or buildup that weakens the structure over time. Third, aesthetics: let's face it—raw, unfinished profile ends stick out like a sore thumb. A well-fitted end cap gives your project a polished, professional look, elevating it from "homemade" to "custom-crafted."
Whether you're a hobbyist building a garage organizer or a manufacturer assembling production line components, getting end cap installation right is key. And like any project, the secret to success lies in using the right tools. In this guide, we'll walk you through everything you need to know about the tools required for installing 2040 aluminum profile end caps, along with pro tips to ensure a snug, long-lasting fit.
Understanding 2040 Aluminum Profile End Caps
Before diving into tools, let's take a moment to understand the end caps themselves. 2040 aluminum profile end caps are small, usually plastic or rubber components designed to snap, press, or screw into the open ends of 2040 profiles. They come in various styles, but the most common are:
- Snap-on end caps: These are the simplest type, designed to fit snugly into the profile's end via friction. They often have flexible tabs or ribs that grip the inner walls of the profile, holding them in place without additional fasteners.
- Press-fit end caps: Similar to snap-on caps but with a tighter tolerance. They require a gentle tap with a tool to seat fully, creating a more secure hold than snap-on versions.
- Screw-on end caps: These have pre-drilled holes or threaded inserts that align with holes in the profile, allowing them to be fastened with small screws (often included with the caps). They're ideal for high-vibration environments where a friction fit might fail.
Most end caps are made from durable plastics like polypropylene or nylon, chosen for their resistance to impact, temperature, and chemicals. Some premium options even match the profile's color, ensuring a seamless look. No matter the type, the goal is the same: a tight, secure fit that stays in place for years.
Now, let's talk about the star of the show: the tools. Without the right equipment, installing end caps can turn into a frustrating battle—snapped caps, scratched profiles, or caps that pop off at the slightest touch. Below, we've broken down the essential tools, why they're needed, and how to use them effectively.

Essential Tools for 2040 Aluminum Profile End Cap Installation
Installing 2040 aluminum profile end caps isn't rocket science, but it does require a few specialized (and some everyday) tools to get the job done right. Think of it like baking a cake: you could try mixing with a spoon, but a whisk makes the batter smoother and the end result better. The same logic applies here—using the right tools saves time, reduces frustration, and ensures a professional finish. Let's break them down:
| Tool Name | Purpose | Why It Matters |
|---|---|---|
| Deburring Tool | Removes burrs, sharp edges, and rough spots from the cut end of the aluminum profile. | Burrs can prevent end caps from seating properly and cause snags or cuts. A deburred edge ensures a smooth, even surface for the cap to grip. |
| Rubber Mallet | Gently taps press-fit or snap-on end caps into place without damaging the profile or cap. | Metal hammers are too hard and can crack plastic end caps or dent aluminum profiles. A rubber mallet delivers controlled force for a snug fit. |
| Flathead Screwdriver (Small) | Helps pry off misaligned end caps or adjust snap-on caps that aren't seating evenly. | Sometimes end caps get stuck at an angle. A small flathead lets you gently nudge them into position without tearing the plastic. |
| Hex Key Set (Metric) | Tightens screws for screw-on end caps (common sizes: 2mm, 2.5mm, or 3mm). | Most screw-on end caps use hex-head screws (Allen screws). A well-fitted hex key prevents stripping the screw head, which is critical for a secure hold. |
| Measuring Tape or Ruler | Confirms the profile end is square and the end cap size matches the profile (e.g., 2040 vs. 3030). | Mismatched end cap sizes are a common mistake. Measuring ensures you're using the right cap for your 2040 aluminum extrusion profile. |
| Isopropyl Alcohol and Cloth | Cleans the profile end of dust, oil, or debris before installation. | Dirt or grease on the profile can prevent the end cap from adhering properly, leading to a loose fit that falls off over time. |
| Safety Gloves | Protects hands from sharp edges during deburring and handling. | Even with deburring, aluminum profiles can have hidden sharp spots. Gloves add a layer of protection against cuts. |
| Level (Optional) | Ensures the profile is upright and level before installing end caps (useful for vertical applications like shelving). | A tilted profile can cause end caps to sit unevenly, leading to gaps or premature wear. |
You might notice that many of these tools are already in your toolbox—and that's the beauty of end cap installation: it doesn't require expensive, specialized equipment. The key is using them correctly, which we'll cover next.

Step-by-Step: Installing End Caps with the Right Tools
Now that you have your tools ready, let's walk through the installation process step by step. We'll focus on the two most common types of end caps: snap-on/press-fit and screw-on. The process is similar for both, with a few key differences in the final step.
Step 1: Prepare the Profile End
Start by inspecting the cut end of your 2040 aluminum extrusion profile. Even if the cut looks clean, there's likely a small burr or rough edge left from the saw. Grab your deburring tool and run it along the inner and outer edges of the profile. A good deburring tool has a sharp, curved blade that shaves off burrs with minimal effort—think of it like using a pencil sharpener, but for metal. Work slowly and evenly to avoid gouging the profile. Once done, wipe the end with a cloth dampened with isopropyl alcohol to remove metal shavings and dust. A clean surface ensures the end cap adheres properly.
Step 2: Confirm End Cap Size
Not all aluminum profile end caps are created equal. A 2040 profile has a cross-section of 20mm x 40mm, while a 3030 is 30mm x 30mm—mixing them up will result in a cap that's either too loose or too tight. Use your measuring tape to double-check the profile dimensions, then compare to the end cap packaging (most caps are labeled with the profile size they fit). It's a simple step, but I've seen too many projects derailed by using the wrong size—don't skip it!
Step 3: Align the End Cap
Hold the end cap up to the profile end and check that the corners and edges align. For snap-on or press-fit caps, look for small tabs or ridges on the inside of the cap—these should match the grooves or channels in the profile. For screw-on caps, ensure the pre-drilled holes line up with the holes (or slots) in the profile. If the cap has a logo or brand name, make sure it's facing the right direction—you don't want to tap it into place only to realize it's upside down!
Step 4: Install the End Cap (Snap-On/Press-Fit)
For snap-on caps: Apply gentle pressure with your hands first. Many snap-on caps will pop into place with a satisfying "click" if aligned correctly. If it's tight, don't force it—you risk bending the tabs. Instead, grab your rubber mallet and place a soft cloth over the end cap (to prevent scuffing) and tap lightly around the edges. Rotate the profile as you tap to ensure even pressure, working from one corner to the opposite side. The cap should sit flush with the profile end—no gaps, no overhang.
For press-fit caps: These are designed to be a tighter fit, so hand pressure alone may not be enough. Again, use the rubber mallet with a cloth buffer. Tap firmly but not aggressively—think of it as "persuading" the cap into place rather than hammering. If the cap starts to tilt, stop and realign it to avoid cracking the plastic.
Step 5: Install the End Cap (Screw-On)
Screw-on end caps require a bit more precision. Once aligned, insert the screws (usually included with the cap) into the pre-drilled holes. Use your hex key to tighten them, but go slowly—over-tightening can strip the threads in the plastic cap or the aluminum profile. Stop when you feel resistance, then give the screw a quarter-turn more to ensure it's snug. Repeat for all screws, alternating between them to distribute pressure evenly (like tightening lug nuts on a car wheel).
Step 6: Test the Fit
Once installed, give the end cap a gentle tug to ensure it's secure. A properly installed cap shouldn't wiggle or come loose. If it does, check for misalignment, burrs you missed, or a mismatched size. For snap-on caps, you might need to remove it (using the flathead screwdriver to pry gently) and re-debur or clean the profile end. For screw-on caps, check if the screws are tight enough or if the holes in the profile are stripped (in which case you may need a slightly larger screw).
Pro Tips for a Flawless Finish
Even with the right tools, a few extra tricks can take your end cap installation from "good" to "great." Here are some pro tips I've picked up over years of working with aluminum extrusion profiles and aluminum profile accessories:
Tip 1: Warm Up Stiff End Caps
Plastic end caps can become stiff in cold weather, making them harder to snap or press into place. If you're working in a garage or workshop with low temperatures, warm the cap in your hands for 30 seconds or place it in a bowl of warm (not hot) water for a minute. The heat softens the plastic slightly, making it more flexible and easier to install.
Tip 2: Use a Block of Wood for Even Pressure
If your rubber mallet alone isn't getting the end cap seated evenly, place a small block of wood (about 2x2 inches) over the cap before tapping. The wood distributes the mallet's force across the entire cap, preventing dents or cracks and ensuring the cap sits flush.
Tip 3: Deburr Both Inner and Outer Edges
Most people only deburr the outer edge of the profile, but the inner edge is just as important. A sharp inner burr can catch on the end cap's tabs, preventing it from seating properly. Run your deburring tool along the inner edge with a gentle, circular motion to ensure it's smooth all around.
Tip 4: Invest in Quality End Caps
Not all aluminum profile accessories are created equal. Cheap end caps often have inconsistent sizing, flimsy tabs, or brittle plastic that cracks easily. Spend a little extra on caps from a reputable aluminum profile supplier—they'll fit better, last longer, and save you the hassle of replacing cracked or loose caps later.
Tip 5: Mark Alignment Points
For profiles with asymmetrical designs (e.g., slots on one side), use a pencil to mark a small line on both the profile and the end cap before installation. This ensures you align them correctly, especially if the cap has a specific orientation (like a logo or vent hole).
Troubleshooting Common End Cap Installation Issues
Even with careful preparation, things can go wrong. Here are the most common issues you might encounter and how to fix them:
Issue: End Cap Won't Seat Fully
Cause: The most likely culprit is an unremoved burr or a bent profile end. If the profile was cut at an angle (not square), the cap will sit unevenly. Solution: Re-deburr the profile end, focusing on any spots you might have missed. If the cut is angled, use a file to gently square off the end (this takes patience—work slowly to avoid making it worse). If the profile is bent, use a rubber mallet to straighten it gently (aluminum is flexible, but don't overdo it).
Issue: End Cap Pops Off After Installation
Cause: Either the cap is too loose (wrong size), the profile end was dirty, or the tabs on a snap-on cap are worn or broken. Solution: Check the cap size again—if it's labeled for 2040, confirm your profile is indeed 20mm x 40mm. Clean the profile end with isopropyl alcohol and try a new cap (if the tabs are broken, the old one is beyond repair).
Issue: Screw Strips When Tightening (Screw-On Caps)
Cause: Using the wrong size hex key, over-tightening, or the plastic in the cap is brittle. Solution: Switch to a hex key that fits snugly in the screw head (worn keys slip and strip screws). If the cap is brittle, replace it with a new one (cheap caps are prone to this). For stripped holes in the profile, try a slightly larger screw or use a small drop of thread-locking adhesive (like Loctite) to hold the screw in place.
Issue: End Cap Cracks During Installation
Cause: Using a metal hammer instead of a rubber mallet, tapping too hard, or the cap is made of low-quality plastic. Solution: Always use a rubber mallet with a cloth buffer. If the cap cracks, replace it—there's no fixing a cracked cap, and it won't provide a secure seal. Invest in higher-quality caps made from impact-resistant plastic.
Safety First: Handling Aluminum Profiles
Working with aluminum extrusion profiles and aluminum profile accessories is generally safe, but it's important to take precautions to avoid injury. Here are a few safety tips to keep in mind:
- Wear gloves: Even after deburring, aluminum edges can be sharp. A pair of leather or nitrile gloves provides protection against cuts.
- Eye protection: When deburring, metal shavings can fly into your eyes. Safety glasses are a must, especially if you're using a power deburring tool.
- Secure the profile: Clamp the profile to a workbench before deburring or installing end caps. A wobbly profile is harder to work with and increases the risk of slips.
- Use tools as intended: A rubber mallet is for tapping, not prying. Using tools for the wrong purpose can lead to injury or damaged equipment.
- Clean up metal shavings: Deburring leaves small metal bits on your work surface. Sweep them up with a magnet (aluminum is non-magnetic, but shavings can stick to other metals) or a damp cloth to avoid stepping on them.
Conclusion: The Finishing Touch That Makes a Difference
Installing 2040 aluminum profile end caps might seem like a small step, but it's one that transforms a functional project into a polished, professional one. With the right tools—a deburring tool, rubber mallet, hex keys, and a few basics—you can ensure a snug, secure fit that protects your profile, enhances safety, and elevates the look of your work.
Remember, the key is preparation: deburr thoroughly, clean the profile end, and confirm the end cap size before installation. And don't overlook the value of quality aluminum profile accessories—investing in good end caps and tools saves time and frustration in the long run.
Whether you're building a workbench, a shelving unit, or a custom machine frame, the effort you put into installing end caps will shine through. So grab your tools, take your time, and enjoy the satisfaction of a project that's not just built to last, but built to look great too.