- Company Articles
- Products and Technology
- Installation And Maintenance
- Tools Needed for Gusset ALP 4040 Installation: A Complete Checklist

Tools Needed for Gusset ALP 4040 Installation: A Complete Checklist
Related Product
Gusset ALP 4040
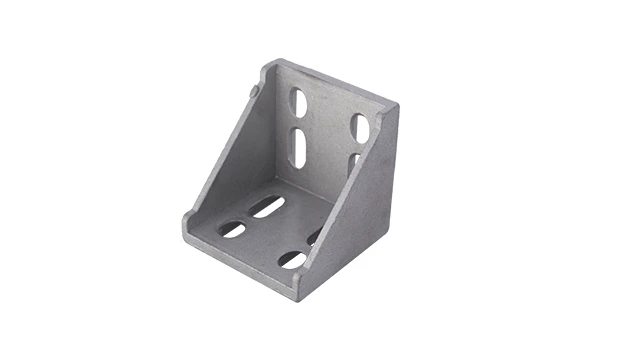
The 4040 bracket/Gusset is an external fastening method that creates a 90 degree connection. 4040 means this size is used for 40 series aluminum profile with a quick connection by bolt and nut. It is a lightweight bracket that requires no machining servic
Introduction: Why the Right Tools Matter for Gusset ALP 4040 and Aluminum Profile Projects
If you've ever tried to build something with aluminum profiles—whether it's a sturdy workbench, a sleek material rack, or part of a lean system to streamline your production line—you know that the difference between a wobbly mess and a rock-solid structure often comes down to two things: the quality of your materials and the tools you use. Today, we're zeroing in on one critical component of aluminum profile assembly: the Gusset ALP 4040. This unassuming little accessory might look simple, but it's the backbone of stable, durable connections in 4040 aluminum profile setups. And to install it right, you need more than just a screwdriver and a prayer.
Gusset ALP 4040s are designed to reinforce corners and joints in aluminum profiles, adding rigidity to frames, workbenches, and racks. They fit into the T-slots that run along the length of most aluminum profiles, locking into place with bolts or screws to create a tight, secure bond. But here's the thing: aluminum is a soft metal, prone to stripping if over-tightened, and its precision-engineered slots and joints demand accurate measurements and clean cuts. Use the wrong tool, or skip a step, and you could end up with a gusset that doesn't sit flush, a profile that bends under pressure, or a structure that wobbles when you load it up with parts. That's not just frustrating—it's a safety risk, and it undermines the efficiency of the lean system you're trying to build.
In this guide, we're breaking down every tool you need to install Gusset ALP 4040s like a pro. From measuring and cutting to fastening and finishing, we'll cover why each tool matters, what features to look for when buying, and pro tips to avoid common mistakes. Whether you're a seasoned fabricator or a weekend DIYer setting up your first workbench, this checklist will ensure your aluminum profile projects are strong, precise, and built to last.
1. Measuring Tools: Getting the Numbers Right Before You Cut
Before you even pick up a saw, you need to measure—twice, maybe three times. Aluminum profiles are typically sold in standard lengths (like 2m or 3m), but your project might call for shorter pieces. Cutting a profile too short is a costly mistake (aluminum isn't cheap!), and cutting it too long means you'll have to trim it again, wasting time and risking a messy edge. Here are the measuring tools you can't skip:
Tape Measure: Your First Line of Defense Against Wasted Material
Not all tape measures are created equal, especially when working with aluminum profiles. Look for a tape that's at least 5 meters long (16 feet) to handle most profile lengths, with clear metric markings—since aluminum profiles (and their accessories, like Gusset ALP 4040s) are almost always designed using metric dimensions. A lockable end hook is a must; it keeps the tape from sliding while you mark your cut, ensuring accuracy. Bonus points if the tape has a magnetic end—handy for sticking to metal profiles while you measure solo.
Pro tip: When measuring, always mark the profile at the exact point you need to cut, then double-check by measuring from the opposite end. Aluminum profiles can have slight variations in straightness, so this "double-check" method catches any discrepancies before you make the cut.
Speed Square: Ensuring Perfect 90-Degree Angles
Gusset ALP 4040s are all about reinforcing right angles, so your cuts and joints need to be as close to 90 degrees as possible. A speed square—those triangular metal tools with a lip on one edge—is perfect for this. Press the lip against the edge of the aluminum profile, and the square's straight edge will show you exactly where to mark a perpendicular line. Look for a speed square made of heavy-duty aluminum (not plastic) to avoid bending, and make sure the markings are etched (not printed) so they don't wear off after repeated use.
Pro tip: After marking your cut line with the speed square, use a straightedge (like a long level or a spare piece of aluminum profile) to extend the line down the entire length of the profile. This ensures your saw stays on track, even if your hand wavers slightly.
Digital Caliper: Precision for Tight Tolerances
If your project involves fitting Gusset ALP 4040s with other aluminum profile accessories—like T-nuts, brackets, or corner connectors—you'll need to measure small, precise distances. A digital caliper (the kind with a LCD screen) makes this easy. It can measure the thickness of the gusset, the depth of a T-slot, or the diameter of a bolt hole down to 0.01mm, ensuring parts fit together without gaps. Most digital calipers switch between metric and imperial, but stick to metric for aluminum profiles. Look for one with a stainless steel body (rust-resistant) and a locking screw to hold measurements in place.
Pro tip: Zero out the caliper before each measurement by closing the jaws and pressing the "zero" button. This eliminates any small errors from manufacturing tolerances in the tool itself.
Level: Keeping It Straight (Literally)
Even if your cuts are perfect, a frame or workbench built with Gusset ALP 4040s will still wobble if the aluminum profiles aren't level during installation. A 60cm (24-inch) spirit level is ideal for checking individual profiles, while a longer level (1m or more) works for entire frames. Look for a level with at least three vials (for checking horizontal, vertical, and 45-degree angles) and a magnetic edge to stick to aluminum profiles, freeing up your hands to adjust the position. Avoid cheap plastic levels—they can warp over time, leading to false readings.
Pro tip: When installing a gusset on a vertical and horizontal profile (like the corner of a workbench), use the level to check both the vertical profile (is it plumb?) and the horizontal profile (is it level?) before tightening the bolts. A gusset can't fix a crooked frame—it can only reinforce a straight one.

2. Cutting Tools: Making Clean, Precise Cuts in Aluminum
Once you've measured and marked your aluminum profiles, it's time to cut. Aluminum is softer than steel, but that doesn't mean any old saw will do. A dull blade or the wrong tool will leave jagged edges, burrs, or even bend the profile, making it impossible to fit Gusset ALP 4040s or other accessories properly. Here's what you need to make clean, professional cuts:
Miter Saw with a Fine-Tooth Blade: The Gold Standard for Straight Cuts
If you're cutting more than a few profiles, a miter saw is worth the investment. It delivers the straightest, most consistent cuts, and with the right blade, it can handle aluminum like a hot knife through butter. Look for a blade specifically designed for non-ferrous metals (aluminum, brass, copper)—these have more teeth (80–100 teeth per inch) and a zero-degree hook angle to prevent the blade from "grabbing" the soft aluminum and causing rough edges. Avoid using wood-cutting blades; they're too aggressive and will leave burrs or even chip the aluminum.
Pro tip: Clamp the aluminum profile tightly to the miter saw's fence before cutting. Aluminum can vibrate during cutting, leading to wavy edges. A good clamp (we'll talk about those later) keeps it steady. Also, cut slowly—let the blade do the work. Rushing increases heat, which can melt the aluminum and clog the blade.
Hacksaw: A Budget-Friendly Alternative for Small Jobs
If you don't have a miter saw, or you're only cutting a couple of profiles, a hacksaw will get the job done—with a little patience. Choose a hacksaw frame that adjusts to fit 12-inch blades, and use a blade with 32 teeth per inch (TPI) for aluminum. The higher TPI means more teeth make contact with the metal, resulting in a smoother cut. Hold the saw at a slight angle (about 15 degrees) and use long, slow strokes, letting the weight of the saw do most of the work. Avoid pressing down hard—this bends the blade and leads to crooked cuts.
Pro tip: Mark your cut line with a permanent marker, then cover the line with masking tape. The tape prevents the marker from smudging as you saw, and it helps reduce chipping on the profile's surface.
Deburring Tool: Removing Sharp Edges (Because Safety Matters)
No matter how careful you are, cutting aluminum leaves burrs—those sharp, ragged bits of metal along the cut edge. Not only are they a safety hazard (ever tried sliding your hand along a burred edge? Ouch), but they'll also prevent Gusset ALP 4040s from sitting flush against the profile. A deburring tool is a small, handheld device with a rotating blade that shaves off burrs in seconds. Look for one with replaceable blades (you'll go through them faster than you think) and a comfortable grip. For extra precision, use a file with fine teeth to smooth any remaining rough spots.
Pro tip: Deburr both the inside and outside edges of the cut. Burrs on the inside of the profile (especially near T-slots) can block T-nuts or bolts from sliding into place, making it impossible to attach the gusset securely.

3. Fastening Tools: Locking Gusset ALP 4040s Into Place
Now comes the moment of truth: attaching the Gusset ALP 4040 to the aluminum profile. This is where the right fastening tools make all the difference. Aluminum's softness means you need to tighten bolts enough to hold the gusset securely, but not so much that you strip the threads or warp the profile. Here's what you'll need:
Hex Key Set (Allen Wrenches): The T-Slot Workhorse
Most Gusset ALP 4040s attach to aluminum profiles using bolts that fit into T-slots, and those bolts almost always have hexagonal (hex) heads. That means you'll need a hex key set (also called Allen wrenches) in metric sizes. The most common sizes for 4040 profiles are M5 and M6, but it's smart to have a set that includes smaller (M3, M4) and larger (M8) sizes too, just in case. Look for a set with ball-end keys—they allow you to turn bolts at an angle, which is handy when the gusset or other accessories block a straight-on approach. A foldable hex key set (with the keys stored in a handle) is more portable than loose keys, and it's harder to lose.
Pro tip: If a bolt is tight and won't budge, don't force it with a hex key—you'll strip the key or the bolt head. Instead, spray a little penetrating oil (like WD-40) into the T-slot and let it sit for 5 minutes. The oil will loosen any debris or corrosion, making the bolt easier to turn.
Torque Wrench: Avoiding Over-Tightening (Aluminum Hates That)
Here's a rookie mistake: cranking down on a bolt with a hex key until it won't turn anymore. Aluminum is soft, and over-tightening can strip the threads in the T-slot, crack the profile, or even bend the gusset. A torque wrench prevents this by letting you set a specific torque (measured in Newton-meters, or Nm) and clicking when you reach it. For most Gusset ALP 4040 installations on 4040 profiles, a torque of 3–5 Nm is sufficient (check the gusset manufacturer's specs to be sure). Look for a small, adjustable torque wrench with a range of 1–10 Nm—anything larger will be overkill and hard to control for small bolts.
Pro tip: If you don't have a torque wrench, use the "finger-tight plus a quarter turn" rule. Tighten the bolt with your fingers until it's snug, then use the hex key to turn it a quarter turn more. This works for most light to medium-duty applications (like a workbench), but for heavy-duty racks or production-line frames, splurge on the torque wrench.
C-Clamps: Holding Everything Steady While You Fasten
Trying to hold a gusset, a profile, and a hex key at the same time is a recipe for frustration. C-clamps solve this by holding the gusset and profile together tightly while you insert and tighten the bolts. Look for clamps with rubberized jaws to avoid scratching the aluminum profile's finish. A 15cm (6-inch) clamp works for most gusset installations, but having a few sizes (10cm, 20cm) gives you flexibility. Avoid cheap clamps with plastic handles—they can break under pressure, sending the gusset flying.
Pro tip: Place a small piece of scrap wood or cardboard between the clamp jaws and the aluminum profile to prevent indentations. Aluminum is soft, and the clamp's pressure can leave marks if you're not careful.
T-Handle Screwdriver (for Phillips or Slotted Bolts): Backup for Oddball Fasteners
While hex bolts are standard for T-slot aluminum profiles, some Gusset ALP 4040s (or custom accessories) might use Phillips or slotted bolts. A T-handle screwdriver gives you more leverage than a regular screwdriver, making it easier to tighten these bolts without slipping. Look for a set with interchangeable bits (Phillips #1, #2; slotted 6mm, 8mm) to cover all bases. Magnetic bits help hold small bolts in place, which is a lifesaver when working in tight spaces.
4. Safety Gear: Protecting Yourself While You Work
We've talked a lot about tools for precision and strength, but let's not forget the most important tool of all: your safety. Aluminum cutting and fabrication can send chips flying, create sharp edges, and produce dust—all of which pose risks. Here's the gear you need to stay safe:
- Safety Glasses: Aluminum chips fly when you cut or drill, and they can scratch your eyes (or worse). Look for ANSI Z87.1-certified glasses with side shields for full protection.
- Work Gloves: Leather or cut-resistant gloves (like those made with Kevlar) protect your hands from sharp burrs and cuts while handling profiles and gussets.
- Ear Protection: Power tools (miter saws, drills) generate loud noise that can damage hearing over time. Foam earplugs or earmuffs (NRR 25+) work well.
- Dust Mask: Cutting aluminum produces fine dust that can irritate your lungs. A disposable N95 mask is better than nothing, but a reusable respirator with P100 filters is ideal for frequent projects.
- Closed-Toe Shoes: Dropping a 3m aluminum profile on your foot hurts—trust us. Steel-toed boots are best, but thick-soled sneakers are better than sandals.
Pro Safety Tip:
Always wear safety gear, even for "quick" jobs. A 30-second cut can send a chip flying into your eye, and a single sharp burr can slice your hand open. It's not worth the risk.
The Complete Gusset ALP 4040 Installation Tool Checklist (Table)
| Tool Category | Tool Name | Purpose | Key Features to Look For | Pro Tips |
|---|---|---|---|---|
| Measuring | Tape Measure | Measure profile lengths and mark cuts | 5m+ length, metric markings, lockable end, magnetic hook | Double-check measurements from both ends of the profile |
| Speed Square | Check 90° angles on cuts and joints | Metal construction, easy-grip handle, clear markings | Align with the profile edge to ensure straight, square cuts | |
| Digital Caliper | Measure small distances (gusset thickness, bolt holes) | Stainless steel, LCD screen, 0.01mm precision, zero function | Zero out before each measurement to avoid errors | |
| Spirit Level | Check if profiles are level/plumb | 3 vials (horizontal, vertical, 45°), magnetic edge, 60cm+ length | Check both profiles in a joint before installing the gusset | |
| Cutting | Miter Saw | Make straight, precise cuts in aluminum profiles | Fine-tooth non-ferrous blade (80–100 TPI), adjustable angle | Clamp profiles tightly to prevent vibration during cutting |
| Hacksaw | Budget-friendly alternative for small jobs | 32 TPI blade, adjustable frame, comfortable grip | Use masking tape on the cut line to reduce chipping | |
| Deburring Tool | Remove sharp burrs from cut edges | Replaceable blades, ergonomic handle | Deburr both inside and outside edges of the cut | |
| Fastening | Hex Key Set | Tighten hex bolts in T-slots | Ball-end keys, metric sizes (M3–M8), foldable case | Use ball-end keys for angled access to tight bolts |
| Torque Wrench | Prevent over-tightening bolts | Adjustable (1–10 Nm), metric settings, click mechanism | Follow manufacturer specs (usually 3–5 Nm for gussets) | |
| C-Clamps | Hold gusset and profile together during fastening | Rubberized jaws, 15cm+ size, sturdy steel construction | Use scrap wood to protect aluminum from clamp marks | |
| T-Handle Screwdriver | Tighten Phillips/slotted bolts | Interchangeable bits, magnetic tip, comfortable grip | Use for oddball fasteners not compatible with hex keys | |
| Safety | Safety Glasses, Gloves, Ear Protection, Dust Mask | Protect against chips, cuts, noise, and dust | ANSI-certified glasses, cut-resistant gloves, NRR 25+ ear protection, N95 mask | Wear gear for every project, no matter how small |
5. Putting It All Together: A Quick Gusset ALP 4040 Installation Walkthrough
Now that you have all the tools, let's walk through installing a Gusset ALP 4040 on a 4040 aluminum profile corner (like the corner of a workbench or material rack). This step-by-step will show you how each tool comes into play:
- Measure and Mark: Use the tape measure to mark where the horizontal and vertical profiles will meet. Use the speed square to draw a straight line across the profile where you'll cut (if needed).
- Cut the Profile: Clamp the profile to a workbench, then cut with a miter saw (or hacksaw) using a fine-tooth blade. Deburr the cut edge with the deburring tool.
- Align the Profiles: Place the vertical and horizontal profiles in a 90-degree corner. Use the level to check that the vertical profile is plumb and the horizontal profile is level. Adjust as needed.
- Clamp the Gusset: Position the Gusset ALP 4040 over the corner, ensuring its holes align with the T-slots in both profiles. Use C-clamps to hold the gusset and profiles together.
- insert and Tighten Bolts: Slide T-nuts into the T-slots of the profiles, aligning them with the gusset's holes. insert bolts through the gusset and into the T-nuts. Use a hex key to tighten the bolts finger-tight, then finish with a torque wrench set to 3–5 Nm.
- Final Check: Remove the clamps and use the level again to ensure the corner is still straight. Give the gusset a gentle shake—if it moves, the bolts might be loose. Tighten them a little more (but don't overdo it!).
That's it! With the right tools, installing a Gusset ALP 4040 is straightforward, and the result is a joint that's strong enough to handle the demands of a busy workshop or production line.
Conclusion: Tools That Build Better Aluminum Profile Projects
Installing Gusset ALP 4040s might seem like a small part of building with aluminum profiles, but it's a critical one. These little gussets turn wobbly frames into rigid structures, and to install them right, you need the right tools. From measuring with precision to cutting clean edges, from fastening without stripping to protecting yourself while you work, every tool on this list plays a role in creating a project that's safe, durable, and built to last.
Whether you're setting up a workbench in your garage, building a material rack for your warehouse, or designing a lean system to boost production efficiency, remember this: the tools you use matter as much as the materials. Invest in quality tools, take your time with measurements and cuts, and don't skip the safety gear. Your back (and your aluminum profiles) will thank you.
Now go grab your tools, and start building something strong.