- Company Articles
- Products and Technology
- Installation And Maintenance
- Tools Needed for Installing Lean Pipe Clamp Chrome: A Complete List

Tools Needed for Installing Lean Pipe Clamp Chrome: A Complete List
Related Product
Lean Pipe Clamp Chrome
Lean pipe clamp is used for rack system hang monitor or other panel for workbenck, flowrack in production daily use.
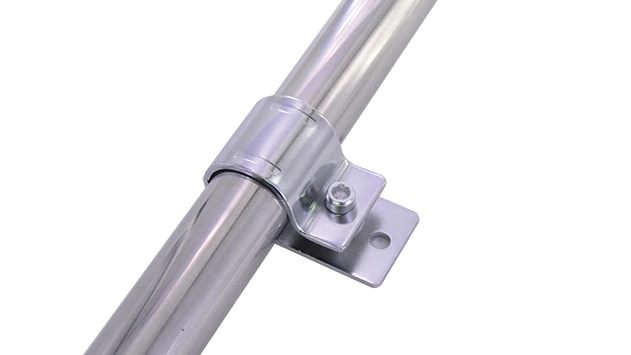
The unsung heroes of efficient production lines, lean pipe clamp chrome might not grab headlines—but anyone who's worked in a lean system knows: their installation can make or break the flow of your entire operation. Let's dive into the tools that turn a pile of parts into a seamless, sturdy foundation for your workflow.
Walk into any well-run production facility, and you'll spot them: sleek aluminum profiles holding up workbenches, conveyor systems gliding with precision, and lean pipe clamps keeping everything locked into place. These clamps are the quiet organizers of the manufacturing world—they hold pipes steady, align workstations, and ensure that every component sits exactly where it needs to be. But here's the thing: installing them isn't just about twisting a joint or tightening a bolt. It's about precision . And precision? It doesn't happen by accident. It happens when you have the right tools in hand.
I've visited factories where teams tried to "make do" with whatever was in the toolbox—a rusty wrench here, a generic tape measure there. The result? Wobbly workbenches that shook during assembly, clamps that loosened after a week of use, and workers who wasted time adjusting instead of producing. On the flip side, I've seen facilities where installers treated lean pipe clamp chrome like the critical component it is: using specialized tools to measure twice, cut cleanly, and fasten securely. The difference? A production line that hums instead of hesitates, and a team that trusts their workspace to support them.
Why the Right Tools Aren't Just "Nice to Have"—They're Essential
Let's get real: installing lean pipe clamp chrome is a balancing act. You're working with aluminum pipes, lean pipe joints, and sometimes even aluminum profile accessories that need to align perfectly. A single misstep—a cut that's off by a millimeter, a joint that's over-tightened—can throw off the entire system. And in lean manufacturing, where every second counts, those small mistakes add up.
Take, for example, a simple caster wheel installation. If you use a generic socket wrench instead of a torque-limiting tool, you might crank the bolt too hard, stripping the thread or warping the aluminum base. Suddenly, that caster doesn't roll smoothly, and your turnover trolley drags instead of glides. Or consider measuring: a flimsy tape measure with faded markings might lead you to cut a pipe 1/4 inch too short. Now you're scrambling for a replacement, holding up the entire assembly line. These aren't just "tool problems"—they're workflow problems.
The right tools, though? They turn these headaches into non-issues. They let you cut pipes cleanly so joints fit snugly. They help you torque bolts to the exact specification, so clamps stay tight for months (not days). They let you level a workbench with confidence, knowing it won't wobble when a worker leans into it. In short, they turn installation from a chore into a process you can trust.
The Essential Tools for Installing Lean Pipe Clamp Chrome
Not all tools are created equal. When it comes to lean pipe clamp chrome, you need tools that are as precise and durable as the components themselves. Below is a breakdown of the must-haves, organized by how they fit into your installation process.
| Tool Name | Primary Use | Why It Matters |
|---|---|---|
| Digital Caliper with Stainless Steel Jaws | Measuring pipe diameters, joint spacing, and alignment gaps | Aluminum and stainless steel pipes have tight tolerances—even 0.1mm off can prevent a joint from seating properly. |
| Pipe Cutter with Carbide Blade | Cleanly cutting lean pipes, aluminum pipes, and stainless steel pipes | A dull blade leaves burrs that scratch hands and prevent joints from sliding on smoothly. Carbide blades stay sharp longer for consistent cuts. |
| Hex Key Set (Ball-End, SAE & Metric) | Tightening lean pipe joints and aluminum profile accessories | Ball-end keys reach awkward angles (like internal rotary aluminum joints) without stripping the hex head. |
| Torque Wrench (Adjustable, 5-25 Nm) | Setting precise torque on bolts for clamps, casters, and workbench legs | Over-tightening cracks plastic joint components; under-tightening leads to wobble. A torque wrench hits the sweet spot every time. |
| Magnetic Bubble Level (24-inch) | Aligning workbenches, conveyor rails, and material racks | Even a slight slope throws off gravity-fed flow racks—this tool ensures your system is perfectly horizontal (or angled, if needed). |
| Deburring Tool with Titanium Nitride Coating | Removing burrs from cut pipes and aluminum profiles | Sharp burrs damage ESD workbench surfaces and can snag gloves or wiring. A smooth edge is safer and ensures better joint contact. |
| Rubber Mallet (Non-Marring Head) | Gently tapping joints into place without damaging aluminum or plastic components | Metal hammers dent pipes and crack plastic roller track guide rails. Rubber heads deliver force without leaving marks. |
Specialized Tools for Tricky Components
Some parts of the lean system need a little extra care. For example, when installing roller track and accessories (like plastic roller track guide rails or aluminum guide rails), you'll want a few more tools in your kit:
- Roller Spacing Gauge: Ensures each roller on a conveyor or flow rack sits exactly 1.5 inches apart (or your specified gap), so products glide without jamming.
- Caster Wheel Alignment Tool: When attaching caster wheels to turnover trolleys, this tool checks that all four wheels point the same direction—no more "drifting" carts.
- ESD-Safe Torque Screwdriver: For ESD workbenches and ESD workstations, this prevents static buildup that could damage sensitive electronics during assembly.

How to Choose Tools That Last (and Save You Money)
Investing in tools is just that—an investment. But with so many options, how do you pick ones that won't let you down? Here's what I've learned after years of working with lean system suppliers and installers:
1. Prioritize Durability Over Price
A $10 pipe cutter might work for a weekend project, but if you're installing 50 lean pipe clamps a month, it'll dull after 10 cuts. Spend a little more on a cutter with replaceable carbide blades—you'll save money on replacements and avoid frustrating delays.
2. Look for Compatibility with Your Components
If your facility uses mostly aluminum lean pipes, a pipe cutter designed for steel might not give clean cuts. Check the tool's specs to ensure it works with aluminum, stainless steel, and plastic-coated lean pipes.
3. Ergonomics Matter (A Lot)
Installing lean pipe clamp chrome involves hours of bending, reaching, and turning. A torque wrench with a rubber grip reduces hand fatigue, and a lightweight digital caliper won't strain your wrist during long measurements. Trust me—your team will thank you.
A Day in the Life: Installing Lean Pipe Clamp Chrome with the Right Tools
Let's walk through a typical installation to see how these tools work together. Say you're building a new assembly workbench using aluminum lean pipes, internal rotary aluminum joints, and a single-deck workbench top (without casters, per the specs). Here's how the tools come into play:
-
Step 1: Measure and Mark the Pipes
Grab your digital caliper to confirm the aluminum pipe diameter matches the joints (most are 28mm or 30mm). Use the magnetic level to mark a straight line where you'll cut—this ensures the pipe sits flat in the joint. -
Step 2: Cut and Deburr
Clamp the pipe in a vice (use a soft jaw to avoid dents) and cut with your carbide blade cutter. Then, run the deburring tool around the edge—no more sharp edges! -
Step 3: Assemble the Frame
Slide the internal rotary joints onto the pipes. Use the hex key set to hand-tighten them, then finish with the torque wrench set to 15 Nm (check the joint manufacturer's specs!). The ball-end hex key reaches the tight spots where the joint meets the pipe. -
Step 4: Level the Workbench
Place the frame on the floor and set the magnetic level on top. Adjust the feet (using your torque wrench again) until the bubble centers. A level workbench means parts won't roll off, and workers stand straighter—no more backaches. -
Step 5: Test for Stability
Give the frame a gentle shake. If it wobbles, check the torque on the joints—you might have missed one. Tighten with the torque wrench, and test again. When it feels solid, you're done.
See the difference? With the right tools, what could take 2 hours (and a lot of frustration) takes 45 minutes. And the best part? That workbench will stay stable for years, not weeks.
5 Mistakes to Avoid (Even with the Best Tools)
Tools are powerful, but they can't fix bad habits. Here are the most common slip-ups I've seen—and how to steer clear:
Mistake #1: Skipping the Torque Wrench
"I can just 'feel' when it's tight enough," I've heard. Spoiler: You can't. Over-tightening cracks plastic joints; under-tightening leads to looseness. Always use the torque wrench.
Mistake #2: Using Dull Blades
A blade that drags leaves ragged cuts. Swap blades when you notice the cutter "fighting" the pipe—it's cheaper than replacing bent joints.
Mistake #3: Ignoring ESD Safety
For ESD workbenches, use ESD-safe tools (like the ESD torque screwdriver) to prevent static discharge. Regular tools can damage circuit boards during assembly.
Mistake #4: Rushing the Leveling Step
A workbench that's "close enough" will annoy workers daily. Take 5 extra minutes with the level—your team's posture (and mood) will thank you.
The Tools That Build Better Workspaces
At the end of the day, lean pipe clamp chrome is more than just metal and plastic. It's the foundation of a workspace that helps teams do their best work—faster, safer, and with less stress. And the tools you use to install it? They're the unsung partners in that mission.
Whether you're a small shop putting together your first lean system or a large manufacturer working with a lean pipe supplier to outfit a new facility, remember this: the right tools don't just make installation easier—they make your entire operation better. They turn "good enough" into "great," and "frustrating" into "satisfying."
So grab your caliper, tighten your torque wrench, and start building. The best lean systems aren't just designed—they're crafted . And crafting takes the right tools.