- Company Articles
- Products and Technology
- Installation And Maintenance
- Tools Needed to Install 3030 Aluminum Profile End Caps: A Beginner's List

Tools Needed to Install 3030 Aluminum Profile End Caps: A Beginner's List
Related Product
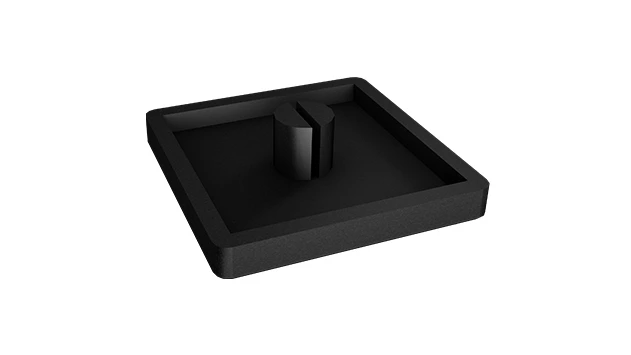
3030 Aluminum Profile End Cap
The aluminum profile end cap adds a finishing touch to your project and closes off profile ends to limit dust and debris buildup, also it can avaid some scratch for material and labor during the assemble work.
If you've ever dabbled in DIY projects, industrial workbench setups, or even just organizing your garage with aluminum profiles, you've probably come across the 3030 aluminum profile. It's one of the most versatile players in the world of aluminum extrusion—sturdy enough for workbenches, flexible enough for custom shelving, and sleek enough to look professional in any setting. But here's the thing: even the best aluminum profile feels unfinished without its end caps. Those small, unassuming pieces aren't just about looks—they protect the profile's edges, keep out dust and debris from the T-slots, and prevent accidental scratches or cuts from sharp corners. If you're new to this, installing 3030 aluminum profile end caps might sound intimidating, but trust me—it's a beginner-friendly task. The key? Having the right tools. Let's walk through everything you'll need to get the job done smoothly, safely, and with that satisfying "professional finish" feel.
First Things First: Why 3030 Aluminum Profile End Caps Matter
Before we dive into tools, let's quickly talk about why these end caps are non-negotiable. Imagine you've just built a sleek aluminum workbench using 3030 profiles. It's sturdy, it fits your space perfectly, and you're ready to start using it—until you run your hand along the edge and catch a sharp burr from the cut profile. Ouch. Or maybe you notice dust and small debris collecting in the T-slots, gumming up the works when you try to add accessories later. That's where 3030 aluminum profile end caps come in. They snap or screw into place, covering the raw ends of the profile to smooth out edges, seal off slots, and give your project that polished, intentional look.
But not all end caps are created equal. The 3030 profile gets its name from its dimensions—30mm by 30mm—so you'll need end caps specifically designed for this size. Using the wrong size can lead to loose fits (which fall off) or tight fits (which crack the end cap or damage the profile). That's why, along with the right tools, using compatible aluminum profile accessories is just as crucial. Now, let's get to the star of the show: the tools.
The Essential Toolkit: What You'll Need
Don't worry—you won't need a fully stocked industrial workshop. Most of these tools are either already in your garage or easy to pick up at a hardware store. We'll break them down into categories: basic hand tools, specialized tools, safety gear, and a few optional extras to make the job even easier. Let's start with the basics.
1. Basic Hand Tools: Your Everyday Heroes
These are the workhorses you'll reach for first. They handle measuring, marking, and the physical act of installing the end caps. Let's go through each one:
Measuring Tape or Ruler
You might be thinking, "End caps are pre-sized for 3030 profiles—why measure?" Great question! While most 3030 aluminum profile end caps are standardized, it's still smart to double-check the length of your profile ends. Sometimes, cuts can be slightly off (especially if you're cutting the profiles yourself), and a quick measurement ensures you're not forcing an end cap onto a profile that's a hair too long (which can split the cap) or leaving gaps with one that's too short. A small, flexible measuring tape (like the kind tailors use) works best here, but a metal ruler will do the trick too. Aim for measurements in millimeters for precision—30mm is the magic number for 3030 profiles, but it never hurts to confirm.
Pencil or Fine-Tip Marker
Marking might seem optional, but trust me, it's a lifesaver. Let's say you're installing end caps on multiple profiles—how do you keep track of which end goes where? A tiny mark on the profile (near the end) helps you align the end cap correctly, especially if the end cap has a specific orientation (some have notches or tabs that fit into the T-slots). Use a pencil if you want the mark to later, or a fine-tip marker if you're okay with a permanent (but small!) indicator. Avoid thick markers—they can bleed and look messy on the profile's surface.
Utility Knife or Deburring Tool
Here's a rookie mistake I made once: skipping this step. After cutting an aluminum profile, the ends can have tiny burrs—sharp, jagged bits of metal that stick out. If you try to push an end cap over those burrs, you'll either scratch the end cap or, worse, damage the profile's T-slot edges. A utility knife with a fresh blade works for light burrs—just gently scrape the edge at a 45-degree angle to smooth it out. For more stubborn burrs, a dedicated deburring tool is worth the investment. These tools have a small, curved blade that rolls along the edge, shaving off burrs cleanly. Pro tip: Always deburr both the outer edges and the inner T-slot edges of the profile—those inner burrs are easy to miss but just as problematic.
Rubber Mallet
Once the profile is prepped, you'll need to seat the end cap firmly. A rubber mallet is your best friend here. Unlike a metal hammer, it won't dent or scratch the aluminum profile or crack the plastic (or aluminum) end cap. Hold the end cap in place with one hand, aligning it so the edges are flush with the profile, then tap gently with the mallet—start with light taps on all sides to seat it evenly, then a few firmer taps to lock it in. Avoid swinging hard! Too much force can warp the end cap or push it in crookedly. If the end cap is tight, try tapping it at a slight angle (top to bottom, left to right) to help it slide into place.
Hex Key (Allen Wrench) or Screwdriver
Not all end caps are "push-fit." Some 3030 aluminum profile end caps come with small screws that secure them to the profile (these are great for high-vibration environments, like workshop tools). If yours are screw-on, you'll need the right tool to tighten them. Most use hex screws (so a hex key/Allen wrench) or Phillips-head screws (so a Phillips screwdriver). Check the end cap packaging—they often list the screw size. For hex keys, a set with multiple sizes (like 2mm, 2.5mm, 3mm) ensures you'll have the right fit. For screwdrivers, go with a "precision" size—too big, and you'll strip the screw head; too small, and you'll struggle to get enough torque.
Pro Tip:
If you're unsure whether your end caps are push-fit or screw-on, check the T-slots! Screw-on end caps usually have a small hole that lines up with a T-slot, where the screw threads into a T-nut inside the profile. Push-fit end caps rely on friction and sometimes small tabs that snap into the T-slots.
2. Specialized Tools: The "Nice to Have" (But Actually "Need to Have") Helpers
These tools are more specific to aluminum profiles and end cap installation, but they'll save you time and frustration. You might not use them every day, but for this project, they're worth tracking down.
Caliper (Digital or Vernier)
A caliper is like a measuring tape's precision-obsessed cousin. It measures the exact thickness, width, and depth of objects—perfect for confirming that your 3030 profile's end is truly 30mm across, or that the end cap's inner dimensions match. Digital calipers are easier for beginners (they display measurements in numbers), but a Vernier caliper works too if you're comfortable reading the scales. Why does this matter? If your profile's end is slightly bent (from shipping or handling), a caliper will catch it before you try to force an end cap on, preventing cracks. It's also handy for checking aluminum profile accessories like T-nuts or screws to ensure they fit the T-slots.
End Cap Installation Tool (Optional, But Awesome)
Yes, there's a tool specifically for installing end caps! These are small, plastic or metal tools shaped like a shallow cup that fits over the end cap. They distribute pressure evenly when you tap them with a mallet, so you don't risk denting the end cap or pushing it in crookedly. If you're installing a lot of end caps (say, on a large workbench with dozens of profiles), this tool is a game-changer. You can find them at industrial supply stores or online, often labeled as "aluminum profile end cap installers." They're not essential for one or two end caps, but if you plan to work with aluminum profiles regularly, add it to your toolkit.
3. Safety Gear: Protect Yourself While You Work
This might seem like overkill for a "simple" end cap installation, but trust me—safety first, always. Aluminum burrs are sharp, and even a tiny slip with a utility knife can draw blood. Here's what you'll need:
Work Gloves
A pair of lightweight, puncture-resistant work gloves (like nitrile or leather) will protect your hands from burrs, sharp edges, and the occasional slip with a tool. Avoid bulky gloves—you need dexterity to hold the end cap and tap it into place. Look for gloves with a snug fit and good grip on the palms.
Safety Glasses
When you're deburring the profile or tapping the end cap, tiny metal shavings or plastic bits can fly off. Safety glasses (even basic ones from the hardware store) shield your eyes from these projectiles. It's a small investment for peace of mind—you only get one pair of eyes!
Knee Pads (If Working on the Floor)
This one's optional, but if you're kneeling on a hard garage floor while installing end caps, your knees will thank you. A cheap pair of foam knee pads makes the job much more comfortable, especially if you're working on a large project with multiple profiles.

Optional Extras: Tools to Make the Job Easier
These tools aren't strictly necessary, but they'll turn a "good" installation into a "great" one. Think of them as the cherry on top for beginners who want to avoid common headaches.
Clamps (C-Clamp or Bar Clamp)
If you're installing end caps on a profile that's already part of a larger structure (like a workbench that's already assembled), clamping the profile to a stable surface keeps it from moving while you tap the end cap. A small C-clamp works well for this—just make sure to place a soft cloth between the clamp and the profile to avoid scratching the aluminum.
Heat Gun (For Stubborn End Caps)
Plastic end caps can sometimes be too rigid, especially in cold weather. A quick blast of heat (on the lowest setting!) from a heat gun softens the plastic slightly, making it more flexible and easier to push into place. Hold the heat gun 6–8 inches away from the end cap and move it in a circular motion for 5–10 seconds—don't overheat it, or the plastic will warp. This trick works wonders for tight-fitting end caps that just won't seat properly.
Rubber Mat or Workbench Pad
Laying your aluminum profile on a rubber mat or padded workbench top prevents it from sliding around while you work and protects the profile's finish from scratches. Even an old towel folded up works in a pinch!

Tool Breakdown: A Handy Reference Table
To keep track of everything, here's a quick table summarizing the tools, their uses, and why they matter:
| Tool | Use | Why It Matters |
|---|---|---|
| Measuring Tape/Ruler | Confirm profile end length (30mm for 3030 profiles) | Avoids forcing ill-fitting end caps |
| Pencil/Marker | Mark end cap alignment | Ensures even, straight installation |
| Utility Knife/Deburring Tool | Remove burrs from profile ends | Prevents scratches, cuts, and end cap damage |
| Rubber Mallet | Gently tap end cap into place | Even pressure without damaging profile/end cap |
| Hex Key/Screwdriver | Tighten screws on screw-on end caps | Secures end caps in high-vibration setups |
| Caliper | Precision measurement of profile/end cap dimensions | Catches bent profiles or mismatched end caps |
| Work Gloves | Protect hands from burrs and tools | Prevents cuts and scrapes |
| Safety Glasses | Shield eyes from flying debris | Protects against metal/plastic shavings |
Step-by-Step: Installing 3030 Aluminum Profile End Caps (Using Your New Tools!)
Now that you've got your toolkit ready, let's walk through the installation process. I'll break it down into simple steps, so even if you've never touched an aluminum profile before, you'll feel confident.
Step 1: Prep the Profile
Start by placing the aluminum profile on a stable surface (like a workbench or rubber mat). Use your measuring tape to confirm the end is 30mm (if it's a cut end). Then, grab your utility knife or deburring tool and carefully remove any burrs from the edges—run the tool along both the outer edges and the inner T-slot edges. Wipe the end with a clean cloth to remove any metal shavings.
Step 2: Mark the End Cap Position (Optional but Helpful)
If your end cap has a specific orientation (e.g., a logo or notch that needs to face up), use your pencil to mark a small dot on the profile where the top of the end cap should align. This ensures consistency, especially if you're installing multiple end caps.
Step 3: Align and Seat the End Cap
Hold the end cap with one hand, aligning it with the profile end (use your mark as a guide). Gently push it into place—you should feel slight resistance, but it shouldn't require force. If it's tight, try warming the end cap with a heat gun (on low!) for 5 seconds, then try again. Once it's partially seated, take your rubber mallet and tap lightly around the edges—top, bottom, left, right—to seat it evenly. Keep tapping until the end cap is flush with the profile (no overhangs or gaps).
Step 4: Secure Screw-On End Caps (If Applicable)
If your end cap has screws, insert them into the pre-drilled holes (they should line up with the T-slots). Use your hex key or screwdriver to tighten them—snug, but not too tight (over-tightening can crack the end cap). A good rule of thumb: stop when you feel resistance, then give it a tiny quarter-turn more.
Step 5: Check the Fit
Give the end cap a gentle tug—if it moves, it's not seated properly. Tap it again with the mallet or tighten the screws a bit more. The end cap should feel solid, with no wiggling or gaps. Repeat for all profile ends, and you're done!
Troubleshooting Common Issues (Because Mistakes Happen!)
Even with the right tools, things can go wrong. Here's how to fix the most common hiccups:
End Cap Won't Seat All the Way
Chances are, there's a burr you missed or the end cap is misaligned. Deburr the profile again, then try rotating the end cap slightly (15–30 degrees) and tapping it into place—sometimes the T-slot tabs just need a better angle. If it's still stuck, warm the end cap with a heat gun (low heat!) to soften it.
End Cap Falls Off Easily
This means it's too loose. Check if you're using the correct size (3030 end caps for 3030 profiles). If the size is right, the profile end might be too smooth (some end caps rely on friction). Try lightly sanding the profile end with fine-grit sandpaper (220 grit) to create a tiny bit of texture—this helps the end cap grip better. For screw-on end caps, ensure the screws are tight and the T-nut is properly seated in the T-slot.
End Cap Cracks When Tapping
Ouch—this is usually from too much force or a misaligned tap. If the crack is small, it might still work (but keep an eye on it). If it's big, replace the end cap. Next time, tap more gently and use an end cap installation tool to distribute pressure evenly.
Stripped Screw (On Screw-On End Caps)
If the screw head is stripped, try placing a rubber band over the screw and pressing the screwdriver into it—this adds grip. If that doesn't work, use a small drill bit (smaller than the screw) to drill out the head, then remove the remaining screw with pliers. Always use the correct screwdriver/hex key size to avoid stripping!
Where to Find Quality Tools and Aluminum Profile Accessories
Now that you know what tools you need, where do you get them? For basic hand tools (measuring tape, rubber mallet, screwdrivers), your local hardware store (Home Depot, Lowe's, or a local mom-and-pop shop) will have everything. For specialized tools like deburring tools or end cap installers, check industrial supply stores or online retailers (Amazon, eBay, or aluminum profile-specific suppliers). When shopping for 3030 aluminum profile end caps and other aluminum profile accessories, look for suppliers that specify "3030 compatibility"—this ensures a snug, safe fit.
Pro tip: Read reviews! Other DIYers and beginners often leave notes about which tools are user-friendly or which end caps are durable. Avoid generic "one-size-fits-all" end caps—they rarely fit 3030 profiles well. Stick to brands that specialize in aluminum extrusion products—they know their stuff.
Final Thoughts: You've Got This!
Installing 3030 aluminum profile end caps might seem like a small step, but it's the details that make a project feel professional. With the tools on this list, a little patience, and a willingness to learn, you'll be sealing those profiles like a pro in no time. Remember: even experts started as beginners, and mistakes are just part of the process. So grab your toolkit, prep those profiles, and enjoy the satisfaction of a job well done—your aluminum project (and your hands!) will thank you.
Now go out there and make those 3030 aluminum profiles shine—with their end caps, of course.