- Company Articles
- Products and Technology
- Installation And Maintenance
- Training Guide for Gusset ALP 4040 Installation: Ensuring Proper Assembly Techniques

Training Guide for Gusset ALP 4040 Installation: Ensuring Proper Assembly Techniques
Related Product
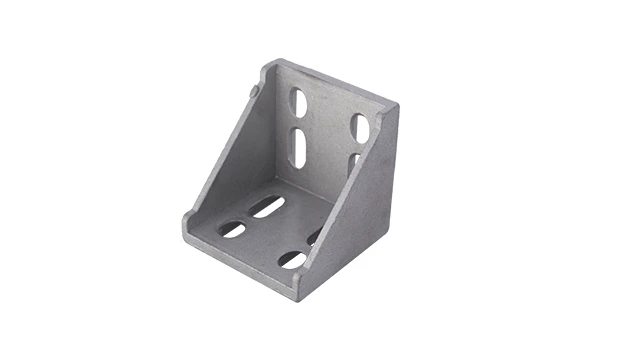
Gusset ALP 4040
The 4040 bracket/Gusset is an external fastening method that creates a 90 degree connection. 4040 means this size is used for 40 series aluminum profile with a quick connection by bolt and nut. It is a lightweight bracket that requires no machining servic
Introduction: Understanding Gusset ALP 4040 in Modern Manufacturing
In the world of lean manufacturing and efficient workspace design, every component plays a critical role in ensuring stability, durability, and adaptability. Among these components, the Gusset ALP 4040 stands out as a small but mighty element that reinforces the structural integrity of aluminum profile assemblies. Whether you're building a workbench, a material rack, or a custom production line, this unassuming piece of hardware is the unsung hero that keeps your aluminum profile structures rigid and reliable.
Aluminum profiles have become the backbone of modern industrial setups, thanks to their lightweight yet robust nature, corrosion resistance, and ease of customization. When combined with the right accessories—like gussets, connectors, and fasteners—they form the foundation of lean systems that streamline workflows, reduce waste, and boost productivity. The Gusset ALP 4040, specifically designed for 40-series aluminum profiles, is engineered to distribute stress evenly across joints, preventing flexing or wobbling even under heavy loads. This guide will walk you through everything you need to know to install Gusset ALP 4040 correctly, from tools and preparation to step-by-step assembly and post-installation checks.
Tools and Materials: What You'll Need for a Smooth Installation
Before diving into the installation process, it's essential to gather all the necessary tools and materials. Having the right equipment on hand not only speeds up the assembly but also ensures precision and safety. Below is a comprehensive list of what you'll need:
| Category | Items | Purpose |
|---|---|---|
| Hand Tools | Hex Key Set (Metric, 2-6mm) | Tightening and loosening socket head cap screws |
| Torque Wrench (Adjustable, 0-20 Nm) | Ensuring proper fastener tightness to avoid over/under-tightening | |
| Straightedge (1m or longer) | Verifying alignment of aluminum profiles | |
| Rubber Mallet | Gently adjusting profile positions without damaging surfaces | |
| Aluminum Profile Accessories | Gusset ALP 4040 (Quantity per joint as per design) | Reinforcing 90° joints between aluminum profiles |
| Socket Head Cap Screws (M5 x 16mm, stainless steel) | Securing gussets to profiles | |
| T-Nuts (M5, compatible with 40-series aluminum profile grooves) | Providing threaded anchors in profile T-slots | |
| Safety Gear | Anti-Slip Gloves | Protecting hands while handling profiles and tools |
| Safety Glasses | Preventing debris from entering eyes during assembly |
Pro Tip: Always use genuine aluminum profile accessories from a reputable supplier. Generic fasteners or low-quality gussets may not fit properly or withstand operational stresses, compromising the entire structure's integrity.

Pre-Installation Checks: Setting the Stage for Success
Rushing into installation without proper preparation is a common mistake that leads to misalignments, loose joints, and rework. Take 10-15 minutes to perform these pre-installation checks to ensure a seamless process:
1. Inspect Components for Damage
Unpack the Gusset ALP 4040, aluminum profiles, and accessories. Check for signs of shipping damage, such as bent gusset flanges, stripped threads on screws, or dents in the aluminum profile T-slots. Even minor deformities can affect fitment—if you spot any issues, contact your aluminum profile supplier immediately for replacements.
2. Verify Profile Compatibility
The Gusset ALP 4040 is designed for 40-series aluminum profiles (e.g., 4040A, 4040B, or 4080A EU standard aluminum profiles). Confirm that your profiles have the correct slot dimensions (typically 8mm wide for M5 T-nuts) and that the profile walls are thick enough to accommodate the screws (minimum 1.5mm wall thickness is recommended).
3. Clean the Work Area
Clear a flat, stable workspace large enough to lay out the profiles and components. Use a non-abrasive cloth to wipe down the aluminum profiles, removing any dust, oil, or debris from the T-slots—this ensures T-nuts seat properly and screws tighten without obstruction.
4. Review Assembly Drawings
Refer to your lean system design drawings to confirm the number of gussets needed per joint. Most 90° joints require 2 gussets (one on each side of the profile), but high-load applications (like material rack B with 3 rows and 3 floors) may need additional reinforcement. Note the exact positions where gussets will be mounted to avoid misalignment later.

Step-by-Step Installation: Mounting Gusset ALP 4040 Like a Pro
Now that you've prepared, let's walk through the installation process. Follow these steps carefully to ensure a secure, long-lasting joint:
Step 1: Position the Aluminum Profiles
Lay the two aluminum profiles that form the 90° joint on a flat surface, ensuring their ends meet at a perfect right angle. Use a square tool to check the angle—even a 1° deviation can cause the gusset to sit unevenly. For larger structures (e.g., workbench E or turnover trolley frames), clamp the profiles together temporarily to prevent movement during assembly.
Step 2: insert T-Nuts into Profile T-Slots
Slide M5 T-nuts into the T-slots of both profiles at the marked gusset positions. Tilt the T-nut 45° to align its wings with the slot, then rotate it 90° until it locks into place. For 40-series profiles with dual T-slots, use the slots closest to the joint for maximum stability. Leave the T-nuts loose enough to slide along the slot—you'll adjust their position in the next step.
Step 3: Align the Gusset ALP 4040
Place the Gusset ALP 4040 over the joint, ensuring its two flanges fit snugly against the sides of the aluminum profiles. The gusset should sit flush with the profile edges—no gaps or overhangs. If the gusset doesn't align, double-check the T-nut positions or profile angles; forcing it into place will warp the gusset or damage the profile.
Step 4: Secure with Socket Head Cap Screws
Take an M5 x 16mm socket head cap screw and thread it through one of the gusset's mounting holes into the T-nut below. Hand-tighten the screw until it's snug, but not fully tightened. Repeat this for all mounting holes (most Gusset ALP 4040 models have 4 holes: 2 per profile flange). This "finger-tight" stage allows for final adjustments before locking everything down.
Step 5: Torque the Screws to Specification
Using a torque wrench set to 4-5 Nm (check your supplier's specs—this may vary slightly for different materials), tighten each screw in a diagonal sequence (e.g., top-left, bottom-right, top-right, bottom-left). This ensures even pressure distribution and prevents the gusset from warping. Avoid over-tightening, as this can strip T-nuts or crack the aluminum profile.
Pro Tip: If you don't have a torque wrench, a good rule of thumb is to tighten until the screw head is flush with the gusset surface, then give it a 1/8 turn more. Over-tightening is the #1 cause of T-nut failure in aluminum profile assemblies!
Step 6: Verify Alignment and Stability
Once all screws are tightened, use a straightedge to check that the profiles remain perpendicular. Gently shake the structure—there should be no visible movement or creaking at the joint. If the joint feels loose, check for cross-threaded screws or misaligned T-nuts and adjust as needed.
Common Mistakes to Avoid: Lessons from the Field
Even experienced installers can fall prey to simple errors that compromise gusset performance. Here are the most frequent mistakes and how to steer clear of them:
Mistake 1: Using the Wrong Screw Length
Using screws longer than 16mm can pierce through the opposite side of the aluminum profile, creating sharp edges and weakening the structure. Shorter screws may not engage the T-nut fully, leading to loose joints. Always match screw length to profile thickness—for standard 40-series profiles (1.5-2mm wall), M5 x 16mm is ideal.
Mistake 2: Ignoring Profile Bowing
Aluminum profiles can bow slightly if stored improperly. If your profile has a curve, mounting a gusset will lock in that bend, creating a permanent misalignment. Lay profiles on a flat surface and check for gaps using a feeler gauge—if gaps exceed 0.5mm over 1m, straighten the profile before assembly or replace it.
Mistake 3: Skipping the T-Nut "Lock" Step
After inserting T-nuts, some installers forget to rotate them 90° to lock into the T-slot. This causes T-nuts to spin when tightening screws, making it impossible to secure the gusset. Always confirm T-nuts are locked by gently pulling on them—they should not slide or rotate.
Mistake 4: Overlooking Secondary Reinforcement
For heavy-duty applications (e.g., conveyor systems or material racks holding over 50kg per shelf), a single Gusset ALP 4040 per joint may not be enough. Pair gussets with 90° aluminum profile connectors or internal rotary aluminum joints for added strength. Your lean system supplier can help calculate the required reinforcement based on load requirements.
Troubleshooting: Fixing Common Installation Issues
Even with careful planning, issues can arise during installation. Here's how to diagnose and fix the most common problems:
Issue: Gusset Wobbles After Tightening
Cause: T-nuts may have spun during tightening, or the gusset is misaligned. Solution: Loosen the screws, rotate the T-nuts 90° to relock them, realign the gusset, and retighten using the diagonal torque sequence.
Issue: Screw Won't Thread into T-Nut
Cause: T-nut is misaligned with the gusset hole, or threads are damaged. Solution: Loosen the T-nut, slide it until it aligns with the hole, and try again. If threads are stripped, replace the T-nut with a new one.
Issue: Aluminum Profile Cracks Near Screw
Cause: Over-tightening or using a screw that's too long. Solution: replace the cracked profile section (small cracks can spread under load). Use shorter screws and reduce torque to 3-4 Nm for future installations.
Maintenance: Keeping Gusset ALP 4040 Joints in Top Shape
Properly installed gussets require minimal maintenance, but regular checks will extend their lifespan and ensure ongoing structural integrity—especially in high-vibration environments like production lines with conveyor systems or turnover trolleys.
Monthly Checks
Visually inspect gussets for signs of corrosion (especially in humid environments) or deformation. Tighten any loose screws using the torque wrench (target 4-5 Nm). Clean gussets with a damp cloth to remove dust and debris that can trap moisture.
Quarterly Inspections
For critical structures (e.g., workbenches used for heavy assembly), remove one screw per gusset and check the T-nut for wear. If the T-nut's threads are worn or the wings are bent, replace it. Also, verify that the aluminum profile T-slots are free of cracks or deformation.
Long-Term Care
If the structure is moved or reconfigured, always recheck gusset tightness and alignment. Avoid using power tools for maintenance—hand tools and torque wrenches are gentler on aluminum profiles and accessories.
Conclusion: Mastering Gusset ALP 4040 Installation for Lean Success
The Gusset ALP 4040 may seem like a small component, but its role in creating stable, efficient aluminum profile structures cannot be overstated. By following this guide—from pre-installation checks to torque specifications and maintenance—you'll ensure that every joint in your lean system is built to last, supporting smoother workflows, safer workspaces, and reduced downtime.
Remember, the key to success lies in attention to detail: using quality aluminum profile accessories, verifying alignment at every step, and avoiding common pitfalls like over-tightening. Whether you're a seasoned installer or new to aluminum profile assembly, these techniques will help you build structures that stand up to the demands of modern manufacturing.
For more specialized applications or custom designs, don't hesitate to reach out to your aluminum profile supplier—their expertise can help tailor gusset installation to your unique needs, ensuring your lean system delivers maximum value for years to come.