- Company Articles
- Products and Technology
- Installation And Maintenance
- Troubleshooting 2040 Aluminum Profile End Cap Issues: Expert Guide

Troubleshooting 2040 Aluminum Profile End Cap Issues: Expert Guide
Related Product
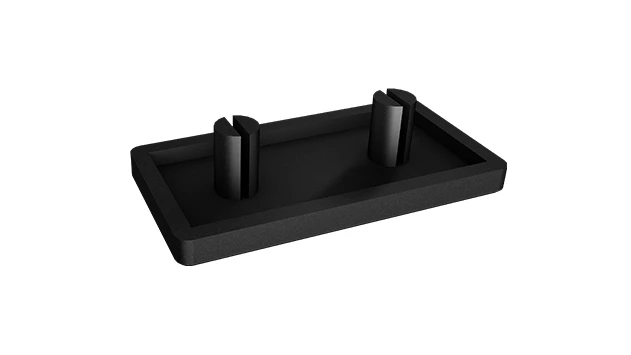
2040 Aluminum Profile End Cap
The aluminum profile end cap adds a finishing touch to your project and closes off profile ends to limit dust and debris buildup, also it can avaid some scratch for material and labor during the assemble work.
In the world of manufacturing and industrial design, aluminum extrusion profiles are the unsung heroes that hold everything together. From the workbenches where assembly line workers piece together electronics to the material racks that keep warehouses organized, these versatile structures rely on precision, durability, and attention to detail. Yet, even the most robust systems can be undermined by small, often overlooked components—like the end caps that seal the edges of aluminum profiles. Today, we're diving deep into one of the most common profile sizes: the 2040 aluminum extrusion profile. Specifically, we'll tackle the frustrating, yet fixable, issues that arise with its end caps. Whether you're a seasoned facility manager, a DIY enthusiast building a custom workstation, or a procurement specialist sourcing aluminum profile accessories, this guide will walk you through identifying, troubleshooting, and preventing problems with 2040 aluminum profile end caps.
Understanding 2040 Aluminum Profile End Caps: More Than Just a "Cap"
Before we jump into troubleshooting, let's make sure we're all on the same page about what 2040 aluminum profile end caps are and why they matter. The 2040 aluminum extrusion profile is a staple in industrial settings, named for its dimensions: 20mm in width and 40mm in height. Its versatility makes it ideal for light to medium-duty applications—think workbenches, shelving units, and small conveyor systems. But like any extrusion, its open ends are sharp, unfinished, and prone to collecting dust, debris, or even moisture over time. That's where end caps come in.
2040 aluminum profile end caps are small, often plastic or rubber components designed to fit snugly into the open ends of the 2040 profile. They serve three critical roles: safety, protection, and aesthetics. First, they cover the sharp, raw edges of the aluminum extrusion, preventing cuts to workers or damage to materials that slide against the profile. Second, they act as a barrier, keeping dust, dirt, and liquids from entering the profile's internal channels—this is especially important for profiles used in cleanrooms or environments with strict hygiene standards. Third, they give the finished structure a polished, professional look, hiding the rough edges that would otherwise make the system feel unfinished.
Most end caps are made from durable plastics (like polypropylene or ABS) or soft rubbers, and some even include aluminum profile rubber strip inserts for a tighter seal. They're designed to be press-fit, meaning you simply push them into the profile's end until they lock into place. But here's the catch: not all end caps are created equal. Poorly manufactured ones, or those mismatched to the 2040 profile's exact dimensions, are where most issues start.
Common Issues with 2040 Aluminum Profile End Caps: What Can Go Wrong?
If you've ever installed or maintained 2040 aluminum profiles, you've likely run into at least one of these end cap headaches. Let's break down the most frequent problems, why they happen, and how to spot them early.
1. Loose Fit: The End Cap That Just Won't Stay Put
One of the most frustrating issues is an end cap that pops off or wiggles loose shortly after installation. You press it in, think it's secure, and a week later, it's lying on the shop floor. Why does this happen? In most cases, it's a mismatch between the end cap's size and the profile's internal dimensions. Aluminum extrusion profiles, including 2040, have slight manufacturing tolerances—small variations in width or height that are normal but can throw off a one-size-fits-all end cap. If the end cap is too small, it won't grip the profile's inner walls. If it's too large, you might force it in, but the stress can cause it to warp or crack over time, leading to looseness later.
Another culprit? Debris or residue inside the profile's end. If there's dirt, metal shavings, or old adhesive from a previous end cap, the new cap can't seat properly. Even a tiny pebble can create a gap, letting the cap slide out with vibration or movement.
2. Cracking or Brittle End Caps: When Plastic Fails
Nothing is more disheartening than installing a new end cap, only to hear a faint "crack" as you press it in. Cracking is often a sign of poor material quality or improper handling. Many budget end caps are made from low-grade plastic that lacks flexibility, especially in cold environments. When you force a rigid end cap into a profile with tight tolerances, the plastic can't flex—it snaps instead. Sunlight and UV exposure can also degrade plastic over time, making end caps brittle and prone to cracking, even if they were once flexible.
Over-tightening is another hidden cause. Some people, frustrated by loose fits, resort to gluing or taping end caps in place. While adhesives can work, using too much or the wrong type (like super glue) can create rigid bonds that don't allow for the slight expansion and contraction aluminum profiles undergo with temperature changes. This stress builds up and eventually cracks the end cap.
3. Difficulty Installing: When "Press-Fit" Feels Like "Fight-Fit"
Installing end caps should be a quick, satisfying task—press, click, done. But when it turns into a wrestling match, something's off. If you're struggling to push the end cap into the 2040 profile, the first thing to check is the profile's end itself. Aluminum extrusions are cut with saws, and if the cut is uneven or has burrs (tiny metal protrusions), the end cap will catch on these rough spots. Imagine trying to slide a sock over a foot with a splinter—same idea.
End caps with misaligned or misshapen edges are another problem. If the cap's insertion lip is warped (from being stored in a hot warehouse, for example), it won't slide smoothly into the profile. Even minor warping can turn a 10-second job into a 5-minute struggle, and forcing it can lead to the cracking we discussed earlier.
4. Discoloration or Fading: When Aesthetics Take a Hit
While not a functional issue, discoloration can be a dealbreaker for applications where appearance matters—like customer-facing displays or high-end workbenches. End caps, especially those made from colored plastic, can fade or yellow over time, often due to UV exposure. If your 2040 profile system is near a window or in a facility with bright overhead lights, the end caps may start to look dull or mismatched compared to newer ones. Chemical exposure is another factor: cleaning agents with harsh solvents (like acetone or ammonia) can strip the color from plastic end caps, leaving them blotchy or discolored.
5. Improper Sealing: When Dust and Moisture Sneak In
Remember how we said end caps protect profiles from debris? If they're not sealing properly, dust, water, or even small tools can work their way into the profile's internal channels. This is a big issue for profiles used in electronics manufacturing, where dust can damage sensitive components, or in food processing facilities, where moisture can lead to bacterial growth. Improper sealing is usually caused by a loose fit (as we discussed) or a damaged end cap—like one with a crack that creates a tiny gap. Even a hairline fracture can let in enough dust to clog the profile's T-slots, making it hard to attach accessories later.

Troubleshooting 2040 Aluminum Profile End Cap Issues: Step-by-Step Solutions
Now that we've identified the most common issues, let's roll up our sleeves and fix them. Below, we'll walk through each problem with actionable steps to diagnose and resolve it. For quick reference, we've also included a troubleshooting table at the end of this section.
Fixing Loose End Caps: Getting a Snug, Lasting Fit
Step 1: Clean the profile end thoroughly. Start by removing the loose end cap (if it's still partially attached). Use a dry cloth to wipe out any dust, then a small brush (like a toothbrush) to dislodge metal shavings or debris. For stubborn residue, dampen a cloth with isopropyl alcohol and wipe the inner walls—this removes oil, grease, or old adhesive without damaging the aluminum.
Step 2: Check for profile damage. Inspect the end of the 2040 profile for dents, bends, or warping. If the edges are bent inward, they'll prevent the end cap from seating. Use a rubber mallet to gently tap the edges back into place—be careful not to overdo it, as aluminum can crack if bent too far. If the damage is severe (like a major dent), you may need to trim a small section off the profile with a hacksaw to create a clean, flat end.
Step 3: Test-fit with a new end cap. If the original end cap is too small, replace it with a high-quality, tolerance-matched cap. Look for end caps specifically labeled for 2040 profiles—reputable suppliers will list the exact dimensions (e.g., 20.2mm x 40.2mm) to account for profile tolerances. When test-fitting, the cap should require a firm push to install but shouldn't bend or crack. If it slides in with zero resistance, it's too small; if you need pliers to force it, it's too large.
Step 4: Use a rubber strip for extra grip (if needed). If you're between sizes or dealing with a profile that has slightly larger tolerances, wrap a thin aluminum profile rubber strip around the end cap's insertion lip. The rubber adds friction, helping the cap stay in place without damaging the profile. Just make sure the strip is thin enough (1-2mm) so the cap still fits snugly—too much thickness will cause bulging.
Repairing or Replacing Cracked End Caps: Salvaging vs. Starting Fresh
Step 1: Assess the crack's severity. If the crack is small (less than 5mm) and not on the insertion lip, you might be able to repair it with plastic glue. Clean the area with alcohol, apply a tiny amount of glue (like cyanoacrylate gel), and hold the crack closed for 30 seconds. Let it cure for 24 hours before reinstalling. Note: This is a temporary fix for low-stress applications—cracked end caps in high-vibration areas (like near conveyor belts) should be replaced.
Step 2: replace with flexible end caps. For permanent solutions, opt for end caps made from flexible plastic or rubber. These materials can bend slightly during installation, reducing the risk of cracking. Look for end caps labeled "impact-resistant" or "UV-stabilized"—these are designed to withstand temperature changes and sunlight without becoming brittle. When installing, apply gentle, even pressure with your thumbs (not a hammer!) to avoid stressing the material.
Step 3: Avoid over-tightening. If you must use adhesive (e.g., for end caps that keep popping off), choose a flexible, low-VOC adhesive like E6000. Apply a thin bead around the end cap's insertion lip, then press it into the profile and wipe away excess glue. The adhesive will flex with the profile, preventing cracks from stress.
Making Installation Easier: Smooth Sailing for End Caps
Step 1: Deburr the profile end. Burrs are the enemy of easy installation. Use a deburring tool (a small hand tool with a blade) to trim away rough edges from the profile's end. Run the tool around both the inner and outer edges—you'll feel it catch on burrs, which will fall away as small metal shavings. Wipe the end with a cloth afterward to remove any remaining shavings.
Step 2: Warm plastic end caps (gently!). If you're struggling with rigid plastic end caps, warm them slightly to increase flexibility. Hold the cap under warm (not hot!) water for 10-15 seconds, or use a hair dryer on the lowest setting from 6 inches away. The heat will soften the plastic, making it easier to press into the profile. Just don't overheat—melted plastic is impossible to fix!
Step 3: Align before pressing. Misalignment is a common installation mistake. Hold the end cap parallel to the profile's end, making sure all edges line up evenly. Start by pressing one corner into the profile, then work your way around—this prevents the cap from skewing and getting stuck. If you feel resistance, stop and check for debris or misalignment before forcing it.
Restoring or Preventing Discoloration: Keeping End Caps Looking New
Step 1: Clean with mild soap and water. For minor fading or surface discoloration, mix a few drops of dish soap with warm water and gently scrub the end cap with a soft sponge. Avoid abrasive pads or harsh cleaners—these will scratch the plastic. Rinse and dry thoroughly; you'd be surprised how much brighter a clean end cap looks!
Step 2: Apply UV protectant (for outdoor or bright-light use). If your 2040 profile system is exposed to sunlight, spray the end caps with a plastic UV protectant (like 303 Aerospace Protectant). This creates a barrier that slows fading and yellowing. Reapply every 3-6 months for best results.
Step 3: replace discolored caps in visible areas. If cleaning and protectant don't work, and the end caps are in a customer-facing or high-visibility area, replace them. Choose caps made from UV-stabilized plastic—these are typically labeled as "weather-resistant" or "outdoor-rated" and will hold their color longer than standard plastic caps.
Fixing Improper Sealing: Keeping Debris Out for Good
Step 1: Check for gaps. After installing the end cap, hold the profile up to a light source—if you see light coming through, there's a gap. Use a thin piece of paper to test: slide it between the cap and profile. If it moves freely, the seal is poor.
Step 2: Add a rubber O-ring or foam tape. For small gaps, wrap a thin foam tape (1mm thick) around the end cap's base before installation. The foam compresses when the cap is pressed in, creating a tight seal. For larger gaps, use a small O-ring (size 10-15mm) placed in the profile's end before inserting the cap—the O-ring sits between the cap and profile, blocking dust and moisture.
Step 3: Use a sealed end cap design. If sealing is critical (e.g., in cleanrooms or humid environments), upgrade to sealed end caps. These have a built-in rubber gasket that presses against the profile's inner walls, creating a watertight, dustproof seal. They're slightly more expensive but worth the investment for applications where contamination is a risk.
| Issue | Common Causes | Troubleshooting Steps |
|---|---|---|
| Loose end cap | Size mismatch, debris in profile, profile warping | 1. Clean profile end; 2. Check for warping/dents; 3. Test-fit new, tolerance-matched cap; 4. Add rubber strip for grip |
| Cracked end cap | Brittle plastic, over-force during installation, UV damage | 1. Repair small cracks with plastic glue; 2. replace with flexible/UV-stabilized caps; 3. Avoid over-tightening |
| Difficult installation | Burrs on profile, warped end cap, size mismatch | 1. Deburr profile end; 2. Warm plastic caps gently; 3. Align cap evenly before pressing |
| Discoloration/fading | UV exposure, chemical cleaners, low-quality plastic | 1. Clean with mild soap; 2. Apply UV protectant; 3. replace with UV-stabilized caps |
| Improper sealing | Loose fit, cracked cap, missing gasket | 1. Check for gaps with light/paper test; 2. Add foam tape/O-ring; 3. Upgrade to sealed end caps |

Preventive Maintenance: Keeping 2040 End Caps in Top Shape
The best way to deal with end cap issues is to prevent them from happening in the first place. With a little regular maintenance, you can extend the life of your 2040 aluminum profile end caps and avoid costly replacements. Here's what to add to your maintenance checklist:
1. Inspect End Caps During Routine System Checks
Make end cap inspection part of your monthly or quarterly equipment checks. Walk through your facility and check each 2040 profile end cap for looseness, cracks, or discoloration. Tighten any loose caps immediately—catching them early prevents them from falling off and getting damaged. For profiles in high-traffic areas (like near doorways or walkways), check every two weeks, as these end caps are more prone to being bumped or kicked.
2. Clean Profiles and End Caps Regularly
Dust and debris are the enemies of tight-fitting end caps. Wipe down 2040 profiles and their end caps with a dry cloth every month. For heavier grime (like oil or grease), use a mild soap solution—just avoid soaking the end caps, as prolonged moisture can weaken plastic over time. Pay extra attention to profiles near machining areas, where metal shavings are common—these can work their way into end caps and cause abrasion.
3. Choose Quality Over Price When Sourcing End Caps
It's tempting to buy the cheapest end caps available, but skimping on quality often leads to more frequent replacements and downtime. When sourcing, look for suppliers that specialize in aluminum profile accessories and list detailed specifications (material type, dimensions, UV resistance). Reputable brands will also offer warranties—if an end cap cracks within a year, they'll replace it for free. Remember: a $0.50 end cap that lasts 6 months costs more in the long run than a $1.00 cap that lasts 3 years.
4. Train Your Team on Proper Installation
Many end cap issues stem from improper installation by well-meaning but untrained staff. Take 10 minutes to show your team how to: clean the profile end, align the cap, and apply even pressure. Emphasize that forcing a cap is a red flag—if it doesn't fit easily, stop and check for burrs, debris, or the wrong size. Provide deburring tools and a small supply of extra end caps near workstations so they have what they need to do the job right.
When to replace End Caps: Knowing When Repair Isn't Enough
Even with the best maintenance, end caps don't last forever. Here are the signs that it's time to retire an old cap and install a new one:
- Severe cracking: If the crack runs the entire length of the cap or splits the insertion lip, repair glue won't hold—replace it.
- Warping: End caps that are bent or misshapen (from heat or over-force) can't seal properly and should be replaced.
- Looseness despite fixes: If you've cleaned the profile, tried a rubber strip, and the cap still pops off, it's likely worn out—swap it for a new one.
- Discoloration that affects safety: Faded end caps in high-visibility areas (like emergency exits or walkway edges) can make the profile harder to see, increasing trip hazards—replace them for safety.
When replacing, always keep a small stock of 2040 aluminum profile end caps on hand. Running out mid-project can lead to delays, and rushing to buy whatever's available locally often results in poor-quality caps that cause more issues down the line.
Final Thoughts: Small Parts, Big Impact
At the end of the day, 2040 aluminum profile end caps might seem like trivial components. But as we've explored, they play a critical role in keeping your aluminum extrusion systems safe, functional, and professional-looking. Loose, cracked, or poorly fitting end caps aren't just nuisances—they can lead to downtime, safety hazards, and unnecessary replacement costs. By understanding the common issues, following the troubleshooting steps, and investing in preventive maintenance, you can ensure these small parts continue to support your larger operations smoothly.
So the next time you're standing in front of a 2040 profile with a loose end cap, remember: it's not just a cap. It's a piece of the puzzle that makes your facility run. And with the tips in this guide, you've got the expertise to fix it—for good.