- Company Articles
- Products and Technology
- Installation And Maintenance
- Troubleshooting Common Issues with 2040 National Standard Profile Assemblies

Troubleshooting Common Issues with 2040 National Standard Profile Assemblies
Related Product
2040 National Standard Profile
45° external bending joint, used for 45° external connection of two aluminum pipes.
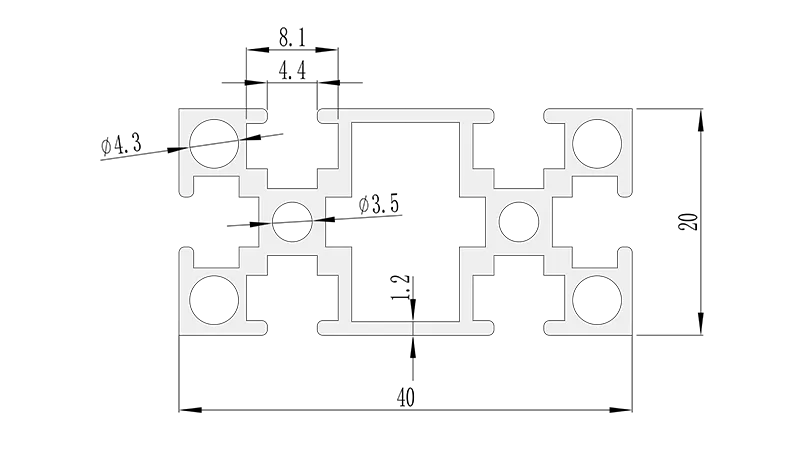
Walk into any modern workshop, manufacturing plant, or DIY garage, and you're likely to spot structures built with 2040 national standard profiles. These aluminum extrusion profiles have become the backbone of lean manufacturing systems, workbenches, material racks, and turnover trolleys—thanks to their versatility, strength, and ease of assembly. But even the most reliable components can hit snags during setup. Whether you're a seasoned assembler or a newcomer to aluminum profile systems, dealing with loose connectors, misaligned parts, or stubborn accessories can turn a straightforward project into a frustrating afternoon. Let's dive into the most common assembly headaches and how to fix them, with practical, hands-on solutions you can apply right away.
1. Loose or Misaligned 90° Aluminum Profile Connectors
Picture this: You've spent an hour piecing together a frame for a new material rack using 2040 national standard profiles. You've secured each joint with 90° aluminum profile connectors, tightened the bolts, and stepped back to admire your work—only to notice the entire structure wobbles when you push it gently. The corners don't sit flush, and there's a noticeable gap between the profiles and the connectors. Sound familiar? Loose or misaligned 90° connectors are perhaps the most frequent issue assemblers face, and they can compromise both safety and functionality.
Symptoms to Watch For
- Visible gaps between the profile and connector
- Wobbly or unstable structures, even after tightening
- Bolts that back out on their own after minimal use
- Profiles that shift or twist under light loads
Root Causes
More often than not, the culprit isn't poor quality—it's human error or oversight. One common mistake is over-tightening or under-tightening the connector bolts. Aluminum profiles are strong, but their threads are delicate; over-tightening can strip the threads, while under-tightening leaves room for movement. Another issue is using damaged connectors: if the threads inside the 90° aluminum profile connector are bent or clogged with debris, the bolt won't seat properly. Mismatched accessories are a third offender—using a connector designed for a 3030 profile on a 2040 national standard profile will never work, even if they look similar.
Step-by-Step Fixes
- Check torque specs: Most 90° aluminum profile connectors for 2040 national standard profiles require a torque of 4-6 Nm. Grab a torque wrench (not a regular socket set) and re-tighten each bolt to the manufacturer's specification. This ensures you're not stripping threads or leaving them loose.
- Clean and inspect threads: If a bolt won't tighten, remove the connector and check the threads inside. Use a small wire brush to clear out dust, metal shavings, or rust. If the threads are damaged (you'll feel rough spots when running a finger inside), replace the connector—damaged threads can't be fixed reliably.
- Verify accessory compatibility: Double-check that the connector is labeled for 2040 profiles. Some suppliers use similar part numbers for different sizes, so a quick glance at the product code (e.g., "2040-90C") can save hours of frustration.
Prevention Tips
Start by inspecting all aluminum profile accessories before assembly. Lay out the 90° connectors, bolts, and profiles on a clean workbench, and check for signs of damage: cracked plastic components, bent metal parts, or dull threads. During assembly, use a level to ensure each joint is square before tightening—this prevents misalignment from the start. Finally, invest in a good torque wrench; it's a small tool that makes a huge difference in the longevity of your structures.
2. Aluminum Profile End Caps That Won't Stay Put
Aluminum profile end caps might seem like a small detail, but they serve a big purpose: they protect workers from sharp edges, keep dust and debris out of the profile's T-slot, and give assemblies a polished, professional look. But there's nothing more annoying than spending 10 minutes trying to jam a cap into the end of a 2040 national standard profile, only to have it pop out as soon as you let go. Or worse, noticing half the caps have fallen off your newly built workbench by the end of the day.
Symptoms to Watch For
- End caps that won't snap into the profile's end
- Caps that fall off with minimal contact
- Gaps between the cap and the profile edge
- Visible cracks or warping in the cap material
Root Causes
The most common cause is burrs or rough edges on the profile's cut end. When 2040 national standard profiles are cut to length (either at the factory or on-site), the saw can leave tiny metal burrs along the edge. These burrs catch on the plastic or rubber end cap, preventing it from seating fully. Another issue is using the wrong size cap: end caps are designed to fit specific profile widths, so a cap meant for a 3030 profile will be too loose on a 2040, and vice versa. Temperature can also play a role—cold weather makes plastic caps brittle, while heat can warp them, both leading to poor fit.
Step-by-Step Fixes
- Deburr the profile end: Grab a fine-grit file or sandpaper and gently smooth the edges of the profile. Work in small, circular motions to remove burrs, being careful not to scratch the profile's anodized finish. A quick test: run your finger along the edge—if it feels smooth, the cap should slide in easily.
- Warm plastic caps (for cold conditions): If you're working in a chilly workshop, hold the end cap in your hand for 30 seconds to warm it up. The slight expansion will make it more flexible and easier to snap into place. Avoid using heat guns, as excessive heat can melt or warp the cap.
- Check for warped caps: Lay the end cap flat on a table. If it rocks or doesn't sit evenly, it's warped. Swap it out for a new one—warped caps rarely fit well, even after deburring.
- Use a rubber mallet (gently!): For stubborn caps, place the cap on the profile end and tap it lightly with a rubber mallet. The soft impact helps the cap seat without damaging it. Avoid metal hammers, which can crack the cap or dent the profile.
Prevention Tips
When cutting 2040 national standard profiles on-site, use a fine-tooth saw blade and follow up with a deburring tool immediately. Store end caps in a cool, dry place away from direct sunlight to prevent warping. And always double-check the cap size—most suppliers label caps with the profile size (e.g., "2040-EC"), so matching them up is easy if you take a second to look.
3. Uneven Workbench Surfaces from Misaligned Aluminum Profile Accessories
A level workbench is essential for precision—whether you're assembling electronics, packing products, or working on machinery. But if your workbench, built with 2040 national standard profiles, has a surface that slopes or wobbles, it can throw off measurements, cause tools to slide, and even lead to errors in production. More often than not, the problem traces back to misaligned or mismatched aluminum profile accessories, like brackets, supports, or tabletop mounts.
Symptoms to Watch For
- Spirit level shows the surface tilts more than 1°
- Tools or small parts roll off the bench when placed near the edge
- Gaps between the tabletop and the supporting aluminum profiles
- Squeaking or creaking when pressure is applied to different areas of the bench
Root Causes
Aluminum profile accessories, such as angle brackets or tabletop supports, come in standard heights—but that doesn't mean they're always consistent. A bracket that's supposed to be 50mm tall might measure 51mm due to manufacturing tolerances, creating a slight tilt when paired with a 50mm bracket on the opposite side. Misaligned T-slot nuts are another culprit: if the nuts holding the accessories aren't seated straight in the 2040 profile's T-slot, the accessory will sit at an angle. Bent profiles are less common but still possible—even a tiny bend in a 2040 national standard profile can throw off the entire surface when assembled.
Step-by-Step Fixes
- Identify the high spot: Place a spirit level on the workbench surface and move it around to find where the tilt occurs. Once you've pinpointed the uneven area, check the supporting aluminum profile accessories below it—this is usually where the problem lies.
- Adjust T-slot nuts: Loosen the bolts holding the accessory to the profile, and slide the T-slot nut back and forth. You'll feel it "snap" into alignment when it's seated straight. Retighten the bolt gently, then check with the level again.
- Shim with washers: If the accessory is slightly shorter than its counterpart, add a thin metal washer between the accessory and the profile. Start with one washer (about 0.5mm thick) and check the level—repeat until the surface is even. Avoid stacking more than 2-3 washers, as this can weaken the joint.
- replace bent profiles: If the 2040 national standard profile itself is bent, you'll need to swap it out. To check for bends, roll the profile on a flat surface—if it rocks or doesn't touch the surface evenly, it's bent. Most suppliers offer straightening services, but for critical applications like workbenches, replacement is safer.
Prevention Tips
During assembly, use a spirit level after attaching each accessory. This catches misalignments early, before they compound. When ordering aluminum profile accessories, stick to the same batch or lot number—suppliers often adjust production runs slightly, so parts from the same lot are more consistent in size. Finally, handle profiles with care during transport and storage—avoid leaning heavy objects on them, and store them horizontally on a flat rack to prevent bending.
4. Sticking Roller Tracks on Material Racks
Material racks built with 2040 national standard profiles and aluminum guide rails are workhorses in factories and warehouses, allowing parts and products to flow smoothly from one workstation to the next. But when the roller tracks start sticking or jamming, that smooth flow turns into a frustrating bottleneck. Parts get stuck, workers have to manually push items along, and productivity takes a hit—all because of a few misaligned rollers or a little debris.
Symptoms to Watch For
- Items move slowly or stop completely on the roller track
- Rollers spin unevenly or make grinding noises
- Visible gaps between the aluminum guide rail and the rollers
- Debris (dust, metal shavings) caught between rollers
Root Causes
Debris is the number one enemy of roller tracks. In a busy workshop, dust, oil, and metal shavings find their way into every nook and cranny, including the small spaces between rollers and aluminum guide rails. Over time, this buildup creates friction, slowing the rollers down. Misaligned aluminum guide rails are another issue: if the rails aren't parallel or are tilted, the rollers will bind as items pass over them. Worn roller bearings are less common but still a factor—after months of heavy use, the bearings can dry out or develop play, causing rollers to wobble and stick.
Step-by-Step Fixes
- Clean the track thoroughly: Start by removing all items from the rack. Use a stiff-bristled brush to sweep away loose debris, then wipe the rollers and aluminum guide rails with a rag dampened with isopropyl alcohol. For stubborn grime, use a toothpick or small screwdriver to dislodge debris from between rollers—be careful not to scratch the rails.
- Check guide rail alignment: Loosen the bolts holding the aluminum guide rails to the 2040 national standard profiles. Place a straightedge across the rails to ensure they're parallel, and use a spirit level to confirm they're level. Retighten the bolts, then test the rollers by rolling a small box along the track—they should spin freely.
- Lubricate roller bearings: If rollers are still sticking after cleaning and alignment, apply a drop of lightweight machine oil to each bearing (avoid heavy oils, which attract dust). Spin the rollers by hand to distribute the oil, then wipe away excess with a clean rag.
- replace worn rollers: If a roller doesn't spin smoothly even after lubrication, it's time to replace it. Most roller tracks use standard-sized rollers that can be swapped out with basic hand tools. Look for rollers with sealed bearings—they're less prone to debris buildup and last longer.
Prevention Tips
Make roller track maintenance part of your regular workshop routine. A quick weekly brush-down with a stiff brush prevents debris from building up. Every month, check the aluminum guide rails for alignment and lubricate the rollers if needed. For high-traffic racks, consider adding a dust cover or installing the rack away from areas with heavy dust (like near sanding stations). Finally, train workers to report stuck rollers immediately—small issues become big problems when ignored.
Quick Reference: Common Issues & Fixes
| Issue | Key Symptom | Primary Cause | Quick Fix |
|---|---|---|---|
| Loose 90° Aluminum Profile Connectors | Wobbly structure, gaps at joints | Incorrect torque or damaged threads | Retighten to 4-6 Nm with torque wrench; replace damaged connectors |
| End Caps Falling Off | Caps pop out or won't seat | Burred profile edges or wrong cap size | Deburr profile ends; use caps labeled for 2040 profiles |
| Uneven Workbench Surface | Tools slide, spirit level shows tilt | Misaligned accessories or bent profiles | Adjust T-slot nuts; shim with washers; replace bent profiles |
| Sticking Roller Tracks | Items stop moving, rollers grind | Debris in tracks or misaligned guide rails | Clean tracks with alcohol; realign aluminum guide rails |
Conclusion: The Little Details Make the Difference
Assembling structures with 2040 national standard profiles is supposed to be straightforward—their modular design and compatible aluminum profile accessories are meant to save time and reduce frustration. But as we've covered, even small issues like a burred profile end or a misaligned 90° aluminum profile connector can turn a simple project into a day-long headache. The good news is that most of these problems are preventable with a little attention to detail: inspecting parts before assembly, using the right tools (like a torque wrench or spirit level), and following basic maintenance routines.
At the end of the day, the goal is to build structures that are safe, reliable, and efficient. Whether you're putting together a workbench, a material rack, or a conveyor system, taking the time to troubleshoot these common issues ensures your 2040 national standard profile assemblies will stand the test of time. And when they do, you'll wonder how you ever worked with anything else.