- Company Articles
- Products and Technology
- Installation And Maintenance
- Troubleshooting Common Issues with 4040F EU Standard Aluminum Profile Installations

Troubleshooting Common Issues with 4040F EU Standard Aluminum Profile Installations
Related Product
4040F EU Standard Aluminum Profile
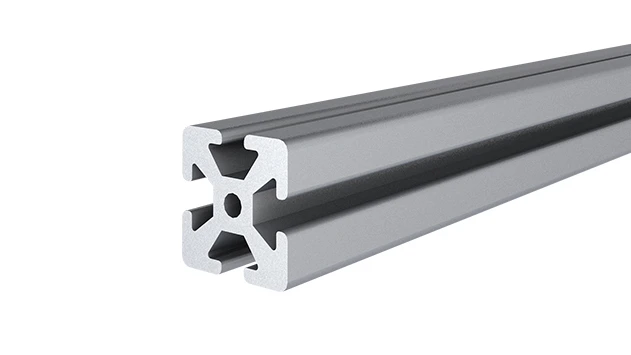
4040F is a 4.00x4.00 CM fractional 40 series square extrusion T-slot profile with four side open T-slots, each side with 4.00cm face. The profile has align-a-grooves to assist in aligning connecting profiles.
If you've ever walked into a well-organized workshop, factory floor, or even a home garage turned maker space, chances are you've seen the sleek, modular structures built with aluminum extrusion profiles. Among the most popular options is the 4040F EU standard aluminum profile—a workhorse known for its versatility, strength, and compatibility with a wide range of projects, from workbenches and material racks to conveyor systems and machine guards. But as any seasoned builder will tell you, even the most reliable materials can throw curveballs during installation. Whether you're a hobbyist assembling your first workbench or a production manager overseeing a lean system upgrade, hitting snags like misaligned frames, wobbly joints, or scratched surfaces can quickly turn excitement into frustration. In this guide, we'll walk through the most common issues installers face with 4040F profiles, why they happen, and how to fix them—so you can get back to building something sturdy, functional, and built to last.
Issue 1: Misaligned Profiles – When Straight Lines Go Crooked
There's nothing more disheartening than spending time cutting, measuring, and fitting 4040F profiles, only to step back and realize your frame is leaning like a tired palm tree. Misalignment is one of the most frequent headaches, and it often starts long before the first bolt is tightened. Let's break down why this happens and how to course-correct.
What's Causing It? First, check your raw materials. Even high-quality 4040F profiles can arrive with minor bends or twists if they weren't stored or transported properly. A tiny kink in a 2-meter profile might seem insignificant, but by the time you connect three or four sections, that "tiny" bend can snowball into a noticeable lean. Another culprit? Incorrect cutting. If your miter saw or hacksaw blade was dull, or if you rushed the cut, the ends might not be perfectly square. A 1-degree angle off on a cut edge can throw an entire frame out of whack when joined with another profile. Finally, uneven work surfaces are a silent enemy. If you're assembling on a floor that slopes or a table with a warped top, your "level" frame will actually be anything but.
How to Spot It Early: Before you start bolting everything together, lay out all your cut profiles on a flat surface. Use a long straightedge (a 4-foot level or even another uncut 4040F profile) to check for bends—hold it against the length of the profile and see if there's daylight between the straightedge and the profile. For cut ends, place two profiles end-to-end with their cut edges touching; if there's a gap, the cuts aren't square. And always, always use a spirit level during assembly. Check both horizontal and vertical alignment as you go—don't wait until the entire frame is built to realize it's leaning.
Fixing the Problem: If you've got a slightly bent profile, don't panic—minor bends can often be corrected with gentle pressure. Lay the profile on a flat surface, place a block of wood over the bent area, and tap lightly with a rubber mallet (never a metal hammer, which can damage the surface). For more severe bends, it's safer to replace the profile—trying to force it straight can weaken the aluminum. For uneven cuts, use a deburring tool to clean up the edges, then use a square to mark a new cut line and recut with a sharp blade. And if your work surface is the issue, invest in a sheet of ½-inch plywood or a leveling mat to create a flat base. Pro tip: When joining profiles, start with the longest sections first, securing them to the work surface with clamps to keep them stable as you add shorter pieces.
What's Causing It? First, check your raw materials. Even high-quality 4040F profiles can arrive with minor bends or twists if they weren't stored or transported properly. A tiny kink in a 2-meter profile might seem insignificant, but by the time you connect three or four sections, that "tiny" bend can snowball into a noticeable lean. Another culprit? Incorrect cutting. If your miter saw or hacksaw blade was dull, or if you rushed the cut, the ends might not be perfectly square. A 1-degree angle off on a cut edge can throw an entire frame out of whack when joined with another profile. Finally, uneven work surfaces are a silent enemy. If you're assembling on a floor that slopes or a table with a warped top, your "level" frame will actually be anything but.
How to Spot It Early: Before you start bolting everything together, lay out all your cut profiles on a flat surface. Use a long straightedge (a 4-foot level or even another uncut 4040F profile) to check for bends—hold it against the length of the profile and see if there's daylight between the straightedge and the profile. For cut ends, place two profiles end-to-end with their cut edges touching; if there's a gap, the cuts aren't square. And always, always use a spirit level during assembly. Check both horizontal and vertical alignment as you go—don't wait until the entire frame is built to realize it's leaning.
Fixing the Problem: If you've got a slightly bent profile, don't panic—minor bends can often be corrected with gentle pressure. Lay the profile on a flat surface, place a block of wood over the bent area, and tap lightly with a rubber mallet (never a metal hammer, which can damage the surface). For more severe bends, it's safer to replace the profile—trying to force it straight can weaken the aluminum. For uneven cuts, use a deburring tool to clean up the edges, then use a square to mark a new cut line and recut with a sharp blade. And if your work surface is the issue, invest in a sheet of ½-inch plywood or a leveling mat to create a flat base. Pro tip: When joining profiles, start with the longest sections first, securing them to the work surface with clamps to keep them stable as you add shorter pieces.
Issue 2: Loose or Unstable Joints – The Wobble That Won't Quit
You've aligned your 4040F profiles perfectly, tightened all the bolts, and stood back to admire your handiwork—only to give the frame a gentle shake and watch it wobble like a Jenga tower. Loose joints are not just annoying; they're a safety hazard, especially if your structure is meant to hold tools, materials, or heavy equipment. More often than not, the problem traces back to how you're using your 90° aluminum profile connectors and fasteners. Let's dive into why joints fail and how to lock them down for good.
What's Causing It? The 4040F profile's T-slot design relies on connectors (like the 90° aluminum profile connector) and bolts to hold pieces together, but several missteps can undermine this system. One common mistake is overtightening or undertightening the bolts. Aluminum is a soft metal—cranking a bolt too hard can strip the threads in the T-slot or even warp the profile, while too little torque leaves the joint loose. Another issue is using the wrong size or type of fastener. If you're using M5 bolts with M6 connectors (or vice versa), they won't grip properly. Low-quality connectors are another culprit: cheap, poorly machined 90° connectors might not seat flush against the profile, leaving gaps that allow movement. Finally, vibration over time can loosen even properly tightened bolts, especially in high-traffic areas like near conveyor belts or heavy machinery.
How to Spot It Early: As you assemble, give each joint a firm but gentle twist after tightening. If it moves more than 1-2 millimeters, it's not secure. For completed structures, check joints periodically by pressing or pulling on the connected profiles—any give means it's time to re-tighten. You might also hear creaking or rattling during use, which is a clear sign of loose joints.
Fixing the Problem: Start by using the right tools. A torque wrench is a game-changer here—most 4040F profiles and connectors are designed for M5 or M6 bolts, with recommended torque settings between 3-5 Nm (check the manufacturer's specs to be sure). This ensures you're tight enough to secure the joint without damaging the aluminum. If you've stripped a T-slot, don't despair: you can use a helicoil insert (a small metal coil that threads into the damaged slot, creating new threads) to repair it. For connectors that won't seat flush, inspect them for burrs or deformities—sanding down rough edges with fine-grit sandpaper (200-grit or higher) can help them fit better. To prevent vibration-related loosening, apply a small drop of thread-locking fluid (like Loctite Blue) to the bolt threads before tightening—just avoid overdoing it, as excess fluid can make future disassembly tricky. And if you're building a structure that will see heavy use, consider adding diagonal bracing with shorter 4040F profiles—this triangulation adds rigidity and reduces stress on joints.
What's Causing It? The 4040F profile's T-slot design relies on connectors (like the 90° aluminum profile connector) and bolts to hold pieces together, but several missteps can undermine this system. One common mistake is overtightening or undertightening the bolts. Aluminum is a soft metal—cranking a bolt too hard can strip the threads in the T-slot or even warp the profile, while too little torque leaves the joint loose. Another issue is using the wrong size or type of fastener. If you're using M5 bolts with M6 connectors (or vice versa), they won't grip properly. Low-quality connectors are another culprit: cheap, poorly machined 90° connectors might not seat flush against the profile, leaving gaps that allow movement. Finally, vibration over time can loosen even properly tightened bolts, especially in high-traffic areas like near conveyor belts or heavy machinery.
How to Spot It Early: As you assemble, give each joint a firm but gentle twist after tightening. If it moves more than 1-2 millimeters, it's not secure. For completed structures, check joints periodically by pressing or pulling on the connected profiles—any give means it's time to re-tighten. You might also hear creaking or rattling during use, which is a clear sign of loose joints.
Fixing the Problem: Start by using the right tools. A torque wrench is a game-changer here—most 4040F profiles and connectors are designed for M5 or M6 bolts, with recommended torque settings between 3-5 Nm (check the manufacturer's specs to be sure). This ensures you're tight enough to secure the joint without damaging the aluminum. If you've stripped a T-slot, don't despair: you can use a helicoil insert (a small metal coil that threads into the damaged slot, creating new threads) to repair it. For connectors that won't seat flush, inspect them for burrs or deformities—sanding down rough edges with fine-grit sandpaper (200-grit or higher) can help them fit better. To prevent vibration-related loosening, apply a small drop of thread-locking fluid (like Loctite Blue) to the bolt threads before tightening—just avoid overdoing it, as excess fluid can make future disassembly tricky. And if you're building a structure that will see heavy use, consider adding diagonal bracing with shorter 4040F profiles—this triangulation adds rigidity and reduces stress on joints.

Issue 3: Incompatible or Poor-Quality Aluminum Profile Accessories
Aluminum extrusion systems thrive on compatibility— the ability to mix and match profiles, connectors, brackets, and panels to create custom setups. But that flexibility can backfire when you're using aluminum profile accessories that aren't designed for the 4040F EU standard. From brackets that won't clip into T-slots to panels that sag because the supports are too weak, using the wrong or low-quality accessories is a recipe for disappointment. Let's untangle this common issue.
What's Causing It? The first problem is standards confusion. The EU standard (like the 4040F) and metric standards (common in Asia) might look similar, but their T-slot dimensions, hole spacing, and connector designs can vary slightly. For example, an EU standard T-slot is typically 8mm wide, while some metric slots are 6mm or 10mm—meaning accessories designed for one won't fit the other. Another issue is buying "universal" accessories that claim to work with all profiles but end up being a poor fit for 4040F's specific dimensions. Then there's quality: cheap accessories often use thin, brittle plastic or low-grade aluminum that bends or cracks under minimal stress. A plastic end cap might snap when you try to press it into the profile, or a bracket might warp when you tighten a bolt, leaving gaps. Finally, overlooking small but critical accessories—like T-nuts or washers—can derail a project. Using a bolt without a T-nut, for instance, means it won't grip the T-slot, leading to loose connections.
How to Spot It Early: Before buying accessories, check the product specs for compatibility with "4040F EU standard" or "8mm T-slot." If the listing says "universal" or doesn't specify, reach out to the supplier for clarification. When unboxing, compare the accessory to your 4040F profile: a T-nut should slide easily into the slot without wobbling, and a connector should align perfectly with the profile's holes. If an accessory feels flimsy in your hand or has rough, unfinished edges, it's probably low-quality.
Fixing the Problem: The simplest solution is to buy accessories from the same supplier as your 4040F profiles—this ensures they're engineered to work together. If you need to mix suppliers, stick to reputable brands that clearly label EU standard compatibility. For T-slot issues, invest in a set of T-nut adapters (available in 6mm, 8mm, and 10mm sizes) to bridge the gap between mismatched slots. For low-quality plastic parts, replace them with metal alternatives—stainless steel or aluminum brackets might cost a bit more, but they'll last longer. And don't skip the small stuff: Always use T-nuts with bolts, and add washers under bolt heads to distribute pressure and prevent damage to the profile's surface. Pro tip: Keep a small "test kit" on hand—one 4040F profile, a few bolts, T-nuts, and a 90° connector—to test new accessories before buying in bulk.
What's Causing It? The first problem is standards confusion. The EU standard (like the 4040F) and metric standards (common in Asia) might look similar, but their T-slot dimensions, hole spacing, and connector designs can vary slightly. For example, an EU standard T-slot is typically 8mm wide, while some metric slots are 6mm or 10mm—meaning accessories designed for one won't fit the other. Another issue is buying "universal" accessories that claim to work with all profiles but end up being a poor fit for 4040F's specific dimensions. Then there's quality: cheap accessories often use thin, brittle plastic or low-grade aluminum that bends or cracks under minimal stress. A plastic end cap might snap when you try to press it into the profile, or a bracket might warp when you tighten a bolt, leaving gaps. Finally, overlooking small but critical accessories—like T-nuts or washers—can derail a project. Using a bolt without a T-nut, for instance, means it won't grip the T-slot, leading to loose connections.
How to Spot It Early: Before buying accessories, check the product specs for compatibility with "4040F EU standard" or "8mm T-slot." If the listing says "universal" or doesn't specify, reach out to the supplier for clarification. When unboxing, compare the accessory to your 4040F profile: a T-nut should slide easily into the slot without wobbling, and a connector should align perfectly with the profile's holes. If an accessory feels flimsy in your hand or has rough, unfinished edges, it's probably low-quality.
Fixing the Problem: The simplest solution is to buy accessories from the same supplier as your 4040F profiles—this ensures they're engineered to work together. If you need to mix suppliers, stick to reputable brands that clearly label EU standard compatibility. For T-slot issues, invest in a set of T-nut adapters (available in 6mm, 8mm, and 10mm sizes) to bridge the gap between mismatched slots. For low-quality plastic parts, replace them with metal alternatives—stainless steel or aluminum brackets might cost a bit more, but they'll last longer. And don't skip the small stuff: Always use T-nuts with bolts, and add washers under bolt heads to distribute pressure and prevent damage to the profile's surface. Pro tip: Keep a small "test kit" on hand—one 4040F profile, a few bolts, T-nuts, and a 90° connector—to test new accessories before buying in bulk.
Issue 4: Surface Scratches and Damage – When "Brand New" Looks "Well-Loved"
There's something satisfying about unboxing a fresh 4040F profile—its smooth, anodized surface gleaming, free of blemishes. But by the time you've cut, drilled, and assembled it, that pristine finish might be covered in scratches, dents, or scuff marks. While surface damage doesn't always affect structural integrity, it's frustrating to put time into a project only to have it look unprofessional. Worse, deep scratches can expose the aluminum to moisture, increasing the risk of corrosion over time. Let's talk about how to prevent and fix these cosmetic (and sometimes functional) issues.
What's Causing It? Scratches and dents usually happen during handling and assembly, not manufacturing. Dragging profiles across concrete floors or rough workbenches is a prime culprit—the anodized layer is tough, but it's no match for gravel, metal shavings, or sharp edges. Using metal tools (like screwdrivers or wrenches) without padding can also leave marks, especially when prying or tightening bolts. Cutting with a dull saw blade is another offender; it can cause the aluminum to "grab" and tear, leaving ragged edges and deep scratches along the cut line. Even stacking profiles improperly—piling heavy pieces on top of lighter ones—can lead to dents or warping.
How to Spot It Early: Inspect profiles as soon as you unbox them—most suppliers will replace damaged pieces if you report issues within a few days. During assembly, wear nitrile gloves to avoid leaving fingerprints (which can attract dirt and make scratches more visible), and periodically wipe profiles with a soft, lint-free cloth to check for new marks. After cutting, examine the edges closely for burrs or tears—these can scratch other profiles during assembly.
Fixing the Problem: Prevention is key here. Start by creating a dedicated workspace: lay down a rubber mat, old carpet, or even thick cardboard to protect profiles from hard surfaces. When moving profiles, lift them instead of dragging, and use a dolly with padded rails for longer pieces. For cutting, always use a sharp blade designed for aluminum (carbide-tipped blades work best) and secure the profile with a clamp lined with a piece of scrap wood to prevent slipping. After cutting, use a deburring tool to smooth edges, then sand lightly with 400-grit sandpaper to remove any remaining scratches. For minor scuffs, a quick wipe with a microfiber cloth dampened with isopropyl alcohol can often buff them out. Deeper scratches might require touch-up paint—look for anodized aluminum touch-up pens in silver or the color of your profile (most 4040F profiles are clear anodized, so silver works best). For dents, use a suction cup dent puller (the kind used for car doors) on shallow dents—apply gentle, even pressure to avoid worsening the damage. For deep dents, it's often better to live with them or replace the profile if the damage is structural.
What's Causing It? Scratches and dents usually happen during handling and assembly, not manufacturing. Dragging profiles across concrete floors or rough workbenches is a prime culprit—the anodized layer is tough, but it's no match for gravel, metal shavings, or sharp edges. Using metal tools (like screwdrivers or wrenches) without padding can also leave marks, especially when prying or tightening bolts. Cutting with a dull saw blade is another offender; it can cause the aluminum to "grab" and tear, leaving ragged edges and deep scratches along the cut line. Even stacking profiles improperly—piling heavy pieces on top of lighter ones—can lead to dents or warping.
How to Spot It Early: Inspect profiles as soon as you unbox them—most suppliers will replace damaged pieces if you report issues within a few days. During assembly, wear nitrile gloves to avoid leaving fingerprints (which can attract dirt and make scratches more visible), and periodically wipe profiles with a soft, lint-free cloth to check for new marks. After cutting, examine the edges closely for burrs or tears—these can scratch other profiles during assembly.
Fixing the Problem: Prevention is key here. Start by creating a dedicated workspace: lay down a rubber mat, old carpet, or even thick cardboard to protect profiles from hard surfaces. When moving profiles, lift them instead of dragging, and use a dolly with padded rails for longer pieces. For cutting, always use a sharp blade designed for aluminum (carbide-tipped blades work best) and secure the profile with a clamp lined with a piece of scrap wood to prevent slipping. After cutting, use a deburring tool to smooth edges, then sand lightly with 400-grit sandpaper to remove any remaining scratches. For minor scuffs, a quick wipe with a microfiber cloth dampened with isopropyl alcohol can often buff them out. Deeper scratches might require touch-up paint—look for anodized aluminum touch-up pens in silver or the color of your profile (most 4040F profiles are clear anodized, so silver works best). For dents, use a suction cup dent puller (the kind used for car doors) on shallow dents—apply gentle, even pressure to avoid worsening the damage. For deep dents, it's often better to live with them or replace the profile if the damage is structural.
Issue 5: Load-Bearing Failures in Workbench Setups – When Your Table Saggs Under Pressure
One of the most popular uses for 4040F profiles is building workbenches—sturdy, customizable surfaces for everything from assembly work to woodworking. But if you've ever loaded up your new workbench with tools, materials, or heavy equipment, only to watch the top sag in the middle or the legs bow outward, you've experienced a load-bearing failure. This isn't just about inconvenience; a collapsing workbench can damage tools, injure workers, or derail production. Let's break down why workbenches fail and how to build one that can handle the weight.
What's Causing It? The 4040F profile is strong, but it's not indestructible. Load-bearing failures in workbenches usually come down to three factors: poor frame design, insufficient bracing, or overestimating the profile's weight capacity. For example, using a single 4040F profile as a tabletop (without a solid surface like plywood or aluminum honeycomb panel) is a recipe for sagging—aluminum profiles are great for frames, but they're not meant to span large distances unsupported. Similarly, spacing the legs too far apart (more than 3 feet) can cause the top to bow, even with a solid surface. Using undersized or low-quality connectors in the legs is another issue; if the joints holding the legs to the frame loosen, the entire bench can shift and collapse under weight. Finally, many people forget to account for dynamic loads—like dropping a heavy tool on the bench—which can exert far more force than static loads (like a stack of materials sitting quietly).
How to Spot It Early: Test your workbench gradually before full use. Start with light loads (50-100 lbs), then add weight incrementally, checking for sagging, creaking, or shifting. Use a level to check if the top is still flat after adding weight—even a ¼-inch sag over 4 feet is a sign the frame needs reinforcement. Pay attention to the legs, too: if they're spreading outward or the feet are lifting off the ground, the bench isn't stable.
Fixing the Problem: Start with a solid frame design. For a workbench, aim for a leg spacing of 24-30 inches apart (front to back and side to side) to minimize sag. Use 4040F profiles for the frame, and add a cross-brace between the legs at both the top and bottom (this is called "racking" and prevents the frame from twisting). For the tabletop, don't rely on the profiles alone—attach a ¾-inch plywood, MDF, or aluminum honeycomb panel to the top frame using T-slot bolts. The panel distributes weight evenly across the frame, reducing stress on individual profiles. If your bench is already sagging, add a center support leg or a cross-brace under the top frame (running perpendicular to the length) to lift the sagging area. For dynamic loads, consider adding a layer of rubber matting to the top to absorb impact. And always check the 4040F profile's weight capacity (most suppliers list this as "allowable deflection" or "maximum load per linear foot")—err on the side of caution, and never exceed 75% of the listed capacity to account for unexpected stress.
What's Causing It? The 4040F profile is strong, but it's not indestructible. Load-bearing failures in workbenches usually come down to three factors: poor frame design, insufficient bracing, or overestimating the profile's weight capacity. For example, using a single 4040F profile as a tabletop (without a solid surface like plywood or aluminum honeycomb panel) is a recipe for sagging—aluminum profiles are great for frames, but they're not meant to span large distances unsupported. Similarly, spacing the legs too far apart (more than 3 feet) can cause the top to bow, even with a solid surface. Using undersized or low-quality connectors in the legs is another issue; if the joints holding the legs to the frame loosen, the entire bench can shift and collapse under weight. Finally, many people forget to account for dynamic loads—like dropping a heavy tool on the bench—which can exert far more force than static loads (like a stack of materials sitting quietly).
How to Spot It Early: Test your workbench gradually before full use. Start with light loads (50-100 lbs), then add weight incrementally, checking for sagging, creaking, or shifting. Use a level to check if the top is still flat after adding weight—even a ¼-inch sag over 4 feet is a sign the frame needs reinforcement. Pay attention to the legs, too: if they're spreading outward or the feet are lifting off the ground, the bench isn't stable.
Fixing the Problem: Start with a solid frame design. For a workbench, aim for a leg spacing of 24-30 inches apart (front to back and side to side) to minimize sag. Use 4040F profiles for the frame, and add a cross-brace between the legs at both the top and bottom (this is called "racking" and prevents the frame from twisting). For the tabletop, don't rely on the profiles alone—attach a ¾-inch plywood, MDF, or aluminum honeycomb panel to the top frame using T-slot bolts. The panel distributes weight evenly across the frame, reducing stress on individual profiles. If your bench is already sagging, add a center support leg or a cross-brace under the top frame (running perpendicular to the length) to lift the sagging area. For dynamic loads, consider adding a layer of rubber matting to the top to absorb impact. And always check the 4040F profile's weight capacity (most suppliers list this as "allowable deflection" or "maximum load per linear foot")—err on the side of caution, and never exceed 75% of the listed capacity to account for unexpected stress.
| Common Issue | Key Cause | Quick Fix | Prevention Tip |
|---|---|---|---|
| Misaligned profiles | Bent profiles, uneven cuts, or sloped work surfaces | Recut uneven edges; straighten minor bends with a rubber mallet; use a flat base for assembly | Inspect profiles for bends on arrival; use a sharp saw blade and square for cutting |
| Loose joints | Undertightened/overtightened bolts, wrong fastener size, or low-quality 90° connectors | Retighten with torque wrench (3-5 Nm); replace stripped T-slots with helicoil inserts | Use EU standard-compatible connectors; apply thread-locking fluid to bolts |
| Scratched/damaged surfaces | Dragging profiles, metal tools, or dull saw blades | Buff minor scratches with 400-grit sandpaper; use touch-up paint for deep marks | Wear gloves; use padded work surfaces; cut with sharp, carbide-tipped blades |
| Workbench sagging | Wide leg spacing, lack of bracing, or unsupported tabletop | Add cross-braces or center support; attach solid panel to top frame | Space legs 24-30 inches apart; use plywood/aluminum panel for tabletop |
| Incompatible accessories | Mixing EU/metric standards or using "universal" low-quality parts | Use T-nut adapters; replace plastic parts with metal alternatives | Buy from reputable suppliers; test accessories with a sample profile first |
Pro Tips for Smooth 4040F Profile Installations
Even with the best troubleshooting, prevention is always easier than fixing problems after they occur. Here are a few extra tips to make your next 4040F installation go off without a hitch:
Organize Before You Start: Lay out all profiles, connectors, bolts, and tools on a clean work surface. Use small bins or labeled bags to sort accessories by type (e.g., "90° connectors," "T-nuts," "end caps")—this saves time and prevents mixing up parts.
Pre-Drill (When Needed): While most connections use T-slots and bolts, if you need to drill holes (e.g., for attaching a panel to the frame), use a drill bit designed for aluminum. Start with a smaller pilot hole, then step up to the final size to avoid cracking the profile.
Clean as You Go: Aluminum shavings and dust can scratch surfaces and jam T-slots. Use a shop vac to clean up after cutting, and wipe profiles with a dry cloth before joining them.
Use Templates for Repetitive Parts: If you're building multiple identical structures (like a row of workbenches), create a template from plywood or cardboard to mark cut lines and hole positions. This ensures consistency and reduces errors.
Don't Overbuild (But Don't Underbuild Either): It's tempting to add extra bracing "just in case," but overcomplicating the frame can add unnecessary weight and cost. Use online load-calculator tools (many aluminum profile suppliers offer them) to determine the minimum bracing and profile size needed for your project.
Organize Before You Start: Lay out all profiles, connectors, bolts, and tools on a clean work surface. Use small bins or labeled bags to sort accessories by type (e.g., "90° connectors," "T-nuts," "end caps")—this saves time and prevents mixing up parts.
Pre-Drill (When Needed): While most connections use T-slots and bolts, if you need to drill holes (e.g., for attaching a panel to the frame), use a drill bit designed for aluminum. Start with a smaller pilot hole, then step up to the final size to avoid cracking the profile.
Clean as You Go: Aluminum shavings and dust can scratch surfaces and jam T-slots. Use a shop vac to clean up after cutting, and wipe profiles with a dry cloth before joining them.
Use Templates for Repetitive Parts: If you're building multiple identical structures (like a row of workbenches), create a template from plywood or cardboard to mark cut lines and hole positions. This ensures consistency and reduces errors.
Don't Overbuild (But Don't Underbuild Either): It's tempting to add extra bracing "just in case," but overcomplicating the frame can add unnecessary weight and cost. Use online load-calculator tools (many aluminum profile suppliers offer them) to determine the minimum bracing and profile size needed for your project.
Conclusion: Turn Frustration Into Functionality
Installing 4040F EU standard aluminum profiles should be a rewarding experience—watching a pile of raw materials transform into a custom, functional structure is one of the joys of building. But when misalignments, loose joints, or scratched surfaces rear their heads, it's easy to feel stuck. The good news is that most issues are fixable with a little patience, the right tools, and a better understanding of how these profiles work. By taking the time to inspect materials, use compatible accessories (like properly sized 90° aluminum profile connectors), and follow best practices for handling and assembly, you can avoid common pitfalls and build structures that are not only strong and stable but also a pleasure to use. Remember: Every problem you solve during installation is one less headache down the line. So grab your level, tighten those bolts, and get back to building—your perfect 4040F structure is waiting.