- Company Articles
- Products and Technology
- Installation And Maintenance
- Troubleshooting Common Issues with 4080A EU Standard Aluminum Profile Installations

Troubleshooting Common Issues with 4080A EU Standard Aluminum Profile Installations
Related Product
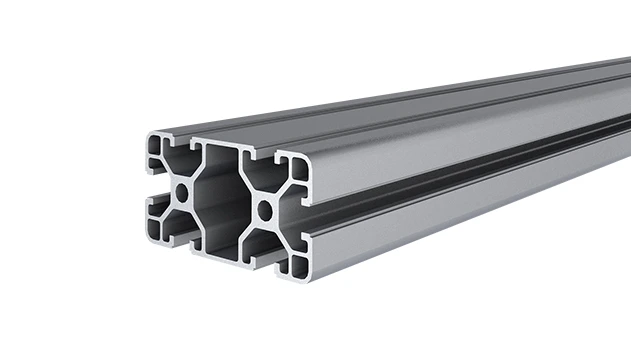
4080A EU Standard Aluminum Profile
4080A is a 4.00x8.00 CM fractional 40 series square extrusion T-slot profile with two side open T-slots, each side with 4.00cm face, two side with 8.00cm face. The profile has align-a-grooves to assist in aligning connecting profiles.
If you've spent any time in a workshop, factory, or even a well-organized garage, you've probably encountered aluminum profiles. These versatile, modular building blocks are the backbone of everything from workbenches and material racks to production line setups. Among the most popular options is the 4080A EU standard aluminum profile—a workhorse known for its balance of strength, flexibility, and ease of assembly. But even the most reliable components can hit snags during installation. Whether you're a seasoned installer or a DIY enthusiast putting together your first aluminum structure, misalignments, loose connections, or finicky accessories can turn a straightforward project into a frustrating ordeal. In this guide, we'll walk through the most common issues you might face when installing 4080A profiles, why they happen, and how to fix them—so you can get back to building structures that are sturdy, efficient, and built to last.
Understanding the 4080A EU Standard Aluminum Profile
Before diving into troubleshooting, let's take a quick refresher on what makes the 4080A profile so widely used. As part of the EU standard aluminum extrusion profile family, the 4080A gets its name from its dimensions: 40mm in width and 80mm in height. Its T-slot design—those grooves running along its length—allows for easy attachment of aluminum profile accessories like connectors, brackets, and guide rails, making it infinitely customizable. From heavy-duty workbenches in manufacturing plants to lightweight shelving in labs, this profile's adaptability is unmatched. But its versatility also means it interacts with dozens of components, and even small missteps in installation can lead to bigger problems down the line. Let's start with one of the most frequent headaches: misalignment during assembly.
Issue 1: Misalignment During Assembly
Symptoms: Gaps, Crooked Joints, or Uneven Surfaces
You're halfway through building a material rack B (3 row and 3 floor) using 4080A profiles. You've cut the vertical posts to length, attached the horizontal beams, and suddenly notice the whole structure leans to one side. Or maybe the top shelf sits at a slight angle, leaving gaps between the profiles where there should be tight joints. These are classic signs of misalignment—and they're more common than you might think. Misalignment can happen at any stage, from cutting profiles to securing the final joint, and it often stems from a few key culprits.
Causes: Inaccurate Measurements, Uneven Work Surfaces, or Bent Profiles
Let's break it down. First, inaccurate measurements are a prime offender. If your vertical posts are even 1mm shorter on one side, the entire rack will tilt. Similarly, cutting horizontal beams at an angle (instead of a precise 90°) will throw off joint alignment. Second, working on an uneven surface—like a workshop floor with a slight slope or a wobbly table—can cause profiles to shift as you assemble them. Even if you measure perfectly, a wobbly base will lead to crooked results. Third, using bent or damaged profiles is a recipe for disaster. Aluminum is strong, but it's not indestructible; a profile that's been dropped or stored improperly might have a subtle bend that's hard to spot until it's already in place.
Solutions: Start with a Level Base and Measure Twice
Fixing misalignment starts before you even pick up a saw. Here's how to tackle it step by step:
1. Prep your workspace: Use a spirit level to check your work surface. If it's uneven, place shims under the corners until it's flat. For larger projects, lay down a sheet of plywood to create a stable, uniform base.
2. Verify profile straightness: Roll each 4080A profile on your level surface. If it rocks or doesn't lie flat, it's bent. Most minor bends can be gently corrected with a rubber mallet (tap near the bend, not directly on it), but severely bent profiles should be replaced—they'll never align properly.
3. Measure (and mark) twice, cut once: Use a high-quality tape measure and a square to mark cut lines. For long profiles, clamp them to the workbench to prevent movement while cutting. A miter saw with a fine-tooth blade works best for clean, straight cuts—jagged edges from a hacksaw can cause gaps at joints.
4. Use a laser level for large structures: When assembling multi-level racks or workbenches, a laser level ensures vertical posts are plumb (perfectly vertical) and horizontal beams are level. Attach the laser to one post, then align the others to the beam—it's a game-changer for precision.
Pro tip: If you're working alone, use clamps to hold profiles in place before tightening connectors. This prevents shifting while you secure the joints. For example, when attaching a horizontal beam to two vertical posts, clamp the beam to both posts first, check for alignment, then insert the aluminum profile connector and tighten the bolts.

Issue 2: Loose or Wobbly Connections
Symptoms: Joints That Shift, Rattling Structures, or Sagging Shelves
Imagine finishing a workbench using 4080A profiles. You load tools on the top shelf, and suddenly the whole thing wobbles when you lean on it. Or maybe the joint where the leg meets the tabletop shifts every time you open a drawer. Loose connections aren't just annoying—they're a safety hazard. Over time, wobbly joints can stress the T-slots, strip threads, or even cause the structure to collapse. The good news? Most loose connections are fixable with a few tweaks to how you install and tighten your aluminum profile accessories.
Causes: Under-Tightened Connectors, Wrong Connector Type, or Worn Accessories
Let's get to the root of the problem. First, under-tightening is the biggest culprit. It's easy to assume "hand-tight" is enough, but aluminum profile connectors—like the 90° aluminum profile connector or 45° aluminum profile connector—need a specific amount of torque to create a secure grip. Too loose, and they'll slip; too tight, and you risk stripping the T-slot or the connector itself. Second, using the wrong connector for the job is a common mistake. For example, using a lightweight 45° connector to hold a heavy horizontal beam will lead to failure—always match the connector's load rating to the application. Third, worn or low-quality accessories are a silent enemy. If your connector's bolt is stripped, or the plastic end cap is cracked, it won't hold tension, no matter how much you tighten it.
Solutions: Torque Wrenches, Connector Matching, and Regular Inspections
Fixing loose connections starts with the right tools and a little patience:
1. Invest in a torque wrench: Most aluminum profile connectors require between 2-5 Nm of torque (check the manufacturer's specs). A small torque wrench ensures you hit that sweet spot—tight enough to hold, but not so tight you damage the T-slot. For example, the 4080A's T-slots are designed to handle moderate torque, but over-tightening can deform the aluminum, making future adjustments impossible.
2. Match connectors to the load: Not all connectors are created equal. A three-way aluminum pipe joint might work for a light shelf, but a heavy-duty workbench leg needs a reinforced connector like the gusset alp 4040. When in doubt, err on the side of strength—better to have a connector that's overkill than one that's underpowered.
3. Inspect accessories before use: Before installing, check connectors for stripped threads, cracks, or bent bolts. A cracked plastic end cap or a rusted bolt might seem minor, but it'll compromise the joint. If an accessory looks worn, replace it—they're cheap insurance against structural failure.
4. Retighten after initial use: Aluminum profiles and connectors can "settle" after the first few days of use, especially under load. After building a structure, wait 24-48 hours, then go back and retighten all connectors. You'll be surprised how many were loose!
Case in point: A manufacturing plant recently installed a series of workbenches using 4080A profiles. Within a week, workers reported wobbling tops. The issue? The installers had used hand-tightened connectors without a torque wrench. After retightening each joint to 3 Nm (the recommended spec for their 90° aluminum profile connectors), the workbenches stayed stable—even under daily use.
Issue 3: Difficulty Fitting Aluminum Guide Rail A
Symptoms: Rail Binds, Doesn't Slide Smoothly, or Gaps Between Rail and Profile
Aluminum guide rails are essential for moving materials along production lines or sliding shelves on workbenches. Aluminum guide rail A, a common accessory for 4080A profiles, is designed to glide smoothly—so when it sticks, jams, or leaves gaps, it's a major frustration. Maybe you're installing a roller track system and the guide rail won't sit flush with the profile, causing rollers to catch. Or the rail slides unevenly, making it hard to push heavy bins along the track. These issues often boil down to how the rail is mounted and whether the T-slots are prepped properly.
Causes: Bent Rails, Debris in T-Slots, or Incorrect Mounting Brackets
Let's diagnose. First, bent guide rails are a frequent problem. Aluminum is lightweight, so it's easy to accidentally step on a rail or drop a tool on it, creating a subtle kink. Even a 1mm bend can cause the rail to bind when sliding. Second, debris in the T-slots—like sawdust, metal shavings, or dirt—prevents the mounting brackets from seating properly. If the bracket sits unevenly, the rail will tilt, leading to gaps or jams. Third, using the wrong mounting hardware is a sneaky culprit. For example, using a roller track placon mount for aluminum profile high when you need a flat mount will raise the rail too high, creating misalignment with adjacent components.
Solutions: Straighten Rails, Clean T-Slots, and Use the Right Brackets
Here's how to get your guide rail sliding smoothly again:
1. Check rail straightness: Lay the aluminum guide rail A on a flat surface. If it rocks or curves, it's bent. For minor bends, place the rail on a block of wood and gently tap the bent area with a rubber mallet (work slowly—aluminum can crack if over-bent). For severe bends, replace the rail—it's not worth the hassle of trying to fix it.
2. Clean the T-slots: Before mounting the rail, use a small brush or compressed air to clear out debris from the 4080A's T-slots. Even a tiny metal shaving can keep the mounting bracket from sitting flat. A quick wipe with a cloth dampened with isopropyl alcohol will also remove grease or oil that might cause slipping.
3. Match brackets to the application: Not all roller track placon mounts are the same. The roller track placon mount for aluminum profile flat is designed for flush mounting, while the high mount raises the rail off the profile. Check the rail's instructions to see which bracket you need—using the wrong one will throw off alignment. For example, if you're mounting a plastic roller track guide rail yellow (which sits close to the profile), a flat placon mount is the way to go.
4. Test for smoothness before final tightening: After attaching the rail loosely to the brackets, slide a test object (like a small bin) along the rail. If it binds, adjust the brackets—loosen the bolts, realign the rail, then retighten. Repeat until the movement is smooth.
A warehouse recently upgraded their picking stations with 4080A profiles and aluminum guide rail A. The initial install had rails that jammed, slowing down order fulfillment. The fix? The team realized they'd used high placon mounts instead of flat ones, raising the rails too high. Switching to flat mounts and cleaning the T-slots resolved the issue, cutting picking time by 20%.
Issue 4: Stability Problems in Workbench Setups
Symptoms: Workbench Rocks, Casters Wobble, or Feet Sink Into the Floor
A workbench is only as good as its stability. If yours rocks every time you use a drill or saw, it's not just annoying—it's dangerous. Stability issues often crop up in workbenches built with 4080A profiles, especially when using casters or adjustable feet. Maybe the casters don't lock properly, causing the bench to roll unexpectedly. Or the adjustable leveling feet sink into a concrete floor, leaving the bench uneven. These problems are usually easy to fix with the right accessories and a little attention to detail.
Causes: Uneven Leveling Feet, Casters Not Locked, or Insufficient Support Brackets
Let's dig in. First, uneven leveling feet are a common culprit. Most workbenches use anti-slip adjustable leveling feet to compensate for uneven floors, but if they're not adjusted properly, the bench will rock. Even a 2mm difference in foot height can cause instability. Second, casters (if used) are often the issue. If the caster wheels are worn or the locks don't engage fully, the bench will move when it shouldn't. Third, insufficient support brackets—like skipping gusset plates (gusset alp 4040)—can make the bench's frame flex under heavy loads, leading to wobbling.
Solutions: Adjust Feet, Upgrade Casters, and Add Support Brackets
Stabilizing a wobbly workbench is simpler than you might think:
1. Level the feet properly: Use a spirit level on the workbench top. If it tilts to the left, screw the right leveling feet up or the left feet down until the bubble is centered. For extra stability, lock the feet in place with the jam nuts (the small nuts under the foot base) to prevent them from unscrewing over time.
2. Upgrade to heavy-duty casters: If your workbench uses casters, opt for high-quality caster wheels with locking mechanisms. Look for casters with double-locking brakes (which lock both the wheel and the swivel) to prevent movement. Avoid cheap plastic casters—they wear quickly and don't lock reliably.
3. Add gusset plates: Gusset alp 4040 brackets reinforce the joints between vertical legs and horizontal beams, preventing flexing. Install one at each corner of the workbench, and you'll notice an immediate difference in stability. They're easy to attach: just slide the bracket into the T-slots of the 4080A profiles and secure with bolts.
4. Use a solid base: If your floor is especially uneven (like a cracked concrete slab), place a sheet of plywood under the workbench to distribute weight evenly. This prevents leveling feet from sinking into gaps and keeps the bench stable.
One hobbyist built a 4080A workbench for his garage but struggled with wobbling. He added gusset plates at the corners, adjusted the leveling feet with a spirit level, and swapped out cheap casters for heavy-duty ones with locks. The result? A workbench that stays put even when he's using a bench grinder.
Troubleshooting Quick Reference Table
| Common Issue | Key Symptoms | Primary Causes | Quick Fix |
|---|---|---|---|
| Misalignment During Assembly | Gaps, crooked joints, leaning structure | Inaccurate measurements, uneven work surface, bent profiles | Measure twice, use a level surface, check profile straightness with a straightedge |
| Loose or Wobbly Connections | Shifting joints, rattling, sagging shelves | Under-tightened connectors, wrong connector type, worn accessories | Use a torque wrench (2-5 Nm), match connectors to load, replace worn parts |
| Difficulty Fitting Aluminum Guide Rail A | Rail binds, slides unevenly, gaps | Bent rails, debris in T-slots, incorrect brackets | Straighten/bend rails, clean T-slots, use flat placon mounts for flush fit |
| Workbench Stability Issues | Rocking, casters rolling, feet sinking | Uneven feet, cheap casters, missing support brackets | Adjust leveling feet with a spirit level, add gusset plates, upgrade to locking casters |
Prevention: Tips to Avoid Installation Headaches
The best way to troubleshoot is to avoid issues in the first place. Here are some pro tips to make your next 4080A installation go smoothly:
1. Organize your workspace: Lay out all profiles, accessories, and tools before starting. Label cut profiles to avoid mixing up lengths (a simple piece of masking tape works wonders).
2. Invest in quality tools: A good square, tape measure, and torque wrench are non-negotiable. A miter saw with a fine-tooth blade ensures clean cuts, reducing gaps at joints.
3. Read the specs: Check the manufacturer's guidelines for torque settings, load limits, and recommended accessories. Using a connector rated for 50kg on a 100kg shelf is asking for trouble.
4. Test fit before final assembly: Dry-fit all profiles and accessories before tightening any bolts. This lets you spot misalignments or missing parts early.
5. Inspect profiles on arrival: Check for bent, dented, or scratched profiles when they arrive. Most suppliers will replace damaged parts for free if you report it quickly.
Conclusion: Building with Confidence
The 4080A EU standard aluminum profile is a fantastic tool for building everything from simple shelves to complex production systems—but like any tool, it works best when installed correctly. Misalignment, loose connections, finicky guide rails, and stability issues are common, but they're also fixable with the right knowledge and a little patience. By measuring carefully, using the right tools, matching accessories to the job, and taking time to level and tighten properly, you can build structures that are strong, reliable, and built to last. Remember: troubleshooting isn't just about fixing problems—it's about learning how these profiles work, so you can avoid issues in future projects. So grab your torque wrench, clean those T-slots, and get building—your perfectly aligned, rock-solid structure is waiting.