- Company Articles
- Products and Technology
- Installation And Maintenance
- Troubleshooting Common Issues with Aluminum Profile 3 Way Connectors

Troubleshooting Common Issues with Aluminum Profile 3 Way Connectors
Related Product
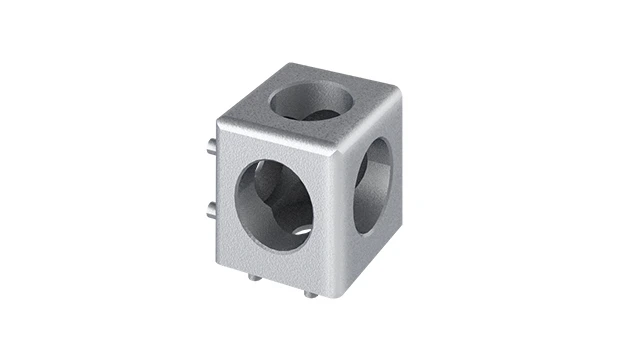
Aluminum Profile 3 Way Connector
The 3 way - squared corner connector is an external fastening method that is typically used to create a corner connection between three profiles. It is a heavy-duty connection that is simple to use and provides a polished look.
Walk into any modern manufacturing facility, warehouse, or workshop, and you'll likely spot a network of sleek, silver structures: workbenches that adjust to any height, material racks that keep inventory organized, and conveyor systems that move products with precision. These aren't just random metal frames—they're built using aluminum profile systems, where the real magic lies in the tiny but mighty components that hold everything together: connectors. Among these, the aluminum profile 3 way connector stands out as a workhorse, allowing builders to create T-junctions, corners, and multi-directional supports with ease. But like any hardworking tool, these connectors can run into issues that throw a wrench into your workflow. Loose joints, misaligned profiles, or sudden instability—these problems don't just look unprofessional; they can slow down production, compromise safety, and even damage expensive equipment.
In this guide, we'll dive deep into the world of aluminum profile 3 way connectors. We'll break down the most common issues workers and facility managers face, explore why they happen, and walk through step-by-step solutions to get your structures back in shape. Whether you're a seasoned maintenance technician or a new operator tasked with setting up a lean workbench, this article will equip you with the knowledge to troubleshoot like a pro—saving time, reducing frustration, and ensuring your aluminum profile systems stay strong, reliable, and ready for whatever the day throws at them.
Understanding Aluminum Profile 3 Way Connectors: The Backbone of Modular Systems
Before we jump into troubleshooting, let's make sure we're all on the same page about what these connectors are and why they matter. Aluminum profiles are extruded metal bars with T-shaped slots running along their length, designed to be lightweight yet incredibly strong. They're the building blocks of modular systems, but without connectors, they're just pieces of metal. Aluminum profile 3 way connectors are specialized components that join three profiles at once, enabling the creation of complex, multi-directional structures. Think of them as the "elbows" and "T-joints" of the industrial world—except they're far more versatile than your average plumbing fitting.
These connectors come in various designs, from simple bolt-on types to precision-cast joints with internal threads. Some are meant for quick assembly (great for temporary setups), while others are engineered for heavy loads (ideal for permanent workstations). What they all share, though, is a critical job: distributing weight evenly across connected profiles, maintaining structural integrity, and allowing for adjustments when needed. When they fail, the whole system suffers. A loose 3 way connector on a material rack might cause a shelf to sag, risking product damage. A misaligned one on a workbench could make tools slide off, leading to wasted time or even injuries. That's why understanding their quirks is so important.
Common Issues with Aluminum Profile 3 Way Connectors (and How to Fix Them)
Let's get to the heart of the matter: the problems you're most likely to encounter with 3 way connectors, and how to solve them. We'll start with the most frequent offender and work our way through.
Issue #1: Loose or Wobbly Joints
Picture this: You're adjusting a shelf on your aluminum profile material rack, and with a gentle push, the entire T-junction shifts. Or maybe you're working at a workbench, and every time you lean on it, you hear a faint "creak" from the corner where three profiles meet. Loose joints are the most common complaint with 3 way connectors, and they're usually a sign that something isn't sitting right between the connector and the profiles.
Why It Happens
Loose joints rarely happen out of nowhere. More often than not, they're caused by one (or more) of these culprits:
- Under-tightened bolts: Most 3 way connectors use bolts or set screws to clamp onto the profile's T-slot. If these aren't tightened to the right torque, vibration from daily use (like tools being placed on a workbench or products sliding on a rack) can slowly loosen them over time.
- Worn or damaged threads: Repeated assembly and disassembly (common in lean systems that need frequent reconfiguration) can strip the threads inside the connector or on the bolts themselves. Once threads are worn, even a tight bolt won't grip properly.
- Debris in the T-slot: Dust, metal shavings, or even small pieces of plastic from packaging can get trapped in the profile's slot. When you insert a connector's bolt or clamping mechanism, this debris creates a gap, preventing a snug fit.
- Mismatched components: Not all aluminum profile accessories are created equal. Using a 3 way connector designed for a 20x20mm profile on a 40x40mm profile (or vice versa) will leave extra space, making a tight joint impossible.
Troubleshooting Steps
Don't panic if you notice a wobbly joint—fixing it is usually straightforward. Here's how to tackle it:
- Inspect the connector and bolts: Start by visually checking the 3 way connector. Are the bolts fully inserted into the T-slot? Do they look bent or stripped? If the bolts are loose, try tightening them with the correct tool (usually an Allen wrench or hex key). Pro tip: Use a torque wrench if you have one—over-tightening can strip threads, too! Most manufacturers recommend a torque of 3-5 Nm for M5 bolts and 5-8 Nm for M6 bolts.
- Clean the T-slot: If tightening doesn't work, remove the bolts and connector. Use a small brush (a toothbrush works in a pinch) or compressed air to blow out any debris in the profile's slot. Wipe the inside with a clean cloth dampened with isopropyl alcohol to remove oil or grease that might be preventing a grip.
- Check for thread damage: Hold the bolt up to the light and look at the threads. If they're flattened, bent, or have gaps between them, replace the bolt. For the connector, check the internal threads by screwing in a new bolt by hand—if it spins freely without resistance, the connector's threads are stripped, and you'll need a replacement.
- Verify component compatibility: Check the profile size (e.g., 2020, 3030, 4040) and compare it to the connector's specifications. Most connectors have the profile size stamped on them (e.g., "4040 3-Way"). If they don't match, swap in the correct connector.
Pro Tip:
To prevent loose joints in high-vibration areas (like near conveyor systems), apply a small drop of thread-locking fluid (like Loctite Blue) to the bolt threads before tightening. This creates a seal that resists loosening but still allows for disassembly later if needed.
Issue #2: Misaligned Profiles
Imagine building a T-junction with three aluminum profiles: one vertical, one horizontal left, and one horizontal right. When you step back, the horizontal profiles are supposed to be perfectly straight, but instead, one is slightly higher than the other, or the vertical profile leans to the side. Misalignment isn't just an eyesore—it can throw off the entire structure's balance, making it harder to attach accessories (like shelves or panels) and increasing stress on the connector itself.
Why It Happens
Misalignment is often a result of imprecise assembly or hidden flaws in the components:
- Incorrect connector orientation: 3 way connectors are designed to fit specific angles (e.g., 90°, 45°, or adjustable). If you accidentally rotate a 90° connector 10° off-center during installation, the profiles will naturally lean.
- Warped or bent profiles: Aluminum profiles are strong, but they're not indestructible. Dropping a heavy object on a profile or storing it improperly (e.g., leaning it against a wall for months) can cause minor bends. When paired with a rigid 3 way connector, a warped profile will pull the joint out of alignment.
- Poorly cut profiles: If the ends of the profiles aren't cut at a perfect 90° angle (common with DIY hacksaws or dull saw blades), they won't sit flush against the connector's internal stops. This creates gaps that lead to "rocking" in the joint.
- Missing or misplaced alignment pins: Some high-precision 3 way connectors have small pins that fit into pre-drilled holes in the profiles, ensuring they line up exactly. If these pins are missing or broken, alignment becomes guesswork.
Troubleshooting Steps
Fixing misalignment requires a bit of patience, but with the right tools, you can straighten things out:
- Check the connector's orientation: Refer to the manufacturer's diagram (usually printed on the connector's packaging or available online) to ensure it's facing the right way. For example, a "T-junction" 3 way connector has one side designed for the vertical profile and two for horizontal—mixing these up will twist the joint.
- Inspect profiles for bends: Lay the profiles on a flat surface (like a concrete floor or a large workbench) and roll them gently. If they wobble or don't roll straight, they're bent. For minor bends, you can use a rubber mallet to tap them back into shape (be gentle—aluminum bends easily but can crack if overworked). For severe bends, replace the profile.
- Trim uneven profile ends: If the profile ends are rough or angled, use a miter saw with a fine-tooth blade (designed for aluminum) to trim them to a clean 90°. Sand the cut edge with 120-grit sandpaper to remove burrs, which can prevent a flush fit against the connector.
- Use a level during reassembly: When reattaching the profiles, place a spirit level along the length of the horizontal profiles to ensure they're straight. For vertical profiles, use the level vertically to check for plumb. Tighten the connector bolts gradually (alternating between bolts if there are multiple) to avoid pulling the joint out of alignment as you tighten.
Issue #3: Corrosion and Surface Damage
Aluminum is known for its resistance to rust, thanks to a natural oxide layer that forms on its surface. But in harsh environments—like factories with high humidity, chemical exposure, or coastal areas with salt in the air—even aluminum can show signs of wear. If you notice white, powdery spots on your 3 way connector or pitting on its surface, corrosion might be the culprit. Left unchecked, it can weaken the connector's grip and eventually lead to failure.
Why It Happens
Corrosion on aluminum profile 3 way connectors is usually triggered by:
- Exposure to moisture and chemicals: Water alone won't harm aluminum, but when mixed with salts (from sweat, seawater, or road salt in warehouses near roads), acids (from cleaning agents or industrial fumes), or alkalis (from some detergents), it breaks down the oxide layer, leading to "white rust" (aluminum oxide corrosion).
- Scratches or chips in the surface: The oxide layer is thin—even a small scratch (from a tool or a dropped profile) can expose the raw aluminum underneath, making it vulnerable to corrosion.
- Contact with dissimilar metals: If the 3 way connector is made of a different metal (e.g., steel) or has steel bolts that aren't coated, the combination of metals and moisture can cause galvanic corrosion (a chemical reaction that eats away at the aluminum).
Troubleshooting Steps
Corrosion isn't always a death sentence for a connector. Here's how to treat it:
- Clean the affected area: Mix a solution of warm water and mild dish soap (avoid harsh cleaners like bleach or ammonia). Use a soft-bristle brush (an old toothbrush works) to scrub away white rust. For stubborn spots, add a pinch of baking soda to the soapy water (the slight abrasiveness helps lift corrosion without scratching).
- Neutralize remaining chemicals: If the corrosion was caused by acids or alkalis, rinse the connector with a solution of 1 part vinegar to 3 parts water to neutralize any leftover residue. Dry thoroughly with a clean cloth.
- Protect the surface: Once clean and dry, apply a thin coat of clear acrylic spray (designed for metal) or aluminum polish to the connector. This creates a barrier against moisture and chemicals.
- replace severely damaged connectors: If the corrosion has eaten into the connector's threads or clamping surfaces (you'll see pitting or holes), it's time to swap it out. Look for connectors labeled "anodized" or "corrosion-resistant"—these have a thicker oxide layer that stands up better to harsh environments.
Issue #4: Compatibility Problems with Other Aluminum Profile Accessories
You've just bought a new 3 way connector, excited to build a custom material rack. You slide it onto your aluminum profiles, grab your aluminum profile end cap to finish the look, and… the end cap won't fit. Or maybe you're trying to attach a shelf bracket to the T-junction, but the bracket's bolt is too short to reach the connector's thread. Compatibility issues between 3 way connectors and other accessories are frustrating, but they're often avoidable with a little pre-purchase research.
Why It Happens
Aluminum profile systems come in two main "flavors": EU standard (common in Europe and many global manufacturers) and national standard (used in some regions like China). While they look similar, their slot sizes, profile dimensions, and accessory designs can vary slightly. For example:
- Slot size differences: EU standard profiles often have T-slots with widths like 8mm or 10mm, while national standard might use 6mm or 12mm. A 3 way connector designed for an 8mm slot won't clamp properly on a 12mm slot, and accessories like end caps (which snap into the slot) will be too loose or too tight.
- Profile thickness: Some profiles have thicker walls than others. A 3 way connector made for a "light-duty" 1.5mm wall profile might not grip a "heavy-duty" 3mm wall profile, as the clamping bolts won't reach far enough to tighten.
- Accessory thread sizes: Bolts, screws, and brackets often use metric threads (e.g., M5, M6). If your 3 way connector has M5 threads but your shelf bracket uses M6 bolts, they won't work together—even if the slot size matches.
Troubleshooting Steps
The key to solving compatibility issues is to stick to a single system—or adapt carefully:
- Identify your profile system: Check the profile for markings (e.g., "4040 EU" or "3030 National Standard"). If there are no markings, measure the slot width with a caliper (the narrowest part of the T-slot) and compare it to manufacturer specs online.
- Buy accessories from the same brand: Most aluminum profile manufacturers (like Bosch Rexroth or Item) make 3 way connectors and accessories (end caps, brackets, etc.) that are guaranteed to work together. Mixing brands increases the risk of mismatched parts.
- Use adapter accessories: If you must mix systems, look for adapters. For example, a "slot adapter" can bridge the gap between an 8mm and 12mm slot, allowing a 3 way connector to clamp securely. Similarly, "thread adapters" can convert M5 to M6 threads for bolts.
Issue #5: Structural Instability Under Load
You've built a sturdy-looking material rack with 3 way connectors at every T-junction. You load it up with boxes, and suddenly—crack! The middle joint bends, and the entire structure leans to one side. Structural instability is scary, but it's usually a sign that the 3 way connector is being asked to do more than it was designed for.
Why It Happens
3 way connectors are rated for specific weight limits, and exceeding these (or using them in ways they weren't intended) is a recipe for disaster:
- Overloading: Every 3 way connector has a "dynamic load" rating (weight it can handle with movement, like products sliding on a rack) and a "static load" rating (weight when stationary). Stacking 50kg boxes on a connector rated for 30kg static load will eventually bend or break it.
- Using the wrong connector type: "Light-duty" 3 way connectors (made of plastic or thin aluminum) are great for small shelves or workbenches, but they'll fail under heavy machinery or large inventory. Heavy-duty connectors use thicker metal and reinforced clamping mechanisms for these jobs.
- Missing reinforcement: In multi-level structures (like a 3-tier rack), 3 way connectors at the bottom bear more weight than those at the top. Without additional supports (like diagonal braces or corner brackets), the bottom connectors can buckle under the strain.
Troubleshooting Steps
Fixing instability starts with reducing the load, then reinforcing the structure:
- Unload the structure immediately: Remove all weight from the unstable area to prevent further damage to the connector or profiles.
- Check the connector's load rating: Look for a label or stamp on the connector indicating its load capacity. If you can't find it, search the manufacturer's website with the connector's part number. Compare this rating to the actual weight you're putting on it—if you're over the limit, you need a heavier-duty connector.
- Add reinforcement: Install diagonal braces (using 2 way connectors) between the vertical and horizontal profiles to distribute weight more evenly. For T-junctions, use "corner brackets" (another type of aluminum profile accessory ) to add extra support to the 3 way connector.
- Upgrade to a heavy-duty connector: replace the light-duty connector with one made of thick aluminum or even steel (for extreme loads). Look for connectors with "reinforced" or "industrial-grade" in their name—these are built to handle the pressure.

Troubleshooting Cheat Sheet: Common Issues at a Glance
| Issue | Common Causes | Quick Fix | Prevention Tip |
|---|---|---|---|
| Loose joints | Under-tightened bolts, debris in T-slot, worn threads | Clean slot, tighten bolts to spec, replace worn threads | Use torque wrench for initial tightening; apply thread-locking fluid |
| Misaligned profiles | Connector orientation wrong, bent profiles, uneven cuts | Realign connector, straighten/bend profiles, trim ends | Use a level during assembly; store profiles flat to avoid bending |
| Corrosion | Moisture + chemicals, scratched surface, dissimilar metals | Clean with soapy water, neutralize, apply protective coating | Choose anodized connectors; avoid mixing metal types |
| Accessory compatibility | EU vs. national standard, slot size mismatch | Use same-brand accessories, try slot/thread adapters | Check profile system type before buying accessories |
| Structural instability | Overloading, light-duty connector, missing reinforcement | Unload, upgrade to heavy-duty connector, add braces | Never exceed load rating; use reinforcement for multi-level structures |

Pro Tips for Long-Term Performance
Maintenance Matters!
Even the best connectors need a little TLC. Set up a monthly inspection routine: walk through your facility, check all 3 way connectors for tightness, corrosion, or damage, and tighten any loose bolts. A 10-minute check can prevent hours of downtime later.
Beyond troubleshooting, these habits will keep your aluminum profile 3 way connectors (and the structures they build) in top shape for years:
- Invest in quality tools: A good torque wrench (set to the connector's recommended torque), a set of hex keys (in both metric and standard sizes), and a level will make assembly and maintenance faster and more precise.
- Label your profiles and connectors: If you frequently disassemble and reassemble structures, use a marker or label maker to note which connectors go with which profiles. This avoids mixing and matching incompatible parts.
- Store spare parts: Keep a small inventory of extra 3 way connectors, bolts, and aluminum profile accessories (like end caps and brackets) on hand. Waiting for a replacement part to ship can halt production—having spares means you can fix issues in minutes.
- Train your team: Make sure everyone who assembles or works with aluminum profile structures knows the basics: how to properly tighten a connector, how to check for loose joints, and when to report damage. A well-trained team catches issues early.
Conclusion: Your Connectors, Your Productivity
Aluminum profile 3 way connectors might be small, but they're the unsung heroes of lean manufacturing, warehousing, and workshop efficiency. When they work well, they disappear into the background, letting you focus on what matters: building, creating, and producing. When they fail, they demand attention—often at the worst possible time.
By understanding the common issues we've covered—loose joints, misalignment, corrosion, compatibility problems, and structural instability—you're now equipped to troubleshoot with confidence. Remember: most connector problems are preventable with proper installation, regular maintenance, and a little know-how. And when issues do arise, take a systematic approach: identify the cause, apply the fix, and take steps to stop it from happening again.
So the next time you're staring at a wobbly workbench or a misaligned material rack, take a deep breath. With the tips in this guide, you've got this. Your aluminum profile 3 way connectors (and your productivity) will thank you.