- Company Articles
- Products and Technology
- Installation And Maintenance
- Troubleshooting Lean Pipe Clamp Chrome Installation Issues

Troubleshooting Lean Pipe Clamp Chrome Installation Issues
Related Product
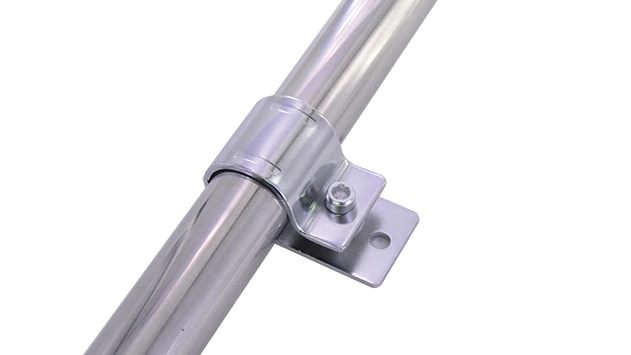
Lean Pipe Clamp Chrome
Lean pipe clamp is used for rack system hang monitor or other panel for workbenck, flowrack in production daily use.
Introduction: The Hidden Hero of Your Lean System
If you've ever spent hours assembling a lean pipe workbench or setting up a roller track, you know the feeling: you're inches from finishing, tighten the last clamp, and then—*wobble*. The whole structure like Jell-O, and you can't help but think: "What on earth did I do wrong?" More often than not, the culprit isn't the complex design or expensive equipment, but those tiny, unassuming parts: lean pipe clamp chrome.
Lean pipe systems are the backbone of efficient workshops, from small garages to massive production lines. They're versatile, customizable, and built to streamline workflows—whether you're putting together a simple material rack or a complex conveyor system. But none of that matters if the connections holding everything together are shaky. That's where lean pipe clamp chrome comes in. These little clamps might not get the glory, but they're the glue (literally) that keeps your aluminum profile straight, your workbench sturdy, and your roller track rolling smoothly.
In this guide, we're diving deep into the world of lean pipe clamp chrome installation. We'll break down why these clamps sometimes cause headaches, how to spot common issues before they derail your project, and share pro tips to get your lean system up and running like a dream. Whether you're a seasoned plant manager or a DIY enthusiast setting up your first workbench, this one's for you.
Understanding Lean Pipe Clamp Chrome: More Than Just a Metal Bracket
Before we jump into troubleshooting, let's make sure we're all on the same page about what lean pipe clamp chrome actually is. These clamps are designed to connect lean pipes (those lightweight, often powder-coated or aluminum tubes) to each other or to other components like aluminum profile, lean pipe joints, or workbench frames. The "chrome" part? That's a protective coating that adds durability and resistance to rust—handy in busy workshops where oil, coolant, or moisture might sneak in.
What makes them special? Unlike rigid metal brackets, lean pipe clamp chrome is engineered for flexibility. Most have a split design with a screw mechanism: you slide the clamp over the pipe, position it where you need, then tighten the screw to lock it in place. This adjustability is why lean systems are so popular—you can reconfigure your setup on the fly as your needs change. But that flexibility also means there's more room for error during installation. Get the angle wrong, overtighten, or use a worn-out clamp, and suddenly your "sturdy" workbench is doing the cha-cha.
Another thing to note: not all clamps are created equal. Some are meant for light-duty use (like a small turnover trolley), while others are built for heavy loads (think a material rack stacked with parts). The thickness of the chrome coating, the quality of the steel, and even the design of the screw thread can all affect performance. That's why it's crucial to use clamps that match your project's needs—and why troubleshooting starts with understanding what you're working with.

Common Installation Issues & How to Fix Them
Let's get to the good stuff: solving those frustrating clamp problems. We've talked to dozens of workshop managers and DIYers to compile the most common issues people run into when installing lean pipe clamp chrome. For each, we'll walk through what's happening, why it's happening, and how to fix it—no engineering degree required.
1. Loose Connections: The Wobbly Workbench Syndrome
This is by far the most reported issue. You finish assembling your workbench, place a toolbox on it, and the whole thing sways. Or maybe you're testing a roller track, and the pipes shift every time a box slides over them. What's going on?
Causes:
- Over-tightening: It's tempting to crank that screw until it won't turn anymore, but lean pipe clamp chrome isn't meant for Hulk-level strength. Over-tightening can strip the threads on the clamp or the pipe, leaving you with a connection that looks tight but actually has zero grip.
- Under-tightening: On the flip side, if you're too gentle, the clamp never fully seats. Vibrations from daily use will loosen it further, turning a minor wobble into a major problem.
- Worn or Damaged Joints: If you're reusing old lean pipe joints (the plastic or metal connectors that join pipes at angles), they might be cracked or worn. A damaged joint can't hold the clamp securely, no matter how tight you twist.
Solutions:
- Stick to Torque Specs: Grab a torque wrench—yes, even for clamps! Most manufacturers recommend 15-20 Newton-meters (Nm) for standard lean pipe clamp chrome. If you don't have a torque wrench, aim for "firm but not forceful": you should feel resistance, but your wrist shouldn't ache.
- Inspect Joints First: Before installing, check your lean pipe joints for cracks, warping, or missing parts. If the plastic looks brittle or the metal is bent, swap them out. It's better to spend $5 on a new joint than redo the entire setup later.
- Use Thread Locker (Sparingly): For high-vibration areas (like near a conveyor or heavy machinery), a drop of medium-strength thread locker (like Loctite Blue) can keep screws from loosening. Just don't overdo it—you'll want to disassemble things later!
2. Misalignment: When "Close Enough" Isn't Good Enough
Ever step back and notice your workbench is leaning like the Tower of Pisa? Or your aluminum profile is bowed, making the roller track tilt to one side? Misalignment isn't just an eyesore—it can throw off your entire workflow. Parts might get stuck on the roller track, tools slide off the workbench, and over time, the stress can bend pipes or break clamps.
Causes:
- Improper Measurement: "I eyeballed it" rarely works with lean systems. Even a 1cm difference in pipe length can throw off angles, making clamps pull joints out of alignment.
- Bent Pipes: If your lean pipe or aluminum profile is bent (maybe from being dropped or stored improperly), it'll force the clamps into awkward positions. The clamp itself might be tight, but the pipe is crooked, so the whole structure leans.
- Ignoring the Level: Assembling on an uneven floor? Not checking if pipes are straight with a level? That's a recipe for disaster. Your clamps can only do so much—they can't fix a wonky foundation.
Solutions:
- Measure Twice, Cut Once: It's an old saying for a reason! Use a tape measure and mark pipes before cutting. For angles, use a protractor or angle finder—most lean pipe joints are designed for 30°, 45°, or 90°, so get those measurements right.
- Check for Bent Pipes: Roll pipes on a flat surface to see if they wobble—if they do, they're bent. For minor bends, you might be able to straighten them with a pipe bender (go slow to avoid cracking the coating). For severe bends, replace the pipe—it's not worth the hassle.
- Level as You Go: Keep a 2-foot level handy while assembling. After attaching each clamp, check that the pipe is straight horizontally and vertically. If it's off, loosen the clamp, adjust the pipe, and retighten. It adds a minute per clamp, but saves hours of rework later.
3. Corrosion or Sticking: When Clamps Refuse to Budge
Ever try to adjust a clamp and the screw just spins, or the clamp itself sticks to the pipe? Or maybe you notice rust spots on the chrome coating after a few weeks. This is more common in humid workshops or areas with exposure to liquids (like near a washing station).
Causes:
- Moisture and Debris: Water, oil, or dust can seep into the clamp's threads or between the clamp and pipe. Over time, this causes rust (even on chrome) or creates a sticky residue that makes adjustment impossible.
- Low-Quality Chrome Coating: Not all chrome coatings are created equal. Cheaper clamps might have thin or uneven chrome, which wears off quickly, leaving the steel underneath exposed to the elements.
Solutions:
- Clean Before Installing: Wipe down pipes and clamps with a dry cloth to remove dust or oil. If you're working in a humid area, a quick spritz of isopropyl alcohol can help evaporate moisture.
- Lubricate Threads: A tiny drop of silicone lubricant or dry graphite spray on the clamp's screw threads will keep them turning smoothly. Avoid oil-based lubes—they attract dust.
- Upgrade to Stainless Steel (If Needed): If your workshop is extra humid or you're dealing with chemicals, consider switching to stainless steel clamps instead of chrome-plated steel. They cost a bit more, but they'll resist rust for years.
4. Compatibility Issues: When Your Clamp and Pipe Just Don't Click
You buy a pack of lean pipe clamp chrome, get home, and realize they don't fit your aluminum profile. Or the clamp is too loose on your lean pipe, even when fully tightened. This is a common problem when mixing parts from different suppliers.
Causes:
- Mismatched Sizes: Lean pipes come in different diameters (common sizes are 28mm and 30mm), and clamps are designed for specific sizes. A 28mm clamp won't fit a 30mm pipe, and vice versa.
- Non-Standard Profiles: Aluminum profile comes in various "standards" (like EU vs. national standards). A clamp made for a 4040 EU profile might not align with a 4040 national standard profile, leaving gaps or loose connections.
Solutions:
- Check the Fine Print: Before buying, confirm the pipe diameter and profile type your clamps are designed for. Most suppliers list this clearly (e.g., "For 28mm Lean Pipe and 4040 EU Aluminum Profile").
- Stick to One Supplier (When Possible): Mixing parts from different brands can save money, but it increases the risk of compatibility issues. If you do mix, ask the supplier if their clamps work with Brand X's pipes—most are happy to confirm.
- Use Adapter Accessories: If you're stuck with mismatched parts, look for adapters. For example, a 28mm-to-30mm pipe adapter can let you use your existing clamps with a different pipe size.
| Symptom | Likely Cause | Quick Fix |
|---|---|---|
| Workbench wobbles when touched | Under-tightened clamps or worn joints | Retighten clamps to 15-20 Nm; replace cracked joints |
| Clamp screw spins but won't tighten | Stripped threads from over-tightening | replace the clamp; use a torque wrench next time |
| Pipes lean to one side | Misaligned or bent pipes | Use a level to adjust; replace bent pipes |
| Rust on clamp surface | Moisture exposure; thin chrome coating | Clean with vinegar, dry, and apply anti-rust spray; upgrade to stainless steel |
| Clamp won't fit around pipe | Mismatched pipe diameter | Check clamp size (28mm vs. 30mm); use correct size |
Pro Tips for Stress-Free Installation
Now that you know how to fix common issues, let's talk about preventing them in the first place. These pro tips come from seasoned installers who've learned the hard way—so you don't have to.
1. Pre-Installation Prep: Measure, Sort, and Inspect
Before you even pick up a clamp, lay out all your parts on a flat surface. Sort pipes by length, separate lean pipe joints by angle, and check every clamp for defects (like cracked plastic or bent screws). It's tedious, but finding a broken clamp now beats discovering it halfway through assembly.
Also, sketch your design first! Even a rough drawing helps you visualize where each clamp goes, so you don't end up with extra parts or missing pieces. Include measurements for pipe lengths and angles—your future self will thank you.
2. The Right Tools Make All the Difference
You can't build a sturdy lean system with just a screwdriver and a prayer. Here's what you'll need:
- Torque wrench: For consistent tightening (worth the $30 investment!)
- Level (2-foot and 4-foot): To check horizontal and vertical alignment
- Tape measure and marker: For precise cuts and placement
- Deburring tool: To smooth rough edges on cut pipes (prevents snags and injuries)
- Rubber mallet: Gently taps joints into place without damaging them
3. Teamwork (or a Friend) Goes a Long Way
Trying to hold a 6-foot pipe, level it, and tighten a clamp by yourself is like patting your head and rubbing your stomach—it's possible, but why make it hard? Grab a coworker or friend to help hold pipes steady while you adjust clamps. For larger setups (like a full conveyor system), assign roles: one person holds, one levels, one tightens. It cuts installation time in half and reduces mistakes.
4. Maintenance: Keep Clamps Tight (Even After Installation)
Your job isn't done once the system is up. Vibrations from daily use will loosen clamps over time, especially on high-traffic areas like roller tracks or workbenches. Schedule a quick check every 2-4 weeks: walk around, wiggle pipes gently, and retighten any loose clamps. It takes 10 minutes and prevents big issues down the line.
Case Study: From Wobbly Roller Track to Smooth Sailing
Let's put this all into practice with a real example. A small electronics manufacturer we worked with recently was struggling with their roller track system. Parts kept getting stuck, and the track itself leaned so much that boxes would slide off the side. They'd already replaced the rollers twice, but the problem got worse. When we arrived, the first thing we noticed? The lean pipe clamp chrome connecting the track to the aluminum profile was barely tightened—some were even finger-loose.
Here's how we fixed it:
- Inspected All Clamps: Found 7 out of 12 clamps were either under-tightened or had stripped threads (from previous over-tightening).
- Replaced Stripped Clamps: Swapped out the 3 worst clamps with new ones (cost: ~$15 total).
- Used a Torque Wrench: Retightened all remaining clamps to 18 Nm (per the manufacturer's specs).
- Leveled the Track: Adjusted the aluminum profile legs to ensure the track was perfectly horizontal (using a 4-foot level).
Result? The roller track went from jamming 5-6 times a day to zero jams in two weeks. The team estimated they saved 10+ hours a week in downtime—all because of a few tweaks to their clamps.
Conclusion: Small Clamps, Big Impact
At the end of the day, lean pipe clamp chrome might not be the most exciting part of your workshop, but they're one of the most important. A little attention to these small components can save you hours of frustration, reduce downtime, and ensure your lean system works as hard as you do.
Remember: installation issues are normal—even pros run into them. The key is to approach troubleshooting systematically: check for loose connections, misalignment, corrosion, or compatibility problems. Use the right tools, measure carefully, and don't skip maintenance checks. And if you're ever stuck, don't hesitate to reach out to your supplier—most are happy to help troubleshoot.
So the next time you're assembling a workbench or setting up a roller track, give those clamps a little love. They might just be the unsung heroes that turn your wobbly mess into a streamlined, productive workspace.